安装
假设已配置完tensorflow,并安装好Anaconda3-4.2.0(此版本为python3.5)
从github下载models
tensorflow/models
Protobuf 编译
protobuf下载
我下载的版本是protoc-3.3.0-win32.zip,解压后将bin文件夹中的【protoc.exe】放到C:\Windows
在models目录下shift+右键打开Powershell窗口,输入:
# From tensorflow/models/
protoc object_detection/protos/*.proto
不报错即可
测试
由于电脑中同时有Anaconda2与Anaconda3,在models目录下输入
jupyter-notebook
进入object_detetion中打开【object_detection_tutorial.ipynb】,无法运行,此时的kernel是python2,而windows只有python3.5的tensorflow。如果你的电脑只有python3.5,那么直接run all就可以看到结果。或者将Anaconda3的jupyter-notebook的工作空间变换到models目录下。
这里我用了另一种方法:
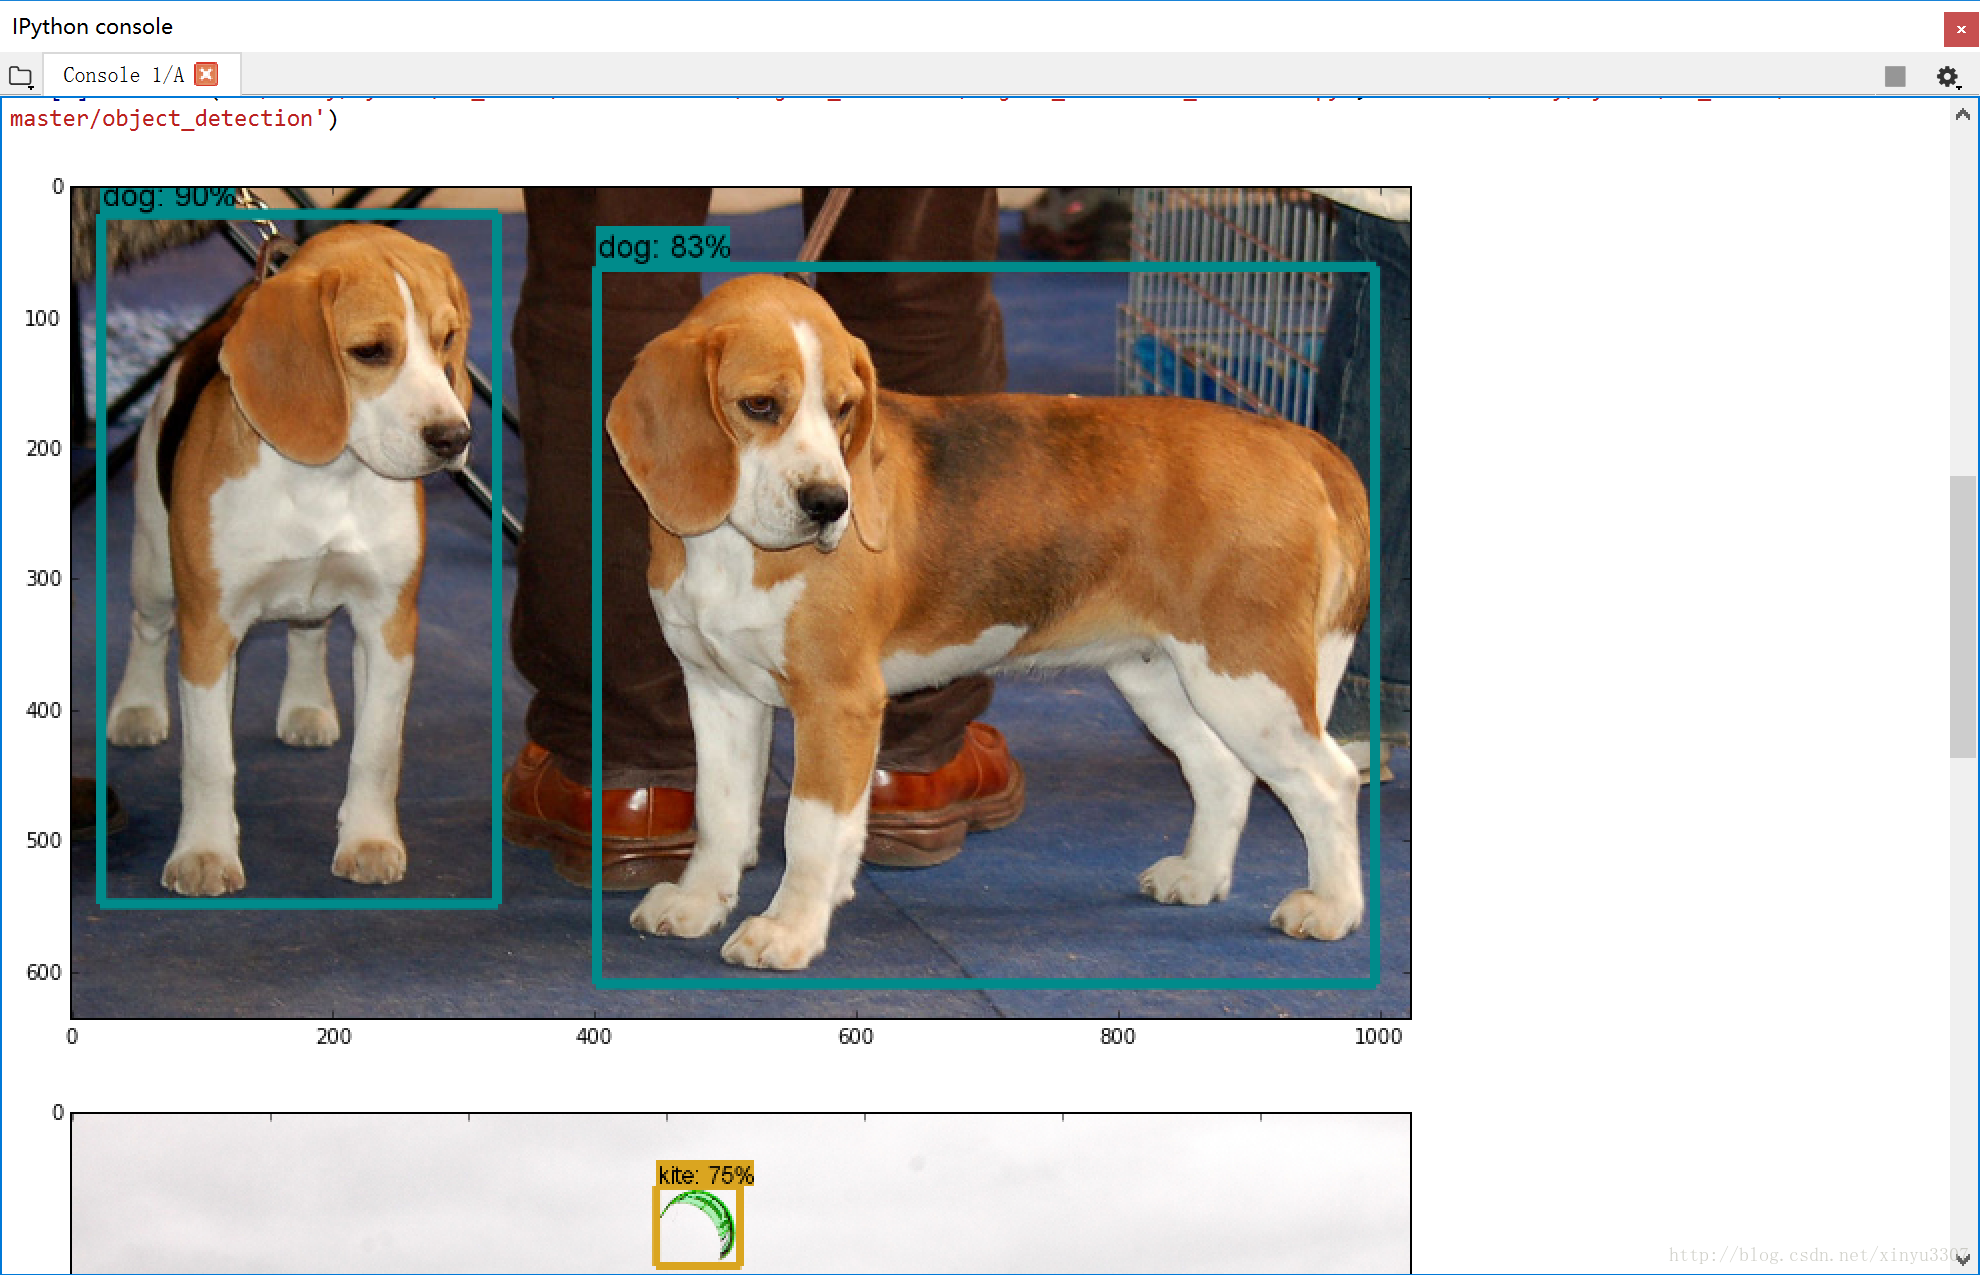
新建一个【object_detection_tutorial.py】,将.ipynb中的代码复制到.py中,然后在spyder中运行。以下是代码。功能是取object_detection\test_images中的图片:image1和image2,做目标检测。
import numpy as np
import os
import six.moves.urllib as urllib
import sys
import tarfile
import tensorflow as tf
import zipfile
from collections import defaultdict
from io import StringIO
from matplotlib import pyplot as plt
from PIL import Image
sys.path.append("..")
from utils import label_map_util
from utils import visualization_utils as vis_util
MODEL_NAME = 'ssd_mobilenet_v1_coco_11_06_2017'
MODEL_FILE = MODEL_NAME + '.tar.gz'
DOWNLOAD_BASE = 'http://download.tensorflow.org/models/object_detection/'
PATH_TO_CKPT = MODEL_NAME + '/frozen_inference_graph.pb'
PATH_TO_LABELS = os.path.join('data', 'mscoco_label_map.pbtxt')
NUM_CLASSES = 90
opener = urllib.request.URLopener()
opener.retrieve(DOWNLOAD_BASE + MODEL_FILE, MODEL_FILE)
tar_file = tarfile.open(MODEL_FILE)
for file in tar_file.getmembers():
file_name = os.path.basename(file.name)
if 'frozen_inference_graph.pb' in file_name:
tar_file.extract(file, os.getcwd())
detection_graph = tf.Graph()
with detection_graph.as_default():
od_graph_def = tf.GraphDef()
with tf.gfile.GFile(PATH_TO_CKPT, 'rb') as fid:
serialized_graph = fid.read()
od_graph_def.ParseFromString(serialized_graph)
tf.import_graph_def(od_graph_def, name='')
label_map = label_map_util.load_labelmap(PATH_TO_LABELS)
categories = label_map_util.convert_label_map_to_categories(label_map, max_num_classes=NUM_CLASSES, use_display_name=True)
category_index = label_map_util.create_category_index(categories)
def load_image_into_numpy_array(image):
(im_width, im_height) = image.size
return np.array(image.getdata()).reshape(
(im_height, im_width, 3)).astype(np.uint8)
PATH_TO_TEST_IMAGES_DIR = 'test_images'
TEST_IMAGE_PATHS = [ os.path.join(PATH_TO_TEST_IMAGES_DIR, 'image{}.jpg'.format(i)) for i in range(1, 3) ]
IMAGE_SIZE = (12, 8)
with detection_graph.as_default():
with tf.Session(graph=detection_graph) as sess:
for image_path in TEST_IMAGE_PATHS:
image = Image.open(image_path)
image_np = load_image_into_numpy_array(image)
image_np_expanded = np.expand_dims(image_np, axis=0)
image_tensor = detection_graph.get_tensor_by_name('image_tensor:0')
boxes = detection_graph.get_tensor_by_name('detection_boxes:0')
scores = detection_graph.get_tensor_by_name('detection_scores:0')
classes = detection_graph.get_tensor_by_name('detection_classes:0')
num_detections = detection_graph.get_tensor_by_name('num_detections:0')
(boxes, scores, classes, num_detections) = sess.run(
[boxes, scores, classes, num_detections],
feed_dict={image_tensor: image_np_expanded})
vis_util.visualize_boxes_and_labels_on_image_array(
image_np,
np.squeeze(boxes),
np.squeeze(classes).astype(np.int32),
np.squeeze(scores),
category_index,
use_normalized_coordinates=True,
line_thickness=8)
plt.figure(figsize=IMAGE_SIZE)
plt.imshow(image_np)
结果
主要时间用于下载模型,目标识别还是蛮快的。

一些细节
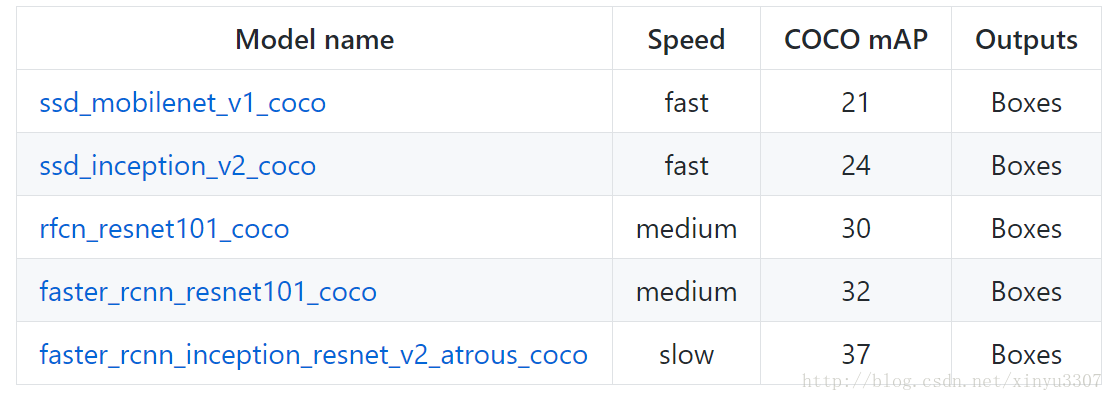
1.模型的选择
Tensorflow detection model zoo
Speed表示速度,COCO mAP表示在COCO数据集上的平均准确率,第一个ssd_mobilenet就是我们默认使用的pre-train模型
# What model to download.
MODEL_NAME = 'ssd_mobilenet_v1_coco_11_06_2017'
#MODEL_NAME = 'faster_rcnn_resnet101_coco_11_06_2017'
#MODEL_NAME = 'ssd_inception_v2_coco_11_06_2017'
MODEL_FILE = MODEL_NAME + '.tar.gz'
DOWNLOAD_BASE = 'http://download.tensorflow.org/models/object_detection/'
2.测试自己的图片
改变【PATH_TO_TEST_IMAGES_DIR】 的路径,要在models-master\object_detection目录下。相应的数量for i in range(1, 3)也要进行改变。
# For the sake of simplicity we will use only 2 images:
# image1.jpg
# image2.jpg
# If you want to test the code with your images, just add path to the images to the TEST_IMAGE_PATHS.
PATH_TO_TEST_IMAGES_DIR = 'test_images'
TEST_IMAGE_PATHS = [ os.path.join(PATH_TO_TEST_IMAGES_DIR, 'image{}.jpg'.format(i)) for i in range(1, 3) ]

测试一张图片快7秒,不知道是什么原因。
3.测试视频
安装Opencv3,这里碰到了问题,直接输入
pip install opencv-python
安装好后import cv2报错
ImportError: DLL load failed: 找不到指定的模块
根据网上的解决方法去安装vc++ for visual2015之后并没有解决,下载重装 【opencv_python-3.2.0.8-cp35-cp35m-win_amd64.whl】也无效。把Anaconda2删除只留Anaconda3也不行。无奈之下重新安装Anaconda3,下载最新版的python-opencv,在目录下
pip install opencv_python-3.3.0-cp35-cp35m-win_amd64.whl
import cv2报错:
ImportError: numpy.core.multiarray failed to import
于是更新numpy到1.13.1:
pip install -U numpy
接下来import cv2就没问题了
本文内容由网友自发贡献,版权归原作者所有,本站不承担相应法律责任。如您发现有涉嫌抄袭侵权的内容,请联系:hwhale#tublm.com(使用前将#替换为@)