本文主要参考于苍穹四轴DIY的公众号文章:
http://mp.weixin.qq.com/mp/homepage?__biz=MzkyNzI1MDUyNw==&hid=3&sn=2ac819c3ed973dc58af3320c682e1e4a&scene=18#wechat_redirect
一、安装树莓派系统
1、下载镜像文件
树莓派官网
https://www.raspberrypi.org/software/operating-systems/#raspberry-pi-os-32-bit

2、将镜像软件烧录到SD中
SD卡烧录软件:

二、树莓派安装Dronekit
1、安装编译环境
这是为了解决ARM交叉编译工具相关的问题。
sudo apt-get install libxml2-dev libxslt1-dev zlib1g-dev python-py
2、安装DroneKit
由于树莓派系统包含python-pip和python-dev,所以直接安装即可。
sudo pip install dronekit
这个安装过程会比较久,中间可能会卡住,需要耐心等待。
最后安装完成的截图:
三、编写测试代码
1、创建文件
sudo vim connect.py
2、拷贝代码
将下面的代码拷贝到创建的文件中,注意这里的波特率设置是115200
from dronekit import connect
# Connect to the Vehicle (in this case a UDP endpoint)
vehicle = connect('/dev/ttyUSB0', wait_ready=True, baud=115200)
# vehicle is an instance of the Vehicle class
print "Autopilot Firmware version: %s" % vehicle.version
print "Autopilot capabilities (supports ftp): %s" % vehicle.capabilities.ftp
print "Global Location: %s" % vehicle.location.global_frame
print "Global Location (relative altitude): %s" % vehicle.location.global_relative_frame
print "Local Location: %s" % vehicle.location.local_frame #NED
print "Attitude: %s" % vehicle.attitude
print "Velocity: %s" % vehicle.velocity
print "GPS: %s" % vehicle.gps_0
print "Groundspeed: %s" % vehicle.groundspeed
print "Airspeed: %s" % vehicle.airspeed
print "Gimbal status: %s" % vehicle.gimbal
print "Battery: %s" % vehicle.battery
print "EKF OK?: %s" % vehicle.ekf_ok
print "Last Heartbeat: %s" % vehicle.last_heartbeat
print "Rangefinder: %s" % vehicle.rangefinder
print "Rangefinder distance: %s" % vehicle.rangefinder.distance
print "Rangefinder voltage: %s" % vehicle.rangefinder.voltage
print "Heading: %s" % vehicle.heading
print "Is Armable?: %s" % vehicle.is_armable
print "System status: %s" % vehicle.system_status.state
print "Mode: %s" % vehicle.mode.name # settable
print "Armed: %s" % vehicle.armed # settable
四、树莓派串口连接Pixhark
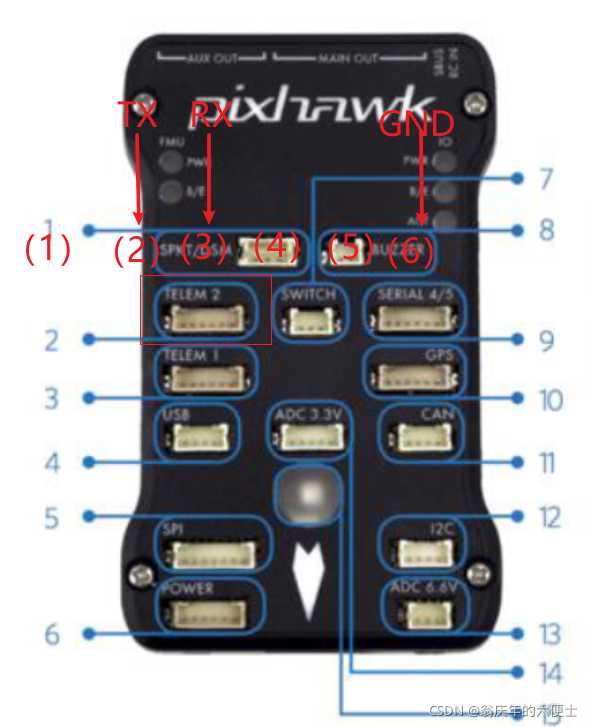
1、pixhark端口定义
连接pixhark上的telem2,下面表示该端口pin的定义:
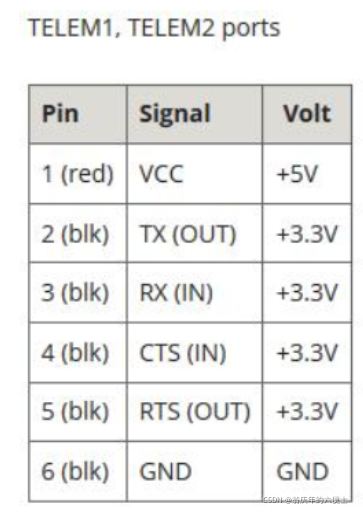
经过测试发现,从左边到右边依次是5V、TX、Rx、cts、rts、GND
2、串口调试器
ttl转usb的串口调试器,一端USB连接树莓派,另一端连接Pixhark的telem2端口,注意通信交叉互连。

五、Pixhark设置串口
设置串口波特率
通过Mission Planner软件设置PIX的端口的波特率。

六、运行测试
1、树莓派查询串口连接
将串口调试器插到树莓派之后,查询ttyUSB*
ls /dev/ttyUSB*
将显示出的USB*修改到测试文件中
比如,显示的是:
/dev/ttyUSB1
修改上面的connect.py中的
vehicle = connect('/dev/ttyUSB1', wait_ready=True, baud=115200)
2、修改权限
sudo chmod 666 /dev/ttyUSB1
3、运行测试
python connect.py
成功获取飞控数据!

本文内容由网友自发贡献,版权归原作者所有,本站不承担相应法律责任。如您发现有涉嫌抄袭侵权的内容,请联系:hwhale#tublm.com(使用前将#替换为@)