一.基础知识
1.cv::mat type返回数字对应的类型
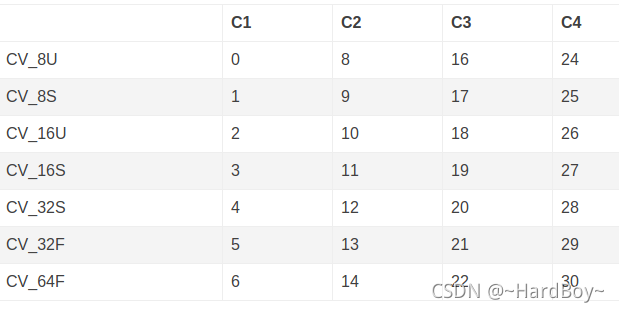
C1, C2, C3, C4 指的是通道(Channel)数,比如3通道的float 32:
cv::Mat M5 = cv::Mat::zeros(2, 3, CV_32FC(3));

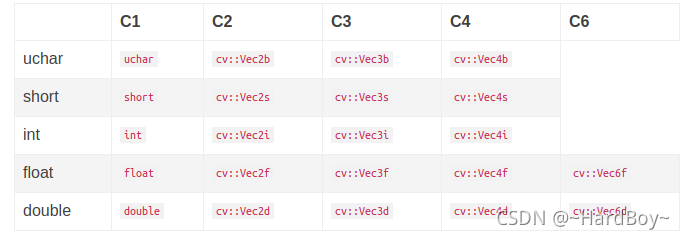
2.at方法数据类型
知道通道数和每个通道数据类型的情况下,指定给 at 方法的数据类型如下表所示:
#include<opencv2/opencv.hpp>
#include<iostream>
#include<string>
using namespace std;
void debug_opencv(){
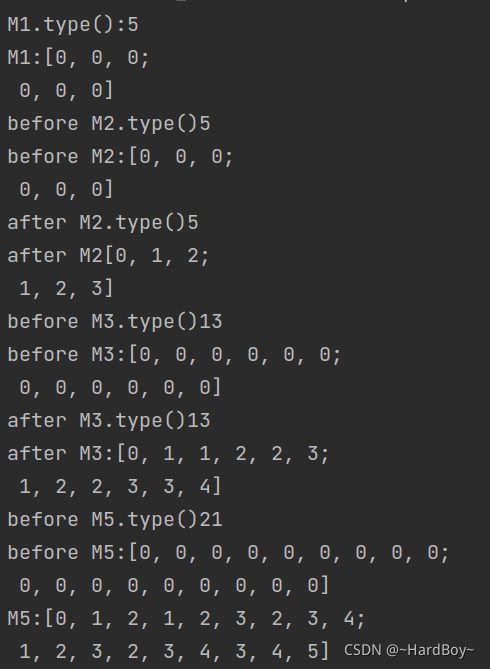
cv::Mat M1 = cv::Mat::zeros(2, 3, CV_32F);//CV_32F等效于CV_32FC(1)
cout<<"M1.type():"<<M1.type()<<endl;
cout<<"M1:"<<M1<<endl;
cv::Mat M2 = cv::Mat::zeros(2, 3, CV_32FC(1));
cout<<"before M2.type()"<<M2.type()<<endl;
cout<<"before M2:"<<M2<<endl;
for(int i = 0; i < M2.rows; i++){
for(int j = 0; j < M2.cols; j++){
for(int c = 0; c < M2.channels(); c++){
M2.at<cv::Vec<float, 1>>(i, j)[c] = float(i + j + c);
}
}
}
cout<<"after M2.type()"<<M2.type()<<endl;
cout<<"after M2"<<M2<<endl;
//Vec2f表示的是2通道float类型的
cv::Mat M3 = cv::Mat::zeros(2, 3, CV_32FC(2));
cout<<"before M3.type()"<<M3.type()<<endl;
cout<<"before M3:"<<M3<<endl;
for(int i = 0; i < M3.rows; i++){
for(int j = 0; j < M3.cols; j++){
for(int c = 0; c < M3.channels(); c++){
// if(c == 0){
// cout<<"float(i + j + c):"<<float(i + j + c)<<",";
// }
M3.at<cv::Vec2f>(i, j)[c] = float(i + j + c);
}
}
}
cout<<"after M3.type()"<<M3.type()<<endl;
cout<<"after M3:"<<M3<<endl;
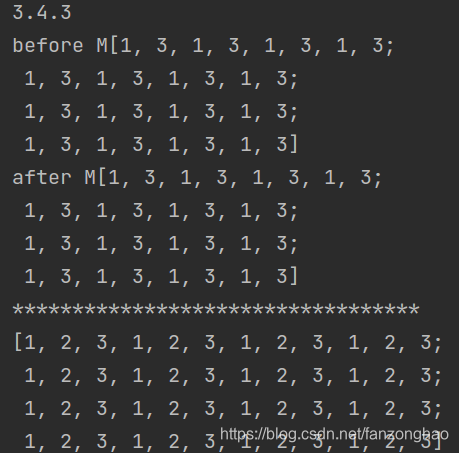
//[0, 1, 1, 2, 2, 3;
// 1, 2, 2, 3, 3, 4]
//Vec3f表示的是3通道float类型的
cv::Mat M5 = cv::Mat::zeros(2, 3, CV_32FC(3));
cout<<"before M5.type()"<<M5.type()<<endl;
cout<<"before M5:"<<M5<<endl;
for(int i = 0; i < M5.rows; i++){
for(int j = 0; j < M5.cols; j++){
for(int c = 0; c < M5.channels(); c++){
// if(c == 0){
// cout<<"float(i + j + c):"<<float(i + j + c)<<",";
// }
M5.at<cv::Vec3f>(i, j)[c] = float(i + j + c);
}
}
}
cout<<"M5:"<<M5<<endl;
//[0, 1, 2, 1, 2, 3, 2, 3, 4;
//1, 2, 3, 2, 3, 4, 3, 4, 5]
}
int main(){
debug_opencv();
return 0;
}
3.mat赋值
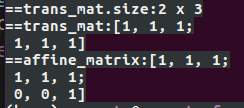
    cv::Mat trans_mat(2, 3, CV_32FC(1), cv::Scalar(1));
    cout<<"==trans_mat.size:"<<trans_mat.size<<endl;
    cout<<"==trans_mat:"<<trans_mat<<endl;

    cv::Mat affine_matrix =
            (cv::Mat_<float>(3, 3) << trans_mat.at<float>(0), trans_mat.at<float>(1), trans_mat.at<float>(2),
                                      trans_mat.at<float>(3), trans_mat.at<float>(4), trans_mat.at<float>(5),
                                      0, 0, 1);
    cout<<"==affine_matrix:"<<affine_matrix<<endl;
二.一些api
1.构建矩阵
#include "iostream"
#include <opencv2/opencv.hpp>
#include "opencv2/dnn/dnn.hpp"
#include "opencv2/imgcodecs/imgcodecs.hpp"
#include <vector>
using namespace std;

typedef cv::Vec<double, 5> Vec5d;

void scalar_demo4(){
    cv::Mat M = cv::Mat::zeros(2, 3, CV_64FC(5));
    cout<<"==M.channels():"<<M.channels()<<endl;
    cout<<"==before M:"<<M<<endl;
    for(int i = 0; i < M.rows; i++){
        for(int j = 0; j < M.cols; j++){
            for(int c = 0; c < M.channels(); c++){
                M.at<Vec5d>(i,j)[c] = c * 0.01;
            }
        }
    }
    cout<<"==after M:"<<M<<endl;
}


int main(int argc ,char** argv)
{
    cout<<CV_VERSION<<endl;
    scalar_demo4();
    return 0;
}

2.构建矩阵与访问某个像素值
#include "iostream"
#include <opencv2/opencv.hpp>
#include "opencv2/dnn/dnn.hpp"
#include "opencv2/imgcodecs/imgcodecs.hpp"
#include <vector>
using namespace std;
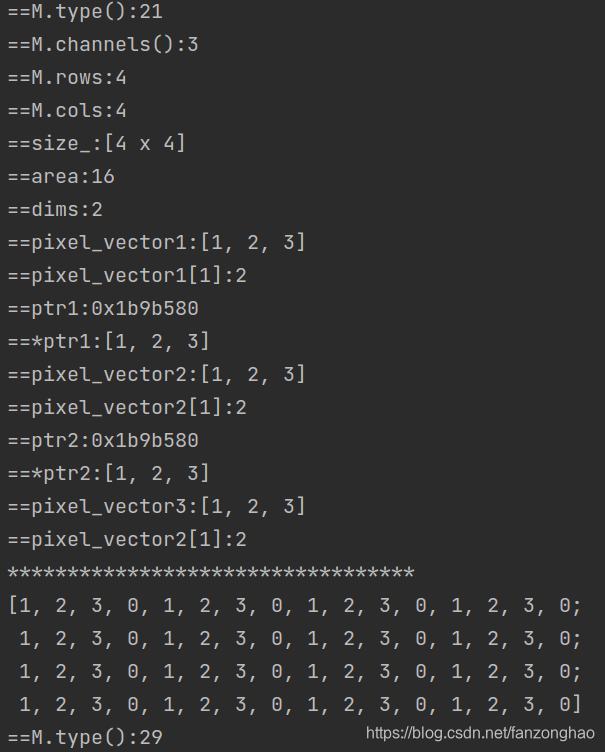
cv::Mat scalar_demo1(){
cv::Mat M(4,4,CV_32FC2,cv::Scalar(1,3));
cout<<"before M"<<M<<endl;
return M;
}
void scalar_demo2(){
cv::Mat M(4,4,CV_32FC3,cv::Scalar(1,2,3));
cout<<M<<endl;
cout<<"==M.type():"<<M.type()<<endl;
cout<<"==M.channels():"<<M.channels()<<endl;
cout<<"==M.rows:"<<M.rows<<endl;
cout<<"==M.cols:"<<M.cols<<endl;
//获取矩阵size 只显示h w 不显示channel
cv::Size size_ = M.size();
cout<<"==size_:"<<size_<<endl;
//获取面积
int area = M.total();
cout<<"==area:"<<area<<endl;
//获取维数
int dims = M.dims;
cout<<"==dims:"<<dims<<endl;
//访问某个值 利用成员函数at 先获取坐标处向量 再根据索引获取值
cv::Vec3f pixel_vector1 = M.at<cv::Vec3f>(0, 0);//获取y=0 x=0处向量
cout<<"==pixel_vector1:"<<pixel_vector1<<endl;
cout<<"==pixel_vector1[1]:"<<pixel_vector1[1]<<endl;
//访问某个值 利用成员函数ptr
auto* ptr1 = M.ptr<cv::Vec3f>(0);//获取y=0处地址
cv::Vec3f pixel_vector2 = ptr1[0];// 再来x=0处获取向量
cout<<"==ptr1:"<<ptr1<<endl;
cout<<"==*ptr1:"<<*ptr1<<endl;//得到首地址向量
cout<<"==pixel_vector2:"<<pixel_vector2<<endl;
cout<<"==pixel_vector2[1]:"<<pixel_vector2[1]<<endl;
//访问某个值用: 利用成员变量data和step, step[0]表示每一行占的字节,step[1]表示每个元素占的字节
int y = 0, x = 0;
auto* ptr2 = (cv::Vec3f* )(M.data + y * M.step[0] + x * M.step[1]);//获取y=0 x=0处向量地址
cout<<"==ptr2:"<<ptr2<<endl;
cout<<"==*ptr2:"<<*ptr2<<endl; //得到首地址向量
cv::Vec3f pixel_vector3 = ptr2[0];
cout<<"==pixel_vector3:"<<pixel_vector2<<endl;
cout<<"==pixel_vector2[1]:"<<pixel_vector2[1]<<endl;
}
void scalar_demo3(){
cv::Mat M(4,4,CV_32FC4,cv::Scalar(1,2,3));
cout<<M<<endl;
cout<<"==M.type():"<<M.type()<<endl;
}
int main(int argc ,char** argv)
{
cout<<CV_VERSION<<endl;
cv::Mat M = scalar_demo1();
cout<<"after M"<<M<<endl;
cout<<"**********************************"<<endl;
scalar_demo2();
cout<<"**********************************"<<endl;
scalar_demo3();
return 0;
}
CV_32F表示每个元素的值的类型为32位浮点数,C2表示通道数为2,Scalar(1,2,3)表示对矩阵每个元素都赋值为(1,2,3),第一个通道中的值都是1,第二个通道中的值都是2,第三个通道中的值都是3.
3.split与merge
#include "iostream"
#include <opencv2/opencv.hpp>
#include "opencv2/dnn/dnn.hpp"
#include "opencv2/imgcodecs/imgcodecs.hpp"
#include <vector>
using namespace std;

typedef cv::Vec<double, 5> Vec5d;

void scalar_demo4(){
    cv::Mat M = cv::Mat::zeros(2, 3, CV_64FC(5));
    cout<<"==M.channels():"<<M.channels()<<endl;
    cout<<"==before M:"<<M<<endl;
    for(int i = 0; i < M.rows; i++){
        for(int j = 0; j < M.cols; j++){
            for(int c = 0; c < M.channels(); c++){
                M.at<Vec5d>(i,j)[c] = c * 0.01;
            }
        }
    }
    cout<<"==after M:"<<M<<endl;
    //split 拆分通道
    vector<cv::Mat> channels;
    cv::split(M, channels);
    cout<<"==channels[0]:"<<channels[0]<<endl;
    cout<<"==channels[1]:"<<channels[1]<<endl;
    cout<<"==channels[2]:"<<channels[2]<<endl;
    cout<<"==channels[3]:"<<channels[3]<<endl;
    cout<<"==channels[4]:"<<channels[4]<<endl;

    //Merge合并
    cv::Mat newchannels[] = {channels[4], channels[3], channels[2], channels[1], channels[0]};
    cv::Mat MergeM;
    cv::merge(newchannels, sizeof(newchannels)/ sizeof(newchannels[0]), MergeM);
    cout<<"==merge M:"<<MergeM<<endl;
}


int main(int argc ,char** argv)
{

    cout<<CV_VERSION<<endl;
    scalar_demo4();
    return 0;
}
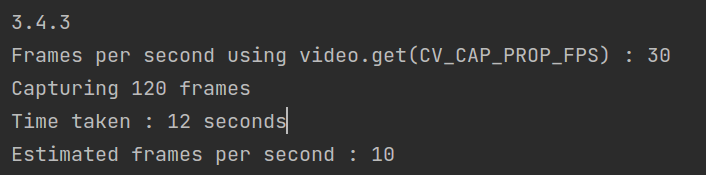
4.查看视频帧与统计时间
python:
#!/usr/bin/env python
import cv2
import time
if __name__ == '__main__' :
# Start default camera
video = cv2.VideoCapture(0);
# Find OpenCV version
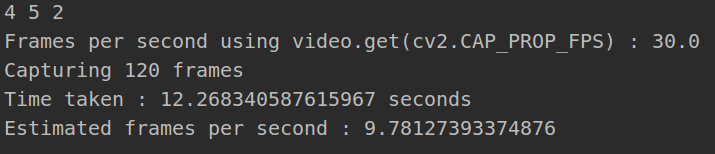
(major_ver, minor_ver, subminor_ver) = (cv2.__version__).split('.')
print(major_ver, minor_ver, subminor_ver)
# With webcam get(CV_CAP_PROP_FPS) does not work.
# Let's see for ourselves.
if int(major_ver) < 3 :
fps = video.get(cv2.cv.CV_CAP_PROP_FPS)
print("Frames per second using video.get(cv2.cv.CV_CAP_PROP_FPS): {0}".format(fps))
else :
fps = video.get(cv2.CAP_PROP_FPS)
print("Frames per second using video.get(cv2.CAP_PROP_FPS) : {0}".format(fps))
# Number of frames to capture
num_frames = 120
print("Capturing {0} frames".format(num_frames))
# Start time
start = time.time()
# Grab a few frames
for i in range(0, num_frames):
ret, frame = video.read()
# End time
end = time.time()
# Time elapsed
seconds = end - start
print("Time taken : {0} seconds".format(seconds))
# Calculate frames per second
fps = num_frames / seconds
print("Estimated frames per second : {0}".format(fps))
# Release video
video.release()
 c++:
c++:
#include <opencv2/opencv.hpp>
#include "time.h"
int main(){
    // Start default camera
    cv::VideoCapture video(0);
    // With webcam get(CV_CAP_PROP_FPS) does not work.
    // Let's see for ourselves.
    std::cout << CV_VERSION<<std::endl;
    double fps = video.get(cv::CAP_PROP_FPS);
    // If you do not care about backward compatibility
    // You can use the following instead for OpenCV 3
    // double fps = video.get(CAP_PROP_FPS);
    std::cout << "Frames per second using video.get(CV_CAP_PROP_FPS) : " << fps << std::endl;

    int num_frames = 120;

    // Start and end times
    time_t start, end;
    // Variable for storing video frames
    cv::Mat frame;

    std::cout << "Capturing " << num_frames << " frames" << std::endl ;

    // Start time
    time(&start);
    // Grab a few frames
    for(int i = 0; i < num_frames; i++)
    {
        video >> frame;
    }
    // End Time
    time(&end);
    // Time elapsed
    double seconds = difftime (end, start);
    std::cout << "Time taken : " << seconds << " seconds" << std::endl;

    // Calculate frames per second
    fps  = num_frames / seconds;
    std::cout << "Estimated frames per second : " << fps << std::endl;

    // Release video
    video.release();
    return  0;
}
//
// Created by fzh on 2021/6/22.
//
//#include <pybind11/numpy.h>
//#include <a.h>
//#include <b.h>
#include <iostream>
#include <opencv2/opencv.hpp>
#include <opencv2/core/core.hpp>
#include <opencv2/imgproc/imgproc.hpp>
#include <string>
#include <algorithm>
#include <vector>
#include <memory>
typedef cv::Vec<double, 5> Vec5d;
using namespace std;
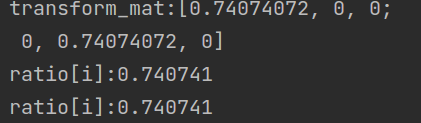
cv::Mat pre_process(const cv::Mat &image, std::vector<float> &ratio) {
// normalize
//debug
int input_width_ = 800, input_height_ = 1333;
cv::Scalar mean_ = cv::Scalar(111.522);
cv::Scalar std_ = cv::Scalar(1./38.877);
cv::Mat normed_image;
float img_height = image.rows;
float img_width = image.cols;
float max_long_edge = std::max(input_width_, input_height_);
float max_short_edge = std::min(input_width_, input_height_);
float scale_factor =
std::min(max_long_edge / std::max(img_height, img_width),
max_short_edge / std::min(img_height, img_width));
// int new_h = scale_factor * img_height;
// int new_w = scale_factor * img_width;
ratio.push_back(scale_factor);
ratio.push_back(scale_factor);
cv::Mat transform_mat =
(cv::Mat_<float>(2, 3) << scale_factor, 0, 0, 0, scale_factor, 0);
cout<<"transform_mat:"<<transform_mat<<endl;
cv::Mat resized_img;
cv::warpAffine(image, resized_img, transform_mat,
cv::Size(input_width_, input_height_), cv::INTER_LINEAR,
cv::BORDER_CONSTANT, cv::Scalar(127));
// cv::resize(image, resized_img, cv::Size(input_width_, input_height_));
// img.convertTo(normed_im, CV_32FC3, 1 / 255.0);
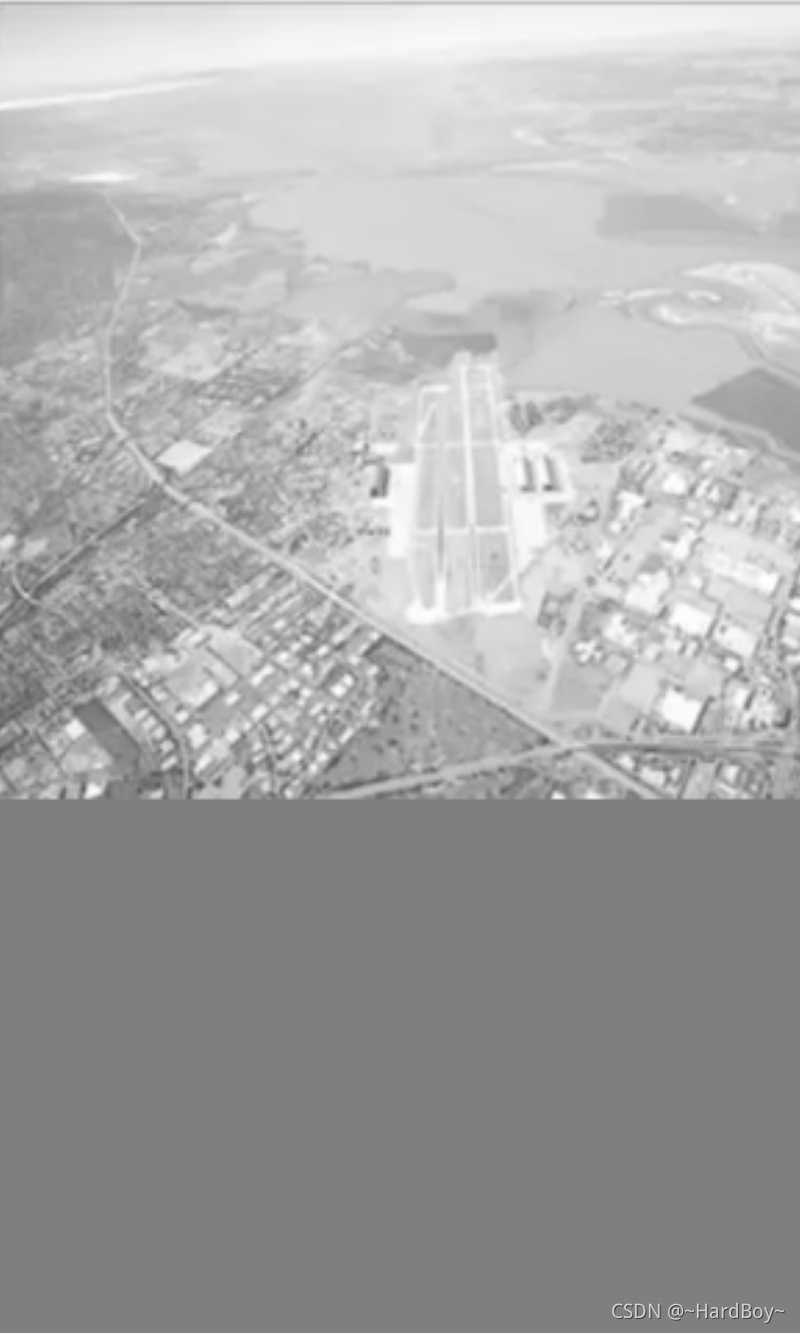
cv::imwrite("warp_resize_img.jpg", resized_img);
resized_img.convertTo(normed_image, CV_32FC1);
// cv::Mat mean(input_height_, input_width_, CV_32FC3, s);
normed_image -= mean_;
normed_image = normed_image.mul(std_);
return normed_image;
}
void debug_preprocess(){
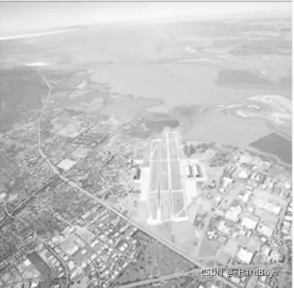
cv::Mat img = cv::imread("/2.jpg", 0);
vector<float> ratio;
std::cout<<"before img h:"<<img.rows<<std::endl;
std::cout<<"before img w:"<<img.cols<<std::endl;
pre_process(img, ratio);
for(int i=0; i<ratio.size(); i++){
cout<<"ratio[i]:"<<ratio[i]<<endl;
}
}
int main(int argc, char** argv)
{
debug_preprocess();
return 0;
}
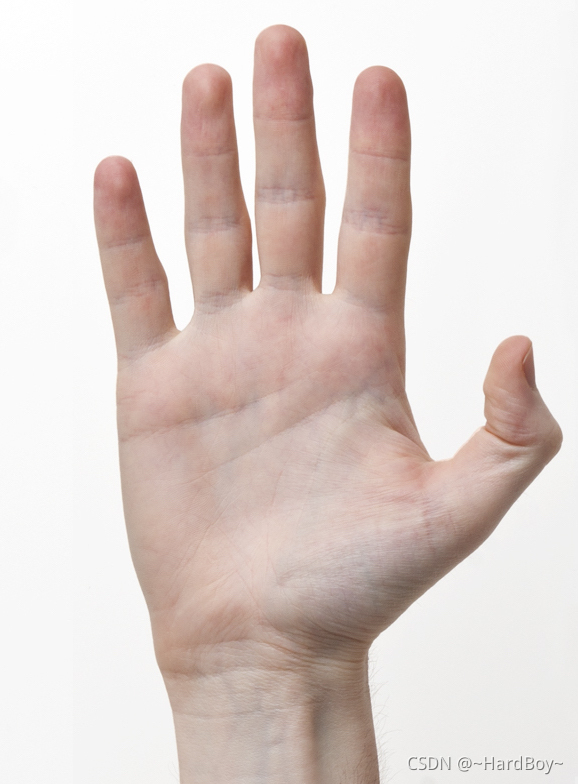
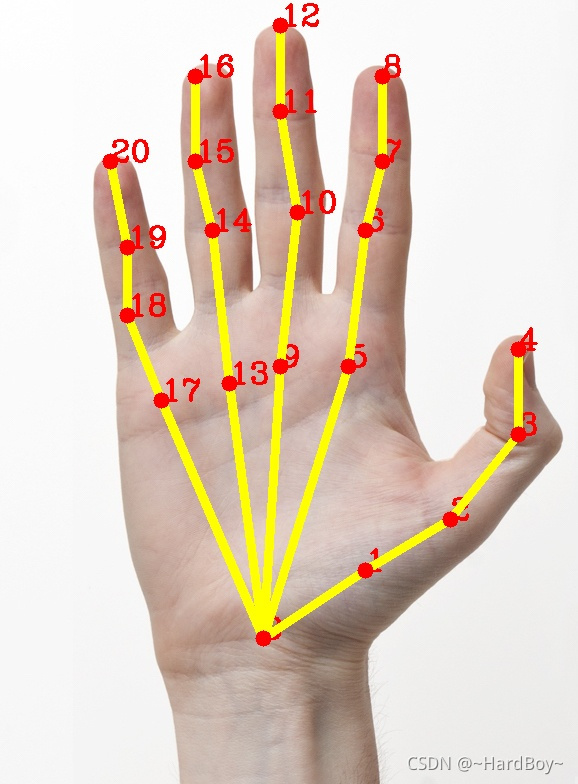
6.cv::minMaxLoc获取feature map最大值索引
python代码:
from __future__ import division
import cv2
import time
import numpy as np

protoFile = "./hand/pose_deploy.prototxt"
weightsFile = "./hand/pose_iter_102000.caffemodel"
nPoints = 22
POSE_PAIRS = [[0, 1], [1, 2], [2, 3], [3, 4],
              [0, 5], [5, 6], [6, 7], [7, 8],
              [0, 9], [9, 10], [10, 11], [11, 12],
              [0, 13], [13, 14], [14, 15], [15, 16],
              [0, 17], [17, 18], [18, 19], [19, 20]]
net = cv2.dnn.readNetFromCaffe(protoFile, weightsFile)

frame = cv2.imread("./right-frontal.jpg")
frameCopy = np.copy(frame)
frameWidth = frame.shape[1]
frameHeight = frame.shape[0]
aspect_ratio = frameWidth / frameHeight

threshold = 0.1

start_time = time.time()
# input image dimensions for the network
inHeight = 368
inWidth = int(((aspect_ratio * inHeight) * 8) // 8)
print(inHeight, inWidth)
# frame = cv2.resize(frame, (inWidth, inHeight))
# print(frame.shape)
inpBlob = cv2.dnn.blobFromImage(frame, 1.0 / 255, (inWidth, inHeight), (0, 0, 0), swapRB=False, crop=False)

net.setInput(inpBlob)
print(inpBlob.shape)
output = net.forward()
print("time taken by network : {:.3f}".format(time.time() - start_time))

# Empty list to store the detected keypoints
points = []

for i in range(nPoints):
    # confidence map of corresponding body's part.
    probMap = output[0, i, :, :]
    probMap = cv2.resize(probMap, (frameWidth, frameHeight))
    # Find global maxima of the probMap.
    minVal, prob, minLoc, point = cv2.minMaxLoc(probMap)

    if prob > threshold:
        cv2.circle(frameCopy, (int(point[0]), int(point[1])), 8, (0, 255, 255), thickness=-1, lineType=cv2.FILLED)
        cv2.putText(frameCopy, str(i), (int(point[0]), int(point[1])), cv2.FONT_HERSHEY_SIMPLEX, 1, (0, 0, 255), 2,
                    lineType=cv2.LINE_AA)

        # Add the point to the list if the probability is greater than the threshold
        points.append((int(point[0]), int(point[1])))
    else:
        points.append(None)

# Draw Skeleton
for pair in POSE_PAIRS:
    partA = pair[0]
    partB = pair[1]

    if points[partA] and points[partB]:
        cv2.line(frame, points[partA], points[partB], (0, 255, 255), 2)
        cv2.circle(frame, points[partA], 8, (0, 0, 255), thickness=-1, lineType=cv2.FILLED)
        cv2.circle(frame, points[partB], 8, (0, 0, 255), thickness=-1, lineType=cv2.FILLED)

cv2.imshow('Output-Keypoints', frameCopy)
cv2.imshow('Output-Skeleton', frame)

cv2.imwrite('Output-Keypoints.jpg', frameCopy)
cv2.imwrite('Output-Skeleton.jpg', frame)

print("Total time taken : {:.3f}".format(time.time() - start_time))

cv2.waitKey(0)
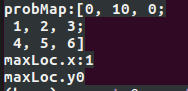
    cv::Mat probMap = (cv::Mat_<float>(3, 3) <<0,10,0,1,2,3,4,5,6);
    cv::Point maxLoc;
    double prob;
    cout<<"probMap:"<<probMap<<endl;
    cv::minMaxLoc(probMap, 0, &prob, 0, &maxLoc);
    cout<<"maxLoc.x:"<<maxLoc.x<<endl;
    cout<<"maxLoc.y"<<maxLoc.y<<endl;
c++代码:
#include <opencv2/dnn.hpp>
#include <opencv2/imgproc.hpp>
#include <opencv2/highgui.hpp>
#include <iostream>

const int POSE_PAIRS[20][2] =
        {
                {0,1}, {1,2}, {2,3}, {3,4},         // thumb
                {0,5}, {5,6}, {6,7}, {7,8},         // index
                {0,9}, {9,10}, {10,11}, {11,12},    // middle
                {0,13}, {13,14}, {14,15}, {15,16},  // ring
                {0,17}, {17,18}, {18,19}, {19,20}   // small
        };

std::string protoFile = "/home/momenta/AI/c++_project_test/hand/pose_deploy.prototxt";
std::string weightsFile = "/home/momenta/AI/c++_project_test/hand/pose_iter_102000.caffemodel";

int nPoints = 22;

int main(int argc, char **argv)
{

    std::cout << "USAGE : ./handPoseImage <imageFile> " << std::endl;

    std::string imageFile = "/home/momenta/AI/c++_project_test/right-frontal.jpg";
    // Take arguments from commmand line
    if (argc == 2)
    {
        imageFile = argv[1];
    }

    float thresh = 0.1;

    cv::Mat frame = cv::imread(imageFile);
    cv::Mat frameCopy = frame.clone();
    int frameWidth = frame.cols;
    int frameHeight = frame.rows;

    float aspect_ratio = frameWidth/(float)frameHeight;
    int inHeight = 368;
    int inWidth = (int(aspect_ratio*inHeight) * 8) / 8;

    std::cout << "framenWidth = " << frameWidth << " ; frameHeight = " << frameHeight << std::endl;
    std::cout << "inWidth = " << inWidth << " ; inHeight = " << inHeight << std::endl;

    double start_time = (double) cv::getTickCount();
    cv::dnn::Net net = cv::dnn::readNetFromCaffe(protoFile, weightsFile);

    cv::Mat inpBlob = cv::dnn::blobFromImage(frame, 1.0 / 255, cv::Size(inWidth, inHeight), cv::Scalar(0, 0, 0), false, false);
    std::cout<<"inpBlob.dims:"<<inpBlob.dims<<std::endl;
    std::cout<<"inpBlob.size:"<<inpBlob.size<<std::endl;
    net.setInput(inpBlob);

    cv::Mat output = net.forward();
    std::cout<<"output.size:"<<output.size<<std::endl;
    int H = output.size[2];
    int W = output.size[3];

    // find the position of the body parts
    std::vector<cv::Point> points(nPoints);
    for (int i=0; i < nPoints; i++)
    {
        // Probability map of corresponding body's part.
        cv::Mat probMap(H, W, CV_32F, output.ptr(0, i));
        std::cout<<"probMapt.size:"<<probMap.size<<std::endl;
        resize(probMap, probMap, cv::Size(frameWidth, frameHeight));

        cv::Point maxLoc;
        double prob;
        cv::minMaxLoc(probMap, 0, &prob, 0, &maxLoc);
//        std::cout<<"prob:"<<prob<<std::endl;
        if (prob > thresh)
        {
//            std::cout<<"(int)maxLoc.x:"<<(int)maxLoc.x<<std::endl;
//            std::cout<<"(int)maxLoc.y:"<<(int)maxLoc.y<<std::endl;
//            circle(frame, cv::Point((int)maxLoc.x, (int)maxLoc.y), 8, Scalar(0,255,255), -1);
            cv::putText(frame, std::to_string(i), cv::Point((int)maxLoc.x, (int)maxLoc.y), cv::FONT_HERSHEY_COMPLEX, 1, cv::Scalar(0, 0, 255), 2);

        }
        points[i] = maxLoc;
    }

    int nPairs = sizeof(POSE_PAIRS)/sizeof(POSE_PAIRS[0]);

    for (int i = 0; i < nPairs; i++)
    {
        // lookup 2 connected body/hand parts
        cv::Point2f partA = points[POSE_PAIRS[i][0]];
        cv::Point2f partB = points[POSE_PAIRS[i][1]];

        if (partA.x<=0 || partA.y<=0 || partB.x<=0 || partB.y<=0)
            continue;

        line(frame, partA, partB, cv::Scalar(0,255,255), 8);
        circle(frame, partA, 8, cv::Scalar(0,0,255), -1);
        circle(frame, partB, 8, cv::Scalar(0,0,255), -1);
    }

    double cost_time = ((double)cv::getTickCount() - start_time)/cv::getTickFrequency();
    std::cout << "Time Taken = " << cost_time << std::endl;
    cv::imwrite("Output-Skeleton.jpg", frame);

    return 0;
}
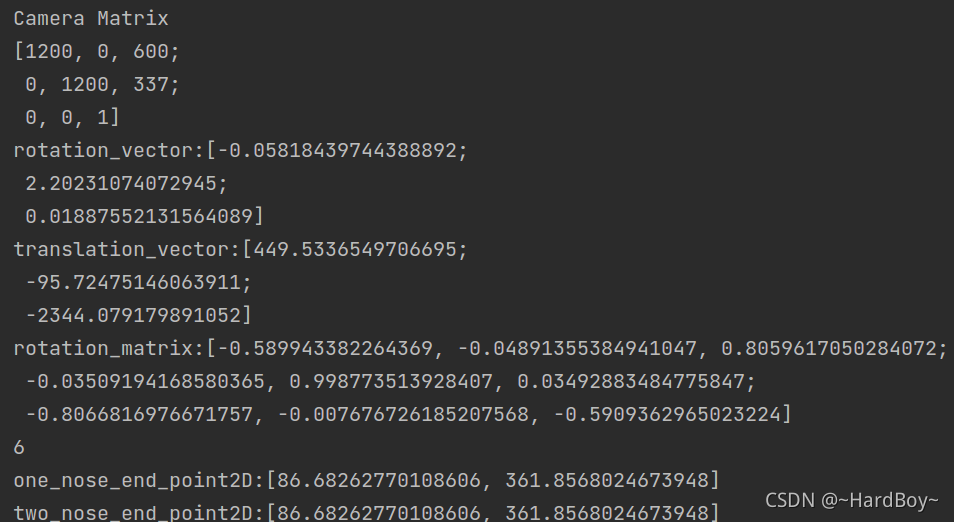
7.cv::projectPoints 通过旋转向量,平移向量与相机坐标系3d点算出投影2d点
有两种解法一个是标题所述,一个是用旋转向量计算出旋转矩阵,用外参和内参变化计算出投影2d点.
python:
#!/usr/bin/env python
import cv2
import numpy as np
def method_one(rotation_matrix, translation_vector, camera_matrix, dist_coeffs, start_point):
cam_3d = rotation_matrix.dot(start_point.reshape(-1, 1)) + translation_vector
print('==cam_3d:', cam_3d)
def camera_to_img2d(x, K, Kd):
"""x(3, N)"""
x[0:2, :] = x[0:2, :] / x[2, :] # (2, N)
r = x[0, :] * x[0, :] + x[1, :] * x[1, :] # x^2 + y^2 (N, )
x[0, :] = x[0, :] * (1 + Kd[0] * r + Kd[1] * r * r + Kd[4] * r * r * r) + 2 * Kd[2] * x[0, :] * x[1, :] + Kd[
3] * (
r + 2 * x[0, :] * x[0, :])
x[1, :] = x[1, :] * (1 + Kd[0] * r + Kd[1] * r * r + Kd[4] * r * r * r) + 2 * Kd[3] * x[0, :] * x[1, :] + Kd[
2] * (
r + 2 * x[1, :] * x[1, :])
x[0, :] = K[0, 0] * x[0, :] + K[0, 1] * x[1, :] + K[0, 2]
x[1, :] = K[1, 0] * x[0, :] + K[1, 1] * x[1, :] + K[1, 2]
return x
_2d = camera_to_img2d(cam_3d, camera_matrix, dist_coeffs)
# print('==_2d:', _2d)
return _2d
def method_two(rotation_vector, translation_vector, camera_matrix, dist_coeffs, start_point):
# Project a 3D point (0, 0, 1000.0) onto the image plane.
# We use this to draw a line sticking out of the nose
(nose_end_point2D, jacobian) = cv2.projectPoints(start_point, rotation_vector, translation_vector, camera_matrix, dist_coeffs)
# print('==nose_end_point2D:', nose_end_point2D)
return nose_end_point2D
def main():
# Read Image
im = cv2.imread("headPose.jpg")
size = im.shape
# 2D image points. If you change the image, you need to change vector
image_points = np.array([
(359, 391), # Nose tip
(399, 561), # Chin
(337, 297), # Left eye left corner
(513, 301), # Right eye right corne
(345, 465), # Left Mouth corner
(453, 469) # Right mouth corner
], dtype=np.float32)
# 3D model points.
model_points = np.array([
(0.0, 0.0, 0.0), # Nose tip
(0.0, -330.0, -65.0), # Chin
(-225.0, 170.0, -135.0), # Left eye left corner
(225.0, 170.0, -135.0), # Right eye right corne
(-150.0, -150.0, -125.0), # Left Mouth corner
(150.0, -150.0, -125.0) # Right mouth corner
])
# Camera internals
focal_length = size[1]
center = (size[1] / 2, size[0] / 2)
camera_matrix = np.array(
[[focal_length, 0, center[0]],
[0, focal_length, center[1]],
[0, 0, 1]], dtype="double"
)
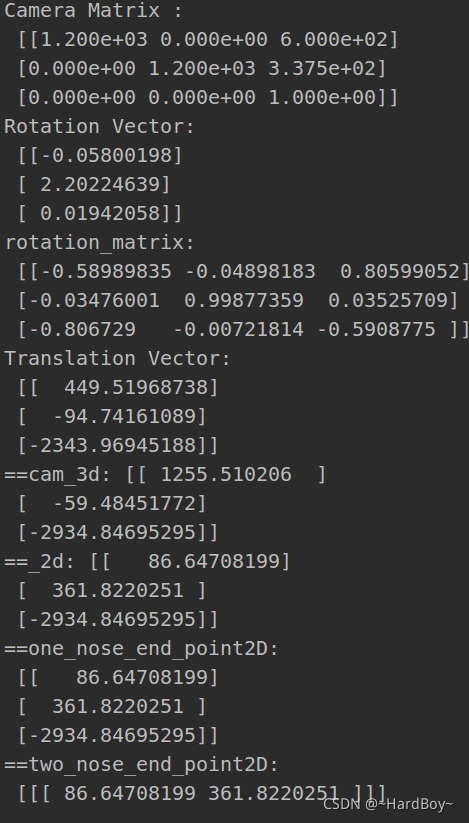
print("Camera Matrix :\n {0}".format(camera_matrix))
dist_coeffs = np.zeros((5, 1)) # Assuming no lens distortion
(success, rotation_vector, translation_vector) = cv2.solvePnP(model_points, image_points, camera_matrix,
dist_coeffs, flags=cv2.SOLVEPNP_ITERATIVE)
rotation_matrix = cv2.Rodrigues(rotation_vector)[0]
print("Rotation Vector:\n {0}".format(rotation_vector))
print('rotation_matrix:\n', rotation_matrix)
print("Translation Vector:\n {0}".format(translation_vector))
start_point = np.array([(0.0, 0.0, 1000.0)])
one_nose_end_point2D = method_one(rotation_matrix, translation_vector, camera_matrix, dist_coeffs, start_point)
two_nose_end_point2D = method_two(rotation_vector, translation_vector, camera_matrix, dist_coeffs, start_point)
print('==one_nose_end_point2D:\n', one_nose_end_point2D)
print('==two_nose_end_point2D:\n', two_nose_end_point2D)
for p in image_points:
cv2.circle(im, (int(p[0]), int(p[1])), 3, (0, 0, 255), -1)
p1 = (int(image_points[0][0]), int(image_points[0][1]))
p2 = (int(two_nose_end_point2D[0][0][0]), int(two_nose_end_point2D[0][0][1]))
cv2.line(im, p1, p2, (255, 0, 0), 2)
if __name__ == '__main__':
main()
c++:
#include <opencv2/opencv.hpp>

using namespace std;
using namespace cv;

void method_two( vector<Point3d> &nose_end_point3D, vector<Point2d> &nose_end_point2D,
                 cv::Mat &rotation_vector, cv::Mat &translation_vector, cv::Mat &camera_matrix, cv::Mat &dist_coeffs){
    projectPoints(nose_end_point3D, rotation_vector, translation_vector, camera_matrix, dist_coeffs, nose_end_point2D);
}

void camera3d_to_img_2d(cv::Mat& x, cv::Mat &K, cv::Mat &Kd){
    x.rowRange(0, 2) = x.rowRange(0, 2) / x.row(2);

    cv::Mat r = x.row(0) * x.row(0) + x.row(1) * x.row(1);
    x.row(0) = x.row(0) * (1 + Kd.at<double>(0) * r + Kd.at<double>(1)*r*r + Kd.at<double>(4)*r*r*r) +
            2*Kd.at<double>(2)*x.row(0)*x.row(1) + Kd.at<double>(3)*(r + 2*x.row(0)*x.row(0));
    x.row(1) = x.row(1) * (1 + Kd.at<double>(0) * r + Kd.at<double>(1)*r*r + Kd.at<double>(4)*r*r*r) +
               2*Kd.at<double>(2)*x.row(0)*x.row(1) + Kd.at<double>(2)*(r + 2*x.row(1)*x.row(1));
    x.row(0) = K.at<double>(0, 0) * x.row(0) + K.at<double>(0, 1) * x.row(1) + K.at<double>(0, 2);
    x.row(1) = K.at<double>(1, 0) * x.row(0) + K.at<double>(1, 1) * x.row(1) + K.at<double>(1, 2);

}
void method_one( vector<Point3d> &nose_end_point3D, vector<Point2d> &nose_end_point2D,
                 cv::Mat &rotation_matrix, cv::Mat translation_vector, cv::Mat &camera_matrix, cv::Mat &dist_coeffs){
    cv::Mat start_point = cv::Mat(nose_end_point3D);
    start_point = start_point.reshape(1, 3);
    start_point.convertTo(start_point, rotation_matrix.type());
//    cout<<"start_point.rows:"<<start_point.rows<<endl;
//    cout<<start_point.cols<<endl;
//    cout<<rotation_matrix.rows<<endl;
//    cout<<"rotation_matrix.cols:"<<rotation_matrix.cols<<endl;
//    cout<<"start_point:"<<start_point<<endl;
//    cout<<"start_point.type():"<<start_point.type()<<endl;
    cv::Mat cam_3d = rotation_matrix*start_point + translation_vector;
//    cout<<cam_3d<<endl;
    camera3d_to_img_2d(cam_3d, camera_matrix, dist_coeffs);
    nose_end_point2D = cv::Mat_<Point2d>(cam_3d.rowRange(0, 2));
}
int main(int argc, char **argv)
{

    // Read input image
    cv::Mat im = cv::imread("/home/momenta/AI/c++_project_test/headPose.jpg");

    // 2D image points. If you change the image, you need to change vector
    std::vector<cv::Point2d> image_points;
    image_points.push_back( cv::Point2d(359, 391) );    // Nose tip
    image_points.push_back( cv::Point2d(399, 561) );    // Chin
    image_points.push_back( cv::Point2d(337, 297) );     // Left eye left corner
    image_points.push_back( cv::Point2d(513, 301) );    // Right eye right corner
    image_points.push_back( cv::Point2d(345, 465) );    // Left Mouth corner
    image_points.push_back( cv::Point2d(453, 469) );    // Right mouth corner

    // 3D model points.
    std::vector<cv::Point3d> model_points;
    model_points.push_back(cv::Point3d(0.0f, 0.0f, 0.0f));               // Nose tip
    model_points.push_back(cv::Point3d(0.0f, -330.0f, -65.0f));          // Chin
    model_points.push_back(cv::Point3d(-225.0f, 170.0f, -135.0f));       // Left eye left corner
    model_points.push_back(cv::Point3d(225.0f, 170.0f, -135.0f));        // Right eye right corner
    model_points.push_back(cv::Point3d(-150.0f, -150.0f, -125.0f));      // Left Mouth corner
    model_points.push_back(cv::Point3d(150.0f, -150.0f, -125.0f));       // Right mouth corner

    // Camera internals
    double focal_length = im.cols; // Approximate focal length.
    Point2d center = cv::Point2d(im.cols/2,im.rows/2);
    cv::Mat camera_matrix = (cv::Mat_<double>(3,3) << focal_length, 0, center.x,
            0 , focal_length, center.y,
            0, 0, 1);
    cv::Mat dist_coeffs = cv::Mat::zeros(5,1,cv::DataType<double>::type); // Assuming no lens distortion

    cout << "Camera Matrix " << endl << camera_matrix << endl ;
    // Output rotation and translation
    cv::Mat rotation_vector; // Rotation in axis-angle form
    cv::Mat translation_vector;

    // Solve for pose
    cv::solvePnP(model_points, image_points, camera_matrix, dist_coeffs, rotation_vector, translation_vector);

    cout<<"rotation_vector:"<<rotation_vector<<endl;
    cout<<"translation_vector:"<<translation_vector<<endl;
    cv::Mat rotation_matrix;
    cv::Rodrigues(rotation_vector,rotation_matrix);
    cout<<"rotation_matrix:"<<rotation_matrix<<endl;
    cout<<rotation_matrix.type()<<endl;
    // Project a 3D point (0, 0, 1000.0) onto the image plane.
    // We use this to draw a line sticking out of the nose
    vector<Point2d> one_nose_end_point2D;
    vector<Point3d> one_nose_end_point3D;
    one_nose_end_point3D.push_back(Point3d(0,0,1000.0));
    method_one(one_nose_end_point3D, one_nose_end_point2D,
                rotation_matrix, translation_vector, camera_matrix, dist_coeffs);
    cout<<"one_nose_end_point2D:"<<one_nose_end_point2D<<endl;

    vector<Point2d> two_nose_end_point2D;
    vector<Point3d> two_nose_end_point3D;
    two_nose_end_point3D.push_back(Point3d(0,0,1000.0));
    method_two(two_nose_end_point3D, two_nose_end_point2D, rotation_vector, translation_vector, camera_matrix, dist_coeffs);
    cout<<"two_nose_end_point2D:"<<two_nose_end_point2D<<endl;

    for(int i=0; i < image_points.size(); i++)
    {
        circle(im, image_points[i], 3, Scalar(0,0,255), -1);
    }

    cv::line(im,image_points[0], two_nose_end_point2D[0], cv::Scalar(255,0,0), 2);
    cv::imwrite("./im_show.jpg", im);

}


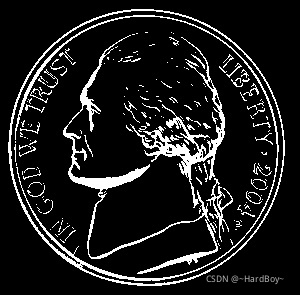
8.cv::floodFill 泛洪算法
python:
#!/usr/bin/env python

import cv2;
import numpy as np;

# Read image
im_in = cv2.imread("nickel.jpg", cv2.IMREAD_GRAYSCALE)

# Threshold.
# Set values equal to or above 220 to 0.
# Set values below 220 to 255.

th, im_th = cv2.threshold(im_in, 220, 255, cv2.THRESH_BINARY_INV)

# Copy the thresholded image.
im_floodfill = im_th.copy()

# Mask used to flood filling.
# Notice the size needs to be 2 pixels than the image.
h, w = im_th.shape[:2]
mask = np.zeros((h+2, w+2), np.uint8)

# Floodfill from point (0, 0)
cv2.floodFill(im_floodfill, mask, (0, 0), 255)

# Invert floodfilled image
im_floodfill_inv = cv2.bitwise_not(im_floodfill)

# Combine the two images to get the foreground.
im_out = im_th | im_floodfill_inv

# Display images.
cv2.imwrite("./Thresholded_Image.jpg", im_th)
cv2.imwrite("./Floodfilled_Image.jpg", im_floodfill)
cv2.imwrite("./Inverted_Floodfilled_Image.jpg", im_floodfill_inv)
cv2.imwrite("./Foreground.jpg", im_out)
c++:
#include "opencv2/opencv.hpp"

//using namespace cv;

int main(int argc, char **argv)
{
    // Read image
    cv::Mat im_in = cv::imread("./nickel.jpg", cv::IMREAD_GRAYSCALE);

    // Threshold.
    // Set values equal to or above 220 to 0.
    // Set values below 220 to 255.
    cv::Mat im_th;
    cv::threshold(im_in, im_th, 220, 255, cv::THRESH_BINARY_INV);

    // Floodfill from point (0, 0)
    cv::Mat im_floodfill = im_th.clone();
    cv::floodFill(im_floodfill, cv::Point(0,0), cv::Scalar(255));

    // Invert floodfilled image
    cv::Mat im_floodfill_inv;
    cv::bitwise_not(im_floodfill, im_floodfill_inv);

    // Combine the two images to get the foreground.
    cv::Mat im_out = (im_th | im_floodfill_inv);

    // Display images
    cv::imwrite("Thresholded_Image.jpg", im_th);
    cv::imwrite("Floodfilled_Image.jpg", im_floodfill);
    cv::imwrite("Inverted_Floodfilled_Image.jpg", im_floodfill_inv);
    cv::imwrite("Foreground.jpg", im_out);

}


9.cv::findHomography
传两个图像里的点集合,它会找到那个目标的透视转换,需要至少4个正确的点来找变换。
python:
#!/usr/bin/env python

import cv2
import numpy as np


def mouse_handler(event, x, y, flags, data):
    if event == cv2.EVENT_LBUTTONDOWN:
        cv2.circle(data['im'], (x, y), 3, (0, 0, 255), 5, 16);
        cv2.imshow("Image", data['im']);
        if len(data['points']) < 4:
            data['points'].append([x, y])

def get_four_points(im):
    # Set up data to send to mouse handler
    data = {}
    data['im'] = im.copy()
    data['points'] = []

    # Set the callback function for any mouse event
    cv2.imshow("Image", im)
    cv2.setMouseCallback("Image", mouse_handler, data)
    cv2.waitKey(0)

    # Convert array to np.array
    points = np.vstack(data['points']).astype(float)

    return points


if __name__ == '__main__' :

    # Read in the image.
    im_src = cv2.imread("book1.jpg")

    # Destination image
    size = (300, 400, 3)

    im_dst = np.zeros(size, np.uint8)

    pts_dst = np.array(
                       [
                        [0, 0],
                        [size[0] - 1, 0],
                        [size[0] - 1, size[1] -1],
                        [0, size[1] - 1]
                        ], dtype=float
                       )


    # Show image and wait for 4 clicks.
    # cv2.imshow("Image", im_src)
    pts_src = get_four_points(im_src)
    print('==pts_src:', pts_src)
    # Calculate the homography
    matrix, status = cv2.findHomography(pts_src, pts_dst)
    print('==matrix:', matrix)
    # Warp source image to destination
    im_dst = cv2.warpPerspective(im_src, matrix, size[0:2])
    print('==im_dst.shape:', im_dst.shape)
    # Show output
    cv2.imshow("Image", im_dst)
    cv2.waitKey(0)
c++:
#include <opencv2/opencv.hpp>

//using namespace cv;
using namespace std;

struct userdata{
    cv::Mat im;
    vector<cv::Point2f> points;
};

void mouseHandler(int event, int x, int y, int flags, void* data_ptr)
{
    if  ( event == cv::EVENT_LBUTTONDOWN )
    {
        userdata *data = ((userdata *) data_ptr);
        cv::circle(data->im, cv::Point(x,y),3,cv::Scalar(0,0,255), 5, cv::LINE_AA);
        imshow("Image", data->im);
        if (data->points.size() < 4)
        {
            data->points.push_back(cv::Point2f(x,y));
        }
    }
}

int main( int argc, char** argv)
{

    // Read source image.
    cv::Mat im_src = cv::imread("/home/fzh/AI/C_learn/datastruct/opencv/book1.jpg");

    // Destination image. The aspect ratio of the book is 3/4
    cv::Size size(300,400);
    cv::Mat im_dst = cv::Mat::zeros(size,CV_8UC3);

    // Create a vector of destination points.
    vector<cv::Point2f> pts_dst;

    pts_dst.push_back(cv::Point2f(0,0));
    pts_dst.push_back(cv::Point2f(size.width - 1, 0));
    pts_dst.push_back(cv::Point2f(size.width - 1, size.height -1));
    pts_dst.push_back(cv::Point2f(0, size.height - 1 ));

    // Set data for mouse event
    cv::Mat im_temp = im_src.clone();
    userdata data;
    data.im = im_temp;

    cout << "Click on the four corners of the book -- top left first and" << endl
         << "bottom left last -- and then hit ENTER" << endl;

    // Show image and wait for 4 clicks.
    imshow("Image", im_temp);
    // Set the callback function for any mouse event
    cv::setMouseCallback("Image", mouseHandler, &data);
    cout<<"data.im.rows:"<<data.im.rows<<endl;
    cout<<"data.im.cols:"<<data.im.cols<<endl;
    cout<<"data.im.channels():"<<data.im.channels()<<endl;

    cv::waitKey(0);

    // Calculate the homography
    cv::Mat matrix = cv::findHomography(data.points, pts_dst);
    cout<<"data.points:"<<data.points<<endl;
    // Warp source image to destination
    cv::warpPerspective(im_src, im_dst, matrix, size);

    // Show image
    cv::imshow("Image", im_dst);
    cv::waitKey(0);
    cv::imwrite("./dst.jpg",im_dst);
    return 0;
}

//

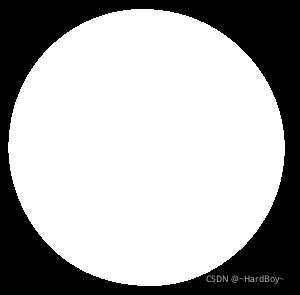
10. cv2::moments 寻找质心
python:
import cv2
import numpy as np
import argparse

# # create object to pass argument
# arg_parse = argparse.ArgumentParser()
# arg_parse.add_argument("-i", "--ipimage", required=True,
# 	help="input image path")
# args = vars(arg_parse.parse_args())
img_path = './circle.png'
# read image through command line
img = cv2.imread(img_path)

# convert image to grayscale image
gray_image = cv2.cvtColor(img, cv2.COLOR_BGR2GRAY)

# convert the grayscale image to binary image
ret, thresh = cv2.threshold(gray_image, 127, 255, 0)

cv2.imwrite('./thresh.jpg', thresh)
# calculate moments of binary image
M = cv2.moments(thresh)
print('==M:', M)
print('==M.keys()', M.keys())
# calculate x,y coordinate of center
cX = int(M["m10"] / M["m00"])
cY = int(M["m01"] / M["m00"])

# put text and highlight the center
cv2.circle(img, (cX, cY), 5, (255, 255, 255), -1)
cv2.putText(img, "centroid", (cX - 25, cY - 25), cv2.FONT_HERSHEY_SIMPLEX, 0.5, (255, 255, 255), 2)
cv2.imwrite('./img_show.jpg', img)
c++:
//#include "opencv2/highgui/highgui.hpp"
//#include "opencv2/imgproc/imgproc.hpp"
#include <opencv2/opencv.hpp>
#include <iostream>
#include <stdio.h>
#include <stdlib.h>

using namespace cv;
using namespace std;

int main(int argc, char** argv)
{
    // Declare Mat type images
    Mat src, gray,thr;
    string img_path="/home/momenta/AI/c++_project_test/circle.png";
    //Load source image, convert it to gray
    src = imread(img_path, 1 );

    // convert image to grayscale
    cvtColor(src, gray, COLOR_BGR2GRAY );

    // convert grayscale to binary image
    threshold( gray, thr, 100,255,THRESH_BINARY );

    // find moments of the image
    Moments m = moments(thr,true);
    cv::Point2i p(m.m10/m.m00, m.m01/m.m00);

    // coordinates of centroid

    cout<< "Mat(p):"<< Mat(p)<< endl;
    cout<< "p:"<< p<< endl;
    // show the image with a point mark at the centroid
    circle(src, p, 5, Scalar(128,0,0), -1);
    p.x -= 25;
    p.y -= 25;
    cv::putText(src, "centroid", p, cv::FONT_HERSHEY_SIMPLEX, 0.5, Scalar(255, 255, 255), 2);
    imwrite("./img_show.jpg",src);
//    imshow("Image with center",src);
//    waitKey(0);
}

多个图案的;
python:
import cv2
import numpy as np
import argparse

# create object to pass argument
# arg_parse = argparse.ArgumentParser()
# arg_parse.add_argument("-i", "--ipimage", required=True,
# 	help="input image path")
# args = vars(arg_parse.parse_args())
img_path = './multiple-blob.png'
# read image through command line
img = cv2.imread(img_path)
# convert the image to grayscale
gray_image = cv2.cvtColor(img, cv2.COLOR_BGR2GRAY)
# convert the grayscale image to binary image
ret, thresh = cv2.threshold(gray_image, 127, 255, 0)
cv2.imwrite('./thresh.jpg', thresh)
# find contour in the binary image
contours, hierarchy = cv2.findContours(thresh, cv2.RETR_TREE, cv2.CHAIN_APPROX_SIMPLE)
print(hierarchy.shape)
print(hierarchy)
# [-1, -1, 1, -1;
#  2, -1, -1, 0;
#  3, 1, -1, 0;
#  4, 2, -1, 0;
#  5, 3, -1, 0;
#  7, 4, 6, 0;
#  -1, -1, -1, 5;
#  -1, 5, -1, 0]
print(len(contours))
for c in contours[1:]:
	# calculate moments for each contour
	M = cv2.moments(c)
	cX = int(M["m10"] / M["m00"])
	cY = int(M["m01"] / M["m00"])

	# calculate x,y coordinate of center
	cv2.circle(img, (cX, cY), 5, (0, 0, 0), -1)
	cv2.putText(img, "centroid", (cX - 25, cY - 25), cv2.FONT_HERSHEY_SIMPLEX, 0.5, (0, 0, 0), 2)
# 	# display the imagecv2.findContours
	cv2.imshow("Image", img)
	cv2.waitKey(0)
c++:
//#include "opencv2/highgui/highgui.hpp"
//#include "opencv2/imgproc/imgproc.hpp"
#include <opencv2/opencv.hpp>
#include <iostream>
#include <stdio.h>
#include <stdlib.h>

using namespace cv;
using namespace std;

RNG rng(12345);

void find_moments( Mat src );

int main(int argc, char** argv)
{
    string img_path="/home/momenta/AI/c++_project_test/multiple-blob.png";
    /// Load source image, convert it to gray
    Mat src, gray;
    src = imread(img_path, 1 );

    cvtColor( src, gray, COLOR_BGR2GRAY );

    Mat thresh;
    vector<vector<Point2i> > contours;
    vector<Vec4i> hierarchy;

    /// Detect edges using canny
//    Canny( gray, canny_output, 50, 150, 3 );
    // Find contours
    threshold(gray, thresh, 127,255,THRESH_BINARY );
    findContours( thresh, contours, hierarchy, RETR_TREE, CHAIN_APPROX_SIMPLE, Point(0, 0) );
    cout<<Mat(hierarchy)<<endl;
    cout<<Mat(hierarchy).size<<endl;
    /// Get the moments
    vector<Moments> mu(contours.size());
    for( int i = 0; i < contours.size(); i++ )
    { mu[i] = moments( contours[i], false ); }

    ///  Get the centroid of figures.
    vector<Point2f> mc(contours.size());
    for( int i = 0; i < contours.size(); i++ )
    {
        mc[i] = Point2f( mu[i].m10/mu[i].m00 , mu[i].m01/mu[i].m00);
    }

    /// Draw contours
    for( int i = 0; i< contours.size(); i++ )
    {
        Scalar color = Scalar(0,0,0);
//        drawContours( drawing, contours, i, color, 2, 8, hierarchy, 0, Point() );
        circle(src, mc[i], 4, color, -1, 7, 0 );
        mc[i].x -=25;
        mc[i].y -=25;
        cv::putText(src, "centroid", mc[i], cv::FONT_HERSHEY_SIMPLEX, 0.5, Scalar(0, 0, 0), 2);
    }
    /// Show the resultant image
    imwrite("./img_show.jpg", src);

    return(0);
}

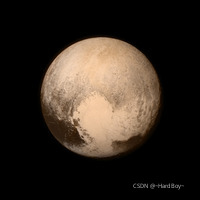
11.cv2::applyColorMap与cv::Rect切ROI
python:
import cv2
import numpy as np


def colormap_name(id):
    switcher = {
        0: "COLORMAP_AUTUMN",
        1: "COLORMAP_BONE",
        2: "COLORMAP_JET",
        3: "COLORMAP_WINTER",
        4: "COLORMAP_RAINBOW",
        5: "COLORMAP_OCEAN",
        6: "COLORMAP_SUMMER",
        7: "COLORMAP_SPRING",
        8: "COLORMAP_COOL",
        9: "COLORMAP_HSV",
        10: "COLORMAP_PINK",
        11: "COLORMAP_HOT"

    }
    return switcher.get(id, "NONE")


if __name__ == '__main__':

    im = cv2.imread("./pluto.jpg", cv2.IMREAD_GRAYSCALE)
    im_out = np.zeros((600, 800, 3), np.uint8)

    for i in range(0, 4):
        for j in range(0, 3):
            k = i + j * 4
            im_color = cv2.applyColorMap(im, k)
            cv2.putText(im_color, colormap_name(k), (30, 180), cv2.FONT_HERSHEY_DUPLEX, 0.5, (255, 255, 255), 1)

            im_out[j*200: j*200 + 200, i*200: i*200 + 200, :] = im_color

    cv2.imwrite('./im_out.jpg', im_out)
c++:
#include <opencv2/opencv.hpp>
#include <iostream>
#include <stdio.h>
#include <stdlib.h>

using namespace cv;
using namespace std;

string colormap_name(int id)
{
    switch(id){
        case COLORMAP_AUTUMN :
            return "COLORMAP_AUTUMN";
        case COLORMAP_BONE :
            return "COLORMAP_BONE";
        case COLORMAP_JET :
            return "COLORMAP_JET";
        case COLORMAP_WINTER :
            return "COLORMAP_WINTER";
        case COLORMAP_RAINBOW :
            return "COLORMAP_RAINBOW";
        case COLORMAP_OCEAN :
            return "COLORMAP_OCEAN";
        case COLORMAP_SUMMER:
            return "COLORMAP_SUMMER";
        case COLORMAP_SPRING :
            return "COLORMAP_SPRING";
        case COLORMAP_COOL :
            return "COLORMAP_COOL";
        case COLORMAP_HSV :
            return "COLORMAP_HSV";
        case COLORMAP_PINK :
            return "COLORMAP_PINK";
        case COLORMAP_HOT :
            return "COLORMAP_HOT";
    }

    return "NONE";
}

int main(){
    // Read 8-bit grayscale image
    Mat im = imread("pluto.jpg", IMREAD_GRAYSCALE);
    cout<<im.cols<<endl;
    cout<<im.rows<<endl;
    Mat im_out = Mat::zeros(600, 800, CV_8UC3);

    for (int i=0; i < 4; i++){
        for(int j=0; j < 3; j++){
            int k = i + j * 4;
            Rect temp_region = Rect(i * 200, j * 200, 200, 200);
            cout<<"temp_region lx:"<<temp_region.x<<endl;
            cout<<"temp_region ly:"<<temp_region.y<<endl;
            Mat im_color = im_out(temp_region);
            applyColorMap(im, im_color, k);
            putText(im_color, colormap_name(k), Point(30, 180), cv::FONT_HERSHEY_DUPLEX, 0.5, Scalar::all(255), 1, cv::LINE_AA);
        }
    }
    imwrite("./im_out.jpg", im_out);
    return 0;
};

12.cv::convexHull 与cv::drawContours
python:
import cv2
import numpy as np
import sys

if __name__ == "__main__":
    if(len(sys.argv)) < 2:
        file_path = "sample.jpg"
    else:
        file_path = sys.argv[1]

    # read image
    src = cv2.imread(file_path, 1)

    # show source image
    cv2.imshow("Source", src)

    # convert image to gray scale
    gray = cv2.cvtColor(src, cv2.COLOR_BGR2GRAY)

    # blur the image
    blur = cv2.blur(gray, (3, 3))

    # binary thresholding of the image
    ret, thresh = cv2.threshold(blur, 200, 255, cv2.THRESH_BINARY)

    # find contours
    contours, hierarchy = cv2.findContours(thresh, cv2.RETR_TREE, \
            cv2.CHAIN_APPROX_SIMPLE)

    # create hull array for convexHull points
    hull = []

    # calculate points for each contour
    for i in range(len(contours)):
        hull.append(cv2.convexHull(contours[i], False))

    # create an empty black image
    drawing = np.zeros((thresh.shape[0], thresh.shape[1], 3), np.uint8)

    # draw contours and hull points
    for i in range(len(contours)):
        color_contours = (0, 255, 0) # color for contours
        color = (255, 255, 255) # color for convex hull
        # draw contours
        cv2.drawContours(drawing, contours, i, color_contours, 2, 8, hierarchy)
        # draw convex hull
        cv2.drawContours(drawing, hull, i, color, 2, 8)

    cv2.imshow("Output", drawing)

    cv2.waitKey(0)
    cv2.destroyAllWindows()
c++:
//#include "opencv2/highgui/highgui.hpp"
//#include "opencv2/imgproc/imgproc.hpp"
#include <opencv2/opencv.hpp>
#include <iostream>
#include <cstdlib>

using namespace cv;
using namespace std;

int main(int argc, char** argv) {
    string image_path; // image path for input image

    if(argc < 2)
        image_path = "sample.jpg";
    else
        image_path = argv[1];

    // declare images
    Mat src, gray, blur_image, threshold_output;

    // take input image
    src = imread(image_path, 1);
    cout<<"src.rows:"<<src.rows<<endl;
    cout<<"src.cols:"<<src.cols<<endl;
    cout<<"src.channels():"<<src.channels()<<endl;
    // convert to grayscale
    cvtColor(src, gray, COLOR_BGR2GRAY);

    // add blurring to the input image
    blur(gray, blur_image, Size(3, 3));

    // binary threshold the input image
    threshold(gray, threshold_output, 200, 255, THRESH_BINARY);

    // show source image
//    namedWindow("Source", WINDOW_AUTOSIZE);
//    imshow("Source", src);

    // Convex Hull implementations
    Mat src_copy = src.clone();

    // contours vector
    vector<vector<Point>> contours;
    vector<Vec4i> hierarchy;

    // find contours for the thresholded image
    findContours(threshold_output, contours, hierarchy, RETR_TREE,
                 CHAIN_APPROX_SIMPLE, Point(0, 0));

    // create convex hull vector
    vector<vector<Point2i>> hull(contours.size());

    // find convex hull for each contour
    for(int i = 0; i < contours.size(); i++){
        convexHull(Mat(contours[i]), hull[i], false);
//        cout<<"hull[i]:"<<hull[i].size()<<endl;
    }
    // create empty black image
    Mat drawing = Mat::zeros(threshold_output.size(), CV_8UC3);

    // draw contours and convex hull on the empty black image
    for(int i = 0; i < contours.size(); i++) {
        Scalar color_contours = Scalar(0, 255, 0); // color for contours : green
        Scalar color = Scalar(255, 255, 255); // color for convex hull : white
        // draw contours
        drawContours(drawing, contours, i, color_contours, 2, 8, vector<Vec4i>(), 0, Point());
        // draw convex hull
        drawContours(drawing, hull, i, color, 2, 8, vector<Vec4i>(), 0, Point());
    }
    imwrite("./drawing.jpg",drawing);
//    namedWindow("Output", WINDOW_AUTOSIZE);
//    imshow("Output", drawing);
//
//    waitKey(0);
    return 0;
}

13.cv::Point系列与修改像素值
可以看见没有unsigned char
可以自己写一个
typedef cv::Point3_<uint8_t> Pixel;
注意的是unsigned char 打印的是ascii玛,需要转一下才能打印值,可以通过上诉形式,取像素值进行修改.
方法1:通过for循环修改像素值
void complicatedThreshold(Pixel &pixel)
{
//  if (pow(double(pixel.x)/10,2.5) > 100)
    if (double(pixel.x)/10 > 10)
    {
        pixel.x = 255;
        pixel.y = 255;
        pixel.z = 255;
    }
    else
    {
        pixel.x = 0;
        pixel.y = 0;
        pixel.z = 0;
    }
}

    for (int i = 0; i < image.rows; i++)
        {
            // Loop over all columns
            for ( int j = 0; j < image.cols; j++)
            {
                Pixel pixel = image.at<Pixel>(i,j);
                cout<<"int(pixel.x)"<<int(pixel.x)<<int(pixel.y)<<int(pixel.z)<<endl;
            // Apply complicatedTreshold
                complicatedThreshold(pixel);
            // Put result back
                image.at<cv::Vec3b>(i,j) = pixel;
            }
        }
cv::imwrite("image.jpg", image);
方法2:指针
        cv::Mat image1 = image.clone();
        Pixel* pixel = image1.ptr<Pixel>(0,0);
        // Mat objects created using the create method are stored
//        // in one continous memory block.
        const Pixel* endPixel = pixel + image1.cols * image1.rows;
//
//        // Loop over all pixels
        for (; pixel != endPixel; pixel++)
        {
            complicatedThreshold(*pixel);
        }
        cv::imwrite("image1_th.jpg", image1);


14.cv::Range切片
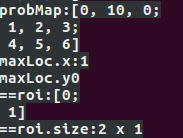
    cv::Mat probMap = (cv::Mat_<float>(3, 3) <<0,10,0,1,2,3,4,5,6);
    cv::Point maxLoc;
    double prob;
    cout<<"probMap:"<<probMap<<endl;
    cv::minMaxLoc(probMap, 0, &prob, 0, &maxLoc);
    cout<<"maxLoc.x:"<<maxLoc.x<<endl;
    cout<<"maxLoc.y"<<maxLoc.y<<endl;

    cv::Mat roi = probMap(cv::Range(0, 2), cv::Range(0, 1));
    cout<<"==roi:"<<roi<<endl;
    cout<<"==roi.size:"<<roi.size<<endl;
15.合成图片
    // 构建新图像的大小
    int width = src1.cols + src2.cols;
    int height = max(src1.rows, src2.rows);
    cv::Mat two = cv::Mat::zeros(cv::Size(width, height), src1.type());
    // 构建ROI
    cv::Rect r1(0, 0, src1.cols, src1.rows);
    cv::Rect r2(0, 0, src2.cols, src2.rows);
    cout<<"==r2.x:"<<r2.x<<endl;
    cout<<"==r2.y:"<<r2.y<<endl;
    cout<<"==r2.height:"<<r2.height<<endl;
    cout<<"==r2.width:"<<r2.width<<endl;
    r2.x = src1.cols;
    r2.y = 0;
    // 内容copy
    src1.copyTo(two(r1));
    src2.copyTo(two(r2));
    cout<<"==two.rows:"<<two.rows<<endl;
    cout<<"==two.cols:"<<two.cols<<endl;
    cv::imwrite("./merge.jpg", two);
16.遍历文件夹图片cv::glob
    std::vector<cv::String> imgs_list_path;
    // Path of the folder containing checkerboard images
    std::string img_dir_path = "../imgs/*";

    cv::glob(img_dir_path, imgs_list_path);

    for(size_t i=0; i < imgs_list_path.size(); i++){
        cout<<"imgs_list_path[i]:"<<imgs_list_path[i]<<endl;
    }