商业合作可联系:547691062@qq.com
目录
- 1车牌提取过程
- 1.1车辆图像获取
- 1.2车牌定位
- 1.3车牌字符分割
- 2车牌提取
- 2.1灰度化
- 2.2Candy边缘检测
- 2.3形态学(膨胀腐蚀)处理
- 2.4轮廓处理
- 2.5自适应二值化处理
- 3字符提取分割
车牌提取过程
一个典型的车辆牌照识别系统一般包括以下4个部分:车辆图像获取、车牌定位、车牌字符分割和车牌字符识别 。
本篇文章只介绍车牌的提取分割过程,关于如何对分割后的字符进行识别 ,请看我的另一篇WIKI ,opencv基于人工神经网络的字母识别。
车辆图像获取
车辆图像获取是车牌识别的第一步,也是很重要的一步,车辆图像的好坏对后面的工作有很大的影响。如果车辆图像的质量太差,连人眼都没法分辨,那么肯定不会被机器所识别出来。车辆图像都是在实际现场拍摄出来的,实际环境情况比较复杂,图像受天气和光线等环境影响较大,在恶劣的工作条件下系统性能将显著下降。 现有的车辆图像获取方式主要有两种:一种是由彩色摄像机和图像采集卡组成,其工作过程是:当车辆检测器(如地感线圈、红外线等)检测到车辆进入拍摄范围时,向主机发送启动信号,主机通过采集卡采集一幅车辆图像,为了提高系统对天气、环境、光线等的适应性,摄像机一般采用自动对焦和自动光圈的一体化机,同时光照不足时还可以自动补光照明,保证拍摄图片的质量;另一种是由数码照相机构成,其工作过程是:当车辆检测器检测到车辆进入拍摄范围时,直接给数码照相机发送一个信号,数码相机自动拍摄一幅车辆图像,再传到主机上,数码相机的一些技术参数可以通过与数码相机相连的主机进行设置,光照不足时也需要自动开启补光照明,保证拍摄图片的质量。
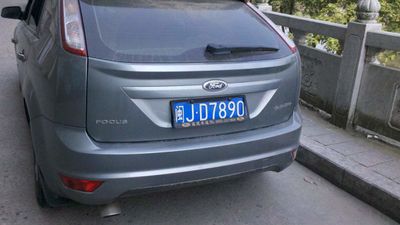
图(有车牌的图像)
车牌定位
车牌定位的主要工作是从摄入的汽车图像中找到汽车牌照所在位置,并把车牌从该区域中准确地分割出来,供字符分割使用。因此,牌照区域的确定是影响系统性能的重要因素之一,牌照的定位与否直接影响到字符分割和字符识别的准确率。目前车牌定位的方法很多,但总的来说可以分为以下4类:(1)基于颜色的分割方法,这种方法主要利用颜色空间的信息,实现车牌分割,包括彩色边缘算法、颜色距离和相似度算法等;(2)基于纹理的分割方法,这种方法主要利用车牌区域水平方向的纹理特征进行分割,包括小波纹理、水平梯度差分纹理等;(3)基于边缘检测的分割方法;(4)基于数学形态法的分割方法。 本文为了代码实现上的方便,我采用的是基于边缘检测的分割方法。主要是利用水平投影方法和垂直投影方法进行车牌定位。
车牌字符分割
要识别车牌字符,前提是先进行车牌字符的正确分割与提取。字符分割的任务是把多列或多行字符图像中的每个字符从整个图像中切割出来成为单个字符。车牌字符的正确分割对字符的识别是很关键的。传统的字符分割算法可以归纳为以下三类:直接分割法、基于识别基础上的分割法、自适应分割线类聚法。直接分割法简单,但它的局限是分割点的确定需要较高的准确性;基于识别基础上的分割法是把识别和分割结合起来,但是需要识别的高准确性,它根据分类和识别的耦合程度又有不同的划分;自适应分割线聚类法是要建立一个分类器,用它来判断图像的每一列是否是分割线,它是根据训练样本来进行自适应学习的神经网络分类器,但对于粘连字符训练困难。也有直接把字符组成的单词当作一个整体来识别的,诸如运用马尔科夫数学模型等方法进行处理,这些算法主要应用于印刷体文本识别。
车牌提取
灰度化
灰度化的概念就是将一张三通道RGB颜色的图像变成单通道灰度图,为接下来的图像处理做准备。
 //灰度化

 Mat  gray_image;

 cvtColor(image, gray_image, CV_RGB2GRAY);

 imshow("test", gray_image);
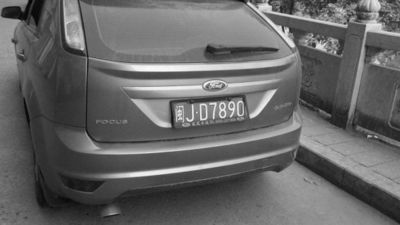 图(灰度图)
Candy边缘检测
Canny边缘检测算子的方向性质保证了很好的边缘强度估计,而且能同时产生边缘梯度方向和强度两个信息,即能在一定程度上抗噪声又能保持弱边缘,因此采用以canny算子做边缘检测。
Canny算法步骤:
(1)去噪
任何边缘检测算法都不可能在未经处理的原始数据上很好地處理,所以第一步是对原始数据与高斯 mask 作卷积,得到的图像与原始图像相比有些轻微的模糊(blurred)。这样,单独的一个像素雜訊在经过高斯平滑的图像上变得几乎没有影响。
(2)用一阶偏导的有限差分来计算梯度的幅值和方向。
(3)对梯度幅值进行非极大值抑制。
车牌细定位的目的是为下一步字符的分割做,就是要进一步去掉车牌冗余的部分。在一幅经过适当二值化处理 含有车牌的图像中,车牌区域具有以下三个基本特征:
1.在一个不大的区域内密集包含有多个字符;
2.车牌字符与车牌底色形成强烈对比;
3.车牌区域大小相对固定,区域长度和宽度成固定比例。
   //Candy/sobel 边缘检测:
    Mat candy_image;
   Canny(blur_image, candy_image, 500, 200, 3);
   //imshow("test", candy_image);
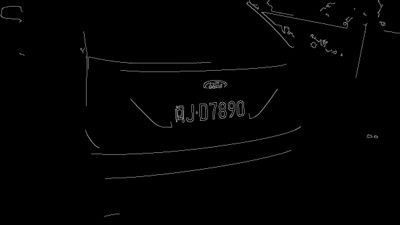 图(边缘检测)
形态学(膨胀腐蚀)处理
膨胀与腐蚀的处理效果就如其名字一样,我们通过膨胀连接相近的图像区域,通过腐蚀去除孤立细小的色块。通过这一步,我们希望将所有的车牌号字符连通起来,这样为我们接下来通过轮廓识别来选取车牌区域做准备。由于字符都是横向排列的,因此要连通这些字符我们只需进行横向的膨胀即可。
进行膨胀腐蚀操作需要注意的是要一次到位,如果一次膨胀没有连通到位,那么再次腐蚀将会将图像回复原装,因此我首先做了2次迭代的膨胀,保证数字区域能连通起来,再进行4次迭代腐蚀,尽可能多的去除小块碎片,随后2次迭代膨胀,保证膨胀次数与腐蚀次数相同,以回复连通区域形态大小。
矩形轮廓查找与筛选:经过上一步操作,理论上来说车牌上的字符连通成一个矩形区域,通过轮廓查找我们可以定位该区域。当然,更为准确的说,经过上面的操作,我们将原始图片中在X方向排列紧密的纵向边缘区域连通成了一个矩形区域,出了车牌符合这个特点外,其他一些部分如路间栏杆,车头的纹理等同样符合。因此我们会找到很多这样的区域,这就需要我们进一步根据一些关于车牌特点的先验知识对这些矩形进行进一步筛选。最终,定位车牌所在的矩形区。
        //形态学处理
	//图片膨胀处理
	Mat dilate_image, erode_image;
	//自定义 核进行 x 方向的膨胀腐蚀
	Mat elementX = getStructuringElement(MORPH_RECT, Size(25, 1));
	Mat elementY = getStructuringElement(MORPH_RECT, Size(1, 19));
	Point point(-1, -1);
	dilate(candy_image, dilate_image, elementX, point, 2);
	erode(dilate_image, erode_image, elementX, point, 4);
	dilate(erode_image, dilate_image, elementX, point, 2);

	//自定义 核进行 Y 方向的膨胀腐蚀
	erode(dilate_image, erode_image, elementY, point, 1);
	dilate(erode_image, dilate_image, elementY, point, 2);
	//imshow("test", dilate_image);
	//waitKey(1000);
	imwrite("dilate_image.jpg", dilate_image);
        //噪声处理
	//平滑处理 中值滤波
	Mat blurr_image;
	medianBlur(dilate_image, blurr_image, 15);
	medianBlur(blurr_image, blurr_image, 15);
	imshow("test", blurr_image);
 图(形态学处理)
轮廓处理
提取轮廓
        //矩形轮廓查找与筛选:
	Mat contour_image;
	//深拷贝  查找轮廓会改变源图像信息,需要重新 拷贝 图像
	contour_image = blurr_image.clone();
	vector<vector<Point>> contours;
	findContours(contour_image, contours, CV_RETR_EXTERNAL, CHAIN_APPROX_SIMPLE);
	//画出轮廓
	drawContours(contour_image, contours, -1, Scalar(255), 1);
         //轮廓表示为一个矩形  车牌提取
	Mat  roi_image;
	vector<Point> rectPoint;
	for (int i = 0; i < contours.size(); i++) {
		Rect r = boundingRect(Mat(contours[i]));
		//RotatedRect r = minAreaRect(Mat(contours[i]));
		cout << "contours " << i << "  height = " << r.height << "  width = " << r.width << "rate = " << ((float)r.width / r.height) << endl;
		if ((float)r.width / r.height >= 2.2 && (float)r.width / r.height <= 3.6) {
			cout << "r.x = " << r.x << "  r.y  = " << r.y << endl;
			rectangle(contour_image, r, Scalar(0, 0, 255), 2);
                        for (int j = 0; j < contours[i].size(); j++) {
				cout << "point = " << contours[i][j] << endl;
			}
			//rectangle(image, r, Scalar(0, 0, 255), 3);
			roi_image = image(r);
		}
	}
 图(轮廓)
图(轮廓)
自适应二值化处理
二值化的处理强化了锐利的边缘,进一步去除图像中无用的信息,使用过程中主要注意阀值的选取,我为了省事儿使用了opencv自带的自适应的的二值化处理,缺点是无用信息有点多,但车牌数字信息也会更为凸显。
cvThreshold(sobel, threshold, 0, 255, CV_THRESH_BINARY| CV_THRESH_OTSU);
最后的参数CV_THRESH_OTSU就是使用自适应算法
        //Candy 边缘检测
	Mat candy_roi_image;
	Canny(roi_gray_image, candy_roi_image, 450, 120, 3);
	imshow("test", candy_roi_image);
        //二值化
	Mat roi_threadhold_image;
	threshold(candy_roi_image, roi_threadhold_image, 50, 255, CV_THRESH_BINARY);
	imshow("test", roi_threadhold_image);
 图(二值化)
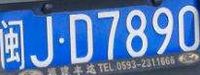
字符提取分割
像素值判断
这里主要使用水平映射和垂直映射像素进行像素级分割。
分割方法:首先判断每一列的像素值大于0的像素个数超过5个时,认为此列是有数字的,记录每列像素是否大于5,产生一个数组,数组的值有可能是一下。
a[100] = {00000001001110011111111111111100001111111111000000011111111100000000000001111110000110101011110000000000000000。。。。。。。}
这里做一个简单的水平方向的滤波,Size大小是5 ,然后对 每一个像素做处理,处理方法:
        //对数组进行滤波,减少突变概率
	for (int i = 2; i < roi_col - 1 - 2; i++) {
		if ((pixrow[i - 1] + pixrow[i - 2] + pixrow[i + 1] + pixrow[i + 2]) >= 3) {
			pixrow[i] = 1;
		}
		else if((pixrow[i - 1] + pixrow[i - 2] + pixrow[i + 1] + pixrow[i + 2]) <= 1) {
			pixrow[i] = 0;
		}
	}
如果 该像素周围为1的像素大于等于3个,不算自己 那么久认为该像素为 1, 如果 该像素周围 像素为0的个数小于等于1 ,那么就认为该像素为0
确认字符位置
//确认字符位置
	int count = 0;
	bool flage = false;
	for (int i = 0; i < roi_col - 1; i++) {
		pix = pixrow[i];
		if (pix == 1 && !flage) {
			flage = true;
			position1[count] = i;
			continue;
		}
		if (pix == 0 && flage) {
			flage = false;
			position2[count] = i;
			count++;
		}
		if (i == (roi_col - 2) && flage) {
			flage = false;
			position2[count] = i;
			count++;
		}
	}
水平映射以同样的方式完成,最后分割字符
//截取字符
	Mat licenseN = Mat(Scalar(0));
	cout << "countYY = "<< countYY << endl;
	for (int i = 0; i < countYY; i++) {
		Rect rect(licenseX[i], licenseY[i], licenseW[i], licenseH[i]);
		cout << "position = " << licenseX[i] << "  " << licenseY[i] << "  " << licenseW[i] << "  " << licenseH[i] << endl;
		licenseN = roi_threadhold_image(rect);
		imshow("test1"+i, licenseN);
		ostringstream oss;
		oss << "licenseN" << i << ".jpg";
		imwrite(oss.str(), licenseN);
		waitKey(1000);
	}


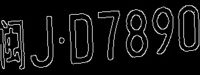
 图(分割后)
源代码
检测分割部分

#include<opencv2/opencv.hpp>
#include<opencv2/core/core.hpp>
#include<opencv2/highgui/highgui.hpp>
#include<iostream>
#include<sstream>
using namespace std;
using namespace cv;


int  main_licenseprogress(Mat & image);


//int main() {
// string path = "license/license";
// Mat image;
// for (int i = 2; i <= 2; i++) {
// ostringstream oss;
// oss << path << i << ".jpg";
// cout << "path = " << path << "str = " << oss.str() << endl;
// image = imread(oss.str(), 1);
// main_licenseprogress(image);
// }
// system("pause");
// return 0;
//}


int main_licenseprogress(Mat & image) {
imshow("test", image);
waitKey(1000);
//灰度化
Mat  gray_image;
cvtColor(image, gray_image, CV_RGB2GRAY);
imshow("test", gray_image);
imwrite("license3_gray.jpg", gray_image);

waitKey(1000);


//平滑处理 中值滤波
Mat blur_image;
medianBlur(gray_image, blur_image, 3);
imwrite("blur_image.jpg", blur_image);
//imshow("test", gray_image);
//waitKey(1000);


//自适应二值化处理  由于candy 算子产生的图像已经是二值化图像,所以这里不做处理
//Mat threadhold_image;
//threshold(blur_image, threadhold_image, 200, 255, CV_THRESH_BINARY);
//imshow("test", threadhold_image);
//waitKey(1000);


//Candy/sobel 边缘检测:
float mask[3][3] = { { 1,2,1 },{ 0,0,0 },{ -1,-2,-1 } };
Mat y_mask = Mat(3, 3, CV_32F, mask) / 8;
Mat x_mask = y_mask.t(); // 转置
Mat sobelX, sobelY;
filter2D(blur_image, sobelX, CV_32F, x_mask);
filter2D(blur_image, sobelY, CV_32F, y_mask);
sobelX = abs(sobelX);
sobelY = abs(sobelY);


Mat candy_image;
Canny(blur_image, candy_image, 500, 250, 3);
//imshow("test", candy_image);
//waitKey(1000);
//imshow("test", sobelY);
//waitKey(1000);
imwrite("candy_image.jpg", candy_image);


//形态学处理
//图片膨胀处理
Mat dilate_image, erode_image;
//自定义 核进行 x 方向的膨胀腐蚀
Mat elementX = getStructuringElement(MORPH_RECT, Size(25, 1));
Mat elementY = getStructuringElement(MORPH_RECT, Size(1, 19));
Point point(-1, -1);
dilate(candy_image, dilate_image, elementX, point, 2);
imwrite("dilate_image.jpg", dilate_image);
erode(dilate_image, erode_image, elementX, point, 4);
imwrite("erode_image.jpg", erode_image);
dilate(erode_image, dilate_image, elementX, point, 2);
imwrite("dilate_image1.jpg", dilate_image);
//自定义 核进行 Y 方向的膨胀腐蚀
erode(dilate_image, erode_image, elementY, point, 1);
imwrite("erode_image1.jpg", erode_image);
dilate(erode_image, dilate_image, elementY, point, 2);
//imshow("test", dilate_image);
//waitKey(1000);
imwrite("dilate_image2.jpg", dilate_image);
//噪声处理
//平滑处理 中值滤波
Mat blurr_image;
medianBlur(dilate_image, blurr_image, 15);
medianBlur(blurr_image, blurr_image, 15);
imshow("test", blurr_image);
waitKey(1000);


//矩形轮廓查找与筛选:
Mat contour_image;
//深拷贝  查找轮廓会改变源图像信息,需要重新 拷贝 图像
contour_image = blurr_image.clone();
vector<vector<Point>> contours;
findContours(contour_image, contours, CV_RETR_EXTERNAL, CHAIN_APPROX_SIMPLE);
//画出轮廓
drawContours(contour_image, contours, -1, Scalar(255), 1);
//imshow("test", contour_image);
//waitKey(1000);


//Mat cannyy_image;
//Canny(contour_image, cannyy_image, 500, 200, 3);


//hough 直线
//vector<Vec4i> lines;
//HoughLinesP(cannyy_image, lines, 1, CV_PI / 180, 20, 10, 0);
//for (size_t i = 0; i < lines.size(); i++) {
// Vec4i l = lines[i];
// line(image, Point(l[0], l[1]), Point(l[2], l[3]), Scalar(0, 0, 255), 1, LINE_AA);
// cout << "直线:  "<< i <<endl;
//}
//imshow("test", image);
//waitKey(1000);


//轮廓表示为一个矩形  车牌提取
Mat  roi_image;
vector<Point> rectPoint;
for (int i = 0; i < contours.size(); i++) {
Rect r = boundingRect(Mat(contours[i]));
//RotatedRect r = minAreaRect(Mat(contours[i]));
cout << "contours " << i << "  height = " << r.height << "  width = " << r.width << "rate = " << ((float)r.width / r.height) << endl;
if ((float)r.width / r.height >= 2.2 && (float)r.width / r.height <= 3.6) {
cout << "r.x = " << r.x << "  r.y  = " << r.y << endl;
rectangle(contour_image, r, Scalar(0, 0, 255), 2);
imwrite("contour_image.jpg", contour_image);
Point p1, p2, p3, p4;
p1.x = r.x;
p1.y = r.y;
p2.x = r.x + r.width;
p2.x = r.y;
p3.x = r.x + r.width;
p3.y = r.y + r.height;
p4.x = r.x;
p4.y = r.y + r.height;


rectPoint.push_back(p1);
rectPoint.push_back(p2);
rectPoint.push_back(p3);
rectPoint.push_back(p4);


for (int j = 0; j < contours[i].size(); j++) {
cout << "point = " << contours[i][j] << endl;
}
//rectangle(image, r, Scalar(0, 0, 255), 3);
roi_image = image(r);
}
}
imshow("test", roi_image);
waitKey(1000);
imwrite("roi_image.jpg", roi_image);
//图片放大
Mat large_image;
int col = roi_image.cols, row = roi_image.rows;
resize(roi_image, large_image, Size(300, 300 * row / col));
imshow("test", large_image);
waitKey(2000);
//车牌分割
//灰度化
Mat  roi_gray_image;
cvtColor(large_image, roi_gray_image, CV_RGB2GRAY);
imshow("test", roi_gray_image);
waitKey(1000);


//中值滤波 增强边缘


//Candy 边缘检测
Mat candy_roi_image;
Canny(roi_gray_image, candy_roi_image, 450, 120, 3);
imshow("test", candy_roi_image);
imwrite("candy_roi_image.jpg", candy_roi_image);
waitKey(1000);
//二值化
Mat roi_threadhold_image;
threshold(candy_roi_image, roi_threadhold_image, 50, 255, CV_THRESH_BINARY);
imshow("test", roi_threadhold_image);
waitKey(1000);
imwrite("roi_threadhold_image.jpg", roi_threadhold_image);
//平滑处理 中值滤波
//Mat roi_blurr_image;
//medianBlur(roi_threadhold_image, roi_blurr_image, 1);
//imshow("test", roi_blurr_image);
//waitKey(1000);


//查找轮廓
Mat roi_contours_image;
vector<vector<Point>> roi_contours;
roi_contours_image = roi_threadhold_image.clone();
findContours(roi_contours_image, roi_contours, CV_RETR_EXTERNAL, CHAIN_APPROX_SIMPLE);
//画出轮廓
//drawContours(roi_contours_image, roi_contours, -1, Scalar(255), 2);
//imshow("test", roi_contours_image);
//waitKey(1000);


//轮廓表示成矩形
//轮廓表示为一个矩形  车牌提取
vector<Point> roi_rectPoint;
for (int i = 0; i < roi_contours.size(); i++) {
Rect r = boundingRect(Mat(roi_contours[i]));
//RotatedRect r = minAreaRect(Mat(contours[i]));
cout << "contours " << i << "  height = " << r.height << "  width = " << r.width << "rate = " << ((float)r.width / r.height) << endl;
cout << "r.x = " << r.x << "  r.y  = " << r.y << endl;


//rectangle(large_image, r, Scalar(0, 0, 255), 1);
Point p1, p2, p3, p4;
p1.x = r.x;
p1.y = r.y;
p2.x = r.x + r.width;
p2.x = r.y;
p3.x = r.x + r.width;
p3.y = r.y + r.height;
p4.x = r.x;
p4.y = r.y + r.height;


roi_rectPoint.push_back(p1);
roi_rectPoint.push_back(p2);
roi_rectPoint.push_back(p3);
roi_rectPoint.push_back(p4);
for (int j = 0; j < roi_contours[i].size(); j++) {
cout << "point = " << roi_contours[i][j] << endl;
}
}
imshow("test", roi_threadhold_image);
waitKey(1000);


//矩形轮廓特征提取
int contours_height[30], contours_width[30];
for (int i = 0; i < roi_contours.size(); i++) {
Rect r = boundingRect(Mat(roi_contours[i]));
contours_height[i] = r.height;
contours_width[i] = r.width;
cout << "contours_height = " << r.height << " contours_width = " << r.width << endl;
}


//判断字符水平位置
int roi_col = roi_threadhold_image.cols, roi_row = roi_threadhold_image.rows, position1[50], position2[50], roi_width[50];
uchar pix;
//cout << roi_threadhold_image << endl;

//确认为1 的像素
int pixrow[1000];
for (int i = 0; i < roi_col - 1; i++) {
for (int j = 0; j < roi_row - 1; j++) {
pix = roi_threadhold_image.at<uchar>(j, i);
pixrow[i] = 0;
if (pix > 0) {
pixrow[i] = 1;
break;
}
}
}
//对数组进行滤波,减少突变概率
for (int i = 2; i < roi_col - 1 - 2; i++) {
if ((pixrow[i - 1] + pixrow[i - 2] + pixrow[i + 1] + pixrow[i + 2]) >= 3) {
pixrow[i] = 1;
}
else if((pixrow[i - 1] + pixrow[i - 2] + pixrow[i + 1] + pixrow[i + 2]) <= 1) {
pixrow[i] = 0;
}
}
//确认字符位置
int count = 0;
bool flage = false;
for (int i = 0; i < roi_col - 1; i++) {
pix = pixrow[i];
if (pix == 1 && !flage) {
flage = true;
position1[count] = i;
continue;
}
if (pix == 0 && flage) {
flage = false;
position2[count] = i;
count++;
}
if (i == (roi_col - 2) && flage) {
flage = false;
position2[count] = i;
count++;
}
}
//记录所有字符宽度
for (int n = 0; n < count; n++) {
cout << " position1 = " << position2[n] <<" position2 = "<< position2[n] << "distance =" << (position2[n] - position1[n]) << endl;
roi_width[n] = position2[n] - position1[n];
}
// 减去最大值,最小值
int max = roi_width[0], max_index = 0;
int min = roi_width[0], min_index = 0;
for (int n = 1; n < count; n++) {
if (max < roi_width[n]) {
max = roi_width[n];
max_index = n;
}
if (min > roi_width[n]) {
min = roi_width[n];
min_index = n;
}
}
int index = 0;
int new_roi_width[50];
for (int i = 0; i < count; i++) {
if (i == min_index || i == max_index) {


}
else {
new_roi_width[index] = roi_width[i];
index++;
}
}
cout << "count = " << count << endl;
for (int i = 0; i < count - 2; i++) {
cout << "new roi width = " << new_roi_width[i] << endl;
}
//取后面三个值的平均值:
int avgre = (int)((new_roi_width[count - 3] + new_roi_width[count - 4] + new_roi_width[count - 5]) / 3.0);
cout << avgre << endl;
//for (int i = count-3; i < count - 6; i--) {
//if (i < 0) {
// break;
//}
//cout << "count = " << new_roi_width[i] << endl;
//}
//字母位置信息确认
int licenseX[10], licenseW[10], licenseNum = 0;
int countX = 0;
for (int i = 0; i < count; i++) {
if (roi_width[i] > (avgre - 8) && roi_width[i] < (avgre + 8)) {
licenseX[licenseNum] = position1[i];
licenseW[licenseNum] = roi_width[i];
licenseNum++;
cout << "licenseX = " << licenseX[i] << "  roi_width  =" << roi_width[i] << endl;
continue;
}
if (roi_width[i] > (avgre * 2 - 10) && roi_width[i] < (avgre * 2 + 10)) {
licenseX[licenseNum] = position1[i];
licenseW[licenseNum] = roi_width[i];
licenseNum++;
cout << "licenseX = " << licenseX[i] <<"  roi_width  ="<< roi_width[i]<< endl;
}
}


 //判断字符垂直位置
int licenseY[10], licenseH[10];
int position3[10], position4[10];
//确认为1 的像素
int countYY = 0;
int pixcol[1000], row_height[10];
for (int temp = 0; temp < licenseNum; temp++) {
for (int i = 0; i < roi_row - 1; i++) {
for (int j = licenseX[temp]; j < (licenseX[temp]+ licenseW[temp]); j++) {
pix = roi_threadhold_image.at<uchar>(i, j);
pixcol[i] = 0;
if (pix > 0) {
pixcol[i] = 1;
break;
}
}
}
//对数组进行滤波,减少突变概率
for (int i = 2; i < roi_row - 1 - 2; i++) {
if ((pixcol[i - 1] + pixcol[i - 2] + pixcol[i + 1] + pixcol[i + 2]) >= 3) {
pixcol[i] = 1;
}
else if ((pixcol[i - 1] + pixcol[i - 2] + pixcol[i + 1] + pixcol[i + 2]) <= 1) {
pixcol[i] = 0;
}
}
//确认字符位置
int countY = 0;
bool flage2 = false;
for (int i = 0; i < roi_row - 1; i++) {
pix = pixcol[i];
if (pix == 1 && !flage2) {
flage2 = true;
position3[countY] = i;
continue;
}
if (pix == 0 && flage2) {
flage2 = false;
position4[countY] = i;
countY++;
}
}

//记录所有字符宽度
for (int n = 0; n < countY; n++) {
cout << " position3 = " << position3[n] << " position4 = " << position4[n] << "distance =" << (position4[n] - position3[n]) << endl;
row_height[countYY] = position4[n] - position3[n];
licenseY[countYY] = position3[n];
licenseH[countYY] = row_height[countYY];
}
countYY++;
}

//截取字符
Mat licenseN = Mat(Scalar(0));
cout << "countYY = "<< countYY << endl;
for (int i = 0; i < countYY; i++) {
Rect rect(licenseX[i], licenseY[i], licenseW[i], licenseH[i]);
cout << "position = " << licenseX[i] << "  " << licenseY[i] << "  " << licenseW[i] << "  " << licenseH[i] << endl;
licenseN = large_image(rect);
imshow("test1"+i, licenseN);
ostringstream oss;
oss << "licenseN" << i << ".jpg";
imwrite(oss.str(), licenseN);
waitKey(1000);
}


cout << "license plate process" << endl;
return 0;
}


识别部分:

#include<opencv2/opencv.hpp>
#include<opencv2/core/core.hpp>
#include<opencv2/highgui/highgui.hpp>
#include <opencv2/ml/ml.hpp>
#include<iostream>
#include<sstream>
using namespace std;
using namespace cv;
using namespace ml;


float sumMatValue(const Mat & image) {
float sumValue = 0;
int r = image.rows;
int c = image.cols;
if (image.isContinuous()) {
c = r*c;
r = 1;
}
for (int i = 0; i < r; i++) {
const uchar *linePtr = image.ptr<uchar>(i);
for (int j = 0; j < c; j++) {
sumValue += linePtr[j];
}
}
return sumValue;
}
void calcGradientFeat(Mat & imgSrc, vector<float> & feat) {
Mat image;
cvtColor(imgSrc, image, CV_BGR2GRAY);
resize(image, image, Size(8, 16));
float mask[3][3] = { { 1,2,1 },{ 0,0,0 },{ -1,-2,-1 } };
Mat y_mask = Mat(3, 3, CV_32F, mask) / 8;
Mat x_mask = y_mask.t(); // 转置
Mat sobelX, sobelY;


filter2D(image, sobelX, CV_32F, x_mask);
filter2D(image, sobelY, CV_32F, y_mask);
sobelX = abs(sobelX);
sobelY = abs(sobelY);


float totleValueX = sumMatValue(sobelX);
float totleValueY = sumMatValue(sobelY);
for (int i = 0; i < image.rows; i = i + 4)
{
for (int j = 0; j < image.cols; j = j + 4)
{
Mat subImageX = sobelX(Rect(j, i, 4, 4));
feat.push_back(sumMatValue(subImageX) / totleValueX);
Mat subImageY = sobelY(Rect(j, i, 4, 4));
feat.push_back(sumMatValue(subImageY) / totleValueY);
}
}


Mat img2;
resize(image, img2, Size(4, 8));
int r = img2.rows;
int c = img2.cols;
if (img2.isContinuous()) {
c = r*c;
r = 1;
}
for (int i = 0; i < r; i++) {
const uchar *linePtr = img2.ptr<uchar>(i);
for (int j = 0; j < c; j++) {
feat.push_back(linePtr[j]);
}
}
//       cout<<sobelX<<endl;
//     cout<<sobelY<<endl;
// cout<< x_mask<<endl;
// cout<<img2<<endl;
// for(int i=0; i<feat[num].size(); i++)
//   {
//           cout<<feat[i]<<endl;
//   }
//       imshow("cat", img2);
//       cout<<"sumValue ="<<sumMatValue(image)<<endl;
}


Ptr<StatModel> buildMLPClassifier(Mat & input, Mat & output) {
Ptr<ANN_MLP> model;
//train classifier;
int layer_sz[] = { input.cols, 100 , output.cols };
int nlayers = (int)(sizeof(layer_sz) / sizeof(layer_sz[0]));
Mat layer_sizes(1, nlayers, CV_32S, layer_sz);
int method;
double method_param;
int max_iter;
if (1) {
method = ANN_MLP::BACKPROP;
method_param = 0.01;
max_iter = 100;
}
else {
method = ANN_MLP::RPROP;
method_param = 0.1;
max_iter = 1000;
}
Ptr<TrainData> tData = TrainData::create(input, ROW_SAMPLE, output);
model = ANN_MLP::create();
cout << "create success" << endl;
model->setLayerSizes(layer_sizes);
model->setActivationFunction(ANN_MLP::SIGMOID_SYM, 0, 0);
model->setTermCriteria(TermCriteria(TermCriteria::MAX_ITER + TermCriteria::EPS, max_iter, FLT_EPSILON));
//setIterCondition(max_iter, 0);
model->setTrainMethod(method, method_param);
cout << "train data in process ...."<<endl;
model->train(tData);
cout << "train success" << endl;
model->save("mlp1.xml");
return model;
}
Ptr<StatModel> loadMLPClassifiler() {


Ptr<ANN_MLP> model = Algorithm::load<ANN_MLP>("mlp1.xml");
return model;
}


int main_num_reconginzed()
{
Mat image;
vector<float>feats;
vector<float>test, test1;
string path = "code/python_image_learn/identfying_code_recognize/charSamples/";
int num = 0;
int classfilternum = 34;
int modlenum = 30;
for (int i = 0; i < classfilternum; i++) {
for (int j = 0; j < modlenum; j++) {
ostringstream oss;
oss << path << i << "/" << j << ".png";
//cout<<oss.str()<<endl;
image = imread(oss.str());
calcGradientFeat(image, feats);
num++;


if (i == 11 && j == 10) {
ostringstream oss;
oss << path << i << "/" << (j + 1) << ".png";
//cout<<oss.str()<<endl;
image = imread(oss.str());
calcGradientFeat(image, test);
}
}
}
Mat input, output;
input = Mat(classfilternum*modlenum, 48, CV_32F);
output = Mat(classfilternum*modlenum, classfilternum, CV_32F, Scalar(0));
int r = input.rows;
int c = input.cols;
if (input.isContinuous()) {
c = r*c;
r = 1;
}
for (int i = 0; i < r; i++) {
float *linePtr = input.ptr<float>(i);
for (int j = 0; j < c; j++) {
linePtr[j] = feats[c*i + j];
}
}
for (int i = 0; i < output.rows; i++) {
float *lineoutput = output.ptr<float>(i);
lineoutput[i / modlenum] = 1;
}


//if(
//Ptr<StatModel> model = buildMLPClassifier(input, output);
Ptr<StatModel> model = loadMLPClassifiler();
float response = model->predict(test, test1);
cout << "response = " << response << endl;
for (int i = 0; i < test1.size(); i++)
{
cout << "test1 = " << test1[i] << endl;
}
//cout<<input<<endl;
//cout<<"rows = "<<input.rows<<"col = "<<input.cols<<endl;
//cout<<output<<endl;
    waitKey(0);                    //等待按键
system("pause");
return 0;
}
https://blog.csdn.net/jinshengtao/article/details/17883075
商业合作可联系:547691062@qq.com
本文内容由网友自发贡献,版权归原作者所有,本站不承担相应法律责任。如您发现有涉嫌抄袭侵权的内容,请联系:hwhale#tublm.com(使用前将#替换为@)