链表逆序的本质就是把没一个节点原本指向的下一个节点的next指针倒转过来,指向它的前置节点
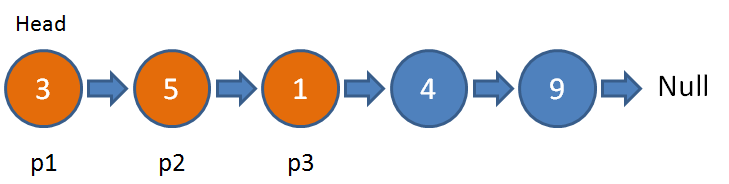
让我们从链表头部开始,建立三个临时节点的引用,分别为p1,p2,p3。它们分别指向头节点、第二个节点、第三个节点。
实现链表逆序的完整步骤如下:
1.以p2节点为视角,把p2节点原本指向p3的next指针倒转,指向p1。

2.三个临时节点引用p1,p2,p3分别向后移动一格位置。

3.重复第1步的工作,以p2节点为视角,把p2节点原本指向p3的next指针倒转,指向p1。

4.重复第2步的工作,三个临时节点引用p1,p2,p3分别向后移动一格位置。

.......
.......
5.继续像这样子迭代下去,一直到p2是空为止。

6.最后,把head节点的next指向空,成为逆序链表的尾节点。并且把p1赋值给head,让p1所在的节点成为逆序链表的头节点。

 private static Node head;

    public static void reverseLinkedList() {
        if (head == null || head.next == null) return;
        Node p1 = head;
        Node p2 = head.next;
        Node p3 = null;
        while (p2 != null) {
            p3 = p2.next;
            p2.next = p1;
            p1 = p2;
            p2 = p3;
        }
        head.next = null;
        head = p1;
    }

    private static class Node {
        int data;
        Node next;
        Node(int data) {
            this.data = data;
        }
    }

    public static void main(String[] args) {/*初始化链表*/
        head = new Node(3);
        head.next = new Node(5);
        Node temp = head.next;
        temp.next = new Node(1);
        temp = temp.next;
        temp.next = new Node(4);
        temp = temp.next;
        temp.next = new Node(9);/*逆序前输出链表*/
        temp = head;
        while (temp != null) {
            System.out.println(temp.data);
            temp = temp.next;
        }/*逆序链表*/
        System.out.println("------------------");
        reverseLinkedList();/*逆序后输出链表*/
        temp = head;
        while (temp != null) {
            System.out.println(temp.data);
            temp = temp.next;
        }
    }
本文内容由网友自发贡献,版权归原作者所有,本站不承担相应法律责任。如您发现有涉嫌抄袭侵权的内容,请联系:hwhale#tublm.com(使用前将#替换为@)