一、前言
最近学习了SpringBoot分页查询的两种写法,一种是手动实现,另一种是使用框架实现。现在我将具体的实现流程分享一下。
二、手动实现分页查询
先复习一下,SQL中的limit关键字,下面一行sql语句的意思是从第二个数据开始查,查询出两条数据
SELECT * FROM map limit 1,2;
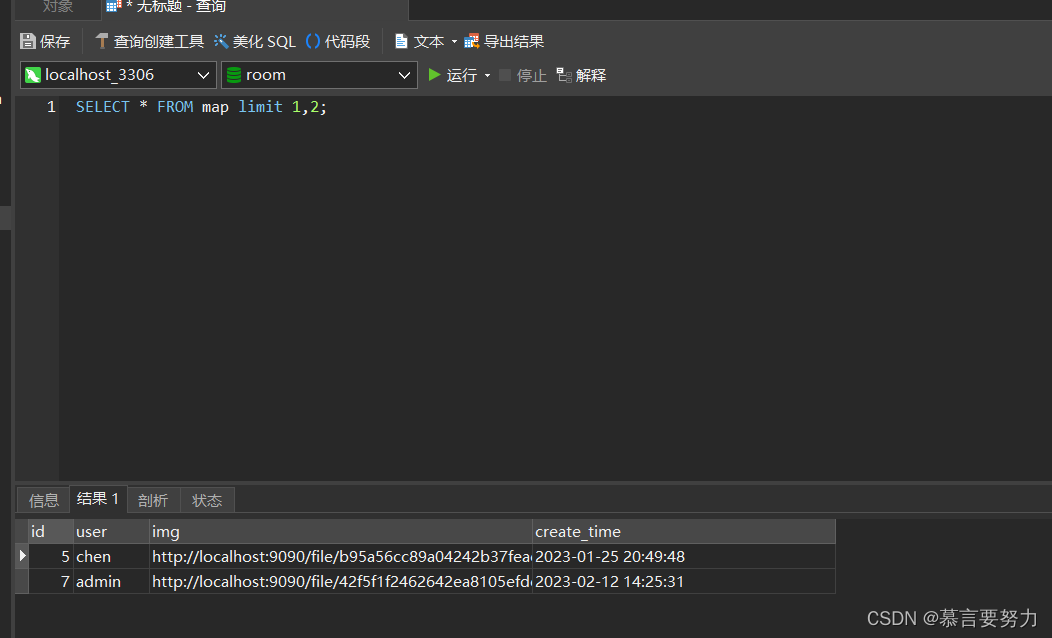
使用limit前一个参数pageNum是从第几个数据开始查,后一个参数pageSize是查询多少条数据,注意数据库查询pageNum=0代表第一个数据。
那么在Springboot中该如何写呢?
三、了解@RequestParam
1.什么是@RequestParam
- @RequestParam:将请求参数绑定到你控制器的方法参数上(是springmvc中接收普通参数的注解)
2.语法
语法:@RequestParam(value=”参数名”,required=”true/false”,defaultValue=””)

value:参数名

required:是否包含该参数,默认为true,表示该请求路径中必须包含该参数,如果不包含就报错。

defaultValue:默认参数值,如果设置了该值,required=true将失效,自动为false,如果没有传该参数,就使用默认值
3.测试环境
环境:jdk1.8 Tomcat8.5  idea2018  manven父工程子模块

步骤:
1、创建web工程、引入依赖
2、配置SpringMvc入口文件 --DispatcherServlet--为总调度、web.xml里配置
3、创建Springmvc.xml文件--理解为:适配器(这里不需要自已指定适配、springmvc会自动指定)--视图解析器
4、创建 业务处理器 Controller类
5、测试
四、了解QueryWrapper
1.QueryWrapper是什么?
QueryWrapper就是在使用Mybatis-plus中真实用到的一种技术,也叫作构造器,能简化sql的操作。
2.常用方法总结
1、单表操作
代码如下(示例):我要查询姓名、班级、年龄符合前端传过来参数的数据并进行排序。
@GetMapping("/list")
public TableDataInfo list(Student student){
	LambdaQueryWrapper<Student> lqw = new LambdaQueryWrapper<Student>();
	lqw.eq(Student::getName, student.getName());
	lqw.like(Student::getClass,student.getClass());
	lqw.between("age",student.getAge1(),student.getAge2());
	lqw.orderByAsc("age");
	List<Student> list = studentService.list(lqw);
}
以上代码对应的sql为:
select * from student where name = '?' and class like '%?%' and age between '?' and '?' order by '?' asc
由此可以看出,QueryWrapper其实可以理解成一个放查询条件的盒子,我们把查询条件放在里面,他就会自动按照对应的条件进行查询数据。
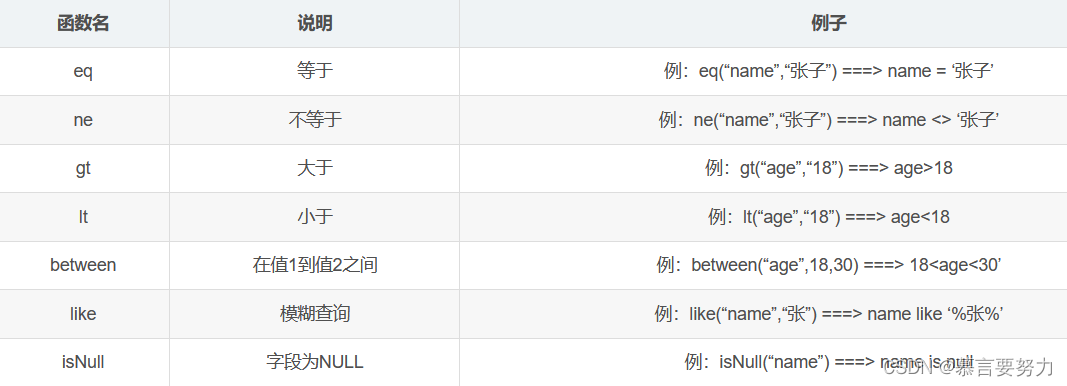
根据不同的查询要求,有不同的用法,常用到的比如:eq、like、and、or、isNull、isNotNull、ne、likeRight、between等;使用方法及说明见下图。
2、多表操作
//Controller
@GetMapping("/listAndClass")
public TableDataInfo listAndClass(Student student)
{
    QueryWrapper<Student > qw = new QueryWrapper<Student >();
    if(StringUtils.isNotBlank(student.getName())){
        qw.eq("s.name",student.getName());
    }
    if(StringUtils.isNotBlank(student.getClassName())){
        qw.like("c.name",student.getClassName());
    }
    startPage();
    List<Student > list = studentService.listAndClass(qw);
    return getDataTable(list);
}

//Service
 List<Student> listAndClass(QueryWrapper<Student> qw);

//Service impl
@Override
public List<Student> listAndClass(QueryWrapper<Student> qw) {
    return this.getBaseMapper().listAndClass(qw);
}

//Mapper
@Select("select s.*,c.name from student s left join class c on s.id = c.student_id "+
        "${ew.customSqlSegment}")
List<YwSpaqjgDj> listAndClass(@Param(Constants.WRAPPER) QueryWrapper<Student> qw);
五.SpringBoot实现分页查询
1.创建UserController
import cn.hutool.core.util.StrUtil;
import com.baomidou.mybatisplus.core.conditions.query.QueryWrapper;
import com.baomidou.mybatisplus.extension.plugins.pagination.Page;
import com.example.demo.common.Constants;
import com.example.demo.common.Result;
import com.example.demo.controller.dto.UserDTO;
import com.example.demo.entity.User;
import com.example.demo.service.IUserService;
import com.example.demo.utils.TokenUtils;
import org.springframework.web.bind.annotation.*;

import javax.annotation.Resource;
import java.util.List;

@CrossOrigin
@RestController
@RequestMapping("/user")
public class UserController {

    @Resource
    private IUserService userService;

    @PostMapping("/login")
    public Result login(@RequestBody UserDTO userDTO) {
        String username = userDTO.getUsername();
        String password = userDTO.getPassword();
        if (StrUtil.isBlank(username) || StrUtil.isBlank(password)) {
            return Result.error(Constants.CODE_400,"参数错误");
        }
        UserDTO dto = userService.login(userDTO);
        return Result.success(dto);
    }

    @PostMapping("/register")
    public Result register(@RequestBody UserDTO userDTO) {
        String username = userDTO.getUsername();
        String password = userDTO.getPassword();
        if (StrUtil.isBlank(username) || StrUtil.isBlank(password)) {
            return Result.error(Constants.CODE_400,"参数错误");
        }
        return Result.success(userService.register(userDTO));
    }

    //新增或者更新
    @PostMapping
    public Result save(@RequestBody User user) {
        String username = user.getUsername();
        if (StrUtil.isBlank(username)) {
            return Result.error(Constants.CODE_400, "参数错误");
        }
        if (user.getId() != null) {
            user.setPassword(null);
        } else {
            user.setNickname(user.getUsername());
            if (user.getPassword() == null) {
                user.setPassword("123456");
            }
        }
        return Result.success(userService.saveOrUpdate(user));
    }

    //删除
    @DeleteMapping("/{id}")
    public Result delete(@PathVariable Integer id) {
        return Result.success(userService.removeById(id));
    }

    @PostMapping("/del/batch")
    public Result deleteBatch(@RequestBody List<Integer> ids) {//批量删除
        return Result.success(userService.removeByIds(ids));
    }

    @GetMapping("/{id}")
    public Result findOne(@PathVariable Integer id) {
        return Result.success(userService.getById(id));
    }

    @GetMapping("/username/{username}")
    public Result findOne(@PathVariable String username) {
        QueryWrapper<User> queryWrapper = new QueryWrapper<>();
        queryWrapper.eq("username", username);
        return Result.success(userService.getOne(queryWrapper));
    }

}
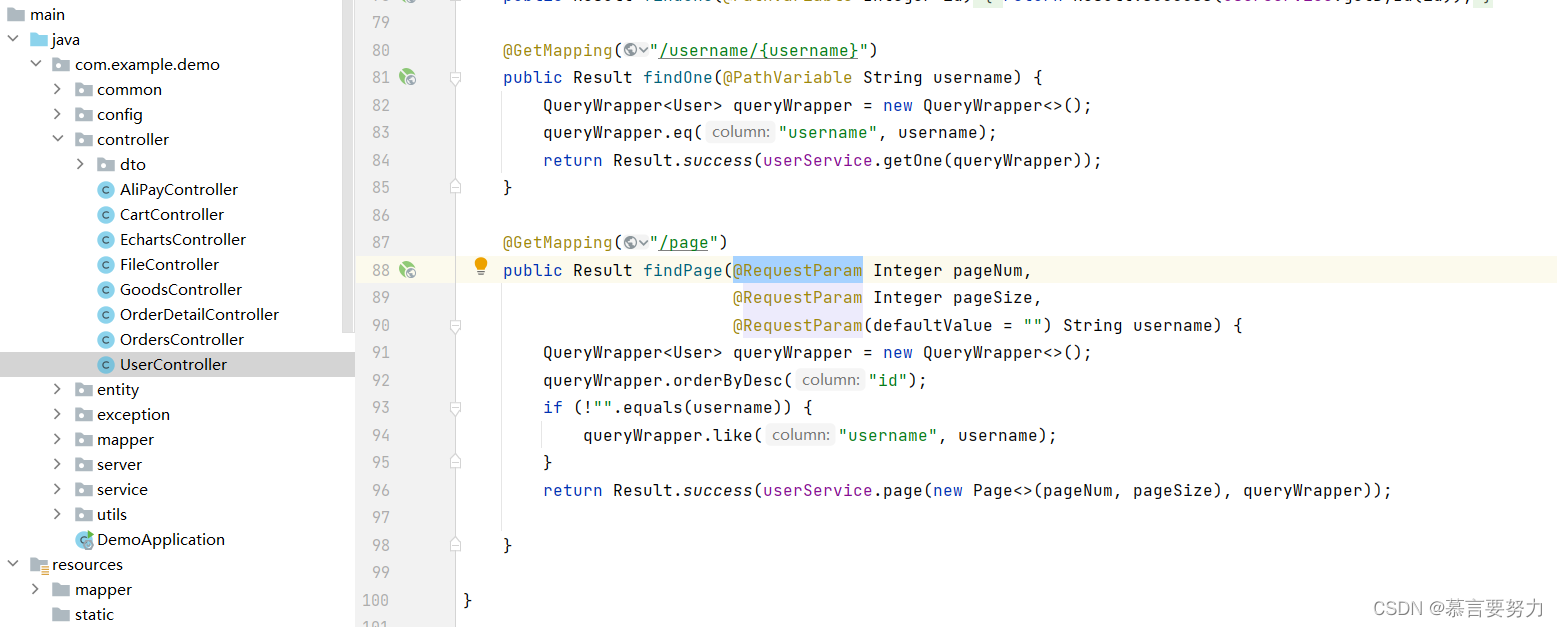
并在Controller里面写好page接口
@GetMapping("/page")
    public Result findPage(@RequestParam Integer pageNum,
                           @RequestParam Integer pageSize,
                           @RequestParam(defaultValue = "") String username) {
        QueryWrapper<User> queryWrapper = new QueryWrapper<>();
        queryWrapper.orderByDesc("id");
        if (!"".equals(username)) {
            queryWrapper.like("username", username);
        }
        return Result.success(userService.page(new Page<>(pageNum, pageSize), queryWrapper));

    }
不难看出我们是根据数据库的id进行查询出数据库的数据
queryWrapper.orderByDesc("id")
六、了解equals
1.什么是equals
equals():equals是Object中的方法,用于检测一个对象是否等于另一个对象,在Object中equals方法实际"ruturn (this==obj)",用到的还是"==",说明如果对象不重写equals方法,实际该对象的equals和"=="作用是一样的,都是比较的地址值(因为"=="比较的就是地址值),但是大部分类都会重写父类的equals方法,用来检测两个对象是否相等,即两个对象的内容是否相等,例如String就重写了equals方法,用来比较两个字符串内容是否相同。看以下代码:
public static void main(String[] args) {
    Object o = new Object();
    Object o1 = o;
    Object o2 = o;
    System.out.println(o3.equals(o2));
}
代码输出:true
所以我们是使用 equals来确定我们查询数据的对象,所以我们这里选择使用username来查询数据库里面的具体数据
if (!"".equals(username)) {
            queryWrapper.like("username", username);
        }
七、前端使用
1.前端技术栈
对于前端,我们使用的是Vue+Element来进行功能实现,对于跨域的处理我使用的是axios进行处理,并且对axios进行了封装,具体步骤请查看:解决SpringBoot和前端Vue的跨域问题_慕言要努力的博客-CSDN博客
2.组件使用
我选用的是Element官网的组件来进行数据渲染
我们进行组件使用,并且设置分页的数据数量,数据可分为一页5条、10条以及15条

<div style="padding: 10px 0">
      <el-pagination
          @size-change="handleSizeChange"
          @current-change="handleCurrentChange"
          :current-page="pageNum"
          :page-sizes="[ 5, 10, 15]"
          :page-size="pageSize"
          layout="total, sizes, prev, pager, next, jumper"
          :total="total">
      </el-pagination>
    </div>
3.数据渲染
我们默认查询处理的数据是0,设置页数为一页,一页为5条数据

data() {
    return {
      tableData: [],
      total: 0,
      pageNum: 1,
      pageSize: 5,
      username: "",
      form: {},
      dialogFormVisible: false,
      multipleSelection: [],
      headerBg: "headerBg",
      roles: []
    }
  }
最后进行数据请求,请求后台写好的page接口

methods: {
    load: function () {
      this.request.get("/user/page", {
        params: {
          pageNum: this.pageNum,
          pageSize: this.pageSize,
          username: this.username,
        }
      }).then(res => {
        this.tableData = res.data.records
        this.total = res.data.total
      })
      this.request.get("/role").then(res => {
        this.roles = res.data
      })
    }
}
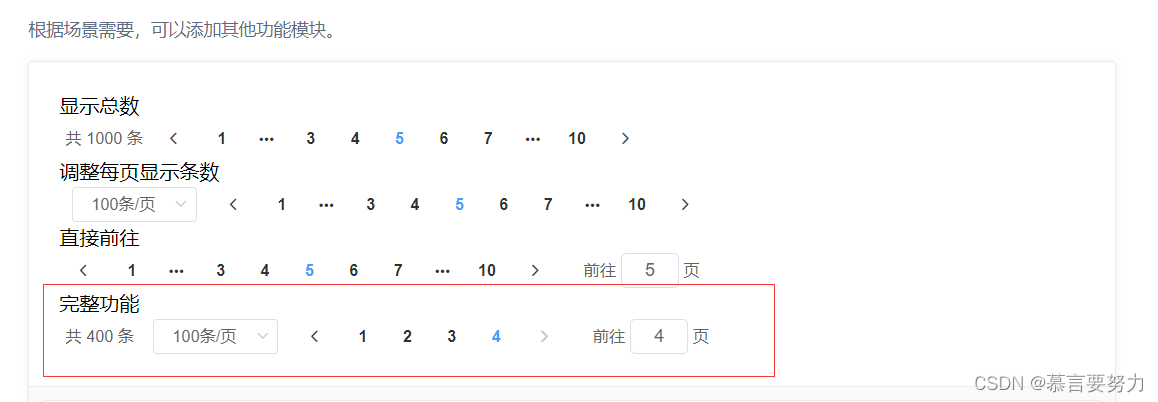
八、功能展示

最后附上前端完整代码
<template>
  <div>
    <div style="margin: 10px 0">
      <el-input style="width: 200px; margin-left: 10px" placeholder="请输入用户名" clearable suffix-icon="el-icon-user" v-model="username" ></el-input>
      <el-button class="ml-5" type="primary" @click="load"><i class="el-icon-search" />搜索</el-button>
      <el-button type="warning" @click="reset"><i class="el-icon-refresh" />刷新</el-button>
    </div>
    <div style="margin: 10px 0">
      <el-button type="primary" @click="handleAdd" class="ml-10"><i class="el-icon-circle-plus-outline" />新增</el-button>
      <el-popconfirm
          class="ml-5"
          confirm-button-text='确认'
          cancel-button-text='取消'
          icon="el-icon-info"
          icon-color="red"
          title="确定批量删除这些信息吗?"
          @confirm="delBatch">
        <el-button type="danger" slot="reference" ><i class="el-icon-remove-outline" />删除</el-button>
      </el-popconfirm>
      <el-upload action="http://localhost:9090/user/import" :show-file-list="false" accept=".xlsx"
                 :on-success="handleExcelImportSuccess" style="display: inline-block">
        <el-button type="primary" class="ml-5"><i class="el-icon-upload"></i>导入</el-button>
      </el-upload>
      <el-button type="primary" class="ml-5" @click="exp"><i class="el-icon-download" />导出</el-button>
    </div>
    <el-table :data="tableData" border stripe :header-cell-class-name="headerBg"
              @selection-change="handleSelectionChange">
      <el-table-column type="selection" width="55"></el-table-column>
      <el-table-column prop="username" label="用户名" ></el-table-column>
      <el-table-column prop="nickname" label="昵称" ></el-table-column>
      <el-table-column prop="email" label="邮箱" ></el-table-column>
      <el-table-column prop="phone" label="联系方式" ></el-table-column>
      <el-table-column prop="address" label="地址"></el-table-column>
<!--      <el-table-column prop="role" label="身份"></el-table-column>-->
      <el-table-column label="操作">
        <template slot-scope="scope">
          <el-button type="success" @click="handleEdit(scope.row)"><i class="el-icon-edit-outline" />编辑</el-button>
        </template>
      </el-table-column>
    </el-table>
    <div style="padding: 10px 0">
      <el-pagination
          @size-change="handleSizeChange"
          @current-change="handleCurrentChange"
          :current-page="pageNum"
          :page-sizes="[ 5, 10, 15]"
          :page-size="pageSize"
          layout="total, sizes, prev, pager, next, jumper"
          :total="total">
      </el-pagination>
    </div>
    <el-dialog title="用户信息" :visible.sync="dialogFormVisible" width="30%">
      <el-form :model="form" label-width="100px" size="small">
        <el-form-item label="用户名" >
          <el-input v-model="form.username" autocomplete="off"></el-input>
        </el-form-item>
        <el-form-item label="昵称" >
          <el-input v-model="form.nickname" autocomplete="off"></el-input>
        </el-form-item>
        <el-form-item label="邮箱" >
          <el-input v-model="form.email" autocomplete="off"></el-input>
        </el-form-item>
        <el-form-item label="联系方式" >
          <el-input v-model="form.phone" autocomplete="off"></el-input>
        </el-form-item>
        <el-form-item label="地址" >
          <el-input v-model="form.address" autocomplete="off"></el-input>
        </el-form-item>
      </el-form>
      <div slot="footer" class="dialog-footer">
        <el-button @click="dialogFormVisible = false">取 消</el-button>
        <el-button type="primary" @click="save">确 定</el-button>
      </div>
    </el-dialog>
  </div>
</template>

<script>
export default {
  name: "User",
  data() {
    return {
      tableData: [],
      total: 0,
      pageNum: 1,
      pageSize: 5,
      username: "",
      form: {},
      dialogFormVisible: false,
      multipleSelection: [],
      headerBg: "headerBg",
      roles: []
    }
  },
  created() {
    this.load()
  },
  methods: {
    load: function () {
      this.request.get("/user/page", {
        params: {
          pageNum: this.pageNum,
          pageSize: this.pageSize,
          username: this.username,
        }
      }).then(res => {
        this.tableData = res.data.records
        this.total = res.data.total
      })
      this.request.get("/role").then(res => {
        this.roles = res.data
      })
    },
    home() {
      this.$router.push("/")
    },
    save() {
      this.request.post("/user", this.form).then(res => {
        if (res.code === '200') {
          this.$message.success("保存成功")
          this.dialogFormVisible = false
          this.load()
        } else {
          this.$message.error("保存失败")
        }
      })
    },
    handleAdd() {
      this.dialogFormVisible = true
      this.form = {}
    },
    handleEdit(row) {
      this.form = row
      this.dialogFormVisible = true
    },
    handleSelectionChange(val) {
      console.log(val)
      this.multipleSelection = val;
    },
    exp() {
      window.open("http://localhost:9090/user/export")
    },
    handleExcelImportSuccess() {
      this.$message.success("文件导入成功")
      this.load()
    },
    delBatch() {
      let ids = this.multipleSelection.map(v => v.id)  //[{}, {}, {}] => [1,2,3]
      this.request.post("/user/del/batch", ids).then(res => {
        if (res.code === '200') {
          this.$message.success("删除用户成功")
          this.load()
        } else {
          this.$message.error("删除用户失败")
        }
      })
    },
    reset() {
      this.username = ""
      this.load()
    },
    handleSizeChange(pageSize) {
      console.log(pageSize)
      this.pageSize = pageSize
      this.load()
    },
    handleCurrentChange(pageNum) {
      console.log(pageNum)
      this.pageNum = pageNum
      this.load()
    },
  }
}
</script>

<style>
.headerBg {
  background: #eee!important;
}
</style>
⛵小结
以上就是对SpringBoot整合mybatis-plus实现分页查询简单的概述,现在我们的项目就更加的趋于完美了,也提升了我们对于编程的能力和思维!
如果这篇文章有帮助到你,希望可以给作者点个赞👍,创作不易,如果有对后端技术、前端领域感兴趣的,也欢迎关注 ,我将会给你带来巨大的收获与惊喜💝💝💝!
本文内容由网友自发贡献,版权归原作者所有,本站不承担相应法律责任。如您发现有涉嫌抄袭侵权的内容,请联系:hwhale#tublm.com(使用前将#替换为@)