一. @Autowired的作用
@Autowired常用来作属性的注入,可以作用在构造方法、普通方法、字段、注解、参数上。
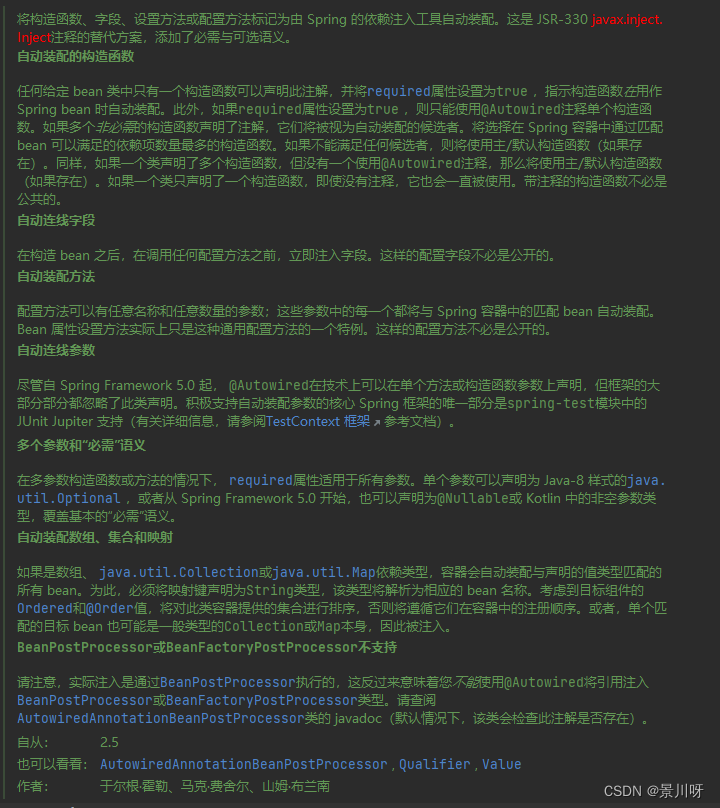
将构造函数、字段、设置方法或配置方法标记为由Spring 的依赖注入工具自动装配。
@Autowired注解做过开发的肯定都很常用了,具体作用和用法就不再多说了。Spring中AutowiredAnnotationBeanPostProcessor 处理器负责处理@Autowired注解相关注入。
二. 源码浅读
package org.springframework.beans.factory.annotation;

import java.lang.annotation.Documented;
import java.lang.annotation.ElementType;
import java.lang.annotation.Retention;
import java.lang.annotation.RetentionPolicy;
import java.lang.annotation.Target;

/**
 * Marks a constructor, field, setter method, or config method as to be autowired by
 * Spring's dependency injection facilities. This is an alternative to the JSR-330
 * {@link javax.inject.Inject} annotation, adding required-vs-optional semantics.
 *
 * <h3>Autowired Constructors</h3>
 * <p>Only one constructor of any given bean class may declare this annotation with the
 * {@link #required} attribute set to {@code true}, indicating <i>the</i> constructor
 * to autowire when used as a Spring bean. Furthermore, if the {@code required}
 * attribute is set to {@code true}, only a single constructor may be annotated
 * with {@code @Autowired}. If multiple <i>non-required</i> constructors declare the
 * annotation, they will be considered as candidates for autowiring. The constructor
 * with the greatest number of dependencies that can be satisfied by matching beans
 * in the Spring container will be chosen. If none of the candidates can be satisfied,
 * then a primary/default constructor (if present) will be used. Similarly, if a
 * class declares multiple constructors but none of them is annotated with
 * {@code @Autowired}, then a primary/default constructor (if present) will be used.
 * If a class only declares a single constructor to begin with, it will always be used,
 * even if not annotated. An annotated constructor does not have to be public.
 *
 * <h3>Autowired Fields</h3>
 * <p>Fields are injected right after construction of a bean, before any config methods
 * are invoked. Such a config field does not have to be public.
 *
 * <h3>Autowired Methods</h3>
 * <p>Config methods may have an arbitrary name and any number of arguments; each of
 * those arguments will be autowired with a matching bean in the Spring container.
 * Bean property setter methods are effectively just a special case of such a general
 * config method. Such config methods do not have to be public.
 *
 * <h3>Autowired Parameters</h3>
 * <p>Although {@code @Autowired} can technically be declared on individual method
 * or constructor parameters since Spring Framework 5.0, most parts of the
 * framework ignore such declarations. The only part of the core Spring Framework
 * that actively supports autowired parameters is the JUnit Jupiter support in
 * the {@code spring-test} module (see the
 * <a href="https://docs.spring.io/spring/docs/current/spring-framework-reference/testing.html#testcontext-junit-jupiter-di">TestContext framework</a>
 * reference documentation for details).
 *
 * <h3>Multiple Arguments and 'required' Semantics</h3>
 * <p>In the case of a multi-arg constructor or method, the {@link #required} attribute
 * is applicable to all arguments. Individual parameters may be declared as Java-8 style
 * {@link java.util.Optional} or, as of Spring Framework 5.0, also as {@code @Nullable}
 * or a not-null parameter type in Kotlin, overriding the base 'required' semantics.
 *
 * <h3>Autowiring Arrays, Collections, and Maps</h3>
 * <p>In case of an array, {@link java.util.Collection}, or {@link java.util.Map}
 * dependency type, the container autowires all beans matching the declared value
 * type. For such purposes, the map keys must be declared as type {@code String}
 * which will be resolved to the corresponding bean names. Such a container-provided
 * collection will be ordered, taking into account
 * {@link org.springframework.core.Ordered Ordered} and
 * {@link org.springframework.core.annotation.Order @Order} values of the target
 * components, otherwise following their registration order in the container.
 * Alternatively, a single matching target bean may also be a generally typed
 * {@code Collection} or {@code Map} itself, getting injected as such.
 *
 * <h3>Not supported in {@code BeanPostProcessor} or {@code BeanFactoryPostProcessor}</h3>
 * <p>Note that actual injection is performed through a
 * {@link org.springframework.beans.factory.config.BeanPostProcessor
 * BeanPostProcessor} which in turn means that you <em>cannot</em>
 * use {@code @Autowired} to inject references into
 * {@link org.springframework.beans.factory.config.BeanPostProcessor
 * BeanPostProcessor} or
 * {@link org.springframework.beans.factory.config.BeanFactoryPostProcessor BeanFactoryPostProcessor}
 * types. Please consult the javadoc for the {@link AutowiredAnnotationBeanPostProcessor}
 * class (which, by default, checks for the presence of this annotation).
 *
 * @author Juergen Hoeller
 * @author Mark Fisher
 * @author Sam Brannen
 * @since 2.5
 * @see AutowiredAnnotationBeanPostProcessor
 * @see Qualifier
 * @see Value
 */
@Target({ElementType.CONSTRUCTOR, ElementType.METHOD, ElementType.PARAMETER, ElementType.FIELD, ElementType.ANNOTATION_TYPE})
@Retention(RetentionPolicy.RUNTIME)
@Documented
public @interface Autowired {

	/**
	 * Declares whether the annotated dependency is required.
	 * <p>Defaults to {@code true}.
	 */
	boolean required() default true;

}
由以上的源码注释得知,@Autowired注解主要是通过org.springframework.beans.factory.annotation.AutowiredAnnotationBeanPostProcessor该类进行处理的,他是一个BeanPostProcessor的实现,关于BeanPostProcessor不了解的同学请先查看:Spring的BeanPostProcessor分析
本篇我们通过下面这个简单的例子来分析:
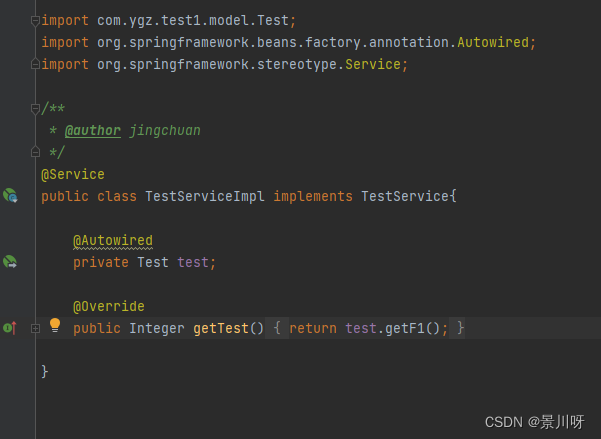
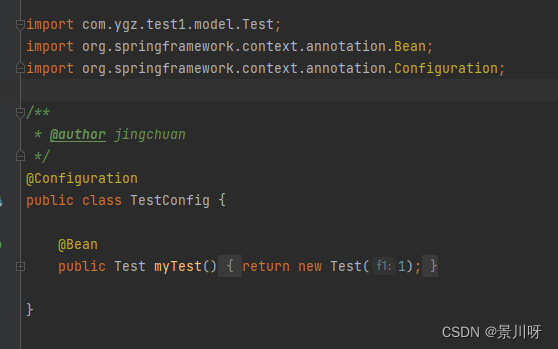
上面两张图是一个很简单的例子,SpringBoot项目,TestConfig作为配置类,内部通过@Bean向Spring容器注册了Test对象;TestServiceImpl作为一个Service接口实现类,通过@Autowired注入Test类
三. 源码分析
3.1 AutowiredAnnotationBeanPostProcessor被注册的过程
首先通过上面的简单了解,我们知道了@Autowired是通过AutowiredAnnotationBeanPostProcessor进行处理的,那么首先来看看AutowiredAnnotationBeanPostProcessor是怎么被加载进来的。其实和上一篇的@Bean注解分析 中的ConfigurationClassPostProcessor是同一个方式。
在SpringBoot启动的过程中,org.springframework.boot.SpringApplication#run(java.lang.String...)方法中有一步:
context = createApplicationContext();
这一步是创建ApplicationContext的策略方法,默认情况我们使用的是SERVLET,所以会反射加载AnnotationConfigServletWebServerApplicationContext,在这个类的构造方法org.springframework.boot.web.servlet.context.AnnotationConfigServletWebServerApplicationContext#AnnotationConfigServletWebServerApplicationContext()中,会调用到org.springframework.context.annotation.AnnotationConfigUtils#registerAnnotationConfigProcessors(org.springframework.beans.factory.support.BeanDefinitionRegistry, java.lang.Object)方法,在这个方法中显式的加载了AutowiredAnnotationBeanPostProcessor
if (!registry.containsBeanDefinition(AUTOWIRED_ANNOTATION_PROCESSOR_BEAN_NAME)) {
	RootBeanDefinition def = new RootBeanDefinition(AutowiredAnnotationBeanPostProcessor.class);
	def.setSource(source);
	beanDefs.add(registerPostProcessor(registry, def, AUTOWIRED_ANNOTATION_PROCESSOR_BEAN_NAME));
}
至此AutowiredAnnotationBeanPostProcessor被注册到了工厂中,此时只是注册了BeanDefinition,还未实例化。
3.2 AutowiredAnnotationBeanPostProcessor实例化的过程
AutowiredAnnotationBeanPostProcessor被实例化是在org.springframework.context.support.AbstractApplicationContext#refresh方法的,关于这一步的详细解释可以看Spring的BeanPostProcessor分析
registerBeanPostProcessors(beanFactory);
该方法详细源码:
public static void registerBeanPostProcessors(
			ConfigurableListableBeanFactory beanFactory, AbstractApplicationContext applicationContext) {
	// 从工厂中扫描注册并实现了BeanPostProcessor的所有BeanName
	// AutowiredAnnotationBeanPostProcessor在这里被扫描出来
	String[] postProcessorNames = beanFactory.getBeanNamesForType(BeanPostProcessor.class, true, false);

	// Register BeanPostProcessorChecker that logs an info message when
	// a bean is created during BeanPostProcessor instantiation, i.e. when
	// a bean is not eligible for getting processed by all BeanPostProcessors.
	int beanProcessorTargetCount = beanFactory.getBeanPostProcessorCount() + 1 + postProcessorNames.length;
	beanFactory.addBeanPostProcessor(new BeanPostProcessorChecker(beanFactory, beanProcessorTargetCount));

	// Separate between BeanPostProcessors that implement PriorityOrdered,
	// Ordered, and the rest.
	// 下面是把扫描出来的BeanPostProcessor进行分组,PriorityOrdered的先执行 再是Ordered的  最后是其他的
	List<BeanPostProcessor> priorityOrderedPostProcessors = new ArrayList<>();
	List<BeanPostProcessor> internalPostProcessors = new ArrayList<>();
	List<String> orderedPostProcessorNames = new ArrayList<>();
	List<String> nonOrderedPostProcessorNames = new ArrayList<>();
	for (String ppName : postProcessorNames) {
		if (beanFactory.isTypeMatch(ppName, PriorityOrdered.class)) {
			// 我们本篇的重点AutowiredAnnotationBeanPostProcessor就是PriorityOrdered  所以会最先被加载
			// 此处通过getBean实例化了AutowiredAnnotationBeanPostProcessor
			BeanPostProcessor pp = beanFactory.getBean(ppName, BeanPostProcessor.class);
			priorityOrderedPostProcessors.add(pp);
			if (pp instanceof MergedBeanDefinitionPostProcessor) {
				internalPostProcessors.add(pp);
			}
		}
		else if (beanFactory.isTypeMatch(ppName, Ordered.class)) {
			orderedPostProcessorNames.add(ppName);
		}
		else {
			nonOrderedPostProcessorNames.add(ppName);
		}
	}

	// First, register the BeanPostProcessors that implement PriorityOrdered.
	sortPostProcessors(priorityOrderedPostProcessors, beanFactory);
	//注册实现PriorityOrdered的BeanPostProcessors
	// 其实就是调用org.springframework.beans.factory.config.ConfigurableBeanFactory#addBeanPostProcessor
	registerBeanPostProcessors(beanFactory, priorityOrderedPostProcessors);

	// Next, register the BeanPostProcessors that implement Ordered.
	List<BeanPostProcessor> orderedPostProcessors = new ArrayList<>(orderedPostProcessorNames.size());
	for (String ppName : orderedPostProcessorNames) {
		BeanPostProcessor pp = beanFactory.getBean(ppName, BeanPostProcessor.class);
		orderedPostProcessors.add(pp);
		if (pp instanceof MergedBeanDefinitionPostProcessor) {
			internalPostProcessors.add(pp);
		}
	}
	sortPostProcessors(orderedPostProcessors, beanFactory);
	registerBeanPostProcessors(beanFactory, orderedPostProcessors);

	// Now, register all regular BeanPostProcessors.
	List<BeanPostProcessor> nonOrderedPostProcessors = new ArrayList<>(nonOrderedPostProcessorNames.size());
	for (String ppName : nonOrderedPostProcessorNames) {
		BeanPostProcessor pp = beanFactory.getBean(ppName, BeanPostProcessor.class);
		nonOrderedPostProcessors.add(pp);
		if (pp instanceof MergedBeanDefinitionPostProcessor) {
			internalPostProcessors.add(pp);
		}
	}
	registerBeanPostProcessors(beanFactory, nonOrderedPostProcessors);

	// Finally, re-register all internal BeanPostProcessors.
	sortPostProcessors(internalPostProcessors, beanFactory);
	registerBeanPostProcessors(beanFactory, internalPostProcessors);

	// Re-register post-processor for detecting inner beans as ApplicationListeners,
	// moving it to the end of the processor chain (for picking up proxies etc).
	beanFactory.addBeanPostProcessor(new ApplicationListenerDetector(applicationContext));
}
上面这个段中,先是分组并通过getBean实例化,最终在registerBeanPostProcessors(beanFactory, priorityOrderedPostProcessors);这一步进行AutowiredAnnotationBeanPostProcessor的注册。对于AutowiredAnnotationBeanPostProcessor的注册最终会来到:org.springframework.beans.factory.support.AbstractBeanFactory#addBeanPostProcessor:
public void addBeanPostProcessor(BeanPostProcessor beanPostProcessor) {
	Assert.notNull(beanPostProcessor, "BeanPostProcessor must not be null");
	// Remove from old position, if any
	// 如果有老的  那么先删除
	this.beanPostProcessors.remove(beanPostProcessor);
	// Track whether it is instantiation/destruction aware
	// 如果是实现自InstantiationAwareBeanPostProcessor  那么做一个标识 这个标识在后续会用到
	// AutowiredAnnotationBeanPostProcessor就实现了InstantiationAwareBeanPostProcessor
	// 所以会在这个if中设置this.hasInstantiationAwareBeanPostProcessors = true;
	if (beanPostProcessor instanceof InstantiationAwareBeanPostProcessor) {
		this.hasInstantiationAwareBeanPostProcessors = true;
	}
	if (beanPostProcessor instanceof DestructionAwareBeanPostProcessor) {
		this.hasDestructionAwareBeanPostProcessors = true;
	}
	// Add to end of list
	// 添加到beanPostProcessors  后续在Bean被实例化之后  会循环这个beanPostProcessors依次执行处理
	this.beanPostProcessors.add(beanPostProcessor);
}
3.3 AutowiredAnnotationBeanPostProcessor后置扫描@Autowired注解并解析注入的过程
然后来分析@Autowired的加载过程。
首先@Autowired是在所属的Bean被初始化之后自动装配属性的,所以肯定是在org.springframework.context.support.AbstractApplicationContext#refresh方法中的最后Bean初始化的过程中处理的。在我们的例子中,TestServiceImpl在被初始化是在org.springframework.context.support.AbstractApplicationContext#refresh的finishBeanFactoryInitialization(beanFactory);这一步,具体的就是SpringIOC的相关知识了,不了解的同学可以看:SpringIOC详解。
所以我们直接来到TestServiceImpl初始化之后的地方:org.springframework.beans.factory.support.AbstractAutowireCapableBeanFactory#doCreateBean
这个方法的源码就不详细贴出来了,我们重点关注下面这两步:
synchronized (mbd.postProcessingLock) {
	if (!mbd.postProcessed) {
		try {
			applyMergedBeanDefinitionPostProcessors(mbd, beanType, beanName);
		}
		catch (Throwable ex) {
			throw new BeanCreationException(mbd.getResourceDescription(), beanName,
					"Post-processing of merged bean definition failed", ex);
		}
		mbd.postProcessed = true;
	}
}
populateBean(beanName, mbd, instanceWrapper);
3.3.1 applyMergedBeanDefinitionPostProcessors(mbd, beanType, beanName);
这一步是在Bean初始化之后,合并Bean定义的,其实是执行MergedBeanDefinitionPostProcessors的postProcessMergedBeanDefinition方法:
protected void applyMergedBeanDefinitionPostProcessors(RootBeanDefinition mbd, Class<?> beanType, String beanName) {
	for (BeanPostProcessor bp : getBeanPostProcessors()) {
		if (bp instanceof MergedBeanDefinitionPostProcessor) {
			MergedBeanDefinitionPostProcessor bdp = (MergedBeanDefinitionPostProcessor) bp;
			bdp.postProcessMergedBeanDefinition(mbd, beanType, beanName);
		}
	}
}
而我们本篇的AutowiredAnnotationBeanPostProcessor就实现了MergedBeanDefinitionPostProcessor,所以会执行:org.springframework.beans.factory.annotation.AutowiredAnnotationBeanPostProcessor#postProcessMergedBeanDefinition方法。
public void postProcessMergedBeanDefinition(RootBeanDefinition beanDefinition, Class<?> beanType, String beanName) {
	// 查找Bean中的Autowired注解和Value注解 如果找到了封装成InjectionMetadata 返回出来
	InjectionMetadata metadata = findAutowiringMetadata(beanName, beanType, null);
	metadata.checkConfigMembers(beanDefinition);
}
跟进findAutowiringMetadata(beanName, beanType, null);
private InjectionMetadata findAutowiringMetadata(String beanName, Class<?> clazz, @Nullable PropertyValues pvs) {
	// Fall back to class name as cache key, for backwards compatibility with custom callers.
	// 使用类名作为缓存键,以便与自定义调用者向后兼容
	String cacheKey = (StringUtils.hasLength(beanName) ? beanName : clazz.getName());
	// Quick check on the concurrent map first, with minimal locking.
	// 先从缓存中取  刚进入肯定是没有的  所以获取到的肯定是null  下面这个其实是个类似双重锁检查的
	InjectionMetadata metadata = this.injectionMetadataCache.get(cacheKey);
	if (InjectionMetadata.needsRefresh(metadata, clazz)) {
		synchronized (this.injectionMetadataCache) {
			metadata = this.injectionMetadataCache.get(cacheKey);
			if (InjectionMetadata.needsRefresh(metadata, clazz)) {
				if (metadata != null) {
					metadata.clear(pvs);
				}
				// 真正的查找注解 并封装的地方  查找到之后存储injectionMetadataCache缓存中
				metadata = buildAutowiringMetadata(clazz);
				this.injectionMetadataCache.put(cacheKey, metadata);
			}
		}
	}
	return metadata;
}
跟进buildAutowiringMetadata(clazz);查看源码:org.springframework.beans.factory.annotation.AutowiredAnnotationBeanPostProcessor#buildAutowiringMetadata
private InjectionMetadata buildAutowiringMetadata(final Class<?> clazz) {
	if (!AnnotationUtils.isCandidateClass(clazz, this.autowiredAnnotationTypes)) {
		return InjectionMetadata.EMPTY;
	}

	List<InjectionMetadata.InjectedElement> elements = new ArrayList<>();
	Class<?> targetClass = clazz;

	do {
		final List<InjectionMetadata.InjectedElement> currElements = new ArrayList<>();

		// 函数式写法  其实就是获取类的所有字段/属性  然后遍历查找注解
		ReflectionUtils.doWithLocalFields(targetClass, field -> {
			// 找到字段/属性上是不是有org.springframework.beans.factory.annotation.AutowiredAnnotationBeanPostProcessor#autowiredAnnotationTypes里面的注解
			// 其实就是Autowired和Value  这两个是在构造方法里面就被加进去的
			MergedAnnotation<?> ann = findAutowiredAnnotation(field);
			if (ann != null) {
				if (Modifier.isStatic(field.getModifiers())) {
					if (logger.isInfoEnabled()) {
						logger.info("Autowired annotation is not supported on static fields: " + field);
					}
					return;
				}
				// 查看是不是有required并返回required的值
				boolean required = determineRequiredStatus(ann);
				// 添加到currElements
				currElements.add(new AutowiredFieldElement(field, required));
			}
		});

		// 函数式写法  获取方法上是否有Autowired或Value注解
		ReflectionUtils.doWithLocalMethods(targetClass, method -> {
			// 查找有没有桥接方法 子类重写了父类或接口带有泛型的方法的时候会生成桥接方法
			// 所以我们这里获取到的是TestServiceImpl的getTest() 方法
			Method bridgedMethod = BridgeMethodResolver.findBridgedMethod(method);
			// 比较桥接方法和它桥接的方法的签名。如果参数和返回类型相同,则为 Java 6 中引入的“可见性”桥接方法
			// 那这个时候的method是ReflectionUtils.doWithLocalMethods()中通过org.springframework.util.ReflectionUtils#getDeclaredMethods(java.lang.Class<?>, boolean)
			// 获取到的方法,目前只有一个getTest()方法  所以method和bridgedMethod 是同一个  所以不会进入这个if
			if (!BridgeMethodResolver.isVisibilityBridgeMethodPair(method, bridgedMethod)) {
				return;
			}
			// 然后从bridgedMethod查找是否有Autowired或Value注解  在我们的例子中  这里是没有的
			MergedAnnotation<?> ann = findAutowiredAnnotation(bridgedMethod);
			if (ann != null && method.equals(ClassUtils.getMostSpecificMethod(method, clazz))) {
				if (Modifier.isStatic(method.getModifiers())) {
					if (logger.isInfoEnabled()) {
						logger.info("Autowired annotation is not supported on static methods: " + method);
					}
					return;
				}
				if (method.getParameterCount() == 0) {
					if (logger.isInfoEnabled()) {
						logger.info("Autowired annotation should only be used on methods with parameters: " +
								method);
					}
				}
				boolean required = determineRequiredStatus(ann);
				PropertyDescriptor pd = BeanUtils.findPropertyForMethod(bridgedMethod, clazz);
				currElements.add(new AutowiredMethodElement(method, required, pd));
			}
		});

		//获取到所有的需要注入的属性
		elements.addAll(0, currElements);
		targetClass = targetClass.getSuperclass();
	}
	while (targetClass != null && targetClass != Object.class);

	// 进行封装并返回
	return InjectionMetadata.forElements(elements, clazz);
}
通过上面这个方法,我们了解了关于@Autowired或@Value注解被扫描到的过程,关于其中的org.springframework.beans.factory.annotation.AutowiredAnnotationBeanPostProcessor#findAutowiredAnnotation方法,这里就不详细说了,属于反射的内容,大家可以自行尝试一下。
上面这个方法执行完成之后,就会返回到org.springframework.beans.factory.annotation.AutowiredAnnotationBeanPostProcessor#findAutowiringMetadata方法,然后返回结果被缓存到:org.springframework.beans.factory.annotation.AutowiredAnnotationBeanPostProcessor#injectionMetadataCache。
至此,@Autowired或@Value注解已经被扫描到并记录到缓存中了,接下来就是给赋值的过程了。
3.3.2 populateBean(beanName, mbd, instanceWrapper);
这一步,是Bean初始化之后,开始给Bean属性值填充值的。当我们例子中的TestServiceImpl实例创建出来之后,就会走到这一步,然后我们进入这个方法:
protected void populateBean(String beanName, RootBeanDefinition mbd, @Nullable BeanWrapper bw) {
	if (bw == null) {
		if (mbd.hasPropertyValues()) {
			throw new BeanCreationException(
					mbd.getResourceDescription(), beanName, "Cannot apply property values to null instance");
		}
		else {
			// Skip property population phase for null instance.
			return;
		}
	}

	// Give any InstantiationAwareBeanPostProcessors the opportunity to modify the
	// state of the bean before properties are set. This can be used, for example,
	// to support styles of field injection.
	// 让任何 InstantiationAwareBeanPostProcessors 有机会在设置属性之前修改 bean 的状态
	if (!mbd.isSynthetic() && hasInstantiationAwareBeanPostProcessors()) {
		for (BeanPostProcessor bp : getBeanPostProcessors()) {
			if (bp instanceof InstantiationAwareBeanPostProcessor) {
				InstantiationAwareBeanPostProcessor ibp = (InstantiationAwareBeanPostProcessor) bp;
				if (!ibp.postProcessAfterInstantiation(bw.getWrappedInstance(), beanName)) {
					return;
				}
			}
		}
	}

	PropertyValues pvs = (mbd.hasPropertyValues() ? mbd.getPropertyValues() : null);

	int resolvedAutowireMode = mbd.getResolvedAutowireMode();
	if (resolvedAutowireMode == AUTOWIRE_BY_NAME || resolvedAutowireMode == AUTOWIRE_BY_TYPE) {
		MutablePropertyValues newPvs = new MutablePropertyValues(pvs);
		// Add property values based on autowire by name if applicable.
		if (resolvedAutowireMode == AUTOWIRE_BY_NAME) {
			autowireByName(beanName, mbd, bw, newPvs);
		}
		// Add property values based on autowire by type if applicable.
		if (resolvedAutowireMode == AUTOWIRE_BY_TYPE) {
			autowireByType(beanName, mbd, bw, newPvs);
		}
		pvs = newPvs;
	}

	// 获取工厂是否拥有一个将在创建时应用于单例 bean 的 InstantiationAwareBeanPostProcessor
	// 就是org.springframework.beans.factory.support.AbstractBeanFactory#addBeanPostProcessor中设置的标识 所以这个是true
	boolean hasInstAwareBpps = hasInstantiationAwareBeanPostProcessors();
	boolean needsDepCheck = (mbd.getDependencyCheck() != AbstractBeanDefinition.DEPENDENCY_CHECK_NONE);

	PropertyDescriptor[] filteredPds = null;
	if (hasInstAwareBpps) {
		if (pvs == null) {
			pvs = mbd.getPropertyValues();
		}
		// 获取到所有的BeanPostProcessors  其中包含AutowiredAnnotationBeanPostProcessor
		for (BeanPostProcessor bp : getBeanPostProcessors()) {
			if (bp instanceof InstantiationAwareBeanPostProcessor) {
				// AutowiredAnnotationBeanPostProcessor实现了InstantiationAwareBeanPostProcessor
				InstantiationAwareBeanPostProcessor ibp = (InstantiationAwareBeanPostProcessor) bp;
				// 执行AutowiredAnnotationBeanPostProcessor的postProcessProperties方法
				PropertyValues pvsToUse = ibp.postProcessProperties(pvs, bw.getWrappedInstance(), beanName);
				// 执行结果不是null
				if (pvsToUse == null) {
					if (filteredPds == null) {
						filteredPds = filterPropertyDescriptorsForDependencyCheck(bw, mbd.allowCaching);
					}
					pvsToUse = ibp.postProcessPropertyValues(pvs, filteredPds, bw.getWrappedInstance(), beanName);
					if (pvsToUse == null) {
						return;
					}
				}
				// 进行赋值
				pvs = pvsToUse;
			}
		}
	}
	if (needsDepCheck) {
		if (filteredPds == null) {
			filteredPds = filterPropertyDescriptorsForDependencyCheck(bw, mbd.allowCaching);
		}
		checkDependencies(beanName, mbd, filteredPds, pvs);
	}

	if (pvs != null) {
		applyPropertyValues(beanName, mbd, bw, pvs);
	}
}
所以我们重点来看:ibp.postProcessProperties(pvs, bw.getWrappedInstance(), beanName);
public PropertyValues postProcessProperties(PropertyValues pvs, Object bean, String beanName) {
	// 查找注解  这个在上面其实已经执行过了  这里实际上从缓存中取到了
	InjectionMetadata metadata = findAutowiringMetadata(beanName, bean.getClass(), pvs);
	try {
		// 然后我们重点看这个
		metadata.inject(bean, beanName, pvs);
	}
	catch (BeanCreationException ex) {
		throw ex;
	}
	catch (Throwable ex) {
		throw new BeanCreationException(beanName, "Injection of autowired dependencies failed", ex);
	}
	return pvs;
}
进入:metadata.inject(bean, beanName, pvs);来到org.springframework.beans.factory.annotation.InjectionMetadata#inject
public void inject(Object target, @Nullable String beanName, @Nullable PropertyValues pvs) throws Throwable {
	Collection<InjectedElement> checkedElements = this.checkedElements;
	Collection<InjectedElement> elementsToIterate =
			(checkedElements != null ? checkedElements : this.injectedElements);
	if (!elementsToIterate.isEmpty()) {
		for (InjectedElement element : elementsToIterate) {
			element.inject(target, beanName, pvs);
		}
	}
}
这个方法就是获取多个InjectedElement然后循环调用element.inject(target, beanName, pvs);,由于我们这里只有一个@Autowired注解,所以Collection只有一个值,也就是org.springframework.beans.factory.annotation.AutowiredAnnotationBeanPostProcessor$AutowiredFieldElement,所以继续跟进到org.springframework.beans.factory.annotation.AutowiredAnnotationBeanPostProcessor.AutowiredFieldElement#inject
protected void inject(Object bean, @Nullable String beanName, @Nullable PropertyValues pvs) throws Throwable {
	Field field = (Field) this.member;
	Object value;
	// this.cached是一个标识,标识是不是有解析过   第一次进来肯定是没有解析过的  所以不会进入这个if
	if (this.cached) {
		try {
			value = resolvedCachedArgument(beanName, this.cachedFieldValue);
		}
		catch (NoSuchBeanDefinitionException ex) {
			// Unexpected removal of target bean for cached argument -> re-resolve
			value = resolveFieldValue(field, bean, beanName);
		}
	}
	else {
		// 解析字段值
		value = resolveFieldValue(field, bean, beanName);
	}
	if (value != null) {
		ReflectionUtils.makeAccessible(field);
		field.set(bean, value);
	}
}
跟进resolveFieldValue(field, bean, beanName);
private Object resolveFieldValue(Field field, Object bean, @Nullable String beanName) {
	DependencyDescriptor desc = new DependencyDescriptor(field, this.required);
	desc.setContainingClass(bean.getClass());
	Set<String> autowiredBeanNames = new LinkedHashSet<>(1);
	Assert.state(beanFactory != null, "No BeanFactory available");
	// 从Spring工厂获取类型转换器  这里的工厂就是DefaultListableBeanFactory
	TypeConverter typeConverter = beanFactory.getTypeConverter();
	Object value;
	try {
		// 调用DefaultListableBeanFactory的resolveDependency获取value  跟进此方法
		value = beanFactory.resolveDependency(desc, beanName, autowiredBeanNames, typeConverter);
	}
	catch (BeansException ex) {
		throw new UnsatisfiedDependencyException(null, beanName, new InjectionPoint(field), ex);
	}
	synchronized (this) {
		// 标识位  标识是否缓存过  刚获取到值肯没有缓存过
		if (!this.cached) {
			Object cachedFieldValue = null;
			if (value != null || this.required) {
				cachedFieldValue = desc;
				// 将指定的 autowiredBeanNames 注册为依赖于自动装配的 bean
				// 意思就是记录下来autowiredBeanNames中的bean是要被依赖注入到beanName对应的Bean中的
				// 在本例中就是说:记录Test是要被注入到TestServiceImpl中的  进行一个依赖注入标记设置到dependentBeanMap中
				registerDependentBeans(beanName, autowiredBeanNames);
				if (autowiredBeanNames.size() == 1) {
					String autowiredBeanName = autowiredBeanNames.iterator().next();
					// 匹配到的要注入的对象存在于容器中  并且类型是匹配的
					if (beanFactory.containsBean(autowiredBeanName) &&
							beanFactory.isTypeMatch(autowiredBeanName, field.getType())) {
						// 封装匹配到的对象
						cachedFieldValue = new ShortcutDependencyDescriptor(
								desc, autowiredBeanName, field.getType());
					}
				}
			}
			this.cachedFieldValue = cachedFieldValue;
			this.cached = true;
		}
	}
	return value;
}
接下来跟进beanFactory.resolveDependency(desc, beanName, autowiredBeanNames, typeConverter);
public Object resolveDependency(DependencyDescriptor descriptor, @Nullable String requestingBeanName,
			@Nullable Set<String> autowiredBeanNames, @Nullable TypeConverter typeConverter) throws BeansException {
	descriptor.initParameterNameDiscovery(getParameterNameDiscoverer());
	if (Optional.class == descriptor.getDependencyType()) {
		return createOptionalDependency(descriptor, requestingBeanName);
	}
	else if (ObjectFactory.class == descriptor.getDependencyType() ||
			ObjectProvider.class == descriptor.getDependencyType()) {
		return new DependencyObjectProvider(descriptor, requestingBeanName);
	}
	else if (javaxInjectProviderClass == descriptor.getDependencyType()) {
		return new Jsr330Factory().createDependencyProvider(descriptor, requestingBeanName);
	}
	else {
		// 获取真实的属性值 但是会检查是不是需要懒加载,比如有@Lazy注解  如果有就返回一个代理对象  如果不需要懒加载就返回null
		Object result = getAutowireCandidateResolver().getLazyResolutionProxyIfNecessary(
				descriptor, requestingBeanName);
		// 很明显我们没有懒加载  所以进入这个if
		if (result == null) {
			// 真正获取值的地方
			result = doResolveDependency(descriptor, requestingBeanName, autowiredBeanNames, typeConverter);
		}
		return result;
	}
}
跟进到doResolveDependency(descriptor, requestingBeanName, autowiredBeanNames, typeConverter);
public Object doResolveDependency(DependencyDescriptor descriptor, @Nullable String beanName,
			@Nullable Set<String> autowiredBeanNames, @Nullable TypeConverter typeConverter) throws BeansException {
	// 设置注入点
	InjectionPoint previousInjectionPoint = ConstructorResolver.setCurrentInjectionPoint(descriptor);
	try {
		// 针对给定工厂解决此依赖关系的快捷方式,例如考虑一些预先解决的信息
		// 其实就是给你一个扩展点,可以让外部跳过默认的筛选从而自定义处理
		Object shortcut = descriptor.resolveShortcut(this);
		if (shortcut != null) {
			return shortcut;
		}

		// 获取注入字段的类型  比如我们例子中是Test
		Class<?> type = descriptor.getDependencyType();
		Object value = getAutowireCandidateResolver().getSuggestedValue(descriptor);
		if (value != null) {
			if (value instanceof String) {
				String strVal = resolveEmbeddedValue((String) value);
				BeanDefinition bd = (beanName != null && containsBean(beanName) ?
						getMergedBeanDefinition(beanName) : null);
				value = evaluateBeanDefinitionString(strVal, bd);
			}
			TypeConverter converter = (typeConverter != null ? typeConverter : getTypeConverter());
			try {
				return converter.convertIfNecessary(value, type, descriptor.getTypeDescriptor());
			}
			catch (UnsupportedOperationException ex) {
				// A custom TypeConverter which does not support TypeDescriptor resolution...
				return (descriptor.getField() != null ?
						converter.convertIfNecessary(value, type, descriptor.getField()) :
						converter.convertIfNecessary(value, type, descriptor.getMethodParameter()));
			}
		}

		// 解析多个值的注入  比如List、Map这种类型的注入
		// 内部根据descriptor的类型进行判断  不同类型进行不同的选择逻辑  本例中我们注入的是一个普通的Test类
		// 所以这个方法返回的是null
		Object multipleBeans = resolveMultipleBeans(descriptor, beanName, autowiredBeanNames, typeConverter);
		if (multipleBeans != null) {
			return multipleBeans;
		}

		// 在Spring容器中查找与所需类型匹配的bean实例  这里查到的可能是多个 key是name  value是Spring中获取的目标
		// 这里的实际就是根据Class类型去容器里面查找匹配的BeanName
		// 然后根据BeanName再去Spring中获取Class 最终放到Map中返回出来
		// 这个map的value有可能是Class  也可能是一个实例
		// 为什么有可能是Class有可能是实例见下文对findAutowireCandidates的分析
		Map<String, Object> matchingBeans = findAutowireCandidates(beanName, type, descriptor);
		if (matchingBeans.isEmpty()) {
			// 如果没匹配到  但是还是isRequired的  那么触发异常
			if (isRequired(descriptor)) {
				raiseNoMatchingBeanFound(type, descriptor.getResolvableType(), descriptor);
			}
			return null;
		}

		String autowiredBeanName;
		Object instanceCandidate;

		// 如果匹配到的Bean数量大于1个  也就是匹配到多个
		if (matchingBeans.size() > 1) {
			// 那么查找是不是有@Primary注解 或者按照@Priority排序确定一个
			autowiredBeanName = determineAutowireCandidate(matchingBeans, descriptor);
			if (autowiredBeanName == null) {
				// 如果还没找到  那么就看是不是isRequired 或者 不是复合类型的  那么就抛出异常
				if (isRequired(descriptor) || !indicatesMultipleBeans(type)) {
					return descriptor.resolveNotUnique(descriptor.getResolvableType(), matchingBeans);
				}
				else {
					// In case of an optional Collection/Map, silently ignore a non-unique case:
					// possibly it was meant to be an empty collection of multiple regular beans
					// (before 4.3 in particular when we didn't even look for collection beans).
					return null;
				}
			}
			// 如果匹配到了  那么根据名称从多个里面找到对应的
			instanceCandidate = matchingBeans.get(autowiredBeanName);
		}
		else {
			// We have exactly one match.
			// 如果只匹配到一个  那么就用这个
			Map.Entry<String, Object> entry = matchingBeans.entrySet().iterator().next();
			autowiredBeanName = entry.getKey();
			instanceCandidate = entry.getValue();
		}

		if (autowiredBeanNames != null) {
			autowiredBeanNames.add(autowiredBeanName);
		}
		// 这里判断获取到的是不是一个Class  原因是因为上面findAutowireCandidates得到的map的value可能是一个Class
		// 如果是一个Class  那么就再从容器中取到实例
		// 对于我们例子中的注入的Test对象  获取的就是一个Class
		// 但是比如我们平时使用的注入一个Service接口  上面获取的就是一个Bean实例  不会进入下面这个Class  不需要再次获取Bean实例
		if (instanceCandidate instanceof Class) {
			// 根据匹配到的Bean从容器中获取一个实例  其实就是getBean
			instanceCandidate = descriptor.resolveCandidate(autowiredBeanName, type, this);
		}
		Object result = instanceCandidate;
		// 再做一次检查
		if (result instanceof NullBean) {
			if (isRequired(descriptor)) {
				raiseNoMatchingBeanFound(type, descriptor.getResolvableType(), descriptor);
			}
			result = null;
		}
		if (!ClassUtils.isAssignableValue(type, result)) {
			throw new BeanNotOfRequiredTypeException(autowiredBeanName, type, instanceCandidate.getClass());
		}
		return result;
	}
	finally {
		// 把注入点重新set   相当于重置
		ConstructorResolver.setCurrentInjectionPoint(previousInjectionPoint);
	}
}
从上面这段代码中我们可以了解到,已经从容器中匹配到了对应的值并返回出去,所以我们根据返回结果回到:org.springframework.beans.factory.annotation.AutowiredAnnotationBeanPostProcessor.AutowiredFieldElement#resolveFieldValue中。
在此之前我们来看看org.springframework.beans.factory.support.DefaultListableBeanFactory#findAutowireCandidates这个方法,根据类型查找Bean。
protected Map<String, Object> findAutowireCandidates(
			@Nullable String beanName, Class<?> requiredType, DependencyDescriptor descriptor) {

	// 这一步就是调用DefaultListableBeanFactory的getBeanNamesForType方法  根据类型获取匹配的BeanName
	String[] candidateNames = BeanFactoryUtils.beanNamesForTypeIncludingAncestors(
			this, requiredType, true, descriptor.isEager());
	Map<String, Object> result = new LinkedHashMap<>(candidateNames.length);
	// 首先从容器自身注册的依赖解析来匹配,Spring容器自身注册了很多Bean的依赖,
	// 当使用者想要注入指定类型的Bean时,会优先从已注册的依赖内寻找匹配
	for (Map.Entry<Class<?>, Object> classObjectEntry : this.resolvableDependencies.entrySet()) {
		Class<?> autowiringType = classObjectEntry.getKey();
		// 确定此Class对象表示的类或接口是否与指定的Class参数表示的类或接口相同,或者是其超类或超接口。如果是,则返回true ;否则返回false 。
		// 如果此Class对象表示原始类型,则如果指定的Class参数正是此Class对象,则此方法返回true ;否则返回false
		if (autowiringType.isAssignableFrom(requiredType)) {
			Object autowiringValue = classObjectEntry.getValue();
			// 处理类似ObjectFactory值  主要是对代理这种进行处理
			autowiringValue = AutowireUtils.resolveAutowiringValue(autowiringValue, requiredType);
			// 如果注册的依赖Bean类型是指定类型的实例或是其父类,接口,则将其作为候选者,注册依赖的类型不会重复
			if (requiredType.isInstance(autowiringValue)) {
				result.put(ObjectUtils.identityToString(autowiringValue), autowiringValue);
				break;
			}
		}
	}
	// 循环匹配到的BeanName
	for (String candidate : candidateNames) {
		// 确定给定的 beanName/candidateName 对是否指示自引用,即候选是否指向原始 bean 或原始 bean 上的工厂方法
		// 同时确定这个Bean是不是可以自动装配,比如 如果是"&"开头 或者 存在于父工厂 这种的就不能自动装配 放到最后处理
		// 要注意这个isAutowireCandidate判断 这个里面对@Qualifier注解进行了判断
		if (!isSelfReference(beanName, candidate) && isAutowireCandidate(candidate, descriptor)) {
			// 把匹配到的BeanName拿着去进行判断  根据类型不同获取到的结果不同  最终都会放入result这个map里面
			// 详细看下面对addCandidateEntry的分析
			addCandidateEntry(result, candidate, descriptor, requiredType);
		}
	}
	if (result.isEmpty()) {
		boolean multiple = indicatesMultipleBeans(requiredType);
		// Consider fallback matches if the first pass failed to find anything...
		// 如果第一遍找不到任何东西,那么准备后续的匹配
		DependencyDescriptor fallbackDescriptor = descriptor.forFallbackMatch();
		for (String candidate : candidateNames) {
			if (!isSelfReference(beanName, candidate) && isAutowireCandidate(candidate, fallbackDescriptor) &&
					(!multiple || getAutowireCandidateResolver().hasQualifier(descriptor))) {
				addCandidateEntry(result, candidate, descriptor, requiredType);
			}
		}
		if (result.isEmpty() && !multiple) {
			// Consider self references as a final pass...
			// but in the case of a dependency collection, not the very same bean itself.
			// 将自引用视为最后一次匹配   但在依赖集合的情况下,不是同一个 bean 本身
			for (String candidate : candidateNames) {
				if (isSelfReference(beanName, candidate) &&
						(!(descriptor instanceof MultiElementDescriptor) || !beanName.equals(candidate)) &&
						isAutowireCandidate(candidate, fallbackDescriptor)) {
					addCandidateEntry(result, candidate, descriptor, requiredType);
				}
			}
		}
	}
	return result;
}
简单了解完上面这个findAutowireCandidates,我们再来看看其中的两个方法:isAutowireCandidate(candidate, descriptor)和addCandidateEntry(result, candidate, descriptor, requiredType)
分开来看:
3.3.2.1 isAutowireCandidate(candidate, descriptor)
接上面的内容:org.springframework.beans.factory.support.DefaultListableBeanFactory#findAutowireCandidates方法里面的 isAutowireCandidate(candidate, descriptor)最终会执行到:
org.springframework.beans.factory.support.DefaultListableBeanFactory#isAutowireCandidate(java.lang.String, org.springframework.beans.factory.config.DependencyDescriptor, org.springframework.beans.factory.support.AutowireCandidateResolver)
protected boolean isAutowireCandidate(
			String beanName, DependencyDescriptor descriptor, AutowireCandidateResolver resolver)
			throws NoSuchBeanDefinitionException {

	String bdName = BeanFactoryUtils.transformedBeanName(beanName);
	if (containsBeanDefinition(bdName)) {
		// 一般我们依赖注入的对象都是在容器中的  所以会进入这个if执行 跟进查看
		return isAutowireCandidate(beanName, getMergedLocalBeanDefinition(bdName), descriptor, resolver);
	}
	else if (containsSingleton(beanName)) {
		return isAutowireCandidate(beanName, new RootBeanDefinition(getType(beanName)), descriptor, resolver);
	}

	BeanFactory parent = getParentBeanFactory();
	if (parent instanceof DefaultListableBeanFactory) {
		// No bean definition found in this factory -> delegate to parent.
		return ((DefaultListableBeanFactory) parent).isAutowireCandidate(beanName, descriptor, resolver);
	}
	else if (parent instanceof ConfigurableListableBeanFactory) {
		// If no DefaultListableBeanFactory, can't pass the resolver along.
		return ((ConfigurableListableBeanFactory) parent).isAutowireCandidate(beanName, descriptor);
	}
	else {
		return true;
	}
}
跟进isAutowireCandidate(beanName, getMergedLocalBeanDefinition(bdName), descriptor, resolver);
protected boolean isAutowireCandidate(String beanName, RootBeanDefinition mbd,
			DependencyDescriptor descriptor, AutowireCandidateResolver resolver) {

	String bdName = BeanFactoryUtils.transformedBeanName(beanName);
	// 为指定的 bean 定义解析 bean 类,将 bean 类名称解析为 Class 引用(如果需要)并将解析的 Class 存储在 bean 定义中以供进一步使用
	resolveBeanClass(mbd, bdName);
	if (mbd.isFactoryMethodUnique && mbd.factoryMethodToIntrospect == null) {
		new ConstructorResolver(this).resolveFactoryMethodIfPossible(mbd);
	}
	BeanDefinitionHolder holder = (beanName.equals(bdName) ?
			this.mergedBeanDefinitionHolders.computeIfAbsent(beanName,
					key -> new BeanDefinitionHolder(mbd, beanName, getAliases(bdName))) :
			new BeanDefinitionHolder(mbd, beanName, getAliases(bdName)));
	// 确定给定的 bean 定义是否有资格作为给定依赖项的自动装配候选者     跟进这一步
	return resolver.isAutowireCandidate(holder, descriptor);
}
跟进resolver.isAutowireCandidate(holder, descriptor);
public boolean isAutowireCandidate(BeanDefinitionHolder bdHolder, DependencyDescriptor descriptor) {
	// 确定是否可以成为候选  也就是是否可以匹配
	boolean match = super.isAutowireCandidate(bdHolder, descriptor);
	if (match) {
		// 检查是否有@Qualifier注解  并判断@Qualifier注解的value是否匹配
		// 在我们常用过的方式中,也就是bean名称是否匹配
		match = checkQualifiers(bdHolder, descriptor.getAnnotations());
		if (match) {
			MethodParameter methodParam = descriptor.getMethodParameter();
			if (methodParam != null) {
				Method method = methodParam.getMethod();
				if (method == null || void.class == method.getReturnType()) {
					match = checkQualifiers(bdHolder, methodParam.getMethodAnnotations());
				}
			}
		}
	}
	return match;
}
跟进checkQualifiers(bdHolder, descriptor.getAnnotations());
protected boolean checkQualifiers(BeanDefinitionHolder bdHolder, Annotation[] annotationsToSearch) {
	if (ObjectUtils.isEmpty(annotationsToSearch)) {
		return true;
	}
	SimpleTypeConverter typeConverter = new SimpleTypeConverter();
	// annotationsToSearch表示的是我们要注入的字段上的所有注解
	// 如果有@Qualifier注解就会有这个值
	for (Annotation annotation : annotationsToSearch) {
		Class<? extends Annotation> type = annotation.annotationType();
		boolean checkMeta = true;
		boolean fallbackToMeta = false;
		// 当循环到@Qualifier注解的时候   就会进去这个if
		if (isQualifier(type)) {
			// 然后这个if判断就是真正判断@Qualifier注解匹配逻辑的地方
			// 如果匹配成功,那么不进入这个if  而是进入else  设置checkMeta = false;
			if (!checkQualifier(bdHolder, annotation, typeConverter)) {
				fallbackToMeta = true;
			}
			else {
				checkMeta = false;
			}
		}
		// 如果上面匹配到  那么就不会进这个if  也就直接返回true表示匹配成功了
		if (checkMeta) {
			boolean foundMeta = false;
			for (Annotation metaAnn : type.getAnnotations()) {
				Class<? extends Annotation> metaType = metaAnn.annotationType();
				if (isQualifier(metaType)) {
					foundMeta = true;
					// Only accept fallback match if @Qualifier annotation has a value...
					// Otherwise it is just a marker for a custom qualifier annotation.
					if ((fallbackToMeta && StringUtils.isEmpty(AnnotationUtils.getValue(metaAnn))) ||
							!checkQualifier(bdHolder, metaAnn, typeConverter)) {
						return false;
					}
				}
			}
			if (fallbackToMeta && !foundMeta) {
				return false;
			}
		}
	}
	return true;
}
跟进checkQualifier(bdHolder, annotation, typeConverter)
protected boolean checkQualifier(
			BeanDefinitionHolder bdHolder, Annotation annotation, TypeConverter typeConverter) {

	// bdHolder是筛选出来的候选Bean    annotation是@Qualifier注解
	Class<? extends Annotation> type = annotation.annotationType();
	RootBeanDefinition bd = (RootBeanDefinition) bdHolder.getBeanDefinition();

	AutowireCandidateQualifier qualifier = bd.getQualifier(type.getName());
	if (qualifier == null) {
		qualifier = bd.getQualifier(ClassUtils.getShortName(type));
	}
	if (qualifier == null) {
		// First, check annotation on qualified element, if any
		// 首先,检查合格元素上的注解,如果有
		Annotation targetAnnotation = getQualifiedElementAnnotation(bd, type);
		// Then, check annotation on factory method, if applicable
		// 然后,检查工厂方法的注解(如果适用)
		if (targetAnnotation == null) {
			targetAnnotation = getFactoryMethodAnnotation(bd, type);
		}
		if (targetAnnotation == null) {
			RootBeanDefinition dbd = getResolvedDecoratedDefinition(bd);
			if (dbd != null) {
				targetAnnotation = getFactoryMethodAnnotation(dbd, type);
			}
		}
		if (targetAnnotation == null) {
			// Look for matching annotation on the target class
			// 在目标类上寻找匹配的注解
			if (getBeanFactory() != null) {
				try {
					Class<?> beanType = getBeanFactory().getType(bdHolder.getBeanName());
					if (beanType != null) {
						targetAnnotation = AnnotationUtils.getAnnotation(ClassUtils.getUserClass(beanType), type);
					}
				}
				catch (NoSuchBeanDefinitionException ex) {
					// Not the usual case - simply forget about the type check...
				}
			}
			if (targetAnnotation == null && bd.hasBeanClass()) {
				targetAnnotation = AnnotationUtils.getAnnotation(ClassUtils.getUserClass(bd.getBeanClass()), type);
			}
		}
		if (targetAnnotation != null && targetAnnotation.equals(annotation)) {
			return true;
		}
	}

	// 获取注解的属性和属性值
	Map<String, Object> attributes = AnnotationUtils.getAnnotationAttributes(annotation);
	if (attributes.isEmpty() && qualifier == null) {
		// If no attributes, the qualifier must be present
		return false;
	}
	for (Map.Entry<String, Object> entry : attributes.entrySet()) {
		// attributeName 就是@Qualifier注解的属性 "value"
		String attributeName = entry.getKey();
		// expectedValue 就是@Qualifier注解的"value"属性的值
		Object expectedValue = entry.getValue();
		Object actualValue = null;
		// Check qualifier first
		if (qualifier != null) {
			actualValue = qualifier.getAttribute(attributeName);
		}
		if (actualValue == null) {
			// Fall back on bean definition attribute
			actualValue = bd.getAttribute(attributeName);
		}
		// 这个if判断中的bdHolder.matchesName((String) expectedValue)
		// 就是 expectedValue 属性和候选Bean名称的比较  如果@Qualifier的value值和这个BeanName匹配了
		// 那么就使用这个Bean完成匹配   continue跳出本次循环
		// 一般我们只有一个@Qualifier注解  也就退出循环了  然后返回true表示匹配成功
		if (actualValue == null && attributeName.equals(AutowireCandidateQualifier.VALUE_KEY) &&
				expectedValue instanceof String && bdHolder.matchesName((String) expectedValue)) {
			// Fall back on bean name (or alias) match
			continue;
		}
		if (actualValue == null && qualifier != null) {
			// Fall back on default, but only if the qualifier is present
			actualValue = AnnotationUtils.getDefaultValue(annotation, attributeName);
		}
		if (actualValue != null) {
			actualValue = typeConverter.convertIfNecessary(actualValue, expectedValue.getClass());
		}
		// 如果一直没匹配到那么在这里返回false了
		if (!expectedValue.equals(actualValue)) {
			return false;
		}
	}
	return true;
}
至此我们了解到isAutowireCandidate这个判断就是用来处理@Autowire和@Qualifier注解的配合使用的重要步骤
3.3.2.2 addCandidateEntry(result, candidate, descriptor, requiredType)
private void addCandidateEntry(Map<String, Object> candidates, String candidateName,
			DependencyDescriptor descriptor, Class<?> requiredType) {

	if (descriptor instanceof MultiElementDescriptor) {
		Object beanInstance = descriptor.resolveCandidate(candidateName, requiredType, this);
		if (!(beanInstance instanceof NullBean)) {
			candidates.put(candidateName, beanInstance);
		}
	}
	// 像我们平时一个Service实现类注入另一个Service这种接口类型的   会进入这个else if
	// 因为candidateName是Service实现类  所以是单例的  containsSingleton(candidateName) 返回的是true
	else if (containsSingleton(candidateName) || (descriptor instanceof StreamDependencyDescriptor &&
			((StreamDependencyDescriptor) descriptor).isOrdered())) {
		// 此处获取到的是一个Bean实例  因为descriptor.resolveCandidate实际调用的就是getBean
		Object beanInstance = descriptor.resolveCandidate(candidateName, requiredType, this);
		candidates.put(candidateName, (beanInstance instanceof NullBean ? null : beanInstance));
	}
	else {
		// 在我们的例子中 注入的是一个普通的Test对象 只是被交给Spring管理了   就会在这里
		// 而此处是getType  所以返回的是一个Class对象
		candidates.put(candidateName, getType(candidateName));
	}
}
回到主流程org.springframework.beans.factory.annotation.AutowiredAnnotationBeanPostProcessor.AutowiredFieldElement#resolveFieldValue中。
当
value = beanFactory.resolveDependency(desc, beanName, autowiredBeanNames, typeConverter);
获取到值之后,进行依赖注入的相关操作,然后返回这个value,具体可以看上面的源码注释。然后回到org.springframework.beans.factory.annotation.AutowiredAnnotationBeanPostProcessor.AutowiredFieldElement#inject方法。
当
value = resolveFieldValue(field, bean, beanName);
获取到值之后,通过下面这个
ReflectionUtils.makeAccessible(field);
field.set(bean, value);
使用反射设置自动的访问控制权限为允许访问,然后反射进行赋值。这样这个字段的value就被赋值成功了。