前言
之前记录过特征图的可视化:Pytorch实现特征图可视化,当时是利用IntermediateLayerGetter 实现的,但是有很大缺陷,只能获取到一级的子模块的特征图输出,无法获取内部二级子模块的输出。今天补充另一种Pytorch官方实现好的特征提取方式,非常好用!
一、Torch FX
首先是Torch FX的介绍:FX Blog(具体可参考Reference)
FX based feature extraction is a new TorchVision utility that lets us access intermediate transformations of an input during the forward pass of a PyTorch Module. It does so by symbolically tracing the forward method to produce a graph where each node represents a single operation. Nodes are named in a human-readable manner such that one may easily specify which nodes they want to access.
Did that all sound a little complicated? Not to worry as there’s a little in this article for everyone. Whether you’re a beginner or an advanced deep-vision practitioner, chances are you will want to know about FX feature extraction. If you still want more background on feature extraction in general, read on. If you’re already comfortable with that and want to know how to do it in PyTorch, skim ahead to Existing Methods in PyTorch: Pros and Cons. And if you already know about the challenges of doing feature extraction in PyTorch, feel free to skim forward to FX to The Rescue.
也就是我们后面调用的特征提取函数是基于Torch FX实现的。总之一句话:基于FX的特征提取是一种新的TorchVision实用程序,它允许我们在PyTorch模块的前向传递过程中访问输入的中间值。
二、特征提取
1.使用get_graph_node_names提取各个节点
首先依然是查看各个网络的子层
#首先定义一个模型,这里直接加载models里的预训练模型
model = torchvision.models.resnet18(weights=models.ResNet18_Weights.DEFAULT)
#查看模型的各个层,
for name in model.named_children():
    print(name[0])
#输出,相当于把ResNet的分成了10个层
"""
conv1
bn1
relu
maxpool
layer1
layer2
layer3
layer4
avgpool
fc"""
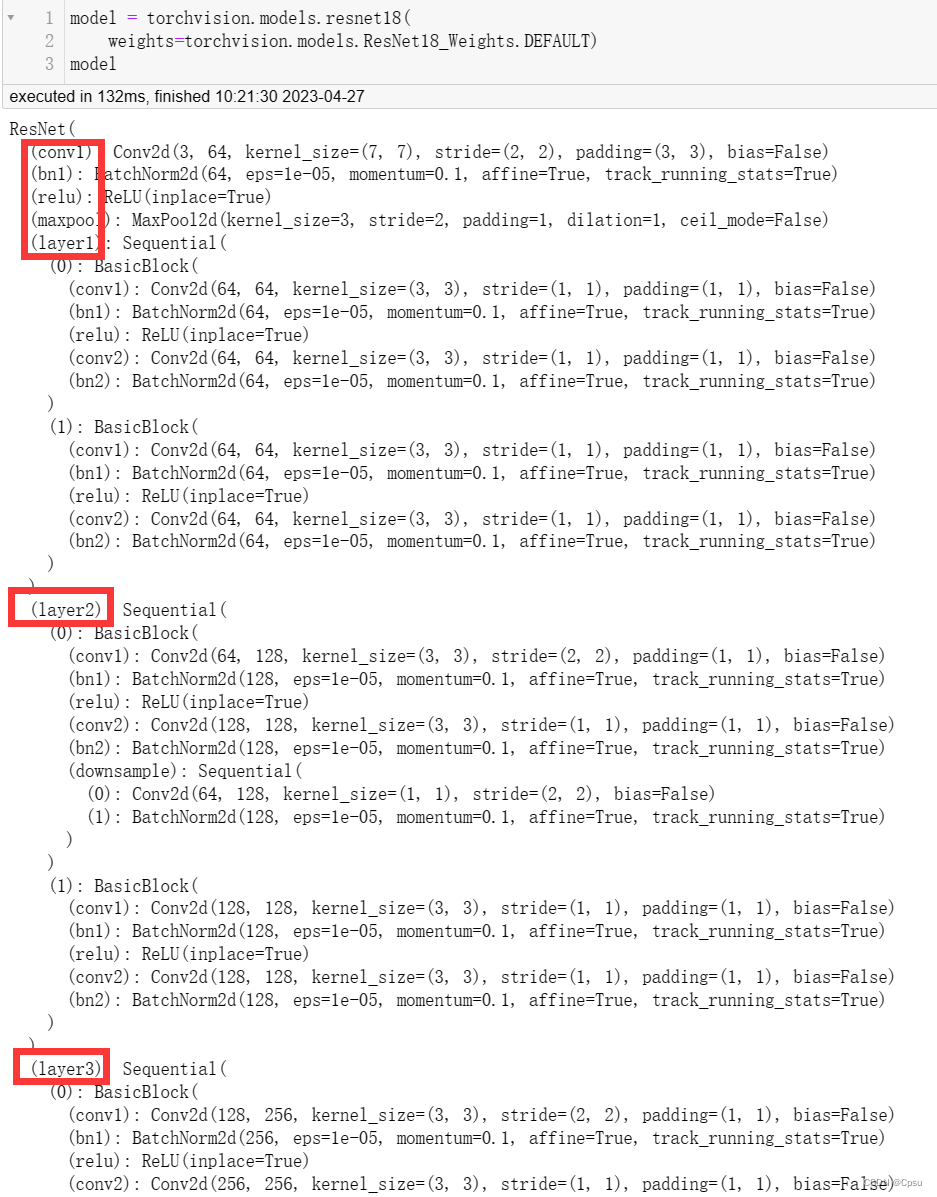
之前是利用IntermediateLayerGetter 实现的,但是有很大缺陷,只能获取到一级的子模块的特征图输出,无法获取内部二级子模块的输出。比如不能获取layer2内部第一个BasicBlock的特征图输出。现在可以利用 get_graph_node_names获取任意前向传播的子节点。
import torchvision
import torch
from torchvision.models.feature_extraction import get_graph_node_names

model = torchvision.models.resnet18(
    weights=torchvision.models.ResNet18_Weights.DEFAULT)
nodes, _ = get_graph_node_names(model)
nodes
# 输出如下
"""
['x',
 'conv1',
 'bn1',
 'relu',
 'maxpool',
 'layer1.0.conv1',
 'layer1.0.bn1',
 'layer1.0.relu',
 'layer1.0.conv2',
 'layer1.0.bn2',
 'layer1.0.add',
 'layer1.0.relu_1',
 'layer1.1.conv1',
 'layer1.1.bn1',
 'layer1.1.relu',
 'layer1.1.conv2',
 'layer1.1.bn2',
 'layer1.1.add',
 'layer1.1.relu_1',
 'layer2.0.conv1',
 'layer2.0.bn1',
 'layer2.0.relu',
 'layer2.0.conv2',
 'layer2.0.bn2',
 'layer2.0.downsample.0',
 'layer2.0.downsample.1',
 'layer2.0.add',
 'layer2.0.relu_1',
 'layer2.1.conv1',
 'layer2.1.bn1',
 'layer2.1.relu',
 'layer2.1.conv2',
 'layer2.1.bn2',
 'layer2.1.add',
 'layer2.1.relu_1',
 'layer3.0.conv1',
 'layer3.0.bn1',
 'layer3.0.relu',
 'layer3.0.conv2',
 'layer3.0.bn2',
 'layer3.0.downsample.0',
 'layer3.0.downsample.1',
 'layer3.0.add',
 'layer3.0.relu_1',
 'layer3.1.conv1',
 'layer3.1.bn1',
 'layer3.1.relu',
 'layer3.1.conv2',
 'layer3.1.bn2',
 'layer3.1.add',
 'layer3.1.relu_1',
 'layer4.0.conv1',
 'layer4.0.bn1',
 'layer4.0.relu',
 'layer4.0.conv2',
 'layer4.0.bn2',
 'layer4.0.downsample.0',
 'layer4.0.downsample.1',
 'layer4.0.add',
 'layer4.0.relu_1',
 'layer4.1.conv1',
 'layer4.1.bn1',
 'layer4.1.relu',
 'layer4.1.conv2',
 'layer4.1.bn2',
 'layer4.1.add',
 'layer4.1.relu_1',
 'avgpool',
 'flatten',
 'fc']
"""
get_graph_node_names把前向传播的各个节点都列出来了形成了一个列表。比如列表中的x表示我们的输入;layer1.0.conv2表示layer1的第1个BasicBlock的conv2节点;layer3.1.conv2表示layer3的第2个BasicBlock的conv2节点;这些节点和我们上图方框中圈出来的是一一对应的,可以结合自己的网络结构具体分析。
class AlexNet(nn.Module):
    def __init__(self):
        super(AlexNet, self).__init__()

        self.conv1 = nn.Sequential(nn.Conv2d(3, 96, 11, 4, 2),
                                   nn.ReLU(),
                                   nn.MaxPool2d(3, 2),
                                   )

        self.conv2 = nn.Sequential(nn.Conv2d(96, 256, 5, 1, 2),
                                   nn.ReLU(),
                                   nn.MaxPool2d(3, 2),
                                   )

        self.conv3 = nn.Sequential(nn.Conv2d(256, 384, 3, 1, 1),
                                   nn.ReLU(),
                                   nn.Conv2d(384, 384, 3, 1, 1),
                                   nn.ReLU(),
                                   nn.Conv2d(384, 256, 3, 1, 1),
                                   nn.ReLU(),
                                   nn.MaxPool2d(3, 2))


        self.fc=nn.Sequential(nn.Linear(256*6*6, 4096),
                                nn.ReLU(),
                                nn.Dropout(0.5),
                                nn.Linear(4096, 4096),
                                nn.ReLU(),
                                nn.Dropout(0.5),
                                nn.Linear(4096, 100),
                                )

    def forward(self, x):
        x=self.conv1(x)
        x=self.conv2(x)
        x=self.conv3(x)
        output=self.fc(x.view(-1, 256*6*6))
        return output

model=AlexNet()
nodes, _ = get_graph_node_names(model)
nodes
# 输出如下
['x',
 'conv1.0',
 'conv1.1',
 'conv1.2',
 'conv2.0',
 'conv2.1',
 'conv2.2',
 'conv3.0',
 'conv3.1',
 'conv3.2',
 'conv3.3',
 'conv3.4',
 'conv3.5',
 'conv3.6',
 'view',
 'fc.0',
 'fc.1',
 'fc.2',
 'fc.3',
 'fc.4',
 'fc.5',
 'fc.6']
如果是自定义网络结构,在__init__中初始化了self.conv1 、self.conv2、self.conv3、self.fc与输出列表相对应。
以conv3为例:
 self.conv3 = nn.Sequential(nn.Conv2d(256, 384, 3, 1, 1),
                                   nn.ReLU(),
                                   nn.Conv2d(384, 384, 3, 1, 1),
                                   nn.ReLU(),
                                   nn.Conv2d(384, 256, 3, 1, 1),
                                   nn.ReLU(),
                                   nn.MaxPool2d(3, 2))
总共定义了7层,3个卷积层、3个激活层、1个池化层。 输出节点列表中的conv3.0就表示conv3的第一个节点即第一个卷积层nn.Conv2d(256, 384, 3, 1, 1),同理, conv3.1表示conv3的第二个节点即nn.ReLU()。
2.使用create_feature_extractor提取输出
在获取节点信息之后,我么可以利用create_feature_extractor来获取对应节点层的输出。所以get_graph_node_names只是帮助我们获取节点层的信息。
比如,我只想获取layer3和layer4内部的第一个卷积层的输出即layer3.0.conv1, layer4.0.conv1:
import torch
import torchvision
from torchvision.models.feature_extraction import create_feature_extractor

# 根据get_graph_node_names得到的节点层信息
# 定义想要得到的输出层
features = ['layer3.0.conv1', "layer4.0.conv1"]

model = torchvision.models.resnet18(
					weights=torchvision.models.ResNet18_Weights.DEFAULT)

# return_nodes参数就是返回对应的输出
feature_extractor = create_feature_extractor(model, return_nodes=features)
# 定义输入
x=torch.ones(1, 3, 224, 224)
# 得到一个我们想要的输出层的字典
out = feature_extractor(x)
out

# tensor即对应的输出
"""
{'layer3.0.conv1': tensor(...),
 'layer4.0.conv1': tensor(...) }
"""
当然,并不是一定要完全按照get_graph_node_names得到的节点层信息来定义输出层。比如,我只想获取layer3整个层的输出特征图,我并不关心layer3内部子层的输出:
import torch
import torchvision
from torchvision.models.feature_extraction import create_feature_extractor

# 定义layer3即可
# 其他层同理
features = ['layer3']
model = torchvision.models.resnet18(
    weights=torchvision.models.ResNet18_Weights.DEFAULT)
feature_extractor = create_feature_extractor(model, return_nodes=features)
# 定义输入
x=torch.ones(1, 3, 224, 224)
# 得到一个我们想要的输出层的字典
out = feature_extractor(x)
out
"""
{'layer3': tensor(...)}
"""
return_nodes参数也可以传入一个字典,字典的键是节点层,值是自定义别名。比如{"layer3":"output1","layer4":"output2"}
features = {"layer3":"output1","layer4":"output2"}
model = torchvision.models.resnet18(
    weights=torchvision.models.ResNet18_Weights.DEFAULT)
feature_extractor = create_feature_extractor(model, return_nodes=features)
x=torch.ones(1, 3, 224, 224)
out = feature_extractor(x)
out
# 输出如下
"""
{'output1': tensor(...),
 'output2': tensor(...)}

"""
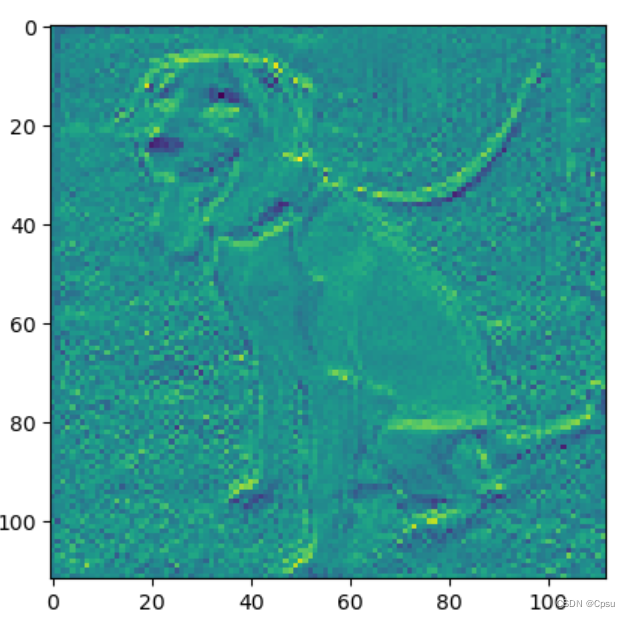
3.六行代码可视化特征图
import torch
import torchvision
from PIL import Image
import torchvision.transforms as transforms
from matplotlib import pyplot as plt
from torchvision.models.feature_extraction import create_feature_extractor


transform = transforms.Compose([transforms.Resize(256),
                                transforms.CenterCrop(224),
                                transforms.ToTensor(),
                                transforms.Normalize([0.485, 0.456, 0.406], [0.229, 0.224, 0.225])])

model = torchvision.models.resnet18(weights=torchvision.models.ResNet18_Weights.DEFAULT)

feature_extractor = create_feature_extractor(model, return_nodes={"conv1":"output"})

original_img = Image.open("dog.jpg")

img=transform(original_img).unsqueeze(0)

out = feature_extractor(img)

# 这里没有分通道可视化
plt.imshow(out["output"][0].transpose(0,1).sum(1).detach().numpy())

三、Reference
Torch FX官方文档:Torch FX官方文档介绍
Torch FX Blog:Feature Extraction in TorchVision using Torch FX
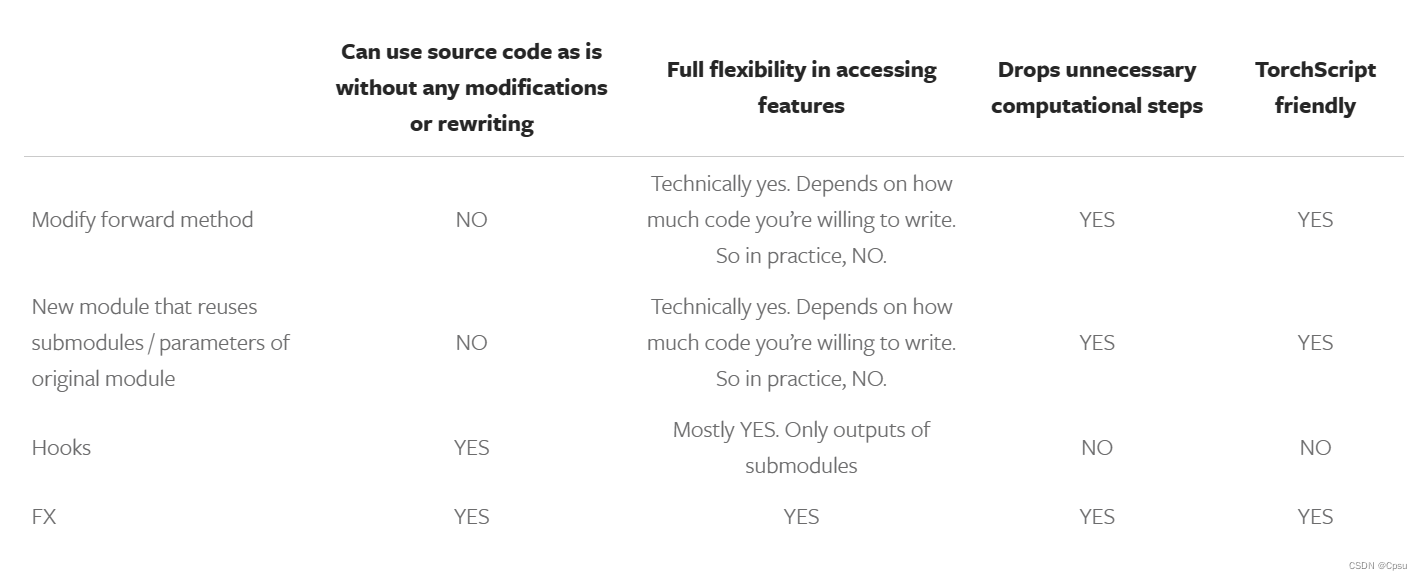
官方对四种获取特征输出的方式进行了对比,这篇Blog写的比较详细,可以仔细看看。