1.uni-app转小程序组件使用插槽的问题
uni-app封装的组件使用问题
1.插槽样式:H5页面编译是有效果的,在小程序中编译的位置错误,它会跳出本来的插槽位置到最后.
!!!解决方法: 使用父传子传递值,就可以继承组件的样式
封装的组件

使用组件

2.传递参数:H5页面能传递对象,在小程序中传递会报错(item(传递的参数) is not defined)
!!!解决方法: 判定当item有在执行。
3.使用函数: 首先H5中一切正常,
小程序中{{item.name}}和 {{item.visitDate}}正常显示,组件中使用函数放方法传递参数报错
,找不到传递的参数,不管在当前页面重新定义函数使用方法,也都会报错.
!!!解决方法: 封装一个组件–传递需要的参数比如:item.visitDate–在使用公共的方法,所以的都能实现
封装的组件
<template>
	<view>{{date ? getCurrentDate(date) : ''}}</view>
</template>
<script>
	import {getCurrentDate} from '@/common/moment.js'
	export default {
		data () {	return {}},
		props: {date: {type: [Number, String],default: ''}},
		mounted() {},
		methods: {getCurrentDate: getCurrentDate}}
</script>
使用组件

2.H5和小程序跨端兼容
uni-app官方文档内有写到条件编译点击进入
1.条件编译是用特殊的注释作为标记,在编译时根据这些特殊的注释,将注释里面的代码编译到不同平台。
写法:以 #ifdef 或 #ifndef 加 %PLATFORM% 开头,以 #endif 结尾。


注意:


3.自定义胶囊按钮封装组件以及适配
封装胶囊组件代码(适配苹果刘海屏以及页面距离顶部位置)
首先你得知道uni-app有获取胶囊的API ,uni.getMenuButtonBoundingClientRect()
只作为参考性…
<template>
<!-- #ifdef MP-WEIXIN -->
<view :class="['flex row header_box ', config.noBgc ? '' : 'header_box_bg']" :style="{paddingTop:`${BarClass.top}px`, height:`${BarClass.top}px`}">
<view class="header_left" :style="{width:`${BarClass.width}px`}">
<view class="flex row left_btn_box center" :style="{height:`${BarClass.height}px`, borderRadius:`${BarClass.height}px`}">
<view class="left_btn flex center" @tap="goBack">
<view class="font icon"></view>
</view>
<view v-if="config.right_text || config.right_icon" class="left_border"></view>
<view v-if="config.right_text || config.right_icon" class="left_btn flex center" @tap="urlBtn">
<text v-if="config.right_text" class="font icon gradient_text">{{config.right_text}}</text>
<text v-else :class="['font icon gradient_text ', config.right_icon || '']"></text>
</view>
</view>
</view>
<view class="header_center full center over_ellipsis font14">{{config.title}}</view>
<view class="header_right"></view>
</view>
<!-- #endif -->
<!-- #ifndef MP-WEIXIN -->
<view :class="['flex row header_box center ', config.noBgc ? '' : 'header_box_bg']">
<view class="header_left flex row">
<view class="btn_box flex center" @tap="goBack">
<view class="font icon" :style="config.iconStyle"></view>
</view>
</view>
<view class="header_center full center over_ellipsis font16">{{config.title}}</view>
<view class="header_right flex row">
<view v-if="config.right_text || config.right_icon" class="btn_box flex row center" @tap="$emit('goBtn')">
<text v-if="config.right_text" class="font icon font14 gradient_text">{{config.right_text}}</text>
<text v-else :class="['font icon font14 gradient_text ', config.right_icon || '']" :style="config.iconStyle"></text>
</view>
</view>
</view>
<!-- #endif -->
</template>
<script>
export default {
data() {
return {
url: "",
handelBarHeight: this.handelBarHeight,
BarClass: {}
}
},
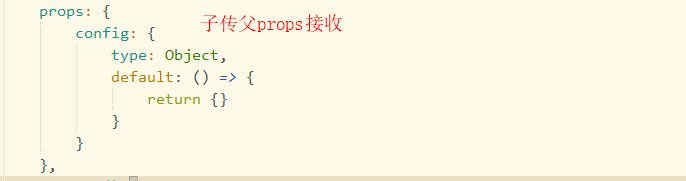
props: {
config: {
type: Object,
default: () => {
return {}
}
}
},
onReady() {
//使用的uni-app获取胶囊的宽高大小 距离顶部的top等样式
let menuButtonInfo = uni.getMenuButtonBoundingClientRect()
this.BarClass = menuButtonInfo
//获取自定义头部的高
handelBarHeight = () => {
// #ifdef MP
return (menuButtonInfo && menuButtonInfo.height ? menuButtonInfo.height : 0) + 8
// #endif
// #ifndef MP
return menuButtonInfo && menuButtonInfo.navigationBarHeight ?menuButtonInfo.navigationBarHeight : 44
// #endif
}
},
mounted() {
},
methods: {
goBack() {
console.log(11)
uni.navigateBack({
delta: 1,
})
},
urlBtn() {this.$emit("goBtn")
}
}
}
</script>
<style scoped lang="scss">
.header_box {
position: fixed;
left: 0;
top: 0;
width: 100%;
z-index: 999999;
/* #ifndef MP */
height: 88rpx;
padding-top: var(--status-bar-height);
/* #endif */
.header_left,
.header_right {
width: 176rpx;
}
.header_left {
/* #ifdef MP-WEIXIN */
margin-left: 20rpx;
/* #endif */
.left_btn_box {
height: 60rpx;
border: 2rpx solid #eeeeee;
border-radius: 60rpx;
background: rgba(255, 255, 255, 0.86);
.left_btn {
width: 50%;
height: 100%;
text-align: center;
.icon {
font-size: 28rpx;
font-weight: bold;
}
}
.left_border {
width: 4rpx;
height: 36rpx;
background: #eeeeee;
}
}
.btn_box {
padding: 0 20rpx;
height: 58rpx;
}
}
.header_center {
margin: 0 10rpx;
text-align: center;
/* #ifdef MP-WEIXIN */
line-height: 60rpx;
/* #endif */
/* #ifndef MP-WEIXIN */
font-weight: 700;
/* #endif */
}
.header_right {
/* #ifdef MP-WEIXIN */
margin-right: 20rpx;
/* #endif */
justify-content: flex-end;
.btn_box {
padding: 0 20rpx;
height: 58rpx;
}
}
}
.header_box_bg {
border-bottom: 2rpx solid #e5e5e5;
background: #ffffff;
}
</style>
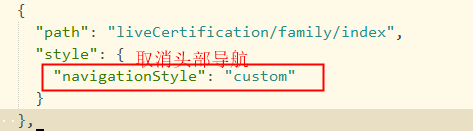
使用顶部组件,
注意你使用的自定义的头部就要在(pages.json设置:custom)
4.定义公共方法并挂载原型链上
1.创建一个utils.js写入方法
export const handelBarHeight = () => {
	let menuButtonInfo = {}
	// #ifdef MP-WEIXIN
	menuButtonInfo = uni.getMenuButtonBoundingClientRect()
	// #endif
	// #ifndef MP
	menuButtonInfo = uni.getSystemInfoSync()
	// #endif
	return menuButtonInfo
}
2.全局都要用的东西 在mian.js里面引入
// main.js
import Vue from 'vue'
import App from './App'
import {handelBarHeight} from './util/util.js'   //引入

Vue.prototype.$handelBarHeight = handelBarHeight  //通过Vue.prototype挂载至全局

Vue.config.productionTip = false

App.mpType = 'app'

const app = new Vue({
    ...App
})
app.$mount()
3.如何使用
//要使用的页面
//data使用
data(){
return {
height:this.$handelBarHeight
}
},
//methods使用
methods: {
 函数名(){
let a=this.$handelBarHeight
}
}