目录
基于XML管理bean
入门案例
引入依赖
创建类HelloWorld
创建Spring的配置文件
在Spring的配置文件中配置bean
创建测试类测试
思路
获取bean
方式一:根据id获取
方式二:根据类型获取
方式三:根据id和类型
总结
扩展
结论
依赖注入之setter注入
配置bean时为属性赋值
依赖注入之构造器注入
配置bean
特殊值处理
(1)字面量赋值
(2)null值
(3)xml实体
(4)CDATA节
为类类型属性赋值
创建Clazz类
修改Student
方式一:引用外部已声明的bean
方式二:内部bean
方式三:级联属性赋值
为数组类型属性赋值
修改Student
配置bean
测试
类类型的数组类型
为集合类型属性赋值
(1)为List集合类型属性赋值
(2)为Map集合类型属性赋值
(3)引用集合类型的bean
p命名空间
引入外部属性文件
(1)加入依赖
(2)创建外部属性文件
(3)引入属性文件
(4)配置bean
(5)测试
基于XML管理bean
入门案例
引入依赖
pom.xml
        <!--Spring-->
        <dependency>
            <groupId>org.springframework</groupId>
            <artifactId>spring-context</artifactId>
            <version>${spring.version}</version>
        </dependency>
        <!--Spring end-->
创建类HelloWorld
com.spring.pojo.HelloWorld
public class HelloWorld {

    public void sayHello(){
        System.out.println("Spring Test");
    }
}
创建Spring的配置文件
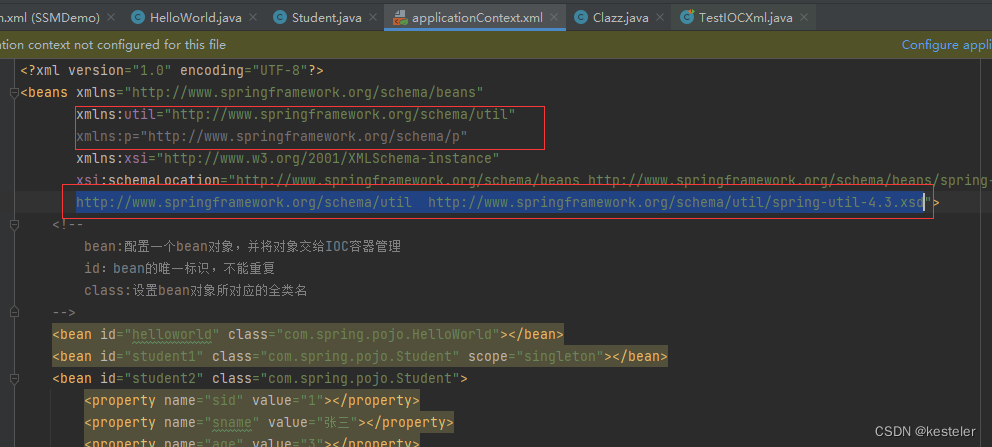
创建applicationContext.xml
在Spring的配置文件中配置bean
<?xml version="1.0" encoding="UTF-8"?>
<beans xmlns="http://www.springframework.org/schema/beans"
       xmlns:xsi="http://www.w3.org/2001/XMLSchema-instance"
       xsi:schemaLocation="http://www.springframework.org/schema/beans http://www.springframework.org/schema/beans/spring-beans.xsd">
    <!--
        bean:配置一个bean对象,并将对象交给IOC容器管理
        id:bean的唯一标识,不能重复
        class:设置bean对象所对应的全类名
    -->
    <bean id="helloworld" class="com.spring.pojo.HelloWorld"></bean>
</beans>
创建测试类测试
com.kesteler.springTest.TestHelloWorld
public class TestHelloWorld {
@Test
public void test(){
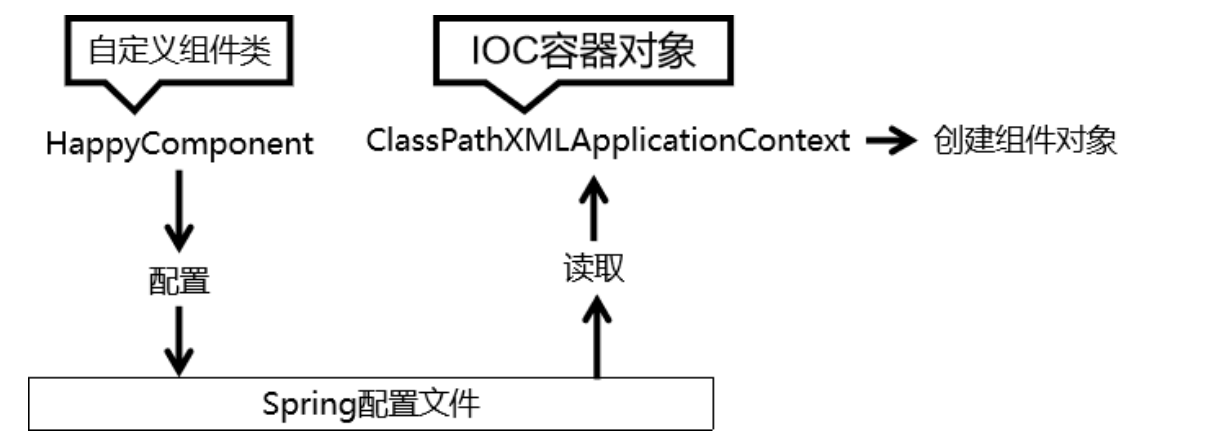
ApplicationContext ioc = new ClassPathXmlApplicationContext("config/applicationContext.xml");
HelloWorld helloWorld = (HelloWorld)ioc.getBean("helloworld");
helloWorld.sayHello();
}
}

思路
com.spring.pojo下创建Student
package com.spring.pojo;

public class Student {
    private Integer sid;
    private String sname;
    private Integer age;
    private String gender;

    public Student(){

    }

    public Student(Integer sid, String sname, Integer age, String gender) {
        this.sid = sid;
        this.sname = sname;
        this.age = age;
        this.gender = gender;
    }

    public Integer getSid() {
        return sid;
    }

    public void setSid(Integer sid) {
        this.sid = sid;
    }

    public String getSname() {
        return sname;
    }

    public void setSname(String sname) {
        this.sname = sname;
    }

    public Integer getAge() {
        return age;
    }

    public void setAge(Integer age) {
        this.age = age;
    }

    public String getGender() {
        return gender;
    }

    public void setGender(String gender) {
        this.gender = gender;
    }

    @Override
    public String toString() {
        return "Student{" +
                "sid=" + sid +
                ", sname='" + sname + '\'' +
                ", age=" + age +
                ", gender='" + gender + '\'' +
                '}';
    }
}
配置文件applicationContext.xml
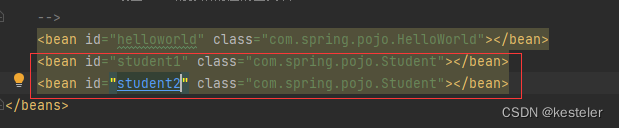
<bean id="student1" class="com.spring.pojo.Student"></bean>
创建测试文件com.kesteler.springTest下的TestIOCXml.java
package com.kesteler.springTest;
import com.spring.pojo.Student;
import org.junit.Test;
import org.springframework.context.ApplicationContext;
import org.springframework.context.support.ClassPathXmlApplicationContext;
public class TestIOCXml {
@Test
public void testIOC(){
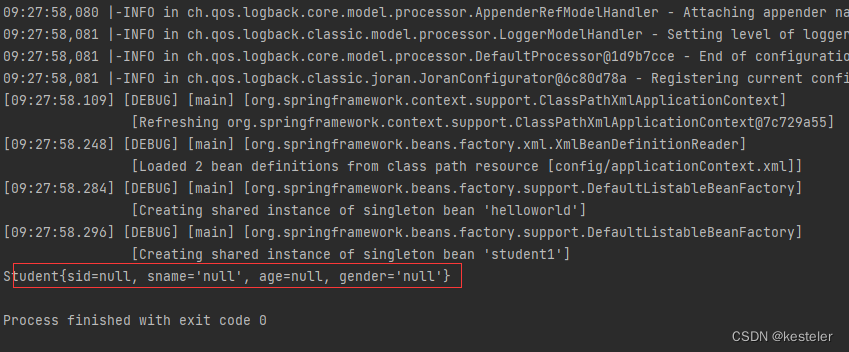
ApplicationContext ac = new ClassPathXmlApplicationContext("config/applicationContext.xml");
Student student = (Student) ac.getBean("student1");
System.out.println(student);
}
}

Spring 底层默认通过反射技术调用组件类的无参构造器来创建组件对象,这一点需要注意。如果在需要无参构造器时,没有无参构造器,则会抛出下面的异常:
获取bean
方式一:根据id获取
由于 id 属性指定了 bean 的唯一标识,所以根据 bean 标签的 id 属性可以精确获取到一个组件对象。
    @Test
    public void testIOC(){
        ApplicationContext ac = new ClassPathXmlApplicationContext("config/applicationContext.xml");
        Student student = (Student) ac.getBean("student1");
        System.out.println(student);
    }
方式二:根据类型获取
    @Test
    public void testIOC(){
        ApplicationContext ac = new ClassPathXmlApplicationContext("config/applicationContext.xml");
        //Student student = (Student) ac.getBean("student1");
        Student student = (Student)ac.getBean(Student.class);
        System.out.println(student);
    }
这里如果在配置文件中同一个类配置多个id会发生什么呢?
 说明在配置文件中一个类出现一次即可,要用类名获取对象的话,需要查看配置文件有无同一个类不同id的情况。
如果一个类都不配置呢

当使用类名去获取对象,仅有且必须有配置一个id
方式三:根据id和类型
    @Test
    public void testIOC(){
        ApplicationContext ac = new ClassPathXmlApplicationContext("config/applicationContext.xml");
        //Student student = (Student) ac.getBean("student1");
        //Student student = (Student)ac.getBean(Student.class);
        Student student = (Student)ac.getBean("student1",Student.class);
        System.out.println(student);
    }

总结
当根据类型获取bean时,要求IOC容器中指定类型的bean有且只能有一个。
所以常用的是第2种方式,根据类型获取。
因为类名往往配置一个即可,如果像配置多个,可以用scope属性更改,可选择单例或者多例:
扩展
如果组件类实现了接口,根据接口类型可以获取 bean 吗?
可以,前提是bean唯一
创建一个Person接口,Student实现Person
public class Student implements Person
测试程序
    @Test
    public void testIOC(){
        ApplicationContext ac = new ClassPathXmlApplicationContext("config/applicationContext.xml");
        //Student student = (Student) ac.getBean("student1");
        //Student student = (Student)ac.getBean(Student.class);
        //Student student = (Student)ac.getBean("student1",Student.class);
        Student student = (Student)ac.getBean(Person.class);
        System.out.println(student);
    }
如果一个接口有多个实现类,这些实现类都配置了 bean,根据接口类型可以获取 bean 吗?
不行,因为bean不唯一
创建Worker实现Person
package com.spring.pojo;

public class Worker implements Person {
    private Integer wid;
    private String wname;
    private Integer age;
    private String gender;

    public Worker() {
    }

    public Worker(Integer wid, String wname, Integer age, String gender) {
        this.wid = wid;
        this.wname = wname;
        this.age = age;
        this.gender = gender;
    }

    public Integer getWid() {
        return wid;
    }

    public void setWid(Integer wid) {
        this.wid = wid;
    }

    public String getWname() {
        return wname;
    }

    public void setWname(String wname) {
        this.wname = wname;
    }

    public Integer getAge() {
        return age;
    }

    public void setAge(Integer age) {
        this.age = age;
    }

    public String getGender() {
        return gender;
    }

    public void setGender(String gender) {
        this.gender = gender;
    }
}
继续上一个测试程序
    @Test
    public void testIOC(){
        ApplicationContext ac = new ClassPathXmlApplicationContext("config/applicationContext.xml");
        //Student student = (Student) ac.getBean("student1");
        //Student student = (Student)ac.getBean(Student.class);
        //Student student = (Student)ac.getBean("student1",Student.class);
        Student student = (Student)ac.getBean(Person.class);
        System.out.println(student);
    }

结论
根据类型来获取bean时,在满足bean唯一性的前提下,其实只是看:『对象 instanceof 指定的类型』的返回结果,只要返回的是true就可以认定为和类型匹配,能够获取到。
依赖注入之setter注入
set注入实际上是调用实体类中的set方法,所以数据库字段其实是和实体类中的set和get方法中的get和set后面的部分映射
配置bean时为属性赋值
    <bean id="student2" class="com.spring.pojo.Student">
        <property name="sid" value="1"></property>
        <property name="sname" value="张三"></property>
        <property name="age" value="3"></property>
        <property name="gender" value="男"></property>
    </bean>
测试
    @Test
    public void testIOC2(){
        ApplicationContext ac = new ClassPathXmlApplicationContext("config/applicationContext.xml");
        Student student = (Student) ac.getBean("student2",Student.class);
        System.out.println(student);
    }

依赖注入之构造器注入
实体类中必须有有参构造函数
配置bean
注意:
constructor-arg标签还有两个属性可以进一步描述构造器参数:
index属性:指定参数所在位置的索引(从0开始)
name属性:指定参数名
    <bean id="student3" class="com.spring.pojo.Student">
        <constructor-arg value="2"></constructor-arg>
        <constructor-arg value="李四"></constructor-arg>
        <constructor-arg value="4"></constructor-arg>
        <constructor-arg value="女"></constructor-arg>
    </bean>
测试
    @Test
    public void testIOC3(){
        ApplicationContext ac = new ClassPathXmlApplicationContext("config/applicationContext.xml");
        Student student = (Student) ac.getBean("student3",Student.class);
        System.out.println(student);
    }

在不加Index的情况下是按照构造函数的参数顺序来的,如果顺序有变,可以通过Index赋值
    <bean id="student3" class="com.spring.pojo.Student">
        <constructor-arg value="2"></constructor-arg>
        <constructor-arg value="4"></constructor-arg>
        <constructor-arg value="李四"></constructor-arg>
        <constructor-arg value="女"></constructor-arg>
    </bean>
报错:Could not convert argument value of type [java.lang.String] to required type [java.lang.Integer]
原因即是第三个参数age是Integer,无法将String转换成Integer
修改:
    <bean id="student3" class="com.spring.pojo.Student">
        <constructor-arg value="2"></constructor-arg>
        <constructor-arg value="4" index="2"></constructor-arg>
        <constructor-arg value="李四" index="1"></constructor-arg>
        <constructor-arg value="女"></constructor-arg>
    </bean>

总结:
1.当construcrot-arg未按构造函数的参数顺序来时,可通过index或者name去指定。
2.当同时有两个有参构造函数时,无法自动适配到使用哪个构造函数,就必须通过name属性去适配构造函数。
特殊值处理
(1)字面量赋值
什么是字面量?
int a = 10;
声明一个变量a,初始化为10,此时a就不代表字母a了,而是作为一个变量的名字。当我们引用a的时候,我们实际上拿到的值是10。
而如果a是带引号的:‘a’,那么它现在不是一个变量,它就是代表a这个字母本身,这就是字面量。所以字面量没有引申含义,就是我们看到的这个数据本身。
(2)null值
区分:
        <constructor-arg name="gender">
            <null></null>
        </constructor-arg>
和
<constructor-arg name="gender" value="null"></constructor-arg>
两者测试程序运行后得到的输出显示是一样的

但实质区别,一个是空值null,一个字符串“null”
(3)xml实体
<!-- 小于号在XML文档中用来定义标签的开始,不能随便使用 -->
<!-- 解决方案一:使用XML实体来代替 -->
<property name="expression" value="a < b"/>
<!-- 小于号< 大于号> -->
(4)CDATA节
用<![CDATA[expression]]>包裹着就不需要转义
<property name="expression">
<!-- 解决方案二:使用CDATA节 -->
<!-- CDATA中的C代表Character,是文本、字符的含义,CDATA就表示纯文本数据 -->
<!-- XML解析器看到CDATA节就知道这里是纯文本,就不会当作XML标签或属性来解析 -->
<!-- 所以CDATA节中写什么符号都随意 -->
<value><![CDATA[a < b]]></value>
</property>
这里注意CDATA节必须放在value标签中,不能在value属性内部出现。
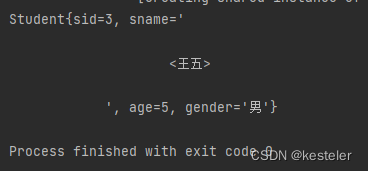
    <bean id="student4" class="com.spring.pojo.Student">
        <constructor-arg value="3"></constructor-arg>
        <constructor-arg value="5" index="2"></constructor-arg>
        <constructor-arg index="1">
            <value><![CDATA[<王五>]]></value>
        </constructor-arg>
        <constructor-arg value="男"></constructor-arg>
    </bean>
测试
    @Test
    public void testIOC4(){
        ApplicationContext ac = new ClassPathXmlApplicationContext("config/applicationContext.xml");
        Student student = (Student) ac.getBean("student4",Student.class);
        System.out.println(student);
    }

这里有个小细节
    <bean id="student4" class="com.spring.pojo.Student">
        <constructor-arg value="3"></constructor-arg>
        <constructor-arg value="5" index="2"></constructor-arg>
        <constructor-arg index="1">
            <value>
                <![CDATA[
                    <王五>
                ]]>
            </value>
        </constructor-arg>
        <constructor-arg value="男"></constructor-arg>
    </bean>
为类类型属性赋值
创建Clazz类
com.spring.pojo下
package com.spring.pojo;

public class Clazz {
    private Integer cid;
    private String cname;

    public Clazz() {
    }

    public Clazz(Integer cid, String cname) {
        this.cid = cid;
        this.cname = cname;
    }

    public Integer getCid() {
        return cid;
    }

    public void setCid(Integer cid) {
        this.cid = cid;
    }

    public String getCname() {
        return cname;
    }

    public void setCname(String cname) {
        this.cname = cname;
    }

    @Override
    public String toString() {
        return "Clazz{" +
                "cid=" + cid +
                ", cname='" + cname + '\'' +
                '}';
    }
}
修改Student
package com.spring.pojo;

public class Student implements Person {
    private Integer sid;
    private String sname;
    private Integer age;
    private String gender;
    private Class clazz;

    public Student(){

    }

    public Student(Integer sid, String sname, Integer age, String gender) {
        this.sid = sid;
        this.sname = sname;
        this.age = age;
        this.gender = gender;
    }

    public Integer getSid() {
        return sid;
    }

    public void setSid(Integer sid) {
        this.sid = sid;
    }

    public String getSname() {
        return sname;
    }

    public void setSname(String sname) {
        this.sname = sname;
    }

    public Integer getAge() {
        return age;
    }

    public void setAge(Integer age) {
        this.age = age;
    }

    public String getGender() {
        return gender;
    }

    public void setGender(String gender) {
        this.gender = gender;
    }

    public Class getClazz(){return clazz;}

    public void setClazz(Class clazz){
        this.clazz = clazz;
    }

    @Override
    public String toString() {
        return "Student{" +
                "sid=" + sid +
                ", sname='" + sname + '\'' +
                ", age=" + age +
                ", gender='" + gender + '\'' +
                ",clazz=" + clazz +
                '}';
    }
}
Clazz是类,不能直接用字面量赋值,可以使用以下三种方法:
方式一:引用外部已声明的bean
ref作用:引用IOC容器中的某个bean的id
    <bean id="student5" class="com.spring.pojo.Student">
        <property name="sid" value="5"></property>
        <property name="sname" value="周五"></property>
        <property name="age" value="5"></property>
        <property name="gender" value="男"></property>
        <property name="clazz" ref="class1"></property>
    </bean>
    <bean id="class1" class="com.spring.pojo.Clazz">
        <property name="cid" value="1001"></property>
        <property name="cname" value="一班"></property>
    </bean>
测试
    @Test
    public void testIOC5(){
        ApplicationContext ac = new ClassPathXmlApplicationContext("config/applicationContext.xml");
        Student student = (Student) ac.getBean("student5",Student.class);
        System.out.println(student);
    }

方式二:内部bean
applicationContext.xml
    <bean id="student6" class="com.spring.pojo.Student">
        <property name="sid" value="6"></property>
        <property name="sname" value="吴六"></property>
        <property name="age" value="6"></property>
        <property name="gender" value="女"></property>
        <property name="clazz">
            <bean id="class2" class="com.spring.pojo.Clazz">
                <property name="cid" value="1001"></property>
                <property name="cname" value="一班"></property>
            </bean>
        </property>
    </bean>
TestIOCXml.java测试
    @Test
    public void testIOC6(){
        ApplicationContext ac = new ClassPathXmlApplicationContext("config/applicationContext.xml");
        Student student = (Student) ac.getBean("student6",Student.class);
        System.out.println(student);
    }

内部Bean只能在当前Bean的内部使用,不能直接通过ioc来获取。
方式三:级联属性赋值
applicationContext.xml,利用方式一中已声明的外部class1
    <bean id="student7" class="com.spring.pojo.Student">
        <property name="sid" value="6"></property>
        <property name="sname" value="吴六"></property>
        <property name="age" value="6"></property>
        <property name="gender" value="女"></property>
        <property name="clazz" ref="class1"></property>
        <property name="clazz.cid" value="1002"></property>
        <property name="clazz.cname" value="二班"></property>
    </bean>
TestIOCXml.java测试
    @Test
    public void testIOC7(){
        ApplicationContext ac = new ClassPathXmlApplicationContext("config/applicationContext.xml");
        Student student = (Student) ac.getBean("student7",Student.class);
        System.out.println(student);
    }

为数组类型属性赋值
修改Student
package com.spring.pojo;

import java.lang.reflect.Array;
import java.util.Arrays;

public class Student implements Person {
    private Integer sid;
    private String sname;
    private Integer age;
    private String gender;
    private Clazz clazz;
    private String[] hobby;
    private Clazz[] classArray;

    public Student(){

    }

    public Student(Integer sid, String sname, Integer age, String gender) {
        this.sid = sid;
        this.sname = sname;
        this.age = age;
        this.gender = gender;
    }

    public Integer getSid() {
        return sid;
    }

    public void setSid(Integer sid) {
        this.sid = sid;
    }

    public String getSname() {
        return sname;
    }

    public void setSname(String sname) {
        this.sname = sname;
    }

    public Integer getAge() {
        return age;
    }

    public void setAge(Integer age) {
        this.age = age;
    }

    public String getGender() {
        return gender;
    }

    public void setGender(String gender) {
        this.gender = gender;
    }

    public Clazz getClazz(){return clazz;}

    public void setClazz(Clazz clazz){
        this.clazz = clazz;
    }

    public String[] getHobby(){return hobby;}

    public void setHobby(String[] hobby){
        this.hobby = hobby;
    }

    public Clazz[] getClassArray(){return classArray;}

    public void setClassArray(Clazz[] classArray){
        this.classArray = classArray;
    }

    @Override
    public String toString() {
        return "Student{" +
                "sid=" + sid +
                ", sname='" + sname + '\'' +
                ", age=" + age +
                ", gender='" + gender + '\'' +
                ",clazz=" + clazz +
                ",hobby=" + Arrays.toString(hobby) +
                ",classArray=" + Arrays.toString(classArray) +
                '}';
    }
}
配置bean
applicationContext.xml
    <bean id="student8" class="com.spring.pojo.Student">
        <property name="sid" value="8"></property>
        <property name="sname" value="王八"></property>
        <property name="age" value="8"></property>
        <property name="gender" value="男"></property>
        <property name="clazz" ref="class1"></property>
        <property name="clazz.cid" value="1002"></property>
        <property name="clazz.cname" value="二班"></property>
        <property name="hobby">
            <array>
                <value>篮球</value>
                <value>足球</value>
                <value>乒乓</value>
            </array>
        </property>
    </bean>
测试
TestIOCXml.java
    @Test
    public void testIOC8(){
        ApplicationContext ac = new ClassPathXmlApplicationContext("config/applicationContext.xml");
        Student student = (Student) ac.getBean("student8",Student.class);
        System.out.println(student);
    }

类类型的数组类型
    <bean id="student8" class="com.spring.pojo.Student">
        <property name="sid" value="8"></property>
        <property name="sname" value="王八"></property>
        <property name="age" value="8"></property>
        <property name="gender" value="男"></property>
        <property name="clazz" ref="class1"></property>
        <property name="clazz.cid" value="1002"></property>
        <property name="clazz.cname" value="二班"></property>
        <property name="hobby">
            <array>
                <value>篮球</value>
                <value>足球</value>
                <value>乒乓</value>
            </array>
        </property>
        <property name="classArray">
            <array>
                <ref bean="class3"></ref>
            </array>
        </property>
    </bean>
    <bean id="class3" class="com.spring.pojo.Clazz">
        <property name="cid" value="1003"></property>
        <property name="cname" value="三班"></property>
    </bean>

为集合类型属性赋值
(1)为List集合类型属性赋值
在Clazz类中添加以下代码:
package com.spring.pojo;

import java.util.List;

public class Clazz {
    private Integer cid;
    private String cname;
    private List<Student> students;

    public Clazz() {
    }

    public Clazz(Integer cid, String cname) {
        this.cid = cid;
        this.cname = cname;
    }

    public Integer getCid() {
        return cid;
    }

    public void setCid(Integer cid) {
        this.cid = cid;
    }

    public String getCname() {
        return cname;
    }

    public void setCname(String cname) {
        this.cname = cname;
    }

    @Override
    public String toString() {
        return "Clazz{" +
                "cid=" + cid +
                ", cname='" + cname + '\'' +
                ", students=" + students +
                '}';
    }
}
方式一:内部的list结合
配置applicationContext.xml:
这里注意list标签内部的属性也有value和ref,其中value用来赋值字面量,ref用来赋值类类型的引用。
    <bean id="class4" class="com.spring.pojo.Clazz">
        <property name="cid" value="1004"></property>
        <property name="cname" value="四班"></property>
        <property name="students">
            <list>
                <ref bean="student2"></ref>
                <ref bean="student3"></ref>
                <ref bean="student4"></ref>
            </list>
        </property>
    </bean>

方式二:引用list集合的bean
在applicationContext.xml中增加bean
    <!-- 方式二:引用list集合的bean -->
    <!--
        配置一个集合类型的bean需要用到新的约束util
     -->
    <bean id="class5" class="com.spring.pojo.Clazz">
        <property name="cid" value="1005"></property>
        <property name="cname" value="五班"></property>
        <property name="students" ref="studentList"></property>
    </bean>
    <!-- 集合类型的Bean -->
    <util:list id="studentList">
        <ref bean="student2"></ref>
        <ref bean="student3"></ref>
        <ref bean="student4"></ref>
    </util:list>
这里会出现报错:
namespace "util" is not bound
这需要applicationContext.xml中添加
xmlns:util="http://www.springframework.org/schema/util"
随后会报错
但无法找到元素 'util:list' 的声明
applicationContext.xml中添加
xmlns:p="http://www.springframework.org/schema/p"
http://www.springframework.org/schema/util http://www.springframework.org/schema/util/spring-util-4.3.xsd
解决报错后,TestIOCXml.java测试程序:
    @Test
    public void testIOC_Class5(){
        ApplicationContext ac = new ClassPathXmlApplicationContext("config/applicationContext.xml");
        Clazz clazz = (Clazz) ac.getBean("class5",Clazz.class);
        System.out.println(clazz);
    }

若为Set集合类型属性赋值,只需要将其中的list标签改为set标签即可
(2)为Map集合类型属性赋值
创建教师类Teacher:
package com.spring.pojo;

public class Teacher {
    private Integer tid;
    private String tname;

    public Teacher() {
    }

    public Teacher(Integer tid, String tname) {
        this.tid = tid;
        this.tname = tname;
    }

    public Integer getTid() {
        return tid;
    }

    public void setTid(Integer tid) {
        this.tid = tid;
    }

    public String getTname() {
        return tname;
    }

    public void setTname(String tname) {
        this.tname = tname;
    }

    @Override
    public String toString() {
        return "Teacher{" +
                "tid=" + tid +
                ", tname='" + tname + '\'' +
                '}';
    }
}
修改Student.java,添加Map属性
package com.spring.pojo;

import java.lang.reflect.Array;
import java.util.Arrays;
import java.util.Map;

public class Student implements Person {
    private Integer sid;
    private String sname;
    private Integer age;
    private String gender;
    private Clazz clazz;
    private String[] hobby;
    private Clazz[] classArray;
    private Map<String,Teacher> teacherMap;

    public Student(){

    }

    public Student(Integer sid, String sname, Integer age, String gender) {
        this.sid = sid;
        this.sname = sname;
        this.age = age;
        this.gender = gender;
    }

    public Integer getSid() {
        return sid;
    }

    public void setSid(Integer sid) {
        this.sid = sid;
    }

    public String getSname() {
        return sname;
    }

    public void setSname(String sname) {
        this.sname = sname;
    }

    public Integer getAge() {
        return age;
    }

    public void setAge(Integer age) {
        this.age = age;
    }

    public String getGender() {
        return gender;
    }

    public void setGender(String gender) {
        this.gender = gender;
    }

    public Clazz getClazz(){return clazz;}

    public void setClazz(Clazz clazz){
        this.clazz = clazz;
    }

    public String[] getHobby(){return hobby;}

    public void setHobby(String[] hobby){
        this.hobby = hobby;
    }

    public Clazz[] getClassArray(){return classArray;}

    public void setClassArray(Clazz[] classArray){
        this.classArray = classArray;
    }

    public Map<String,Teacher> getTeacherMap(){
        return teacherMap;
    }

    public void setTeacherMap(Map<String,Teacher> teacherMap){
        this.teacherMap = teacherMap;
    }

    @Override
    public String toString() {
        return "Student{" +
                "sid=" + sid +
                ", sname='" + sname + '\'' +
                ", age=" + age +
                ", gender='" + gender + '\'' +
                ",clazz=" + clazz +
                ",hobby=" + Arrays.toString(hobby) +
                ",classArray=" + Arrays.toString(classArray) +
                ", teacherMap=" + teacherMap +
                '}';
    }
}
map集合赋值方法一:通过map标签
applicationContext.xml中配置bean:
    <bean id="student9" class="com.spring.pojo.Student">
        <property name="sid" value="9"></property>
        <property name="sname" value="冯九"></property>
        <property name="age" value="9"></property>
        <property name="gender" value="男"></property>
        <property name="clazz" ref="class1"></property>
        <property name="clazz.cid" value="1002"></property>
        <property name="clazz.cname" value="二班"></property>
        <property name="hobby">
            <array>
                <value>篮球</value>
                <value>足球</value>
                <value>乒乓</value>
            </array>
        </property>
        <property name="teacherMap">
            <map>
                <!--
                                    一个entry表示一个键值对
                                    key-ref 引用类型的键
                                    key 字面量类型的键
                                    value-ref 引用类型的值
                                    value 字面量类型的值
                                 -->
                <entry key="1001" value-ref="teacher1"></entry>
                <entry key="1002" value-ref="teacher2"></entry>
            </map>
        </property>
    </bean>
    <bean id="teacher1" class="com.spring.pojo.Teacher">
        <property name="tid" value="1001"></property>
        <property name="tname" value="赵老师"></property>
    </bean>
    <bean id="teacher2" class="com.spring.pojo.Teacher">
        <property name="tid" value="1002"></property>
        <property name="tname" value="钱老师"></property>
    </bean>
TestIOCXml.java测试
    @Test
    public void testIOC9(){
        ApplicationContext ac = new ClassPathXmlApplicationContext("config/applicationContext.xml");
        Student student = (Student) ac.getBean("student9",Student.class);
        System.out.println(student);
    }

map集合赋值方法二:通过< util:map >标签
在applicationContext.xml中新配置Bean
    <util:map id="teacherMap1">
        <entry key="1001" value-ref="teacher1"></entry>
        <entry key="1002" value-ref="teacher2"></entry>
    </util:map>
    <bean id="student10" class="com.spring.pojo.Student">
        <property name="sid" value="10"></property>
        <property name="sname" value="陈十"></property>
        <property name="age" value="10"></property>
        <property name="gender" value="女"></property>
        <property name="clazz" ref="class1"></property>
        <property name="clazz.cid" value="1002"></property>
        <property name="clazz.cname" value="二班"></property>
        <property name="hobby">
            <array>
                <value>篮球</value>
                <value>足球</value>
                <value>乒乓</value>
            </array>
        </property>
        <property name="teacherMap" ref="teacherMap1"></property>
    </bean>
TestIOCXml.java测试
    @Test
    public void testIOC10(){
        ApplicationContext ac = new ClassPathXmlApplicationContext("config/applicationContext.xml");
        Student student = (Student) ac.getBean("student10",Student.class);
        System.out.println(student);
    }

(3)引用集合类型的bean
使用util:list、util:map标签必须引入相应的命名空间,可以通过idea的提示功能选择
p命名空间
在applicationContext.xml中添加Bean
    <bean id="student11" class="com.spring.pojo.Student" p:sid="11" p:sname="褚十一" p:age="36" p:gender="女"
          p:teacherMap-ref="teacherMap1"></bean>
注意这里要引入p标签的命名空间
TestIOCXml.java测试程序:
    @Test
    public void testIOC11(){
        ApplicationContext ac = new ClassPathXmlApplicationContext("config/applicationContext.xml");
        Student student = (Student) ac.getBean("student11",Student.class);
        System.out.println(student);
    }

引入外部属性文件
加入德鲁伊数据库连接池的依赖
(1)加入依赖
在pom.xml中加入依赖
        <!-- 德鲁伊数据库连接池 -->
        <dependency>
            <groupId>com.alibaba</groupId>
            <artifactId>druid</artifactId>
            <version>1.2.9</version>
        </dependency>
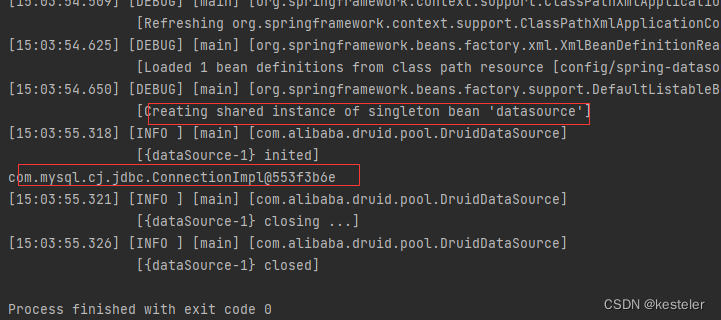
创建核心配置文件spring-datasource.xml
<?xml version="1.0" encoding="UTF-8"?>
<beans xmlns="http://www.springframework.org/schema/beans"
       xmlns:xsi="http://www.w3.org/2001/XMLSchema-instance"
       xsi:schemaLocation="http://www.springframework.org/schema/beans http://www.springframework.org/schema/beans/spring-beans.xsd">
    <bean id="datasource" class="com.alibaba.druid.pool.DruidDataSource">
        <property name="driverClassName" value="com.mysql.cj.jdbc.Driver"></property>
        <property name="url" value="jdbc:mysql://localhost:3306/mybtistest"></property>
        <property name="username" value="root"></property>
        <property name="password" value="000000"></property>
        <!-- 初始化的连接 -->
        <property name="initialSize" value="10"></property>
        <!-- 最大连接数 -->
        <property name="maxActive" value="200"></property>
    </bean>

</beans>
创建TestDataSource.java
package com.kesteler.springTest;

import com.alibaba.druid.pool.DruidDataSource;
import org.junit.Test;
import org.springframework.context.ApplicationContext;
import org.springframework.context.support.ClassPathXmlApplicationContext;

import java.sql.SQLException;

public class TestDataSource {
    @Test
    public void dataSourceTest(){
        ApplicationContext ac = new ClassPathXmlApplicationContext("config/spring-datasource.xml");
        DruidDataSource druidDataSource = (DruidDataSource) ac.getBean("datasource",DruidDataSource.class);
        try {
            System.out.println(druidDataSource.getConnection());
        } catch (SQLException e) {
            e.printStackTrace();
        }
        druidDataSource.close();
    }
}
(2)创建外部属性文件
创建jdbc.properties,配置数据库

jdbc.driver=com.mysql.cj.jdbc.Driver
jdbc.url=jdbc:mysql://localhost:3306/mybtistest
jdbc.username=root
jdbc.password=000000
(3)引入属性文件
spring-datasource.xml中引入属性文件
    <!-- 引入jdbc.properties,之后可以通过${key}的方式来访问value -->
    <context:property-placeholder location="/jdbc.properties"></context:property-placeholder>
(4)配置bean
spring-datasource.xml中配置bean
    <bean id="datasource" class="com.alibaba.druid.pool.DruidDataSource">
        <property name="driverClassName" value="${jdbc.driver}"></property><!--"com.mysql.cj.jdbc.Driver"-->
        <property name="url" value="${jdbc.url}"></property><!--"jdbc:mysql://localhost:3306/mybtistest"-->
        <property name="username" value="${jdbc.username}"></property>
        <property name="password" value="${jdbc.password}"></property>
        <!-- 初始化的连接 -->
        <property name="initialSize" value="10"></property>
        <!-- 最大连接数 -->
        <property name="maxActive" value="200"></property>
    </bean>
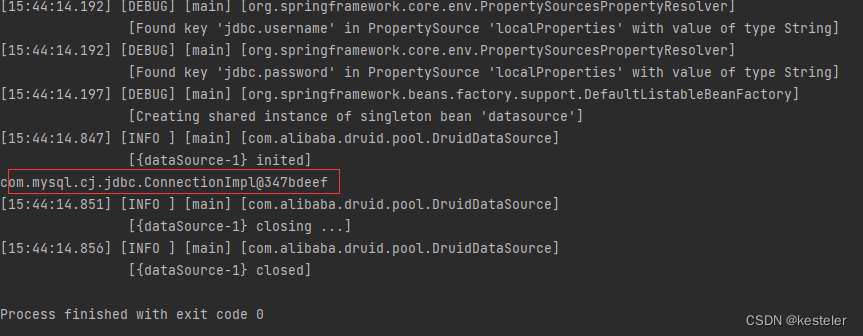
(5)测试
使用上面的测试程序