概述:
代码获取:可私信
在TensorFlow中实现单镜头多盒检测器(SSD),用于检测和分类交通标志。该实现能够在具有Intel Core i7-6700K的GTX 1080上实现40-45 fps。
请注意,此项目仍在进行中。现在的主要问题是模型过度拟合。
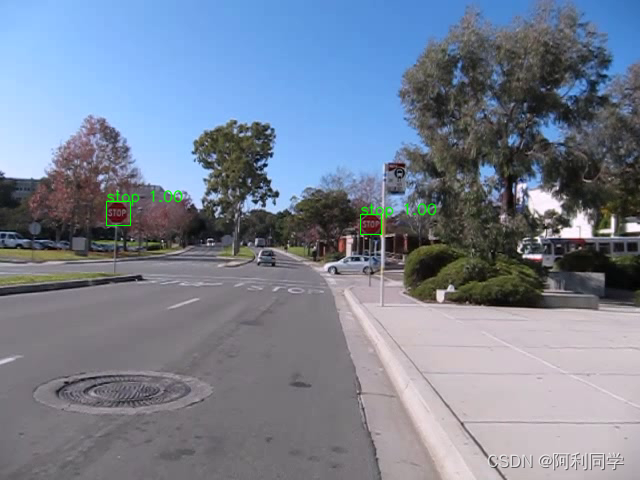
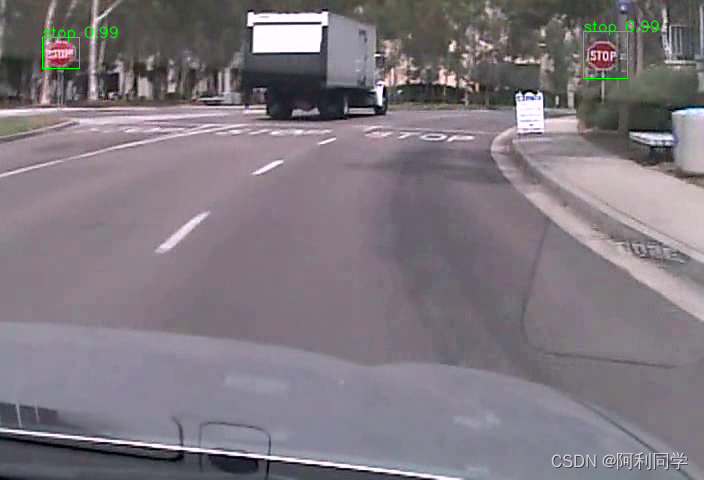
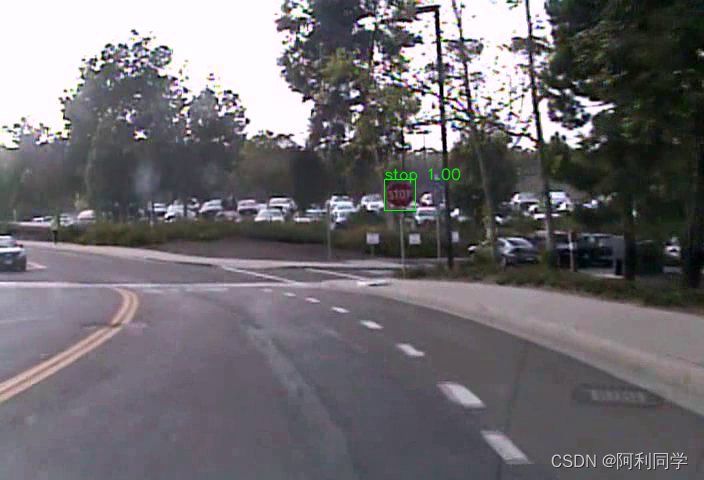
我目前正在先进行VOC2012的预培训,然后进行交通标志检测的转移学习。目前只检测到停车标志和人行横道标志。检测图像示例如下。
依赖库与代码
Skip to content
Product
Solutions
Open Source
Pricing
Search
Sign in
Sign up
georgesung
/
ssd_tensorflow_traffic_sign_detection
Public
Code
Issues
32
Pull requests
Actions
Projects
Security
Insights
ssd_tensorflow_traffic_sign_detection/inference.py /
@georgesung
georgesung Removed unused function run_inference_old()
Latest commit 88f1781 on Feb 15, 2017
 History
 1 contributor
189 lines (155 sloc)  6.08 KB

'''
Run inference using trained model
'''
import tensorflow as tf
from settings import *
from model import SSDModel
from model import ModelHelper
from model import nms
import numpy as np
from sklearn.model_selection import train_test_split
import cv2
import math
import os
import time
import pickle
from PIL import Image
import matplotlib.pyplot as plt
from moviepy.editor import VideoFileClip
from optparse import OptionParser
import glob


def run_inference(image, model, sess, mode, sign_map):
	"""
	Run inference on a given image
	Arguments:
		* image: Numpy array representing a single RGB image
		* model: Dict of tensor references returned by SSDModel()
		* sess: TensorFlow session reference
		* mode: String of either "image", "video", or "demo"
	Returns:
		* Numpy array representing annotated image
	"""
	# Save original image in memory
	image = np.array(image)
	image_orig = np.copy(image)

	# Get relevant tensors
	x = model['x']
	is_training = model['is_training']
	preds_conf = model['preds_conf']
	preds_loc = model['preds_loc']
	probs = model['probs']

	# Convert image to PIL Image, resize it, convert to grayscale (if necessary), convert back to numpy array
	image = Image.fromarray(image)
	orig_w, orig_h = image.size
	if NUM_CHANNELS == 1:
		image = image.convert('L')  # 8-bit grayscale
	image = image.resize((IMG_W, IMG_H), Image.LANCZOS)  # high-quality downsampling filter
	image = np.asarray(image)

	images = np.array([image])  # create a "batch" of 1 image
	if NUM_CHANNELS == 1:
		images = np.expand_dims(images, axis=-1)  # need extra dimension of size 1 for grayscale

	# Perform object detection
	t0 = time.time()  # keep track of duration of object detection + NMS
	preds_conf_val, preds_loc_val, probs_val = sess.run([preds_conf, preds_loc, probs], feed_dict={x: images, is_training: False})
	if mode != 'video':
		print('Inference took %.1f ms (%.2f fps)' % ((time.time() - t0)*1000, 1/(time.time() - t0)))

	# Gather class predictions and confidence values
	y_pred_conf = preds_conf_val[0]  # batch size of 1, so just take [0]
	y_pred_conf = y_pred_conf.astype('float32')
	prob = probs_val[0]

	# Gather localization predictions
	y_pred_loc = preds_loc_val[0]

	# Perform NMS
	boxes = nms(y_pred_conf, y_pred_loc, prob)
	if mode != 'video':
		print('Inference + NMS took %.1f ms (%.2f fps)' % ((time.time() - t0)*1000, 1/(time.time() - t0)))

	# Rescale boxes' coordinates back to original image's dimensions
	# Recall boxes = [[x1, y1, x2, y2, cls, cls_prob], [...], ...]
	scale = np.array([orig_w/IMG_W, orig_h/IMG_H, orig_w/IMG_W, orig_h/IMG_H])
	if len(boxes) > 0:
		boxes[:, :4] = boxes[:, :4] * scale

	# Draw and annotate boxes over original image, and return annotated image
	image = image_orig
	for box in boxes:
		# Get box parameters
		box_coords = [int(round(x)) for x in box[:4]]
		cls = int(box[4])
		cls_prob = box[5]

		# Annotate image
		image = cv2.rectangle(image, tuple(box_coords[:2]), tuple(box_coords[2:]), (0,255,0))
		label_str = '%s %.2f' % (sign_map[cls], cls_prob)
		image = cv2.putText(image, label_str, (box_coords[0], box_coords[1]), 0, 0.5, (0,255,0), 1, cv2.LINE_AA)

	return image


def generate_output(input_files, mode):
	"""
	Generate annotated images, videos, or sample images, based on mode
	"""
	# First, load mapping from integer class ID to sign name string
	sign_map = {}
	with open('signnames.csv', 'r') as f:
		for line in f:
			line = line[:-1]  # strip newline at the end
			sign_id, sign_name = line.split(',')
			sign_map[int(sign_id)] = sign_name
	sign_map[0] = 'background'  # class ID 0 reserved for background class

	# Create output directory 'inference_out/' if needed
	if mode == 'image' or mode == 'video':
		if not os.path.isdir('./inference_out'):
			try:
				os.mkdir('./inference_out')
			except FileExistsError:
				print('Error: Cannot mkdir ./inference_out')
				return

	# Launch the graph
	with tf.Graph().as_default(), tf.Session() as sess:
		# "Instantiate" neural network, get relevant tensors
		model = SSDModel()

		# Load trained model
		saver = tf.train.Saver()
		print('Restoring previously trained model at %s' % MODEL_SAVE_PATH)
		saver.restore(sess, MODEL_SAVE_PATH)

		if mode == 'image':
			for image_file in input_files:
				print('Running inference on %s' % image_file)
				image_orig = np.asarray(Image.open(image_file))
				image = run_inference(image_orig, model, sess, mode, sign_map)

				head, tail = os.path.split(image_file)
				plt.imsave('./inference_out/%s' % tail, image)
			print('Output saved in inference_out/')

		elif mode == 'video':
			for video_file in input_files:
				print('Running inference on %s' % video_file)
				video = VideoFileClip(video_file)
				video = video.fl_image(lambda x: run_inference(x, model, sess, mode, sign_map))

				head, tail = os.path.split(video_file)
				video.write_videofile('./inference_out/%s' % tail, audio=False)
			print('Output saved in inference_out/')

		elif mode == 'demo':
			print('Demo mode: Running inference on images in sample_images/')
			image_files = os.listdir('sample_images/')

			for image_file in image_files:
				print('Running inference on sample_images/%s' % image_file)
				image_orig = np.asarray(Image.open('sample_images/' + image_file))
				image = run_inference(image_orig, model, sess, mode, sign_map)
				plt.imshow(image)
				plt.show()

		else:
			raise ValueError('Invalid mode: %s' % mode)


if __name__ == '__main__':
	# Configure command line options
	parser = OptionParser()
	parser.add_option('-i', '--input_dir', dest='input_dir',
		help='Directory of input videos/images (ignored for "demo" mode). Will run inference on all videos/images in that dir')
	parser.add_option('-m', '--mode', dest='mode', default='image',
		help='Operating mode, could be "image", "video", or "demo"; "demo" mode displays annotated images from sample_images/')

	# Get and parse command line options
	options, args = parser.parse_args()

	input_dir = options.input_dir
	mode = options.mode

	if mode != 'video' and mode != 'image' and mode != 'demo':
		assert ValueError('Invalid mode: %s' % mode)

	if mode != 'demo':
		input_files = glob.glob(input_dir + '/*.*')
	else:
		input_files = []

	generate_output(input_files, mode)
Python 3.5+
TensorFlow v0.12.0
Pickle
OpenCV Python
Matplotlib(可选)
运用
将此存储库克隆到某处,让我们将其称为$ROOT
从头开始训练模型:

代码流程
※Download the LISA Traffic Sign Dataset, and store it in a directory $LISA_DATA
※cd $LISA_DATA
※Follow instructions in the LISA Traffic Sign Dataset to create 'mergedAnnotations.csv' such that only stop signs and pedestrian ※crossing signs are shown
※cp $ROOT/data_gathering/create_pickle.py $LISA_DATA
※python create_pickle.py
※cd $ROOT
※ln -s $LISA_DATA/resized_images_* .
※ln -s $LISA_DATA/data_raw_*.p .
※python data_prep.py
※This performs box matching between ground-truth boxes and default ※boxes, and packages the data into a format used later in the ※pipeline
※python train.py
※This trains the SSD model
※python inference.py -m demo
效果
如上所述,该SSD实现能够在具有Intel Core i7 6700K的GTX 1080上实现40-45 fps。
推理时间是神经网络推理时间和非最大抑制(NMS)时间的总和。总的来说,神经网络推断时间明显小于NMS时间,神经网络推理时间通常在7-8ms之间,而NMS时间在15-16ms之间。这里实现的NMS算法尚未优化,仅在CPU上运行,因此可以在那里进一步努力提高性能。
数据集
整个LISA交通标志数据集由47个不同的交通标志类别组成。因为我们只关注这些类的子集,所以我们只使用LISA数据集的子集。此外,我们忽略了没有找到匹配的默认框的所有训练样本,从而进一步减小了数据集的大小。由于这个过程,我们最终只能处理很少的数据。
为了改进这一问题,我们可以执行图像数据增强,和/或在更大的数据集上预训练模型(例如VOC2012、ILSVRC)
下载链接:](https://cvrr.ucsd.edu/LISA/lisa-traffic-sign-dataset.html)
代码可私信
代码可私信
代码可私信