文章目录
- 系列文章目录
- 一、Netty的Server端启动过程源码分析
- 1、NioEventLoopGroup的创建
-
- 2、ServerBootstrap的创建
- (1)构造方法
- (2)group方法
- (3)channel方法
- (4)option方法
- (5)handler方法
- (6)childHandler方法
- (7)bind方法
- (8)bind方法中——initAndRegister方法
- (9)bind方法中——initAndRegister方法中Channel创建逻辑
- (10)bind方法中——initAndRegister方法中init方法
- (11)Pipeline的addLast方法
- (13)bind方法中——dobind0方法
- 3、启动完毕的事件循环
系列文章目录
Netty核心源码分析(一),Netty的Server端启动过程源码分析
Netty核心源码分析(二),Netty的Server端接收请求过程源码分析
Netty核心源码分析(三)业务请求执行关键——ChannelPipeline、ChannelHandler、ChannelHandlerContext源码分析
Netty核心源码分析(四)心跳检测源码分析
Netty核心源码分析(五)核心组件EventLoop源码分析
一、Netty的Server端启动过程源码分析
1、NioEventLoopGroup的创建
Server端会创建两个EventLoopGroup,我们一般使用NioEventLoopGroup:
EventLoopGroup bossGroup = new NioEventLoopGroup(1);
EventLoopGroup workerGroup = new NioEventLoopGroup();
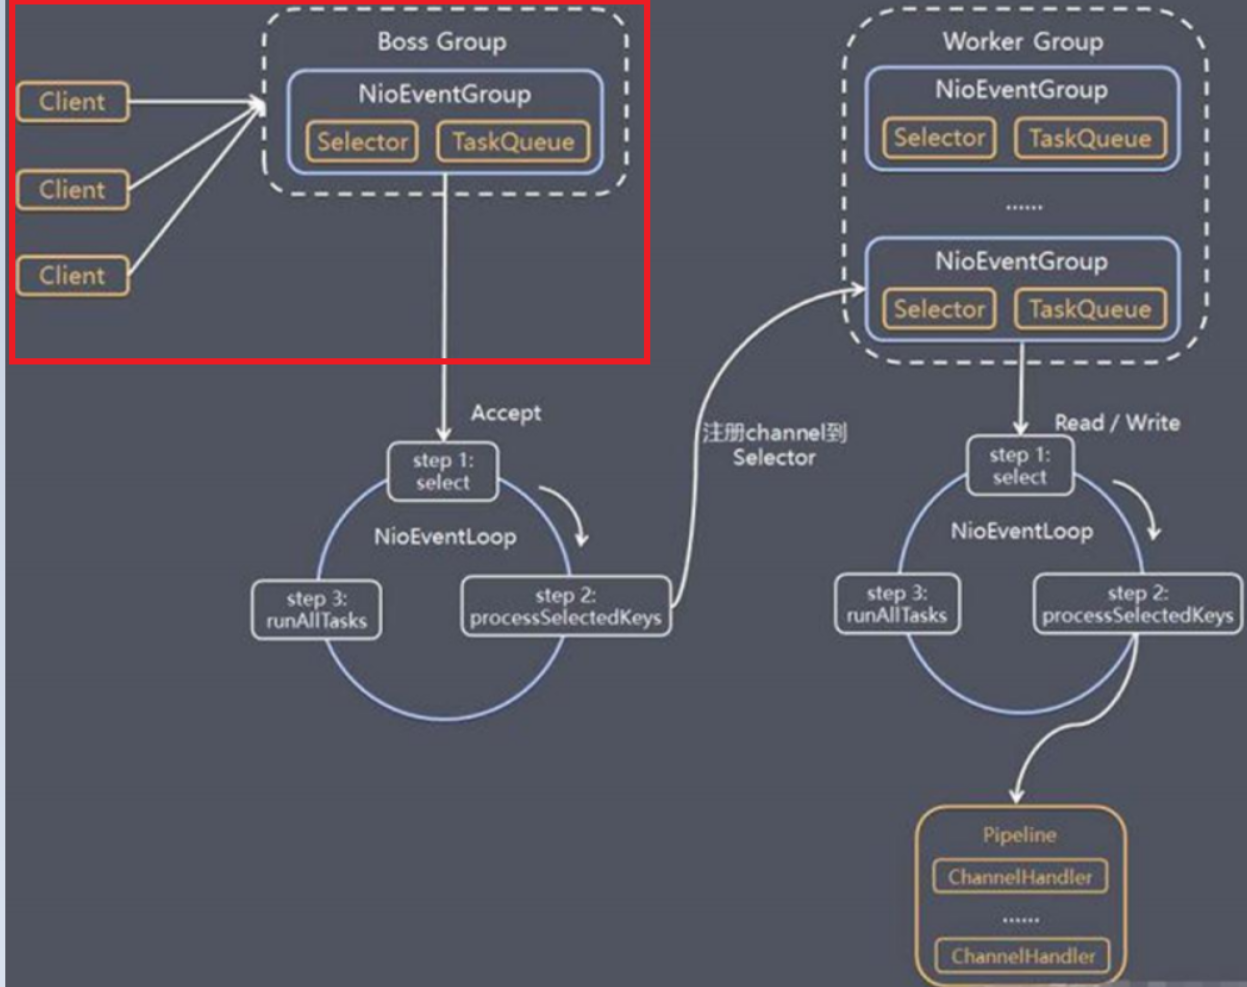
这两个EventLoopGroup是整个Netty的核心对象。boosGroup用于接收Tcp请求,他会将请求交给workerGroup,workerGroup会获取真正的连接,然后和连接进行通信,比如读写解码编码等操作。
EventLoopGroup 是事件循环组(线程组),内涵多个EventLoop,可以注册channel,用于在事件循环中进行选择(和select相关)。
(1)构造方法
在NioEventLoopGroup的构造方法中,如果不传参的话,默认创建cpu核心数*2个线程:
public NioEventLoopGroup() {
this(0);
}
protected MultithreadEventLoopGroup(int nThreads, Executor executor, Object... args) {
super(nThreads == 0 ? DEFAULT_EVENT_LOOP_THREADS : nThreads, executor, args);
}
我们发现在父类中,如果nThreads传参为0,就会赋值为DEFAULT_EVENT_LOOP_THREADS :
private static final int DEFAULT_EVENT_LOOP_THREADS;
static {
DEFAULT_EVENT_LOOP_THREADS = Math.max(1, SystemPropertyUtil.getInt(
"io.netty.eventLoopThreads", NettyRuntime.availableProcessors() * 2));
if (logger.isDebugEnabled()) {
logger.debug("-Dio.netty.eventLoopThreads: {}", DEFAULT_EVENT_LOOP_THREADS);
}
}
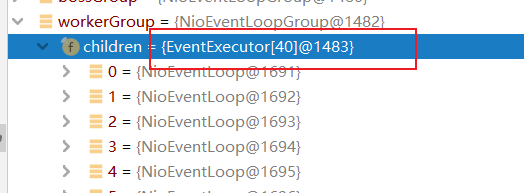
最终是获取了CPU核心数 * 2,并创建这些线程,我本机CPU是20核,所以创建了40个workerGroup线程。
我们在这个构造方法继续往上追:
protected MultithreadEventExecutorGroup(int nThreads, Executor executor,
EventExecutorChooserFactory chooserFactory, Object... args) {
if (nThreads <= 0) {
throw new IllegalArgumentException(String.format("nThreads: %d (expected: > 0)", nThreads));
}
if (executor == null) {
executor = new ThreadPerTaskExecutor(newDefaultThreadFactory());
}
children = new EventExecutor[nThreads];
for (int i = 0; i < nThreads; i ++) {
boolean success = false;
try {
children[i] = newChild(executor, args);
success = true;
} catch (Exception e) {
throw new IllegalStateException("failed to create a child event loop", e);
} finally {
if (!success) {
for (int j = 0; j < i; j ++) {
children[j].shutdownGracefully();
}
for (int j = 0; j < i; j ++) {
EventExecutor e = children[j];
try {
while (!e.isTerminated()) {
e.awaitTermination(Integer.MAX_VALUE, TimeUnit.SECONDS);
}
} catch (InterruptedException interrupted) {
Thread.currentThread().interrupt();
break;
}
}
}
}
}
chooser = chooserFactory.newChooser(children);
final FutureListener<Object> terminationListener = new FutureListener<Object>() {
@Override
public void operationComplete(Future<Object> future) throws Exception {
if (terminatedChildren.incrementAndGet() == children.length) {
terminationFuture.setSuccess(null);
}
}
};
for (EventExecutor e: children) {
e.terminationFuture().addListener(terminationListener);
}
Set<EventExecutor> childrenSet = new LinkedHashSet<EventExecutor>(children.length);
Collections.addAll(childrenSet, children);
readonlyChildren = Collections.unmodifiableSet(childrenSet);
}
此时我们知道了,在NioEventLoopGroup的children中,就是包含着这些EventExecutor,而我们默认的就是使用NioEventLoop,
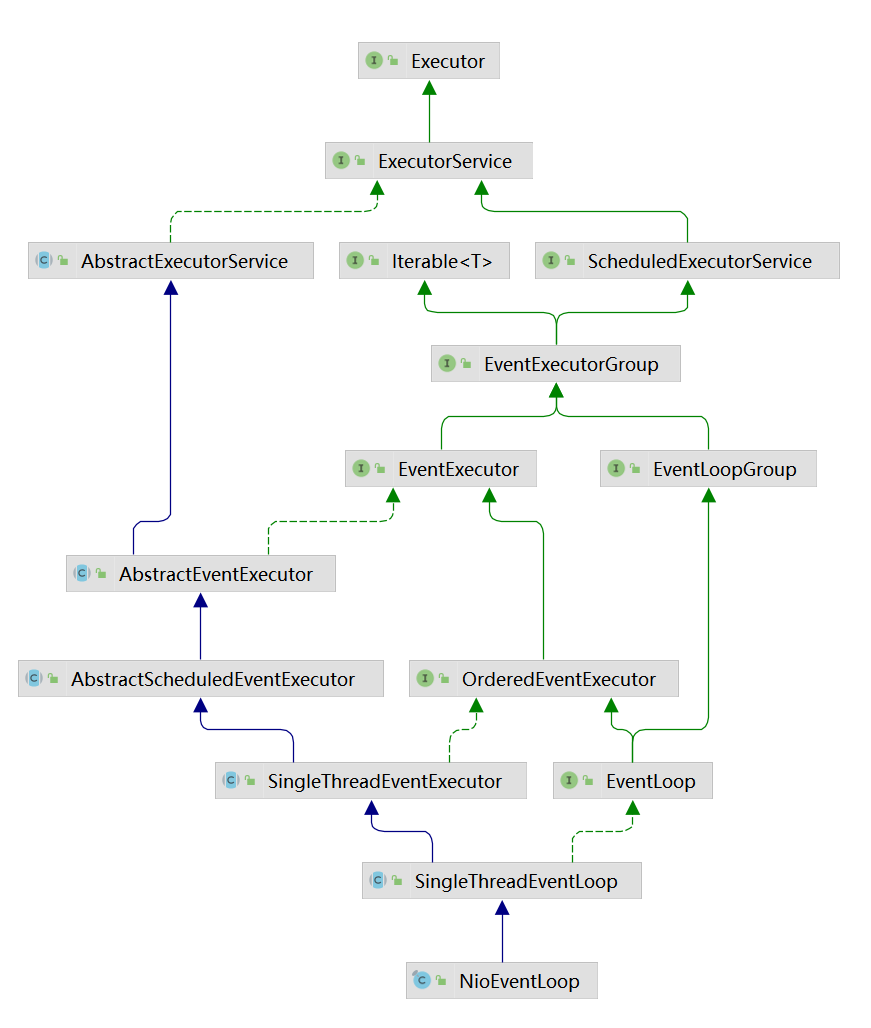
NioEventLoop的父类SingleThreadEventLoop,包含着很多子类:
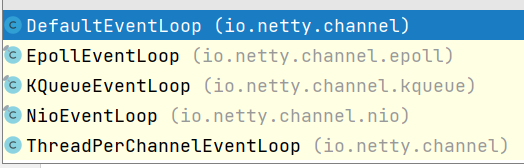
而在我们定义的new NioEventLoopGroup()中,就相当于已经定义好了该实现,通常我们使用NioEventLoop或者EpollEventLoop(linux需支持epoll,提高性能)。
2、ServerBootstrap的创建
ServerBootstrap b = new ServerBootstrap();
b.group(bossGroup, workerGroup)
.channel(NioServerSocketChannel.class)
.option(ChannelOption.SO_BACKLOG, 100)
.handler(new LoggingHandler(LogLevel.INFO))
.childHandler(new ChannelInitializer<SocketChannel>() {
@Override
public void initChannel(SocketChannel ch) throws Exception {
ChannelPipeline p = ch.pipeline();
if (sslCtx != null) {
p.addLast(sslCtx.newHandler(ch.alloc()));
}
p.addLast(new LoggingHandler(LogLevel.INFO));
}
});
(1)构造方法
创建的ServerBootstrap是一个引导类,用于启动服务器和引导整个程序的初始化,它和ServerChannel关联,而ServerChannel继承了Channel。
ServerBootstrap包含着ChannelHandler信息以及EventLoopGroup等信息:
public class ServerBootstrap extends AbstractBootstrap<ServerBootstrap, ServerChannel> {

    private static final InternalLogger logger = InternalLoggerFactory.getInstance(ServerBootstrap.class);

    private final Map<ChannelOption<?>, Object> childOptions = new LinkedHashMap<ChannelOption<?>, Object>();
    private final Map<AttributeKey<?>, Object> childAttrs = new LinkedHashMap<AttributeKey<?>, Object>();
    private final ServerBootstrapConfig config = new ServerBootstrapConfig(this);
    private volatile EventLoopGroup childGroup;
    private volatile ChannelHandler childHandler;

    public ServerBootstrap() { }

    private ServerBootstrap(ServerBootstrap bootstrap) {
        super(bootstrap);
        childGroup = bootstrap.childGroup;
        childHandler = bootstrap.childHandler;
        synchronized (bootstrap.childOptions) {
            childOptions.putAll(bootstrap.childOptions);
        }
        synchronized (bootstrap.childAttrs) {
            childAttrs.putAll(bootstrap.childAttrs);
        }
    }
ServerBootstrap的父类还额外包含一些address等信息:
public abstract class AbstractBootstrap<B extends AbstractBootstrap<B, C>, C extends Channel> implements Cloneable {
volatile EventLoopGroup group;
@SuppressWarnings("deprecation")
private volatile ChannelFactory<? extends C> channelFactory;
private volatile SocketAddress localAddress;
private final Map<ChannelOption<?>, Object> options = new LinkedHashMap<ChannelOption<?>, Object>();
private final Map<AttributeKey<?>, Object> attrs = new LinkedHashMap<AttributeKey<?>, Object>();
private volatile ChannelHandler handler;
AbstractBootstrap() {
}
AbstractBootstrap(AbstractBootstrap<B, C> bootstrap) {
group = bootstrap.group;
channelFactory = bootstrap.channelFactory;
handler = bootstrap.handler;
localAddress = bootstrap.localAddress;
synchronized (bootstrap.options) {
options.putAll(bootstrap.options);
}
synchronized (bootstrap.attrs) {
attrs.putAll(bootstrap.attrs);
}
}
(2)group方法
b.group(bossGroup, workerGroup)
将boosGroup和workerGroup传入参数中:
public ServerBootstrap group(EventLoopGroup parentGroup, EventLoopGroup childGroup) {
super.group(parentGroup);
if (childGroup == null) {
throw new NullPointerException("childGroup");
}
if (this.childGroup != null) {
throw new IllegalStateException("childGroup set already");
}
this.childGroup = childGroup;
return this;
}
public B group(EventLoopGroup group) {
if (group == null) {
throw new NullPointerException("group");
}
if (this.group != null) {
throw new IllegalStateException("group set already");
}
this.group = group;
return self();
}
我们发现,ServerBootstrap和其父类AbstractBootstrap对于EventLoopGroup似乎有着层级关系,其中bossGroup放入了父类中,workerGroup放入了子类。
(3)channel方法
.channel(NioServerSocketChannel.class)
添加了一个Channel的class对象,引导类将通过这个Class对象反射创建ChannelFactory
public B channel(Class<? extends C> channelClass) {
if (channelClass == null) {
throw new NullPointerException("channelClass");
}
return channelFactory(new ReflectiveChannelFactory<C>(channelClass));
}
在ReflectiveChannelFactory中,重写着newChannel方法,通过反射创建Channel:
@Override
public T newChannel() {
try {
return clazz.getConstructor().newInstance();
} catch (Throwable t) {
throw new ChannelException("Unable to create Channel from class " + clazz, t);
}
}
注意!Channel的创建在bind方法中,调用了ChannelFactory的newChannel方法。
(4)option方法
.option(ChannelOption.SO_BACKLOG, 100)
设置一些配置选项:
public <T> B option(ChannelOption<T> option, T value) {
if (option == null) {
throw new NullPointerException("option");
}
if (value == null) {
synchronized (options) {
options.remove(option);
}
} else {
synchronized (options) {
options.put(option, value);
}
}
return self();
}
(5)handler方法
.handler(new LoggingHandler(LogLevel.INFO))
添加一些服务请求专用的处理器:
public B handler(ChannelHandler handler) {
if (handler == null) {
throw new NullPointerException("handler");
}
this.handler = handler;
return self();
}
实际上handler方法中传入的Handler,是交给boosGroup处理的Handler,因为handler方法是ServerBootstrap的父类AbstractBootstrap中的。
(6)childHandler方法
public ServerBootstrap childHandler(ChannelHandler childHandler) {
if (childHandler == null) {
throw new NullPointerException("childHandler");
}
this.childHandler = childHandler;
return this;
}
添加workerGroup的处理类,该方法是ServerBootstrap的,添加的handler也是为workerGroup服务的。
(7)bind方法
ChannelFuture f = b.bind(PORT).sync();
绑定端口并进行阻塞,bind方法执行成功之后,server端就算启动成功了。
public ChannelFuture bind(int inetPort) {
return bind(new InetSocketAddress(inetPort));
}
public ChannelFuture bind(SocketAddress localAddress) {
validate();
if (localAddress == null) {
throw new NullPointerException("localAddress");
}
return doBind(localAddress);
}
private ChannelFuture doBind(final SocketAddress localAddress) {
final ChannelFuture regFuture = initAndRegister();
final Channel channel = regFuture.channel();
if (regFuture.cause() != null) {
return regFuture;
}
if (regFuture.isDone()) {
ChannelPromise promise = channel.newPromise();
doBind0(regFuture, channel, localAddress, promise);
return promise;
} else {
final PendingRegistrationPromise promise = new PendingRegistrationPromise(channel);
regFuture.addListener(new ChannelFutureListener() {
@Override
public void operationComplete(ChannelFuture future) throws Exception {
Throwable cause = future.cause();
if (cause != null) {
promise.setFailure(cause);
} else {
promise.registered();
doBind0(regFuture, channel, localAddress, promise);
}
}
});
return promise;
}
}
(8)bind方法中——initAndRegister方法
final ChannelFuture initAndRegister() {
Channel channel = null;
try {
channel = channelFactory.newChannel();
init(channel);
} catch (Throwable t) {
if (channel != null) {
channel.unsafe().closeForcibly();
return new DefaultChannelPromise(channel, GlobalEventExecutor.INSTANCE).setFailure(t);
}
return new DefaultChannelPromise(new FailedChannel(), GlobalEventExecutor.INSTANCE).setFailure(t);
}
ChannelFuture regFuture = config().group().register(channel);
if (regFuture.cause() != null) {
if (channel.isRegistered()) {
channel.close();
} else {
channel.unsafe().closeForcibly();
}
}
return regFuture;
}
(9)bind方法中——initAndRegister方法中Channel创建逻辑
在initAndRegister调用了channelFactory.newChannel();之后,实际是调用了ReflectiveChannelFactory中,newChannel方法,通过反射创建Channel:
@Override
public T newChannel() {
try {
return clazz.getConstructor().newInstance();
} catch (Throwable t) {
throw new ChannelException("Unable to create Channel from class " + clazz, t);
}
}
NioServerSocketChannel的构造方法,做了许多NioServerSocketChannel的初始化工作:
private static ServerSocketChannel newSocket(SelectorProvider provider) {
try {
return provider.openServerSocketChannel();
} catch (IOException e) {
throw new ChannelException(
"Failed to open a server socket.", e);
}
}
public NioServerSocketChannel() {
this(newSocket(DEFAULT_SELECTOR_PROVIDER));
}
(1) 通过 NIO 的 SelectorProvider 的 openServerSocketChannel 方法得到JDK 的 channel。目的是让 Netty 包装 JDK 的 channel。
(2) 创建了一个唯一的 ChannelId,创建了一个 NioMessageUnsafe,用于操作消息,创建了个 DefaultChannelPipeline 管道,是个双向链表结构,用于过滤所有的进出的消息。
(3) 创建了一个 NioServerSocketChannelConfig 对象,用于对外展示一些配置。
(10)bind方法中——initAndRegister方法中init方法
init方法是在ServerBootstrap中实现的一个方法:
@Override
void init(Channel channel) throws Exception {
final Map<ChannelOption<?>, Object> options = options0();
synchronized (options) {
setChannelOptions(channel, options, logger);
}
final Map<AttributeKey<?>, Object> attrs = attrs0();
synchronized (attrs) {
for (Entry<AttributeKey<?>, Object> e: attrs.entrySet()) {
@SuppressWarnings("unchecked")
AttributeKey<Object> key = (AttributeKey<Object>) e.getKey();
channel.attr(key).set(e.getValue());
}
}
ChannelPipeline p = channel.pipeline();
final EventLoopGroup currentChildGroup = childGroup;
final ChannelHandler currentChildHandler = childHandler;
final Entry<ChannelOption<?>, Object>[] currentChildOptions;
final Entry<AttributeKey<?>, Object>[] currentChildAttrs;
synchronized (childOptions) {
currentChildOptions = childOptions.entrySet().toArray(newOptionArray(childOptions.size()));
}
synchronized (childAttrs) {
currentChildAttrs = childAttrs.entrySet().toArray(newAttrArray(childAttrs.size()));
}
p.addLast(new ChannelInitializer<Channel>() {
@Override
public void initChannel(final Channel ch) throws Exception {
final ChannelPipeline pipeline = ch.pipeline();
ChannelHandler handler = config.handler();
if (handler != null) {
pipeline.addLast(handler);
}
ch.eventLoop().execute(new Runnable() {
@Override
public void run() {
pipeline.addLast(new ServerBootstrapAcceptor(
ch, currentChildGroup, currentChildHandler, currentChildOptions, currentChildAttrs));
}
});
}
});
}
(11)Pipeline的addLast方法
Pipeline的addLast方法是核心。
@Override
public final ChannelPipeline addLast(EventExecutorGroup group, String name, ChannelHandler handler) {
final AbstractChannelHandlerContext newCtx;
synchronized (this) {
checkMultiplicity(handler);
newCtx = newContext(group, filterName(name, handler), handler);
addLast0(newCtx);
if (!registered) {
newCtx.setAddPending();
callHandlerCallbackLater(newCtx, true);
return this;
}
EventExecutor executor = newCtx.executor();
if (!executor.inEventLoop()) {
newCtx.setAddPending();
executor.execute(new Runnable() {
@Override
public void run() {
callHandlerAdded0(newCtx);
}
});
return this;
}
}
callHandlerAdded0(newCtx);
return this;
}
private void addLast0(AbstractChannelHandlerContext newCtx) {
AbstractChannelHandlerContext prev = tail.prev;
newCtx.prev = prev;
newCtx.next = tail;
prev.next = newCtx;
tail.prev = newCtx;
}
我们可以看到,addLast方法并不是将Handler放到了最后,而是将我们自定义的Handler放到了tail的前一个,这样tail永远会在最后面,做一些系统的固定工作。
(13)bind方法中——dobind0方法
private static void doBind0(
final ChannelFuture regFuture, final Channel channel,
final SocketAddress localAddress, final ChannelPromise promise) {
channel.eventLoop().execute(new Runnable() {
@Override
public void run() {
if (regFuture.isSuccess()) {
channel.bind(localAddress, promise).addListener(ChannelFutureListener.CLOSE_ON_FAILURE);
} else {
promise.setFailure(regFuture.cause());
}
}
});
}
channel.bind方法我们一步一步追溯:
@Override
public ChannelFuture bind(SocketAddress localAddress, ChannelPromise promise) {
return pipeline.bind(localAddress, promise);
}
@Override
public final ChannelFuture bind(SocketAddress localAddress, ChannelPromise promise) {
return tail.bind(localAddress, promise);
}
@Override
public ChannelFuture bind(final SocketAddress localAddress, final ChannelPromise promise) {
if (localAddress == null) {
throw new NullPointerException("localAddress");
}
if (isNotValidPromise(promise, false)) {
return promise;
}
final AbstractChannelHandlerContext next = findContextOutbound();
EventExecutor executor = next.executor();
if (executor.inEventLoop()) {
next.invokeBind(localAddress, promise);
} else {
safeExecute(executor, new Runnable() {
@Override
public void run() {
next.invokeBind(localAddress, promise);
}
}, promise, null);
}
return promise;
}
private void invokeBind(SocketAddress localAddress, ChannelPromise promise) {
if (invokeHandler()) {
try {
((ChannelOutboundHandler) handler()).bind(this, localAddress, promise);
} catch (Throwable t) {
notifyOutboundHandlerException(t, promise);
}
} else {
bind(localAddress, promise);
}
}
@Override
public void bind(ChannelHandlerContext ctx, SocketAddress localAddress, ChannelPromise promise) throws Exception {
if (logger.isEnabled(internalLevel)) {
logger.log(internalLevel, format(ctx, "BIND", localAddress));
}
ctx.bind(localAddress, promise);
}
@Override
public ChannelFuture bind(final SocketAddress localAddress, final ChannelPromise promise) {
if (localAddress == null) {
throw new NullPointerException("localAddress");
}
if (isNotValidPromise(promise, false)) {
return promise;
}
final AbstractChannelHandlerContext next = findContextOutbound();
EventExecutor executor = next.executor();
if (executor.inEventLoop()) {
next.invokeBind(localAddress, promise);
} else {
safeExecute(executor, new Runnable() {
@Override
public void run() {
next.invokeBind(localAddress, promise);
}
}, promise, null);
}
return promise;
}
private void invokeBind(SocketAddress localAddress, ChannelPromise promise) {
if (invokeHandler()) {
try {
((ChannelOutboundHandler) handler()).bind(this, localAddress, promise);
} catch (Throwable t) {
notifyOutboundHandlerException(t, promise);
}
} else {
bind(localAddress, promise);
}
}
@Override
public void bind(
ChannelHandlerContext ctx, SocketAddress localAddress, ChannelPromise promise)
throws Exception {
unsafe.bind(localAddress, promise);
}
@Override
public final void bind(final SocketAddress localAddress, final ChannelPromise promise) {
assertEventLoop();
if (!promise.setUncancellable() || !ensureOpen(promise)) {
return;
}
if (Boolean.TRUE.equals(config().getOption(ChannelOption.SO_BROADCAST)) &&
localAddress instanceof InetSocketAddress &&
!((InetSocketAddress) localAddress).getAddress().isAnyLocalAddress() &&
!PlatformDependent.isWindows() && !PlatformDependent.maybeSuperUser()) {
logger.warn(
"A non-root user can't receive a broadcast packet if the socket " +
"is not bound to a wildcard address; binding to a non-wildcard " +
"address (" + localAddress + ") anyway as requested.");
}
boolean wasActive = isActive();
try {
doBind(localAddress);
} catch (Throwable t) {
safeSetFailure(promise, t);
closeIfClosed();
return;
}
if (!wasActive && isActive()) {
invokeLater(new Runnable() {
@Override
public void run() {
pipeline.fireChannelActive();
}
});
}
safeSetSuccess(promise);
}
debug追了一大顿,终于来到了我们关键了!这里就是执行了NIO的channel的bind方法了:
@Override
protected void doBind(SocketAddress localAddress) throws Exception {
if (PlatformDependent.javaVersion() >= 7) {
javaChannel().bind(localAddress, config.getBacklog());
} else {
javaChannel().socket().bind(localAddress, config.getBacklog());
}
}
3、启动完毕的事件循环
bind方法执行完毕之后,此时debug一直下去的话,会最终进入到NioEventLoop的run方法中,这是一个死循环:
@Override
protected void run() {
for (;;) {
try {
switch (selectStrategy.calculateStrategy(selectNowSupplier, hasTasks())) {
case SelectStrategy.CONTINUE:
continue;
case SelectStrategy.SELECT:
select(wakenUp.getAndSet(false));
if (wakenUp.get()) {
selector.wakeup();
}
default:
}
cancelledKeys = 0;
needsToSelectAgain = false;
final int ioRatio = this.ioRatio;
if (ioRatio == 100) {
try {
processSelectedKeys();
} finally {
runAllTasks();
}
} else {
final long ioStartTime = System.nanoTime();
try {
processSelectedKeys();
} finally {
final long ioTime = System.nanoTime() - ioStartTime;
runAllTasks(ioTime * (100 - ioRatio) / ioRatio);
}
}
} catch (Throwable t) {
handleLoopException(t);
}
try {
if (isShuttingDown()) {
closeAll();
if (confirmShutdown()) {
return;
}
}
} catch (Throwable t) {
handleLoopException(t);
}
}
}
此时,就开始接收事件,Netty算是正式启动了。
BoosGroup已经创建完毕并且启动完成,开始下面的Accept接收客户端请求的过程了。
本文内容由网友自发贡献,版权归原作者所有,本站不承担相应法律责任。如您发现有涉嫌抄袭侵权的内容,请联系:hwhale#tublm.com(使用前将#替换为@)