文章目录
- 一、什么是粘包拆包
- 二、粘包拆包实例
-
- 三、解决粘包拆包的方案
- 四、使用自定义编解码器解决粘包拆包问题
- 1、定义协议包
- 2、编解码器
- 3、server端
- 4、client端
- 5、测试一下
一、什么是粘包拆包
TCP 是面向连接的,面向流的,提供高可靠性服务。收发两端(客户端和服务器端) 都要有一一成对的 socket,因此,发送端为了将多个发给接收端的包,更有效的发给对方,使用了优化方法(Nagle 算法),将多次间隔较小且数据量小的数据,合并成一个大的数据块,然后进行封包。这样做虽然提高了效率,但是接收端就难于分辨出完整的数据包了,因为面向流的通信是无消息保护边界的。
优于TCP无消息保护边界,需要在接收端处理消息边界问题,也就是我们所说的粘包、拆包问题。
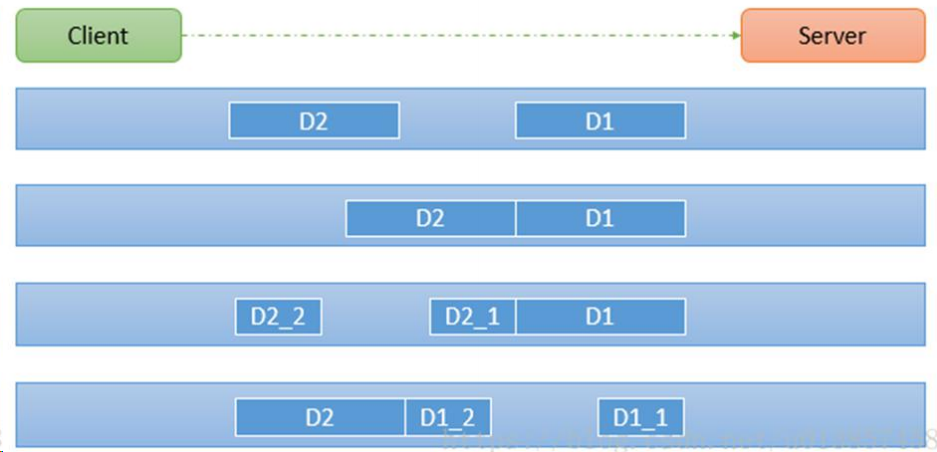
我们从图中可以看出,客户端发送的D1和D2数据,是有可能会被拆分开进行数据传输的,Server端如果不做特殊处理的话,不知道D1和D2的数据边界,可能会少读或者多读,导致数据错乱。
二、粘包拆包实例
1、Server端
import io.netty.bootstrap.ServerBootstrap;
import io.netty.channel.ChannelFuture;
import io.netty.channel.EventLoopGroup;
import io.netty.channel.nio.NioEventLoopGroup;
import io.netty.channel.socket.nio.NioServerSocketChannel;
public class MyServer {
public static void main(String[] args) throws Exception{
EventLoopGroup bossGroup = new NioEventLoopGroup(1);
EventLoopGroup workerGroup = new NioEventLoopGroup();
try {
ServerBootstrap serverBootstrap = new ServerBootstrap();
serverBootstrap.group(bossGroup,workerGroup).channel(NioServerSocketChannel.class).childHandler(new MyServerInitializer());
ChannelFuture channelFuture = serverBootstrap.bind(7000).sync();
channelFuture.channel().closeFuture().sync();
}finally {
bossGroup.shutdownGracefully();
workerGroup.shutdownGracefully();
}
}
}
import io.netty.channel.ChannelInitializer;
import io.netty.channel.ChannelPipeline;
import io.netty.channel.socket.SocketChannel;
public class MyServerInitializer extends ChannelInitializer<SocketChannel> {
@Override
protected void initChannel(SocketChannel ch) throws Exception {
ChannelPipeline pipeline = ch.pipeline();
pipeline.addLast(new MyServerHandler());
}
}
import io.netty.buffer.ByteBuf;
import io.netty.buffer.Unpooled;
import io.netty.channel.ChannelHandlerContext;
import io.netty.channel.SimpleChannelInboundHandler;
import java.nio.charset.Charset;
import java.util.UUID;
public class MyServerHandler extends SimpleChannelInboundHandler<ByteBuf>{
private int count;
@Override
public void exceptionCaught(ChannelHandlerContext ctx, Throwable cause) throws Exception {
ctx.close();
}
@Override
protected void channelRead0(ChannelHandlerContext ctx, ByteBuf msg) throws Exception {
byte[] buffer = new byte[msg.readableBytes()];
msg.readBytes(buffer);
String message = new String(buffer, Charset.forName("utf-8"));
System.out.println("服务器接收到数据 " + message);
System.out.println("服务器接收到消息量=" + (++this.count));
ByteBuf responseByteBuf = Unpooled.copiedBuffer(UUID.randomUUID().toString() + " ", Charset.forName("utf-8"));
ctx.writeAndFlush(responseByteBuf);
}
}
2、Client端
import io.netty.bootstrap.Bootstrap;
import io.netty.channel.ChannelFuture;
import io.netty.channel.EventLoopGroup;
import io.netty.channel.nio.NioEventLoopGroup;
import io.netty.channel.socket.nio.NioSocketChannel;
public class MyClient {
public static void main(String[] args) throws Exception{
EventLoopGroup group = new NioEventLoopGroup();
try {
Bootstrap bootstrap = new Bootstrap();
bootstrap.group(group).channel(NioSocketChannel.class)
.handler(new MyClientInitializer());
ChannelFuture channelFuture = bootstrap.connect("localhost", 7000).sync();
channelFuture.channel().closeFuture().sync();
}finally {
group.shutdownGracefully();
}
}
}
import io.netty.channel.ChannelInitializer;
import io.netty.channel.ChannelPipeline;
import io.netty.channel.socket.SocketChannel;
public class MyClientInitializer extends ChannelInitializer<SocketChannel> {
@Override
protected void initChannel(SocketChannel ch) throws Exception {
ChannelPipeline pipeline = ch.pipeline();
pipeline.addLast(new MyClientHandler());
}
}
import io.netty.buffer.ByteBuf;
import io.netty.buffer.Unpooled;
import io.netty.channel.ChannelHandlerContext;
import io.netty.channel.SimpleChannelInboundHandler;
import java.nio.charset.Charset;
public class MyClientHandler extends SimpleChannelInboundHandler<ByteBuf> {
private int count;
@Override
public void channelActive(ChannelHandlerContext ctx) throws Exception {
for(int i= 0; i< 10; ++i) {
ByteBuf buffer = Unpooled.copiedBuffer("hello,server " + i, Charset.forName("utf-8"));
ctx.writeAndFlush(buffer);
}
}
@Override
protected void channelRead0(ChannelHandlerContext ctx, ByteBuf msg) throws Exception {
byte[] buffer = new byte[msg.readableBytes()];
msg.readBytes(buffer);
String message = new String(buffer, Charset.forName("utf-8"));
System.out.println("客户端接收到消息=" + message);
System.out.println("客户端接收消息数量=" + (++this.count));
}
@Override
public void exceptionCaught(ChannelHandlerContext ctx, Throwable cause) throws Exception {
cause.printStackTrace();
ctx.close();
}
}
3、测试一下
先启动server端,再启动client端,多次启动不同client端查看结果,我们会发现server端接收的数据并没有固定的规律,这就是粘包拆包了。
服务器接收到消息量=1
服务器接收到数据 hello,server 0
服务器接收到消息量=1
服务器接收到数据 hello,server 1
服务器接收到消息量=2
服务器接收到数据 hello,server 2hello,server 3hello,server 4hello,server 5
服务器接收到消息量=3
服务器接收到数据 hello,server 6hello,server 7hello,server 8
服务器接收到消息量=4
服务器接收到数据 hello,server 9
服务器接收到消息量=5
三、解决粘包拆包的方案
Netty解决粘包和拆包问题的四种方案
四、使用自定义编解码器解决粘包拆包问题
1、定义协议包
public class MessageProtocol {
private int len;
private byte[] content;
public int getLen() {
return len;
}
public void setLen(int len) {
this.len = len;
}
public byte[] getContent() {
return content;
}
public void setContent(byte[] content) {
this.content = content;
}
}
2、编解码器
import io.netty.buffer.ByteBuf;
import io.netty.channel.ChannelHandlerContext;
import io.netty.handler.codec.ReplayingDecoder;
import java.util.List;
public class MyMessageDecoder extends ReplayingDecoder<Void> {
@Override
protected void decode(ChannelHandlerContext ctx, ByteBuf in, List<Object> out) throws Exception {
System.out.println("MyMessageDecoder decode 被调用");
int length = in.readInt();
byte[] content = new byte[length];
in.readBytes(content);
MessageProtocol messageProtocol = new MessageProtocol();
messageProtocol.setLen(length);
messageProtocol.setContent(content);
ctx.fireChannelRead(messageProtocol);
}
}
import io.netty.buffer.ByteBuf;
import io.netty.channel.ChannelHandlerContext;
import io.netty.handler.codec.MessageToByteEncoder;
public class MyMessageEncoder extends MessageToByteEncoder<MessageProtocol> {
@Override
protected void encode(ChannelHandlerContext ctx, MessageProtocol msg, ByteBuf out) throws Exception {
System.out.println("MyMessageEncoder encode 方法被调用");
out.writeInt(msg.getLen());
out.writeBytes(msg.getContent());
}
}
3、server端
import io.netty.bootstrap.ServerBootstrap;
import io.netty.channel.ChannelFuture;
import io.netty.channel.EventLoopGroup;
import io.netty.channel.nio.NioEventLoopGroup;
import io.netty.channel.socket.nio.NioServerSocketChannel;
public class MyServer {
public static void main(String[] args) throws Exception{
EventLoopGroup bossGroup = new NioEventLoopGroup(1);
EventLoopGroup workerGroup = new NioEventLoopGroup();
try {
ServerBootstrap serverBootstrap = new ServerBootstrap();
serverBootstrap.group(bossGroup,workerGroup).channel(NioServerSocketChannel.class).childHandler(new MyServerInitializer());
ChannelFuture channelFuture = serverBootstrap.bind(7000).sync();
channelFuture.channel().closeFuture().sync();
}finally {
bossGroup.shutdownGracefully();
workerGroup.shutdownGracefully();
}
}
}
import io.netty.channel.ChannelInitializer;
import io.netty.channel.ChannelPipeline;
import io.netty.channel.socket.SocketChannel;
public class MyServerInitializer extends ChannelInitializer<SocketChannel> {
@Override
protected void initChannel(SocketChannel ch) throws Exception {
ChannelPipeline pipeline = ch.pipeline();
pipeline.addLast(new MyMessageDecoder());
pipeline.addLast(new MyMessageEncoder());
pipeline.addLast(new MyServerHandler());
}
}
import io.netty.buffer.ByteBuf;
import io.netty.buffer.Unpooled;
import io.netty.channel.ChannelHandlerContext;
import io.netty.channel.SimpleChannelInboundHandler;
import java.nio.charset.Charset;
import java.util.UUID;
public class MyServerHandler extends SimpleChannelInboundHandler<MessageProtocol>{
private int count;
@Override
public void exceptionCaught(ChannelHandlerContext ctx, Throwable cause) throws Exception {
ctx.close();
}
@Override
protected void channelRead0(ChannelHandlerContext ctx, MessageProtocol msg) throws Exception {
int len = msg.getLen();
byte[] content = msg.getContent();
System.out.println();
System.out.println();
System.out.println();
System.out.println("服务器接收到信息如下");
System.out.println("长度=" + len);
System.out.println("内容=" + new String(content, Charset.forName("utf-8")));
System.out.println("服务器接收到消息包数量=" + (++this.count));
String responseContent = UUID.randomUUID().toString();
int responseLen = responseContent.getBytes("utf-8").length;
byte[] responseContent2 = responseContent.getBytes("utf-8");
MessageProtocol messageProtocol = new MessageProtocol();
messageProtocol.setLen(responseLen);
messageProtocol.setContent(responseContent2);
ctx.writeAndFlush(messageProtocol);
}
}
4、client端
import io.netty.bootstrap.Bootstrap;
import io.netty.channel.ChannelFuture;
import io.netty.channel.EventLoopGroup;
import io.netty.channel.nio.NioEventLoopGroup;
import io.netty.channel.socket.nio.NioSocketChannel;
public class MyClient {
public static void main(String[] args) throws Exception{
EventLoopGroup group = new NioEventLoopGroup();
try {
Bootstrap bootstrap = new Bootstrap();
bootstrap.group(group).channel(NioSocketChannel.class)
.handler(new MyClientInitializer());
ChannelFuture channelFuture = bootstrap.connect("localhost", 7000).sync();
channelFuture.channel().closeFuture().sync();
}finally {
group.shutdownGracefully();
}
}
}
import io.netty.channel.ChannelInitializer;
import io.netty.channel.ChannelPipeline;
import io.netty.channel.socket.SocketChannel;
public class MyClientInitializer extends ChannelInitializer<SocketChannel> {
@Override
protected void initChannel(SocketChannel ch) throws Exception {
ChannelPipeline pipeline = ch.pipeline();
pipeline.addLast(new MyMessageEncoder());
pipeline.addLast(new MyMessageDecoder());
pipeline.addLast(new MyClientHandler());
}
}
import io.netty.buffer.ByteBuf;
import io.netty.buffer.Unpooled;
import io.netty.channel.ChannelHandlerContext;
import io.netty.channel.SimpleChannelInboundHandler;
import java.nio.charset.Charset;
public class MyClientHandler extends SimpleChannelInboundHandler<MessageProtocol> {
private int count;
@Override
public void channelActive(ChannelHandlerContext ctx) throws Exception {
for(int i = 0; i< 5; i++) {
String mes = "你好啊,我的baby";
byte[] content = mes.getBytes(Charset.forName("utf-8"));
int length = mes.getBytes(Charset.forName("utf-8")).length;
MessageProtocol messageProtocol = new MessageProtocol();
messageProtocol.setLen(length);
messageProtocol.setContent(content);
ctx.writeAndFlush(messageProtocol);
}
}
protected void channelRead0(ChannelHandlerContext ctx, MessageProtocol msg) throws Exception {
int len = msg.getLen();
byte[] content = msg.getContent();
System.out.println("客户端接收到消息如下");
System.out.println("长度=" + len);
System.out.println("内容=" + new String(content, Charset.forName("utf-8")));
System.out.println("客户端接收消息数量=" + (++this.count));
}
@Override
public void exceptionCaught(ChannelHandlerContext ctx, Throwable cause) throws Exception {
System.out.println("异常消息=" + cause.getMessage());
ctx.close();
}
}
5、测试一下
我们发现,server端严格遵守我们的协议包进行分批次接收消息了,此时解决了粘包拆包问题。
本文内容由网友自发贡献,版权归原作者所有,本站不承担相应法律责任。如您发现有涉嫌抄袭侵权的内容,请联系:hwhale#tublm.com(使用前将#替换为@)