本篇博客是我学习某位up在b站讲的pytorch版的yolov3后写的,
那位up主的b站的传送门:
https://www.bilibili.com/video/BV1A7411976Z
他的博客的传送门:
https://blog.csdn.net/weixin_44791964/article/details/105310627
他的源码的传送门:
https://github.com/bubbliiiing/yolo3-pytorch
侵删
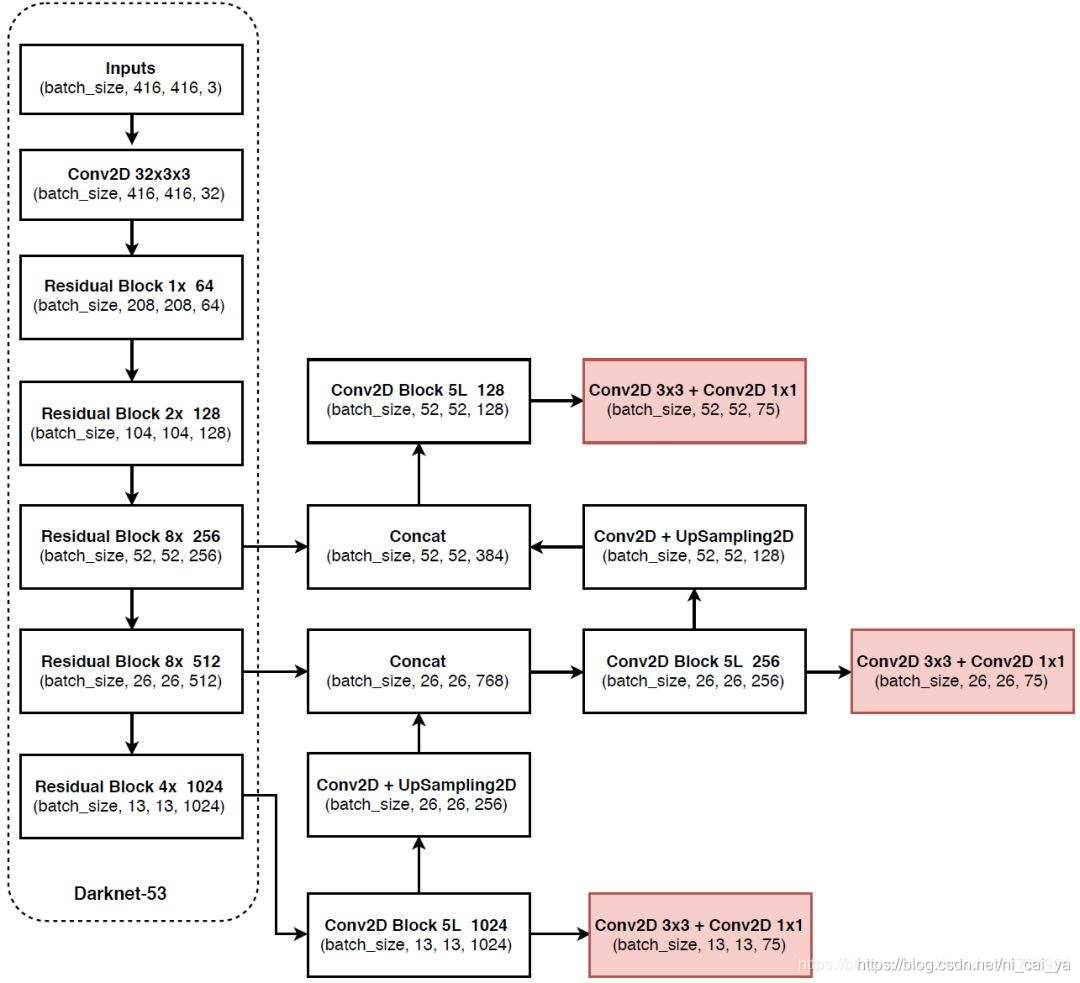
解码过程和可视化其实就是画先验框和调整先验框获得最后的预测框。
话不多说,直接上代码(代码都是以13x13的特征层为例来进行解析的)
下面代码是url.py文件里面的代码
#调整先验框的过程就是解码
#decodebox这个类就是对先验框进行调整,每次只能对一个特征层进行解码,
class DecodeBox(nn.Module):
    def __init__(self, anchors, num_classes, img_size):
        super(DecodeBox, self).__init__()
        self.anchors = anchors
        self.num_anchors = len(anchors)
        self.num_classes = num_classes
        self.bbox_attrs = 5 + num_classes
        self.img_size = img_size

    def forward(self, input):
        """
        拿到预测结果以后,就放进这个forward函数,
        这里的input的shape是batchsize, 3x(1+4+num_classes), 13, 13
        3x(1+4+num_classes)分析:
        3是代表3个先验框,1代表先验框内部是否包含有物体,4表示先验框的调整参数,num_classes表示先验框内部物体的种类
        """
        #判断一共有多少张图片
        batch_size = input.size(0)
        #然后得到特征层的宽和高,根据我们的例子,这里的宽和高都是13和13
        input_height = input.size(2)
        input_width = input.size(3)

        # 计算步长,这里的步长其实就是输入进来的图片的大小除以我们输入进来的特征层,这里步长的别名也叫感受野
        """
        步长也就是每一个特征点对应原图上有多少个像素
        如我们的例子,我们将原图划分为13x13的网格,一张原图有412的像素,那么每一个特征点就对应412/13=32个像素点。(这里除以13是因为我们需要分开计算宽和高)
        那么就可以分别计算出高和宽的步长都是32
        """
        stride_h = self.img_size[1] / input_height
        stride_w = self.img_size[0] / input_width
        # 归一到特征层上
        """
        这里就是对先验框的样式进行调整
        """
        scaled_anchors = [(anchor_width / stride_w, anchor_height / stride_h) for anchor_width, anchor_height in self.anchors]

        # 对预测结果进行resize,进行通道转换和reshape
        """
        batchsize, 3x(5+num_classes), 13, 13->batchsize, 3, 13, 13, (5+num_classes)
        下面self.num_anchors表示的是3,也就是先验框的个数
        self.bbox_attrs也就是5+num_classes
        """
        prediction = input.view(batch_size, self.num_anchors,
                                self.bbox_attrs, input_height, input_width).permute(0, 1, 3, 4, 2).contiguous()

        #下面步骤就是获得先验框的调整参数

        # 获得先验框的中心位置的调整参数,先验框的中心其实就是我们划分网格的时候网格与网格之间的交点
        #中心位置就是先验框和预测框中心的偏移距离
        #在这里加上一个sigmoid可以将我们的值固定在0和1之间,这样我们的先验框的中心就只会往右下角的网格偏移了
        x = torch.sigmoid(prediction[..., 0])
        y = torch.sigmoid(prediction[..., 1])
        # 获得先验框的宽高调整参数,就是先验框的大小调整,调整到预测框的大小
        w = prediction[..., 2]  # Width
        h = prediction[..., 3]  # Height

        # 获得置信度,是否有物体
        conf = torch.sigmoid(prediction[..., 4])
        # 种类置信度
        pred_cls = torch.sigmoid(prediction[..., 5:])  # Cls pred.

        FloatTensor = torch.cuda.FloatTensor if x.is_cuda else torch.FloatTensor
        LongTensor = torch.cuda.LongTensor if x.is_cuda else torch.LongTensor

        # 下面就是生成网格,生成先验框
        #首先是生成先验框的中心,也就是每个网格相交的网格点,它的shape是:batch_size,3,13,13(也就是13x13的网格,每个网格有三个先验框)
        grid_x = torch.linspace(0, input_width - 1, input_width).repeat(input_width, 1).repeat(
            batch_size * self.num_anchors, 1, 1).view(x.shape).type(FloatTensor)
        grid_y = torch.linspace(0, input_height - 1, input_height).repeat(input_height, 1).t().repeat(
            batch_size * self.num_anchors, 1, 1).view(y.shape).type(FloatTensor)

        # 生成先验框的宽高
        anchor_w = FloatTensor(scaled_anchors).index_select(1, LongTensor([0]))
        anchor_h = FloatTensor(scaled_anchors).index_select(1, LongTensor([1]))
        anchor_w = anchor_w.repeat(batch_size, 1).repeat(1, 1, input_height * input_width).view(w.shape)
        anchor_h = anchor_h.repeat(batch_size, 1).repeat(1, 1, input_height * input_width).view(h.shape)

        # 计算调整后的先验框中心与宽高
        pred_boxes = FloatTensor(prediction[..., :4].shape)
        #对先验框的中心进行调整
        pred_boxes[..., 0] = x.data + grid_x
        pred_boxes[..., 1] = y.data + grid_y
        #对先验框的宽高进行调整
        pred_boxes[..., 2] = torch.exp(w.data) * anchor_w
        pred_boxes[..., 3] = torch.exp(h.data) * anchor_h

        # 用于将输出调整为相对于416x416的大小
        _scale = torch.Tensor([stride_w, stride_h] * 2).type(FloatTensor)
        output = torch.cat((pred_boxes.view(batch_size, -1, 4) * _scale,
                            conf.view(batch_size, -1, 1), pred_cls.view(batch_size, -1, self.num_classes)), -1)
下面就是predict过程的代码了
下面代码是predict.py 文件的代码
#首先创建了yolo这个类,这个类就是我们在yolo.py文件里面创建的类
yolo = YOLO()

while True:
    img = input('Input image filename:')
    try:
        image = Image.open(img)
    except:
        print('Open Error! Try again!')
        continue
    else:
    	#detect_image对我们输入进来的图片进行一个预测,然后把预测框给画出来,
        r_image = yolo.detect_image(image)
        r_image.show()
下面的代码文件是出现在yolo.py 文件
def detect_image(self, image):
        #首先获得了输入进来的图片的高和宽是多少
        image_shape = np.array(np.shape(image)[0:2])
        #添加灰条
        crop_img = np.array(letterbox_image(image, (self.model_image_size[0],self.model_image_size[1])))
        photo = np.array(crop_img,dtype = np.float32)
        #对图片进行归一化
        photo /= 255.0
        photo = np.transpose(photo, (2, 0, 1))
        photo = photo.astype(np.float32)
        images = []
        images.append(photo)

        images = np.asarray(images)
        images = torch.from_numpy(images)
        if self.cuda:
            images = images.cuda()

        with torch.no_grad():
            outputs = self.net(images)
            output_list = []
            for i in range(3):
                output_list.append(self.yolo_decodes[i](outputs[i]))
            #这里的cat就是对我们三个预测结果进行一次堆叠
            output = torch.cat(output_list, 1)
            batch_detections = non_max_suppression(output, self.config["yolo"]["classes"],
                                                    conf_thres=self.confidence,
                                                    nms_thres=0.3)
        try :
            batch_detections = batch_detections[0].cpu().numpy()
        except:
            return image
        top_index = batch_detections[:,4]*batch_detections[:,5] > self.confidence
        top_conf = batch_detections[top_index,4]*batch_detections[top_index,5]
        top_label = np.array(batch_detections[top_index,-1],np.int32)
        top_bboxes = np.array(batch_detections[top_index,:4])
        top_xmin, top_ymin, top_xmax, top_ymax = np.expand_dims(top_bboxes[:,0],-1),np.expand_dims(top_bboxes[:,1],-1),np.expand_dims(top_bboxes[:,2],-1),np.expand_dims(top_bboxes[:,3],-1)

        # 去掉灰条
        boxes = yolo_correct_boxes(top_ymin,top_xmin,top_ymax,top_xmax,np.array([self.model_image_size[0],self.model_image_size[1]]),image_shape)

        font = ImageFont.truetype(font='model_data/simhei.ttf',size=np.floor(3e-2 * np.shape(image)[1] + 0.5).astype('int32'))

        thickness = (np.shape(image)[0] + np.shape(image)[1]) // self.model_image_size[0]

        for i, c in enumerate(top_label):
            predicted_class = self.class_names[c]
            score = top_conf[i]

            top, left, bottom, right = boxes[i]
            top = top - 5
            left = left - 5
            bottom = bottom + 5
            right = right + 5

            top = max(0, np.floor(top + 0.5).astype('int32'))
            left = max(0, np.floor(left + 0.5).astype('int32'))
            bottom = min(np.shape(image)[0], np.floor(bottom + 0.5).astype('int32'))
            right = min(np.shape(image)[1], np.floor(right + 0.5).astype('int32'))

            # 画框框
            label = '{} {:.2f}'.format(predicted_class, score)
            draw = ImageDraw.Draw(image)
            label_size = draw.textsize(label, font)
            label = label.encode('utf-8')
            print(label)

            if top - label_size[1] >= 0:
                text_origin = np.array([left, top - label_size[1]])
            else:
                text_origin = np.array([left, top + 1])

            for i in range(thickness):
                draw.rectangle(
                    [left + i, top + i, right - i, bottom - i],
                    outline=self.colors[self.class_names.index(predicted_class)])
            draw.rectangle(
                [tuple(text_origin), tuple(text_origin + label_size)],
                fill=self.colors[self.class_names.index(predicted_class)])
            draw.text(text_origin, str(label,'UTF-8'), fill=(0, 0, 0), font=font)
            del draw
        return image