一、Spring Security简介
Spring Security是一个功能强大且高度可定制的身份验证和访问控制框架。Spring Security致力于为Java应用程序提供身份验证和授权的能力。像所有Spring项目一样,Spring Security的真正强大之处在于它可以轻松扩展以满足定制需求的能力。

Spring Security两大重要核心功能:用户认证(Authentication)和用户授权(Authorization)。
二、快速开始
使用Springboot工程搭建Spring Security项目。
1.引入依赖
<dependencies>
<!--————springSecurity的依赖————-->
       <dependency>
            <groupId>org.springframework.boot</groupId>
            <artifactId>spring-boot-starter-security</artifactId>
        </dependency>
<dependency>
<groupId>org.springframework.security</groupId>
<artifactId>spring-security-core</artifactId>
<version>5.2.6.RELEASE</version>
</dependency>
<!--————— MySql—————-->
<dependency>
<groupId>mysql</groupId>
<artifactId>mysql-connector-java</artifactId>
<scope>runtime</scope>
</dependency>
<!--————— mybatis-plus插件依赖 —————-->
<dependency>
<groupId>com.baomidou</groupId>
<artifactId>mybatis-plus-boot-starter</artifactId>
<version>3.4.2</version>
</dependency>
<!--————— mybatis-plus代码生产器 —————-->
<dependency>
<groupId>com.baomidou</groupId>
<artifactId>mybatis-plus-generator</artifactId>
<version>3.3.2</version>
</dependency>
<!--—————模板 代码生成器使用模板进行生产—————-->
<dependency>
<groupId>org.apache.velocity</groupId>
<artifactId>velocity</artifactId>
<version>1.7</version>
</dependency>
<!--—————配置类相关的依赖—————-->
<dependency>
<groupId>org.springframework.boot</groupId>
<artifactId>spring-boot-configuration-processor</artifactId>
<optional>true</optional>
</dependency>
<!--—————mybatis-plus 扩展插件 比如 分页插件依赖—————-->
<dependency>
<groupId>com.baomidou</groupId>
<artifactId>mybatis-plus-extension</artifactId>
<version>3.4.2</version>
</dependency>
<dependency>
<groupId>org.springframework.security</groupId>
<artifactId>spring-security-test</artifactId>
<scope>test</scope>
</dependency>
<!--————thymeleaf的依赖————-->
<dependency>
<groupId>org.springframework.boot</groupId>
<artifactId>spring-boot-starter-thymeleaf</artifactId>
</dependency>
<dependency>
<groupId>org.springframework.boot</groupId>
<artifactId>spring-boot-starter-web</artifactId>
</dependency>
<dependency>
<groupId>org.springframework.boot</groupId>
<artifactId>spring-boot-devtools</artifactId>
<scope>runtime</scope>
<optional>true</optional>
</dependency>
<dependency>
<groupId>org.springframework.boot</groupId>
<artifactId>spring-boot-configuration-processor</artifactId>
<optional>true</optional>
</dependency>
<dependency>
<groupId>org.projectlombok</groupId>
<artifactId>lombok</artifactId>
<version>1.18.20</version>
<optional>true</optional>
</dependency>
<dependency>
<groupId>org.springframework.boot</groupId>
<artifactId>spring-boot-starter-test</artifactId>
<scope>test</scope>
</dependency>
</dependencies>
在pom中新增了Spring Security的依赖
<dependency>
<groupId>org.springframework.boot</groupId>
<artifactId>spring-boot-starter-security</artifactId>
</dependency>
2.创建测试访问接口
用于访问接口时触发Spring Security登陆页面
@RestController
public class SecurityController {
@RequestMapping("/add")
public String add(){
return "hello security!";
}
}
3.访问接口,自动跳转至Security登陆页面
通过浏览器输入框输入localhost:8080/add,将自动跳转至Security的登陆页面

默认账号是: user
默认密码是:启动项目的控制台中输出的密码

三、原理剖析
在上面中访问add接口,发现被Spring Security的登陆页面拦截,可以猜到这是触发了Security框架的过滤器。Spring Security本质上就是一个过滤器链。下面讲介绍Security框架的过滤器链。
1.过滤器链
-
FilterSecurityInterceptor:是一个方法级的权限过滤器,位于过滤器链的最底部。
-
ExceptionTranslationFilter: 异常过滤器,用来处理在认证授权过程中抛出异常。
-
UsernamePasswordAuthenticationFilter: 用于对/login的POST请求做拦截,校验表单中的用户名和密码。
2.过滤器加载过程
Springboot在整合Spring Security项目时会自动配置DelegatingFilterProxy过滤器,若非Springboot工程,则需要手动配置该过滤器。
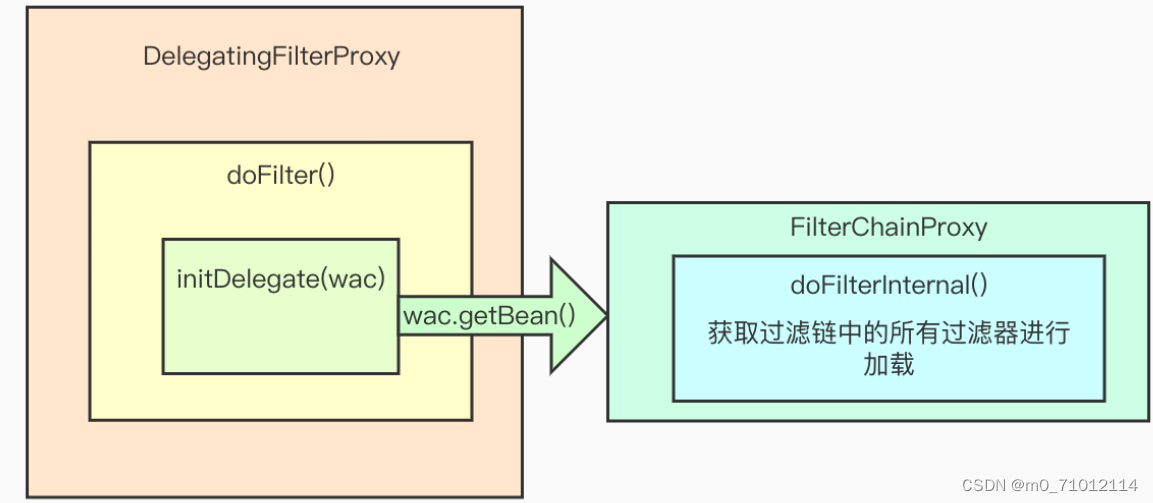
过滤器如何进行加载的?
结合上图和源码,Security在DelegatingFilterProxy的doFilter()调用了initDelegat()方法,在该方法中调用了WebApplicationContext的getBean()方法,该方法出发FilterChainProxy的doFilterInternal方法,用于获取过滤链中的所有过滤器并进行加载。
3.Security的两个关键接口
在快速开始中发现Spring Security使用了默认的用户名和密码,实际用户名和密码需要自定义,因此会用到以下两个接口。下述两个接口的具体实现将在之后的例子中体现。
1) UserDetailsService接口
若需要从数据库中获取用户名和密码,则需要把查询数据库的过程写在这个接口里。
2)PasswordEncoder接口
在密码的处理上,需要进行编解码器,该接口实现对密码进行加密。
四、多种方式配置登陆的用户名和密码
1.通过配置文件设置用户名和密码
# 方式一:设置登陆的用户名和密码
spring:
  security:
    user:
      name: qfadmin
      password: 123456
2.通过创建配置类实现设置
@Configuration
public class SecurityConfig extends WebSecurityConfigurerAdapter {
@Override
protected void configure(AuthenticationManagerBuilder auth) throws Exception {
//用于密码的密文处理
BCryptPasswordEncoder passwordEncoder = new BCryptPasswordEncoder();
//生成密文
String password = passwordEncoder.encode("123456");
//设置用户名和密码
auth.inMemoryAuthentication().withUser("qfAdmin").password(password).roles("admin");
}
@Bean
PasswordEncoder passwordEncoder(){
return new BCryptPasswordEncoder();
}
}
3.编写自定义实现类(常用)
第一步:编写UserDetailsService实现类,可以从数据库中获取用户名和密码
@Service("userDetailsService")
public class MyUserDetailsService implements UserDetailsService {
    @Override
    public UserDetails loadUserByUsername(String username) throws UsernameNotFoundException {
        //设置角色,角色的概念在之后章节介绍
        List<GrantedAuthority> auths = AuthorityUtils.commaSeparatedStringToAuthorityList("role");
        //可以从数据库获取用户名和密码,这里返回的是数据库中的数据,然后再去和用户输入的密码比较
        return new User("qfAdmin",new BCryptPasswordEncoder().encode("123456"),auths);
    }
}
第二步:编写配置类
@Configuration
public class SecurityConfigByImpl extends WebSecurityConfigurerAdapter {
@Autowired
private UserDetailsService userDetailsService;
@Override
protected void configure(AuthenticationManagerBuilder auth) throws Exception {
auth.userDetailsService(userDetailsService).passwordEncoder(passwordEncoder());
}
@Override
protected void configure(HttpSecurity http) throws Exception {
http.formLogin()
.loginPage("/login.html") //设置自定义登陆页面,注意如果不通过controller跳转这个页面需要放在static中
.loginProcessingUrl("/user/login") //登陆时访问的路径,也就是s这个路径表示表单提交,处理登录请求的controller不需要我们写,security帮我们做到了
.defaultSuccessUrl("/index").permitAll() //登陆成功后跳转的路径
.and().authorizeRequests()
.antMatchers("/","/add","/user/login").permitAll() //设置可以直接访问的路径,取消拦截
.anyRequest().authenticated()
.and().csrf().disable(); //关闭csrf防护
}
@Bean
PasswordEncoder passwordEncoder(){
return new BCryptPasswordEncoder();
}
}
为了测试顺利,这里临时关闭csrf防护。所谓csrf防护,全称为跨站请求伪造(Cross-site request forgery),是一种网络攻击方式,CSRF攻击利用网站对于用户网页浏览器的信任,挟持用户当前已登陆的Web应用程序,去执行并非用户本意的操作。简而言之,用户通过盗取目标网站保存的cookie中的用户信息,实现非法使用。
其中,login.html为自己提供的登陆页面,具体内容如下:
<!DOCTYPE html>
<html lang="en">
<head>
<meta charset="UTF-8">
<title>Title</title>
</head>
<body>
<form action="/usr/login" method="post">
用户名:<input type="text" name="username"/><br/>
密码:<input type="password" name="password"><br/>
<input type="submit" value="login"/>
</form>
</body>
</html>
注意:表单提交的地址为配置类中配置的登陆时访问路径:/usr/login
第三步:在controller中添加/index接口
@RestController
public class SecurityController {
@RequestMapping("/add")
public String add(){
return "hello security!";
}
@RequestMapping("/index")
public String index(){
return "hello index";
}
}
五、基于角色和权限进行访问控制
Spring Security提供了四个方法用于角色和权限的访问控制。通过这些方法,对用户是否具有某个或某些权限,进行过滤访问。对用户是否具备某个或某些角色,进行过滤访问。
1.hasAuthority方法
判断当前主题是否有指定的权限,有返回true,否则返回false
该方法适用于只拥有一个权限的用户。
1)在配置类中设置当前主体具有怎样的权限才能访问。
 @Override
    protected void configure(HttpSecurity http) throws Exception {
        //配置没有权限的跳转页面
        http.exceptionHandling().accessDeniedPage("/error.html");
        http.formLogin()
                .loginPage("/login.html") //设置自定义登陆页面
                .loginProcessingUrl("/usr/login") //登陆时访问的路径
                .defaultSuccessUrl("/index").permitAll() //登陆成功后跳转的路径
                .and().authorizeRequests()
                    .antMatchers("/","/add","/user/login").permitAll() //设置可以直接访问的路径,取消拦截
                    //1.hasAuthority方法:当前登陆用户,只有具有admin权限才可以访问这个路径
                    .antMatchers("/index").hasAuthority("admin")
                .anyRequest().authenticated()
                .and().csrf().disable(); //关闭csrf防护
    }
2)在userdetailsService,为返回的User对象设置权限
 @Override
    public UserDetails loadUserByUsername(String s) throws UsernameNotFoundException {
        //因目前还没引入角色的概念,先用工具类快速生成角色
        List<GrantedAuthority> auths = AuthorityUtils.commaSeparatedStringToAuthorityList("admin");
        //可以从数据库获取用户名和密码
        return new User("qfAdmin",new BCryptPasswordEncoder().encode("123456"),auths);
    }
2.hasAnyAuthority方法
适用于一个主体有多个权限的情况,多个权限用逗号隔开。
@Override
protected void configure(HttpSecurity http) throws Exception {
//注销的配置
http.logout().logoutUrl("/logout") //注销时访问的路径
.logoutSuccessUrl("/logoutSuccess").permitAll(); //注销成功后访问的路径
//配置没有权限的跳转页面
http.exceptionHandling().accessDeniedPage("/error.html");
http.formLogin()
.loginPage("/login.html") //设置自定义登陆页面
.loginProcessingUrl("/usr/login") //登陆时访问的路径
// .defaultSuccessUrl("/index").permitAll() //登陆成功后跳转的路径
.defaultSuccessUrl("/success.html").permitAll() //登陆成功后跳转的路径
.and().authorizeRequests()
.antMatchers("/","/add","/user/login").permitAll() //设置可以直接访问的路径,取消拦截
//2.hasAnyAuthority方法:当前登陆用户,具有admin或manager权限可以访问这个路径
.antMatchers("/index").hasAnyAuthority("admin,manager")
.anyRequest().authenticated()
.and().csrf().disable(); //关闭csrf防护
}
2)在userdetailsService,为返回的User对象设置权限
  @Override
    public UserDetails loadUserByUsername(String s) throws UsernameNotFoundException {
        //因目前还没引入角色的概念,先用工具类快速生成角色
        List<GrantedAuthority> auths = AuthorityUtils.commaSeparatedStringToAuthorityList("admin");
        //可以从数据库获取用户名和密码
        return new User("Admin",new BCryptPasswordEncoder().encode("123456"),auths);
    }
3.hasRole方法
如果用户具备给定角色就允许访问,否则报403错误。
1)修改配置类
@Override
protected void configure(HttpSecurity http) throws Exception {
//注销的配置
http.logout().logoutUrl("/logout") //注销时访问的路径
.logoutSuccessUrl("/logoutSuccess").permitAll(); //注销成功后访问的路径
//配置没有权限的跳转页面
http.exceptionHandling().accessDeniedPage("/error.html");
http.formLogin()
.loginPage("/login.html") //设置自定义登陆页面
.loginProcessingUrl("/usr/login") //登陆时访问的路径
// .defaultSuccessUrl("/index").permitAll() //登陆成功后跳转的路径
.defaultSuccessUrl("/success.html").permitAll() //登陆成功后跳转的路径
.and().authorizeRequests()
.antMatchers("/","/add","/user/login").permitAll() //设置可以直接访问的路径,取消拦截
//3.hasRole方法:当前主体具有指定角色,则允许访问
.antMatchers("/index").hasRole("student")
.anyRequest().authenticated()
.and().csrf().disable(); //关闭csrf防护
}
2)修改user对象
//权限设置
    @Override
    public UserDetails loadUserByUsername(String s) throws UsernameNotFoundException {
        //因目前还没引入角色的概念,先用工具类快速生成角色
        //hasRole:  由于源码会把role加上"ROLE_",因此在这里设计角色时需加上前缀
        List<GrantedAuthority> auths = AuthorityUtils.commaSeparatedStringToAuthorityList("admin,ROLE_student");
        //可以从数据库获取用户名和密码
        return new User("qfAdmin",new BCryptPasswordEncoder().encode("123456"),auths);
    }
其中角色student需要在设置时加上“ROLE”前缀,因为通过源码hasRole方法给自定义的角色名前加上了“ROLE”前缀
private static String hasRole(String role) {
        Assert.notNull(role, "role cannot be null");
        Assert.isTrue(!role.startsWith("ROLE_"), () -> {
            return "role should not start with 'ROLE_' since it is automatically inserted. Got '" + role + "'";
        });
        return "hasRole('ROLE_" + role + "')";
    }
4.hasAnyRole方法
设置多个角色,多个角色之间使用逗号隔开,只要用户具有某一个角色,就能访问。
@Override
protected void configure(HttpSecurity http) throws Exception {
//注销的配置
http.logout().logoutUrl("/logout") //注销时访问的路径
.logoutSuccessUrl("/logoutSuccess").permitAll(); //注销成功后访问的路径
//配置没有权限的跳转页面
http.exceptionHandling().accessDeniedPage("/error.html");
http.formLogin()
.loginPage("/login.html") //设置自定义登陆页面
.loginProcessingUrl("/usr/login") //登陆时访问的路径
// .defaultSuccessUrl("/index").permitAll() //登陆成功后跳转的路径
.defaultSuccessUrl("/success.html").permitAll() //登陆成功后跳转的路径
.and().authorizeRequests()
.antMatchers("/","/add","/user/login").permitAll() //设置可以直接访问的路径,取消拦截
//4.hasAnyRole方法:当前主体只要具备其中某一个角色就能访问
.antMatchers("/index").hasAnyRole("student1,teacher")
.anyRequest().authenticated()
.and().csrf().disable(); //关闭csrf防护
}
六、SpringSecurity的常用注解
1、@Secured注解
@Secured注解用于校验用户具有某个角色,才可以访问方法
1)启动类上开启注解
@SpringBootApplication
@EnableGlobalMethodSecurity(securedEnabled = true)
public class SecurityDemo1Application {
    public static void main(String[] args) {
       SpringApplication.run(SecurityDemo1Application.class, args);
    }
}
2)在方法上配置注解
 @RequestMapping("/admin")
    @Secured("ROLE_ls")
    public String testAuthority(){
        return "ls的角色";
    }
3)用户对象中设置角色
     @Override
    public UserDetails loadUserByUsername(String username) throws UsernameNotFoundException {
        List<GrantedAuthority> auths = AuthorityUtils.commaSeparatedStringToAuthorityList("admin,ROLE_student");
        //可以从数据库获取用户名和密码
        return new User("qfAdmin",new BCryptPasswordEncoder().encode("123456"),auths);
    }
2、@PreAuthorize
进入方法前的权限验证
步骤
在启动类上开启注解
@EnableGlobalMethodSecurity(securedEnabled = true, prePostEnabled = true)
在方法上使用注解
@RequestMapping("/items")
 @PreAuthorize("hasAnyAuthority('admin')")
 public String items(){
     return "show itemds";
 }
注意:方法参数是之前介绍的四个方法。
3、@PostAuthorize
在方法访问之后进行校验,实际使用并不多
步骤
启动类上开启注解
@EnableGlobalMethodSecurity(securedEnabled = true, prePostEnabled = true)
方法上使用注解
@RequestMapping("/postItems")
    @PostAuthorize("hasAnyAuthority('teacher')")
    public String postItems(){
        //先执行方法内容,再做权限校验
        System.out.println("show detail here...");
        return "show post items";
    }
4、@PostFilter
权限验证之后对数据进行过滤,只能获取满足条件的数据
步骤
在方法上使用注解
@RequestMapping("/postFilterItems")
@PreAuthorize("hasAnyAuthority('admin')")
@PostFilter("filterObject.userName == 'xiaoming'")
public List<User> getUsers(){
ArrayList<User> list = new ArrayList<User>();
list.add(new User(1L,"xiaowang"));
list.add(new User(2L,"xiaoming"));
return list;
}
访问接口,发现list集合中中获取了满足条件的xiaoming对象
5、@PreFilter
对传入方法的数据进行过滤
步骤
在方法上使用注解
@RequestMapping("/preFilterItems")
    @PreAuthorize("hasAnyAuthority('admin')")
    @PreFilter(value="filterObject.userName == 'xiaoming'")
    public List<User> getUsersByPreFilter(@RequestBody List<User> list){
        //只有userName是'xiaoming'的数据才会被传入
        list.forEach(t->{
            System.out.println(t.getUserName());
        });
        return list;
    }
访问方法,发现只有userName是'xiaoming'的数据才会被传入
七、案例
1.从数据库查询角色或权限案例
1.1准备数据库:
用户表users:
 角色表role:

权限表menu: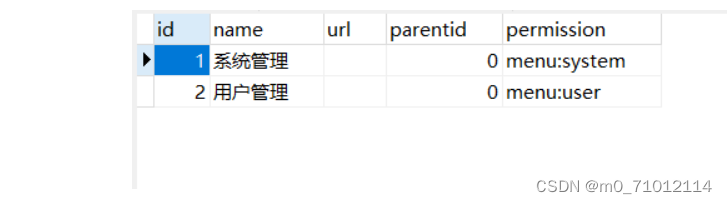
用户和角色关联表role_user:
权限和角色关联表role_menu:
1.2创建配置类继承WebSecurityConfigurerAdapter
用注解方式验证权限
@Configuration
public class SecurityConfig extends WebSecurityConfigurerAdapter {
@Autowired
private UserDetailsService userDetailsService;
@Override
protected void configure(AuthenticationManagerBuilder auth) throws Exception {
auth.userDetailsService(userDetailsService).passwordEncoder(passwordEncoder());
}
@Override
protected void configure(HttpSecurity http) throws Exception {
http.formLogin()
.loginPage("/login.html") //设置自定义登陆页面,注意如果不通过controller跳转这个页面需要放在static中
.loginProcessingUrl("/user/login") //登陆时访问的路径,也就是s这个路径表示表单提交,处理登录请求的controller不需要我们写,security帮我们做到了
.defaultSuccessUrl("/main").permitAll() //登陆成功后跳转的路径
.and().authorizeRequests()
.antMatchers("/","/add","/user/login").permitAll() //设置可以直接访问的路径,取消拦截
.antMatchers("/main","/users/manage").hasAnyRole("普通用户")
.anyRequest().authenticated()
.and().csrf().disable(); //关闭csrf防护
}
@Bean
PasswordEncoder passwordEncoder(){
return new BCryptPasswordEncoder();
}
}
1.3创建application.yml配置文件
spring:
datasource:
driver-class-name: com.mysql.jdbc.Driver
url: jdbc:mysql://localhost:3306/bank?useUnicode=true&characterEncoding=utf8&serverTimezone=Asia/Shanghai&useSSL=false
username: root
password: 123456
mybatis-plus:
configuration:
log-impl: org.apache.ibatis.logging.stdout.StdOutImpl # 查看sql输出日志
global-config:
db-config:
id-type: auto # id自增
mapper-locations: classpath:mapper/*.xml #设置
thymeleaf:
cache: false
type-aliases-package: com.ymk.securitydemo1.pojo #设置别名
logging:
level:
com.ymk.securitydemo1: debug
1.4创UsersMapper和UsersMapper.xml
@Repository
public interface UsersMapper extends BaseMapper<Users> {
    //根据用户id查询用户角色
    List<Role> selectRoleByUserId(Integer userId);

    //根据用户id查询权限
    List<Menu> selectMenuByUserId(Integer userId);
}
<mapper namespace="com.ymk.securitydemo1.mapper.UsersMapper">
    <!--根据用户id查询用户角色-->
    <select id="selectRoleByUserId" resultType="Role">
        select role.name
        from users,
             role_user r,
             role
        where users.id = r.uid
          and r.rid = role.id
          and users.id = #{id}
    </select>
    <!--根据用户id查询用户权限-->
    <select id="selectMenuByUserId" resultType="Menu">
        select menu.name,menu.permission
        from users,
             role_user r,
             role,
             role_menu m,
             menu
        where users.id = r.uid
          and r.rid = role.id
          and role.id = m.rid
          and m.mid = menu.id
          and users.id = #{id}
    </select>
</mapper>
1.5编写实现类UserDetailsService
在此类进行数据库查询
@Service("userDetailsService")
public class MyUserDetailsService implements UserDetailsService {
@Autowired
private UsersMapper usersMapper;
// 接受传过来的用户名 根据传过来的用户名查询数据库的密码,返回数据库中的用户名、密码、权限信息
@Override
public UserDetails loadUserByUsername(String username) throws UsernameNotFoundException {
//查询数据库
QueryWrapper<Users> queryWrapper1 = new QueryWrapper<>();
queryWrapper1.eq("username", username);
Users users = usersMapper.selectOne(queryWrapper1);
if (users == null) {
throw new UsernameNotFoundException("用户名不存在!");
}
System.out.println(users);
// 这个集合是 保存 用户的权限和角色的集合
// List<GrantedAuthority> auths =
// AuthorityUtils.commaSeparatedStringToAuthorityList("manger,ROLE_admin");
//查询权限和角色,然后封装到User中
ArrayList<GrantedAuthority> auths = new ArrayList<>();
//查询用户角色的列表
List<Role> roles = usersMapper.selectRoleByUserId(users.getId().intValue());
//查询权限的列表
List<Menu> menus = usersMapper.selectMenuByUserId(users.getId().intValue());
//处理角色 拼接 ROLE_xxx
for (Role role : roles) {
SimpleGrantedAuthority simpleGrantedAuthority = new SimpleGrantedAuthority("ROLE_" + role.getName());
auths.add(simpleGrantedAuthority);
}
//处理权限
for (Menu menu : menus) {
auths.add(new SimpleGrantedAuthority(menu.getPermission()));
}
System.out.println(auths);
return new User(users.getUsername(), users.getPassword(), auths);
}
}
1.6创建UserController类
是对用户登录时进行的操作,此时不用谢UserService和UserServiceImpl
@RequestMapping("/users")
@RestController
public class UsersController {
@Autowired
private UsersService usersService;
@RequestMapping("/admin")
@Secured("ROLE_管理员") // 需要的角色
public String testAuthority(){
return "张三的角色";
}
@PreAuthorize("hasAnyAuthority('menu:user')") //需要的权限
@RequestMapping("/manage")
public String testAuthority2(){
return "李四的角色";
}
}
八、用户注销
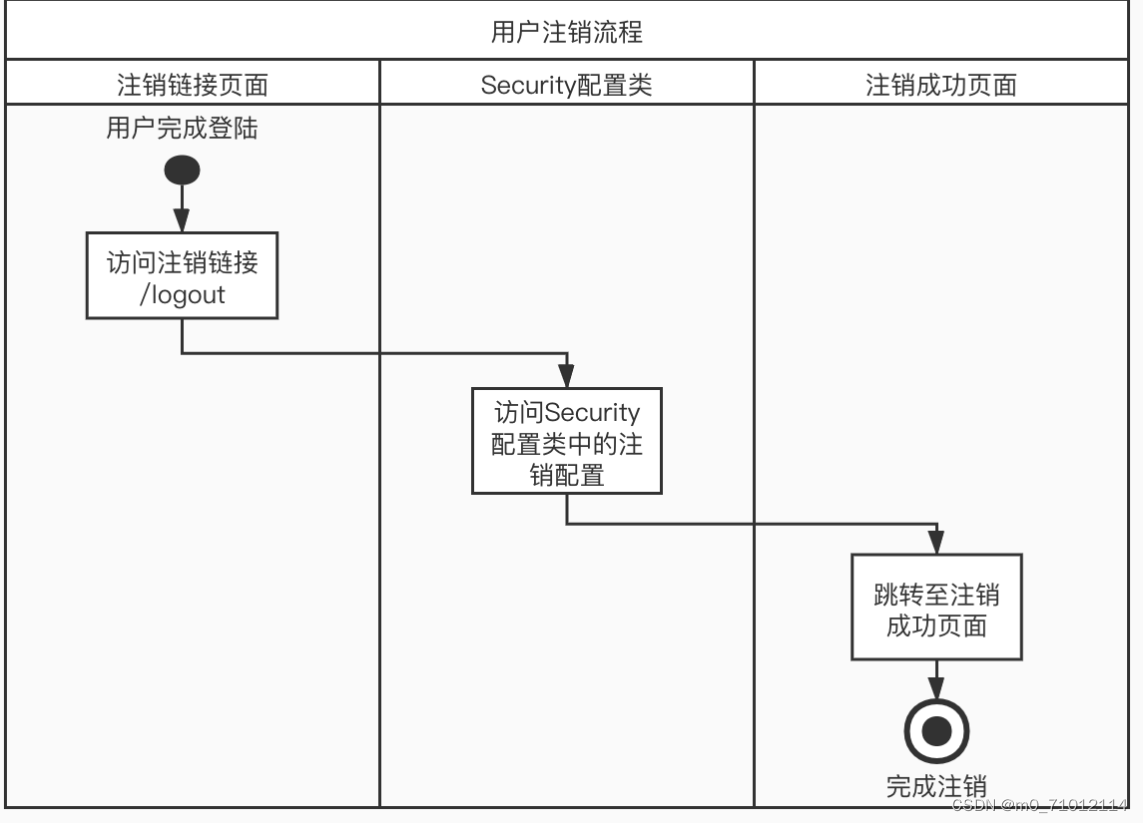
1.在配置类添加注销的配置
@Override
protected void configure(HttpSecurity http) throws Exception {
//注销的配置
http.logout().logoutUrl("/logout") //注销时访问的路径
.logoutSuccessUrl("/logoutSuccess").permitAll(); //注销成功后访问的路径
//配置没有权限的跳转页面
http.exceptionHandling().accessDeniedPage("/error.html");
http.formLogin()
.loginPage("/login.html") //设置自定义登陆页面
.loginProcessingUrl("/usr/login") //登陆时访问的路径
// .defaultSuccessUrl("/index").permitAll() //登陆成功后跳转的路径
.defaultSuccessUrl("/success.html").permitAll() //登陆成功后跳转的路径
.and().authorizeRequests()
.antMatchers("/","/add","/user/login").permitAll() //设置可以直接访问的路径,取消拦截
//1.hasAuthority方法:当前登陆用户,只有具有admin权限才可以访问这个路径
//.antMatchers("/index").hasAuthority("admin")
//2.hasAnyAuthority方法:当前登陆用户,具有admin或manager权限可以访问这个路径
//.antMatchers("/index").hasAnyAuthority("admin,manager")
//3.hasRole方法:当前主体具有指定角色,则允许访问
//.antMatchers("/index").hasRole("student")
//4.hasAnyRole方法:当前主体只要具备其中某一个角色就能访问
.antMatchers("/index").hasAnyRole("student1,teacher")
.anyRequest().authenticated()
.and().csrf().disable(); //关闭csrf防护
}
2.设置注销链接
添加success.html页面作为登陆成功后的跳转页面
<!DOCTYPE html>
<html lang="en">
<head>
    <meta charset="UTF-8">
    <title>Title</title>
</head>
<body>
    登陆成功 <a href="/logout">退出</a>
</body>
</html>
登陆后访问退出按钮,实现注销功能。