打算稍微做一下实验课程的回顾,话不多说,正文开始(期末周的好同志就是这么单刀直入)
实验目的和要求
- 了解路由协议的作用
- 学习动态路由协议的工作原理。掌握 TCP/IP 网络中的Distance Vector Routing Protocols (如RIP)和Link State Routing Protocols(如OSPF)
- 在 CISCO 路由器上配置RIP
- 观察、分析现象,了解 RIP 的工作原理
实验图
![1](https://img-blog.csdnimg.cn/20201221085028970.png?x-oss-process=image/watermark,type_ZmFuZ3poZW5naGVpdGk,shadow_10,text_aHR0cHM6Ly9ibG9nLmNzZG4ubmV0L3FxXzQ0NzAyODQ3,size_16,color_FFFFFF,t_70)
实验原理
(略。)
实验仪器设备
CISCO 路由器,专用电缆,网线,CONSOLE 线,PC 机
实验步骤、过程数据记录
1.连接网络,记录拓扑图如下。
![1](https://img-blog.csdnimg.cn/20201221085808559.png?x-oss-process=image/watermark,type_ZmFuZ3poZW5naGVpdGk,shadow_10,text_aHR0cHM6Ly9ibG9nLmNzZG4ubmV0L3FxXzQ0NzAyODQ3,size_16,color_FFFFFF,t_70)
2.配置网络参数。
A. 配置PCs:IP address,subnet mask,default gateway
配置完各个PC机的IP地址、子网掩码和默认网关之后,分别用ipconfig/all
命令确认配置无误。
其中,PC1的结果如下:
![2](https://img-blog.csdnimg.cn/20201221085822288.png?x-oss-process=image/watermark,type_ZmFuZ3poZW5naGVpdGk,shadow_10,text_aHR0cHM6Ly9ibG9nLmNzZG4ubmV0L3FxXzQ0NzAyODQ3,size_16,color_FFFFFF,t_70)
PCB的结果如下:
![3](https://img-blog.csdnimg.cn/20201221085842828.png)
B. 配置路由器ABC
对路由器的配置包括物理层、数据链路层的配置。以路由器B上为例,进行配置。输入密码cisco之后,输入enable
命令进入特权模式;再次输入密码,输入conf t
命令进入配置模式;输入int s0/3/0
命令,配置s0/3/0端口的相关信息;输入no shut
命令打开s0/3/0端口;输入interface s0/3/0
命令,再输入ip address 10.1.5.2 255.255.255.0
命令配置s0/3/0端口的IP地址。如下图所示:
![4](https://img-blog.csdnimg.cn/20201221090006723.png?x-oss-process=image/watermark,type_ZmFuZ3poZW5naGVpdGk,shadow_10,text_aHR0cHM6Ly9ibG9nLmNzZG4ubmV0L3FxXzQ0NzAyODQ3,size_16,color_FFFFFF,t_70)
同样的方法在配置模式下输入int s0/3/1
命令,配置s0/3/1端口的相关信息;输入no shut
命令打开s0/3/1端口;输入interface s0/3/1
命令,再输入ip address 10.1.6.1 255.255.255.0
命令配置s0/3/1端口的IP地址。如下图所示:
![1](https://img-blog.csdnimg.cn/20201221090108285.png)
然后配置路由器B的f0/1端口的IP地址:在特权模式下输入int f0/1
命令进入配置模式,输入ip add 10.1.2.1 255.255.255.0
命令,再输入no shutdown
命令打开f0/1窗口。回到特权模式输入show run
检查,得到结果如下所示:
![2](https://img-blog.csdnimg.cn/20201221090122323.png?x-oss-process=image/watermark,type_ZmFuZ3poZW5naGVpdGk,shadow_10,text_aHR0cHM6Ly9ibG9nLmNzZG4ubmV0L3FxXzQ0NzAyODQ3,size_16,color_FFFFFF,t_70)
再输入show int s0/3/0
和show int s0/3/1
命令分别检查端口s0/3/0和s0/3/1的配置情况,如下所示:
![1](https://img-blog.csdnimg.cn/20201221090222990.png)
![2](https://img-blog.csdnimg.cn/20201221090233500.png)
同样的步骤配置路由器A和路由器C。
3.为路由器配置恰当的动态路由协议。
在配置模式下输入router rip
命令,启动RIP路由协议,再输入network 10.0.0.0
配置RIP路由协议。
路由器A:
![pca](https://img-blog.csdnimg.cn/20201221090306554.png)
路由器B:
![pcb](https://img-blog.csdnimg.cn/2020122109033212.png)
路由器C:
![pcc](https://img-blog.csdnimg.cn/20201221090351177.png)
4.检查路由表
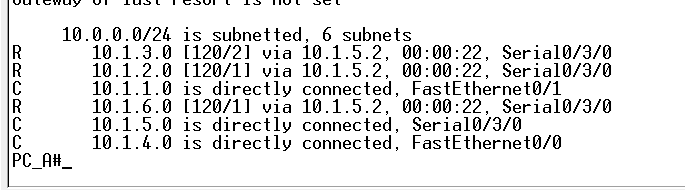
对三个路由器分别在特权模式下输入show ip route命令查看路由表,可以看到每个路由表中都有6个网络,和预期结果相符。
路由器A:
10.0.0.0/24 is subnetted, 6 subnets
R 10.1.3.0 [120/2] via 10.1.5.2, 00:00:21, Serial0/3/0
R 10.1.2.0 [120/1] via 10.1.5.2, 00:00:21, Serial0/3/0
C 10.1.1.0 is directly connected, FastEthernet0/1
R 10.1.6.0 [120/1] via 10.1.5.2, 00:00:21, Serial0/3/0
C 10.1.5.0 is directly connected, Serial0/3/0
C 10.1.4.0 is directly connected, FastEthernet0/0
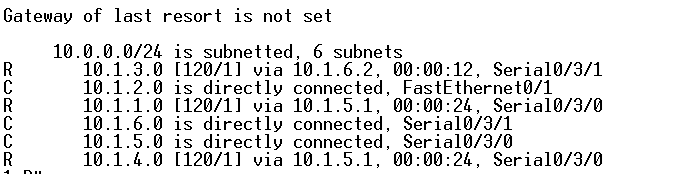
![pca](https://img-blog.csdnimg.cn/20201221090406306.png)
路由器B:
Gateway of last resort is not set
10.0.0.0/24 is subnetted, 6 subnets
R 10.1.3.0 [120/1] via 10.1.6.2, 00:00:12, Serial0/3/1
C 10.1.2.0 is directly connected, FastEthernet0/1
R 10.1.1.0 [120/1] via 10.1.5.1, 00:00:24, Serial0/3/0
C 10.1.6.0 is directly connected, Serial0/3/1
C 10.1.5.0 is directly connected, Serial0/3/0
R 10.1.4.0 [120/1] via 10.1.5.1, 00:00:24, Serial0/3/0
![pcb](https://img-blog.csdnimg.cn/20201221090459902.png)
路由器C:
10.0.0.0/24 is subnetted, 6 subnets
C 10.1.3.0 is directly connected, FastEthernet0/1
R 10.1.2.0 [120/1] via 10.1.6.1, 00:00:25, Serial0/3/1
R 10.1.1.0 [120/2] via 10.1.6.1, 00:00:25, Serial0/3/1
C 10.1.6.0 is directly connected, Serial0/3/1
R 10.1.5.0 [120/1] via 10.1.6.1, 00:00:25, Serial0/3/1
R 10.1.4.0 [120/2] via 10.1.6.1, 00:00:25, Serial0/3/1
![pcc](https://img-blog.csdnimg.cn/20201221090527723.png?x-oss-process=image/watermark,type_ZmFuZ3poZW5naGVpdGk,shadow_10,text_aHR0cHM6Ly9ibG9nLmNzZG4ubmV0L3FxXzQ0NzAyODQ3,size_16,color_FFFFFF,t_70)
5.检查网络连通性
利用多次ping方法来检查网络的连通性,最终得出结果为所有计算机和路由器都能相互ping成功,部分结果如下所示:
![1](https://img-blog.csdnimg.cn/20201221090549164.png?x-oss-process=image/watermark,type_ZmFuZ3poZW5naGVpdGk,shadow_10,text_aHR0cHM6Ly9ibG9nLmNzZG4ubmV0L3FxXzQ0NzAyODQ3,size_16,color_FFFFFF,t_70)
![2](https://img-blog.csdnimg.cn/20201221090612909.png?x-oss-process=image/watermark,type_ZmFuZ3poZW5naGVpdGk,shadow_10,text_aHR0cHM6Ly9ibG9nLmNzZG4ubmV0L3FxXzQ0NzAyODQ3,size_16,color_FFFFFF,t_70)
![3](https://img-blog.csdnimg.cn/20201221090629508.png?x-oss-process=image/watermark,type_ZmFuZ3poZW5naGVpdGk,shadow_10,text_aHR0cHM6Ly9ibG9nLmNzZG4ubmV0L3FxXzQ0NzAyODQ3,size_16,color_FFFFFF,t_70)
![4](https://img-blog.csdnimg.cn/20201221090639880.png?x-oss-process=image/watermark,type_ZmFuZ3poZW5naGVpdGk,shadow_10,text_aHR0cHM6Ly9ibG9nLmNzZG4ubmV0L3FxXzQ0NzAyODQ3,size_16,color_FFFFFF,t_70)
实验结果分析与总结
(略。)