增强现实python

2023-10-27

本博文用来记录使用python实现增强现实

增强现实技术,即实时地计算摄影机影像的位置及角度并加上相应图像、视频、3D模型的技术,这种技术的目标是在屏幕上把虚拟世界套在现实世界并进行互动。

主要工作:实现动态的放置虚拟模型,本文实现了在自己上传的视频中添加虚拟模型,也可以实时添加模型到视频里。

主要代码:

import argparse
import cv2
import numpy as np
import math
import os
from objloader_simple import *

# Minimum number of matches that have to be found
# to consider the recognition valid
MIN_MATCHES = 10  


def main():
    """
    This functions loads the target surface image,
    """
    homography = None 
    # matrix of camera parameters (made up but works quite well for me) 
    camera_parameters = np.array([[800, 0, 320], [0, 800, 240], [0, 0, 1]])
    # create ORB keypoint detector
    orb = cv2.ORB_create()
    # create BFMatcher object based on hamming distance  
    bf = cv2.BFMatcher(cv2.NORM_HAMMING, crossCheck=True)
    # load the reference surface that will be searched in the video stream
    dir_name = os.getcwd()
    model = cv2.imread(os.path.join(dir_name, 'D:/Pycharm/test/book_frontal.JPG'), 0)
    # Compute model keypoints and its descriptors
    kp_model, des_model = orb.detectAndCompute(model, None)
    # Load 3D model from OBJ file
    obj = OBJ(os.path.join(dir_name, 'D:/Pycharm/test/ar/models/rat.obj'), swapyz=True)  # obj model
    # init video capture
    # cap = cv2.VideoCapture(0)  # Implementing Video Recording
    cap = cv2.VideoCapture("D:/Yume/Video/zyl.mp4")  # import video
    while True:
        # read the current frame
        ret, frame = cap.read()
        if not ret:
            print "Unable to capture video"
            return 
        # find and draw the keypoints of the frame
        kp_frame, des_frame = orb.detectAndCompute(frame, None)
        # match frame descriptors with model descriptors
        matches = bf.match(des_model, des_frame)
        # sort them in the order of their distance
        # the lower the distance, the better the match
        matches = sorted(matches, key=lambda x: x.distance)

        # compute Homography if enough matches are found
        if len(matches) > MIN_MATCHES:
            # differenciate between source points and destination points
            src_pts = np.float32([kp_model[m.queryIdx].pt for m in matches]).reshape(-1, 1, 2)
            dst_pts = np.float32([kp_frame[m.trainIdx].pt for m in matches]).reshape(-1, 1, 2)
            # compute Homography
            homography, mask = cv2.findHomography(src_pts, dst_pts, cv2.RANSAC, 5.0)
            if args.rectangle:
                # Draw a rectangle that marks the found model in the frame
                h, w = model.shape
                pts = np.float32([[0, 0], [0, h - 1], [w - 1, h - 1], [w - 1, 0]]).reshape(-1, 1, 2)
                # project corners into frame
                dst = cv2.perspectiveTransform(pts, homography)
                # connect them with lines  
                frame = cv2.polylines(frame, [np.int32(dst)], True, 255, 3, cv2.LINE_AA)  
            # if a valid homography matrix was found render cube on model plane
            if homography is not None:
                try:
                    # obtain 3D projection matrix from homography matrix and camera parameters
                    projection = projection_matrix(camera_parameters, homography)  
                    # project cube or model
                    frame = render(frame, obj, projection, model, False)
                    #frame = render(frame, model, projection)
                except:
                    pass
            # draw first 10 matches.
            if args.matches:
                frame = cv2.drawMatches(model, kp_model, frame, kp_frame, matches[:10], 0, flags=2)
            # show result
            cv2.imshow('frame', frame)
            if cv2.waitKey(1) & 0xFF == ord('q'):
                break

        else:
            print "Not enough matches found - %d/%d" % (len(matches), MIN_MATCHES)

    cap.release()
    cv2.destroyAllWindows()
    return 0

def render(img, obj, projection, model, color=False):  # rending
    """
    Render a loaded obj model into the current video frame
    """
    vertices = obj.vertices
    scale_matrix = np.eye(3) * 3
    h, w = model.shape

    for face in obj.faces:
        face_vertices = face[0]
        points = np.array([vertices[vertex - 1] for vertex in face_vertices])
        points = np.dot(points, scale_matrix)
        # render model in the middle of the reference surface. To do so,
        # model points must be displaced
        points = np.array([[p[0] + w / 2, p[1] + h / 2, p[2]] for p in points])
        dst = cv2.perspectiveTransform(points.reshape(-2, 1, 3), projection)
        imgpts = np.int32(dst)
        if color is False:
            cv2.fillConvexPoly(img, imgpts, (17, 37, 211))
        else:
            color = hex_to_rgb(face[-1])
            color = color[::-1]  # reverse
            cv2.fillConvexPoly(img, imgpts, color)

    return img

def projection_matrix(camera_parameters, homography):
    """
    From the camera calibration matrix and the estimated homography
    compute the 3D projection matrix
    """
    # Compute rotation along the x and y axis as well as the translation
    homography = homography * (-1)
    rot_and_transl = np.dot(np.linalg.inv(camera_parameters), homography)
    col_1 = rot_and_transl[:, 0]
    col_2 = rot_and_transl[:, 1]
    col_3 = rot_and_transl[:, 2]
    # normalise vectors
    l = math.sqrt(np.linalg.norm(col_1, 2) * np.linalg.norm(col_2, 2))
    rot_1 = col_1 / l
    rot_2 = col_2 / l
    translation = col_3 / l
    # compute the orthonormal basis
    c = rot_1 + rot_2
    p = np.cross(rot_1, rot_2)
    d = np.cross(c, p)
    rot_1 = np.dot(c / np.linalg.norm(c, 2) + d / np.linalg.norm(d, 2), 1 / math.sqrt(2))
    rot_2 = np.dot(c / np.linalg.norm(c, 2) - d / np.linalg.norm(d, 2), 1 / math.sqrt(2))
    rot_3 = np.cross(rot_1, rot_2)
    # finally, compute the 3D projection matrix from the model to the current frame
    projection = np.stack((rot_1, rot_2, rot_3, translation)).T
    return np.dot(camera_parameters, projection)

def hex_to_rgb(hex_color):
    """
    Helper function to convert hex strings to RGB
    """
    hex_color = hex_color.lstrip('#')
    h_len = len(hex_color)
    return tuple(int(hex_color[i:i + h_len // 3], 16) for i in range(0, h_len, h_len // 3))


# Command line argument parsing
# NOT ALL OF THEM ARE SUPPORTED YET
parser = argparse.ArgumentParser(description='Augmented reality application')

parser.add_argument('-r','--rectangle', help = 'draw rectangle delimiting target surface on frame', action = 'store_true')
parser.add_argument('-mk','--model_keypoints', help = 'draw model keypoints', action = 'store_true')
parser.add_argument('-fk','--frame_keypoints', help = 'draw frame keypoints', action = 'store_true')
parser.add_argument('-ma','--matches', help = 'draw matches between keypoints', action = 'store_true')
# TODO jgallostraa -> add support for model specification
#parser.add_argument('-mo','--model', help = 'Specify model to be projected', action = 'store_true')

args = parser.parse_args()

if __name__ == '__main__':
    main()

实现结果:

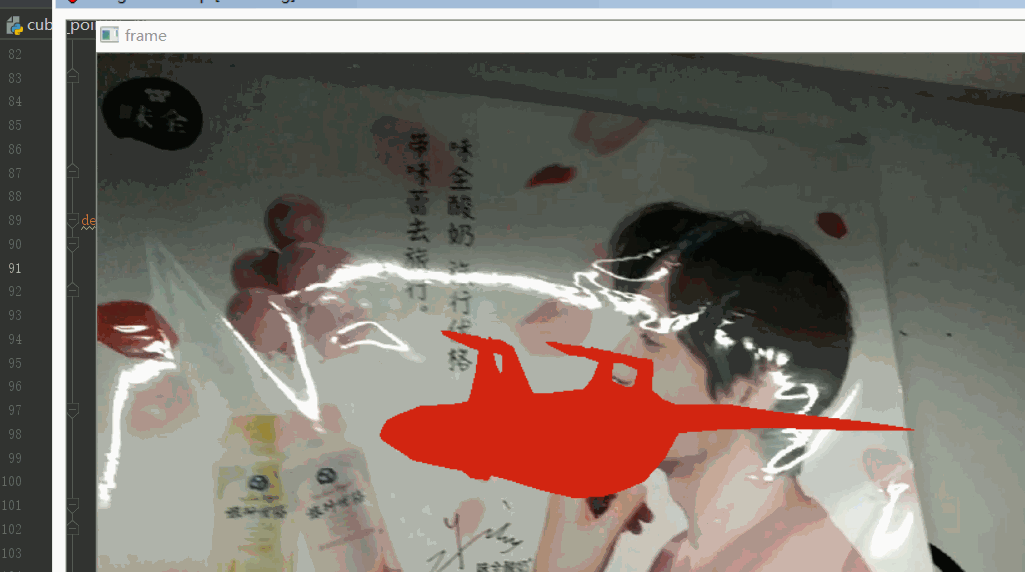
此次实验做的比较粗糙,有兴趣的朋友可以多加研究。

本文内容由网友自发贡献,版权归原作者所有,本站不承担相应法律责任。如您发现有涉嫌抄袭侵权的内容,请联系:hwhale#tublm.com(使用前将#替换为@)

增强现实python 的相关文章

  • 是否可以模拟 Python 3.6 中的内置 len() 函数?

    是否可以模拟内置len Python 3 6 中的函数 我有一个类定义了一个简单的方法 该方法依赖于len 函数如下 class MyLenFunc object def is longer than three characters se
  • 具有多处理功能的 Python 代码无法在 Windows 上运行

    以下简单的绝对初学者代码在 Ubuntu 14 04 Python 2 7 6 和 Cygwin Python 2 7 8 上运行 100 但在 Windows 64 位 Python 2 7 8 上挂起 我使用另一个片段观察到了同样的情况
  • 编辑 scikit-learn 决策树

    我想编辑 sklearn DecisionTree 例如改变条件或切割节点 叶子等 但似乎没有功能可以做到这一点 如果我可以导出到文件 编辑它以导入 如何编辑决策树 环境 Windows 10 python3 3 sklearn 0 17
  • KFold 和 ShuffleSplit CV 有什么区别?

    看起来 KFold 每次迭代对象时都会生成相同的值 而 Shuffle Split 每次都会生成不同的索引 它是否正确 如果是这样 其中一个相对于另一个有什么用处 cv cross validation KFold 10 n folds 2
  • Python:记录垃圾收集器

    我有一个 python 应用程序 有一些性能问题 我想将垃圾收集器的事件 特别是何时调用 添加到我的日志中 是否可以 thanks http docs python org library gc html gc set debug http
  • 底图上的子图

    我有一张英国地图和 121 个地点 每个地点有 3 个值 我想绘制 121 个位置中每个位置的三个值的小条形图 目前 这些值绘制为markersize属性 看起来像这样 密集恐惧症情节 https i stack imgur com 5fv
  • 子进程改变目录

    我想在子目录 超级目录中执行脚本 我需要首先进入该子目录 超级目录 我无法得到subprocess进入我的子目录 tducin localhost Projekty tests ve python Python 2 7 4 default
  • Python 遍历目录树的方法是什么?

    我觉得分配文件和文件夹并执行 item 部分有点黑客 有什么建议么 我正在使用Python 3 2 from os import from os path import def dir contents path contents list
  • 为什么导入 pdb 时出现此错误? “模块”对象没有属性“ascii_letters”

    尝试调试我的代码 我正在导入库pdb import sys from subprocess import check call import pdb functions if name main Code 我收到此错误 File reg p
  • html 解析器 python

    我正在尝试解析一个网站 我正在使用 HTMLParser 模块 问题是我想解析第一个 a href 评论后 但我真的不知道该怎么做 所以我在文档中发现有一个函数叫做handle comment 但我还没有找到如何正确使用它 我有以下内容 i
  • Pyspark 数据框逐行空列列表

    我有一个 Spark 数据框 我想创建一个新列 其中包含每行中具有 null 的列名称 例如 原始数据框是 col 1 col 2 col 3 62 45 null 62 49 56 45 null null null null null
  • 在 Flask (WSGI) 中使用全局单例,我是否需要担心竞争条件? [复制]

    这个问题在这里已经有答案了 Flask 的 hello world 演示是 from flask import Flask app Flask name app route def hello return Hello World if n
  • 如何使用 Pandas 将巨大的 CSV 转换为 SQLite?

    我有一个巨大的表 大约 60 GB 采用存档的 CSV 文件形式 我想将其转换为 SQLite 文件 我现在所做的事情如下 import pandas import sqlite3 cnx sqlite3 connect db sqlite
  • Django - 电子邮件发送两次

    每当我使用如下所示的电子邮件设置从views py调用下面的方法时 电子邮件的两份副本都会发送给收件人 并且我收到如下所示的错误 def sendEmailBasic request msg EmailMessage Request Cal
  • RuntimeError: 预期所有张量都在同一设备上,但发​​现至少有两个设备,cpu 和 cuda:0!使用我的模型进行预测时

    我使用变压器训练了一个序列分类模型 BertForSequenceClassification 我收到错误 预计所有张量都在同一设备上 但发 现至少有两个设备 cpu 和 cuda 0 在方法wrapper index select中检查参
  • 在 matplotlib 中使用 yscale('log') 时缺少误差线

    在某些情况下 当使用对数刻度时 matplotlib 会错误地显示带有误差条的图 假设这些数据 例如在 pylab 内 s 19 0 20 0 21 0 22 0 24 0 v 36 5 66 814250000000001 130 177
  • 一起使用 Flask 和 Tornado?

    我是以下的忠实粉丝Flask 部分是因为它很简单 部分是因为它有很多扩展 http flask pocoo org extensions 然而 Flask 是为了在 WSGI 环境中使用而设计的 而 WSGI 不是非阻塞的 所以 我相信 它
  • numpy.cov() 返回意外的输出

    我有一个 X 数据集 有 9 个特征和 683 行 683x9 我想获取这个 X 数据集和另一个与 X 具有相同形状的数据集的协方差矩阵 我使用np cov originalData generatedData rowvar False 代
  • Django 接受 AM/PM 作为表单输入

    我试图弄清楚如何使用 DateTime 字段在 Django 中接受 am pm 作为时间格式 但我遇到了一些麻烦 我尝试在 forms py 文件中这样设置 pickup date time from DateTimeField inpu
  • 从另一个 python 脚本获取返回信息

    我在 Linux 上 我有一个 python 脚本 我想从另一个 python 脚本调用它 我不想将其作为模块导入 为了一层安全性 现在为了学术练习 因为我想弄清楚这一点 我实际上想让一个脚本使用 os system 或另一个类似的函数 并

随机推荐

  • QT简单播放视频窗口

    一 要点 1 创建一个Widget主窗体 名为test的类 QLabel作为播放框 QListWidget作为播放列表 一个暂停按钮 暂时没懂修改 无法实现进度条进度 只是实现了双击列表 循环播放视频 或者点击按钮 暂停 继续播放视频 2
  • 1.1、Ubuntu 18.04安装(PC+虚拟机)

    一 虚拟机安装 二 PC机安装 2 1制作启动盘 2 2安装步骤 Ubuntu 18 04下载与安装 Linux有上百种不同的发行版 这里学习和使用的是Ubuntu的发行版 Ubuntu 18 04版 搭载PC端或虚拟机进行学习使用 官方下
  • C++二叉树

    代码随想录 programmercarl com 二叉树理论基础篇 算法公开课 代码随想录 算法视频公开课 opens new window 大纲如下 说到二叉树 大家对于二叉树其实都很熟悉了 本文呢我也不想教科书式的把二叉树的基础内容再啰
  • 韦东山视频第3课第2节_JNI_C调用JAVA_P【学习笔记】

    C调JAVA方法主要步骤如下 一 C代码调用java的静态方法 Hello java 1 public class Hello 2 public static void main String args 3 System out print
  • Android多媒体--MediaCodec api

    http www cnblogs com roger yu p 5635494 html MediaCodec public final class MediaCodec extends Object Java lang Object an
  • react-umi-对接Api-1.登录模块

    本篇看点 我们设计了一个很漂亮的登录UI ProForm组件的使用 跳转记录路由 提交前使用md5加密 使用umi框架做登录的话是要刷新跳转页面的 因为要配合app tsx的生命周期进行动态路由实现 官方那边也是这样做的 如果你不需要动态路
  • 学计算机的适不适合买苹果电脑,笔记本电脑的选择真的很重要!别再瞎买了

    原标题 笔记本电脑的选择真的很重要 别再瞎买了 笔记本的选择真的很重要 我求求大家不要想两三千就能买到真正好的笔记本 高端商务本真的有很多一万多块钱性能还不咋地 所以选对了适合你的才是最重要的 所以今天就来聊聊笔记本那些事 1 微软surf
  • Angular -ui - BootStrap组件的解释以及使用

    关于UI BootStrap UI BootStrap 是angularUI团队用纯粹angularJS语法编写的Bootstrap组件 1 关于ng router angular router js 和ui router angular
  • 五种方法 前端代码实现九宫格布局

    前端实现一个九宫格布局 可以用多少种方法实现呐 今天我们就来实际操作一下 看有多少种实现方式 首先 定义好通用的HTML结构 div class box ul li 1 li li 2 li li 3 li li 4 li li 5 li
  • C#入门一一类(class)

    一 什么是类 类的定义 class Person 默认修饰符是internal 表示仅在当前项目内可被访问 Class members 类访问修饰符 注意 1 在C 中只能有一个基类 如果继承了一个抽象类 则必须实现所继承的所有抽象成员 除
  • websocket 携带请求头_深入剖析WebSocket的原理

    前言 针对以上您提起的WebSocket的相关话题 给您做一下系统的梳理 WebSocket是和http类似的可以实现全双工可持久连接通信的应用层协议 以下深入剖析一下WebSocket的原理 什么是WebSocket 首先 我们需要弄明白
  • Kotlin依赖注入框架Koin

    一 简介 Koin是一款轻量级的依赖注入框架 它允许Android应用程序轻松管理组件之间的依赖关系 Koin的主要目标是使依赖注入变得简单 易于理解和使用 它采用纯Kotlin编写 无代理 无需代码生成或反射 而是基于函数式DSL和注解
  • miui删除内置不卡米教程_[MIUI玩机技巧43] Shortcut功能快速提取Apk

    今天Flashcer本期给大家分享2个玩法 1 利用MIUI 11的Shortcut功能快速提取非系统应用的安装包文件 用户应用Apk 2 利用MIUI 11的Shortcut功能快速分享非系统应用的安装包文件 用户应用Apk 通过即时通讯
  • RoaringBitmap和Bitmap的区别与原理

    背景 此文只针对应用于实时数仓 离线数仓领域的标签圈选问题 以企业为例 企业和标签之间一般是多对多的关系 这种情况下对于计算不同标签下的企业数量 或者查询不同企业对应的标签会有较大的性能压力 因此使用Bitmap或者RoaringBitma
  • Python + Pyqt5 使用listWidget设置Item的两种方法

    方法一 addItems 不用分别设置每个Item的显示样式 self ui listWidget pdfList addItems list pdfList DF 文件名 添加Item 列表中有多少个数据 就有多少个Item self u
  • java使用world模板动态生成PDF文件

    根据项目需求 需要用到一个功能 根据页面参数需要动态的生成一个world 并将world生成两份PDF文件 一份正式文件 一份临时的电子文件 带有二维码 扫描可以下载正式文件的电子版本 同时上传到文件存储服务器minio上 下面介绍具体的实
  • Python 生成器原理详解

    点击上方蓝字 快速关注我们 翻译 你逗比 segmentfault com a 1190000011330511 如有好文章投稿 请点击 这里了解详情 这篇文章是对 500 Lines or Less 一书中高效爬虫一章的部分翻译 原文 H
  • 旋转数组的最小值(二分法)

    题目描述 把一个数组最开始的若干个元素搬到数组的末尾 我们称之为数组的旋转 输入一个非减排序的数组的一个旋转 输出旋转数组的最小元素 例如数组 3 4 5 1 2 为 1 2 3 4 5 的一个旋转 该数组的最小值为1 NOTE 给出的所有
  • 一个抓取阿里云GEOJSON地图区域数据的NODEJS脚本

    中国的区域划分大致是这么个结构 中国 gt 省 gt 市 gt 区 gt 县 gt 镇 gt 乡 对于我们一般的开发者或者中小型企业 要我们自己来收集这些区域信息 显然是不可能的 这个时候我们就得借助一些成熟的地图数据 比如百度地图 高德地
  • 增强现实python

    本博文用来记录使用python实现增强现实 增强现实技术 即实时地计算摄影机影像的位置及角度并加上相应图像 视频 3D模型的技术 这种技术的目标是在屏幕上把虚拟世界套在现实世界并进行互动 主要工作 实现动态的放置虚拟模型 本文实现了在自己上