文章目录
- Nginx的源码目录结构
- Nginx中configure的原理
-
- 模块编译顺序
Nginx的源码目录结构
nginx的源码目录与nginx的模块化以及功能的划分是紧密结合,这也使得我们可以很方便地找到相关功能的代码。我们先来看一下nginx源码的目录结构。
使用tree命令看一下:
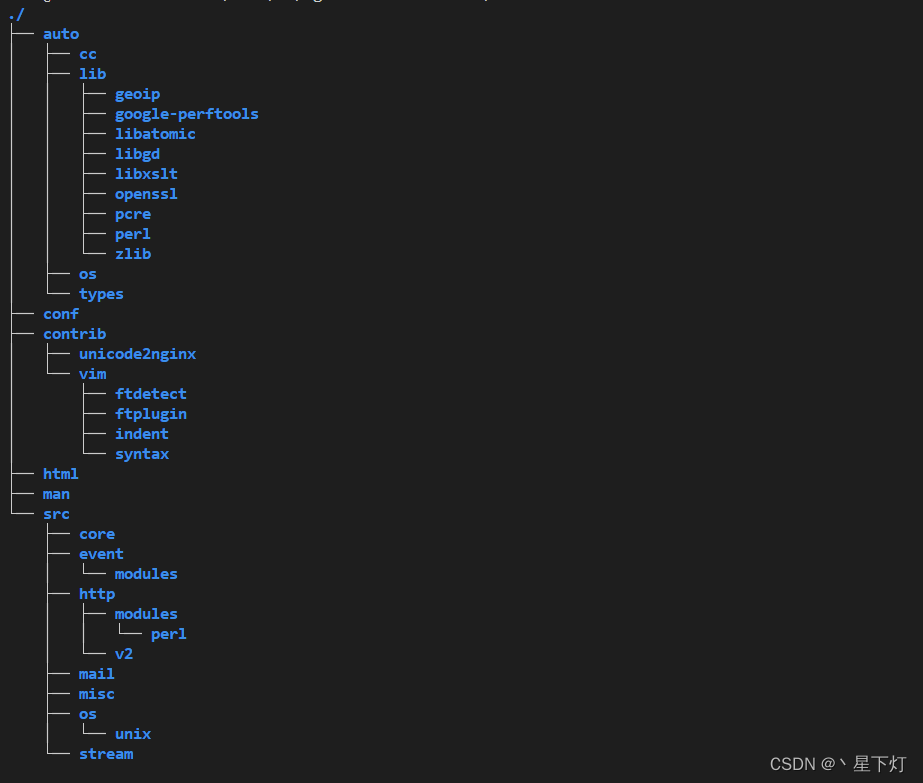
主要目录详情如下:
- auto:自动检测系统环境以及编译相关的脚本。
- cc:关于编译器相关编译选项的检测脚本。
- lib:nginx编译所需要的一些库的检测脚本。
- os:与平台相关的一些系统参数与系统调用相关的检测。
- types:与数据类型相关的一些辅助脚本。
- conf:存放默认配置文件,在make install后,会拷贝到安装目录中去。
- contrib:存放一些实用工具,如geo配置生成工具(geo2nginx.pl)。
- html:存放默认的网页文件,在make install后,会拷贝到安装目录中去。
- man:nginx的man手册。
- src:存放nginx的源代码。
- core:nginx的核心源代码,包括常用数据结构的定义,以及nginx初始化运行的核心代码如main函数。
- event:对系统事件处理机制的封装,以及定时器的实现相关代码。
- modules:不同事件处理方式的模块化,如select、poll、epoll、kqueue等。
- http:nginx作为http服务器相关的代码。
- mail:nginx作为邮件代理服务器相关的代码。
- misc:一些辅助代码,测试c++头的兼容性,以及对google_perftools的支持。
- os:主要是对各种不同体系统结构所提供的系统函数的封装,对外提供统一的系统调用接口。
Nginx中configure的原理
Nginx的编译流程从configure开始:configure脚本将根据我们输入的选项、系统环境参与来生成所需的文件(包含源文件与Makefile文件)。configure会调用一系列auto脚本来实现编译环境的初始化
auto脚本
auto脚本由一系列脚本组成,他们有一些是实现一些通用功能由其它脚本来调用(如have),有一些则是完成一些特定的功能(如option)。
结合configure的代码来分析:
. auto/options
. auto/init
. auto/sources
这是configure源码开始执行的前三行,依次交由auto目录下面的option、init、sources来处理。
-
auto/options:主是处理用户输入的configure选项,并由选项生成一些全局变量的值,这些值在其它文件中会用到。该文件也会输出configure的帮助信息
help=no
NGX_PREFIX=
NGX_SBIN_PATH=
NGX_CONF_PREFIX=
NGX_CONF_PATH=
NGX_ERROR_LOG_PATH=
NGX_PID_PATH=
NGX_LOCK_PATH=
NGX_USER=
NGX_GROUP=
...
for option
do
opt="$opt `echo $option | sed -e \"s/\(--[^=]*=\)\(.* .*\)/\1'\2'/\"`"
case "$option" in
-*=*) value=`echo "$option" | sed -e 's/[-_a-zA-Z0-9]*=//'` ;;
*) value="" ;;
esac
case "$option" in
--help) help=yes ;;
--prefix=) NGX_PREFIX="!" ;;
--prefix=*) NGX_PREFIX="$value" ;;
--sbin-path=*) NGX_SBIN_PATH="$value" ;;
--conf-path=*) NGX_CONF_PATH="$value" ;;
--error-log-path=*) NGX_ERROR_LOG_PATH="$value";;
--pid-path=*) NGX_PID_PATH="$value" ;;
--lock-path=*) NGX_LOCK_PATH="$value" ;;
--user=*) NGX_USER="$value" ;;
--group=*) NGX_GROUP="$value" ;;
...
*)
echo "$0: error: invalid option \"$option\""
exit 1
;;
esac
done
if [ $help = yes ]; then
cat << END
--help print this message
--prefix=PATH set installation prefix
--sbin-path=PATH set nginx binary pathname
--conf-path=PATH set nginx.conf pathname
--error-log-path=PATH set error log pathname
--pid-path=PATH set nginx.pid pathname
--lock-path=PATH set nginx.lock pathname
--user=USER set non-privileged user for
worker processes
--group=GROUP set non-privileged group for
worker processes
END
exit 1
fi
NGX_CONF_PATH=${NGX_CONF_PATH:-conf/nginx.conf}
NGX_CONF_PREFIX=`dirname $NGX_CONF_PATH`
NGX_PID_PATH=${NGX_PID_PATH:-logs/nginx.pid}
NGX_LOCK_PATH=${NGX_LOCK_PATH:-logs/nginx.lock}
...
-
auto/init:该文件的目录在于初始化一些临时文件的路径,检查echo的兼容性,并创建Makefile。
NGX_MAKEFILE=$NGX_OBJS/Makefile
NGX_MODULES_C=$NGX_OBJS/ngx_modules.c
NGX_AUTO_HEADERS_H=$NGX_OBJS/ngx_auto_headers.h
NGX_AUTO_CONFIG_H=$NGX_OBJS/ngx_auto_config.h
NGX_AUTOTEST=$NGX_OBJS/autotest
NGX_AUTOCONF_ERR=$NGX_OBJS/autoconf.err
NGX_ERR=$NGX_OBJS/autoconf.err
MAKEFILE=$NGX_OBJS/Makefile
NGX_PCH=
NGX_USE_PCH=
if echo "test\c" | grep c >/dev/null; then
if echo -n test | grep n >/dev/null; then
ngx_n=
ngx_c=
else
ngx_n=-n
ngx_c=
fi
else
ngx_n=
ngx_c='\c'
fi
cat << END > Makefile
default: build
clean:
rm -rf Makefile $NGX_OBJS
.PHONY: default clean
END
-
auto/sources:它的主要作用是定义不同功能或系统所需要文件的变量。根据功能,分为CORE、REGEX、EVENT、UNIX、FREEBSD、HTTP等。
每一个功能将会由四个变量组成,”_MODULES”表示此功能相关的模块,最终会输出到ngx_modules.c文件中,即动态生成需要编译到nginx中的模块;
“INCS”表示此功能依赖的源码目录,查找头文件的时候会用到,在编译选项中,会出现在”-I”中;
“DEPS”显示指明在Makefile中需要依赖的文件名,即编译时,需要检查这些文件的更新时间;
“SRCS”表示需要此功能编译需要的源文件。
以auto/sources中的core为例:
CORE_MODULES="ngx_core_module ngx_errlog_module ngx_conf_module"

CORE_INCS="src/core"

CORE_DEPS="src/core/nginx.h \
           src/core/ngx_config.h \
           ···"

CORE_SRCS="src/core/nginx.c \
           src/core/ngx_log.c \
           ···"
-
auto/have:这个工具的作用是,将$have变量的值,宏定义为1,并输出到auto_config文件中。通常我们通过这个工具来控制是否打开某个特性。这个工具在使用前,需要先定义宏的名称 ,即$have变量。
cat << END >> $NGX_AUTO_CONFIG_H
#ifndef $have
#define $have 1
#endif
END
再看configure文件:
if [ $NGX_DEBUG = YES ]; then
have=NGX_DEBUG . auto/have
fi
可以看出,configure通过have定义NGX_DEBUG :通过宏定义,输出到config头文件中,然后在程序中可以判断这个宏是否有定义,来实现不同的逻辑。(实际上这段代码表示的就是是否启用debug调试nginx源码)
继续configure:
. auto/cc/conf
if [ "$NGX_PLATFORM" != win32 ]; then
. auto/headers
fi
. auto/os/conf
if [ "$NGX_PLATFORM" != win32 ]; then
. auto/unix
fi
依次调用auto中其它几个文件,来进行环境的检测,包括编译器、操作系统相关。
-
auto/feature:nginx的configure会自动检测不同平台的特性,靠的就是auto/feature的实现。此工具的核心思想是,输出一小段代表性c程序,然后设置好编译选项,再进行编译连接运行,再对结果进行分析。
- 例如:
如果想检测某个库是否存在,就在小段c程序里面调用库里面的某个函数,再进行编译链接,如果出错,则表示库的环境不正常,如果编译成功,且运行正常,则库的环境检测正常。我们在写nginx第三方模块时,也常使用此工具来进行环境的检测,所以,此工具的作用贯穿整个configure过程。
auto/unix里面利用auto/feature实现检测当前操作系统是否支持poll函数调用:ngx_feature="poll()"
ngx_feature_name=
ngx_feature_run=no
ngx_feature_incs="#include <poll.h>"
ngx_feature_path=
ngx_feature_libs=
ngx_feature_test="int n; struct pollfd pl;
pl.fd = 0;
pl.events = 0;
pl.revents = 0;
n = poll(&pl, 1, 0);
if (n == -1) return 1"
. auto/feature
if [ $ngx_found = no ]; then
EVENT_POLL=NONE
fi
在调用auto/feature之前,需要先设置几个输入参数变量的值,然后结果会存在$ngx_found变量里面, 并输出宏定义以表示支持此特性。$ngx_feature 特性名称
$ngx_feature_name 特性的宏定义名称,如果特性测试成功,则会定义该宏定义
$ngx_feature_path 编译时要查找头文件目录
$ngx_feature_test 要执行的测试代码
$ngx_feature_incs 在代码中要include的头文件
$ngx_feature_libs 编译时需要link的库文件选项
$ngx_feature_run 编译成功后,对二进制文件需要做的动作,可以是yes value bug 其它
$ngx_found 如果找到,并测试成功,其值为yes,否则其值为no
再来看auto/feature的代码:
ngx_found=no
if test -n "$ngx_feature_name"; then
ngx_have_feature=`echo $ngx_feature_name \
| tr abcdefghijklmnopqrstuvwxyz ABCDEFGHIJKLMNOPQRSTUVWXYZ`
fi
if test -n "$ngx_feature_path"; then
for ngx_temp in $ngx_feature_path; do
ngx_feature_inc_path="$ngx_feature_inc_path -I $ngx_temp"
done
fi
cat << END > $NGX_AUTOTEST.c
#include <sys/types.h>
$NGX_INCLUDE_UNISTD_H
$ngx_feature_incs
int main(void) {
$ngx_feature_test;
return 0;
}
END
ngx_test="$CC $CC_TEST_FLAGS $CC_AUX_FLAGS $ngx_feature_inc_path \
-o $NGX_AUTOTEST $NGX_AUTOTEST.c $NGX_TEST_LD_OPT $ngx_feature_libs"
ngx_feature_inc_path=
eval "/bin/sh -c \"$ngx_test\" >> $NGX_AUTOCONF_ERR 2>&1"
if [ -x $NGX_AUTOTEST ]; then
case "$ngx_feature_run" in
yes)
if /bin/sh -c $NGX_AUTOTEST >> $NGX_AUTOCONF_ERR 2>&1; then
echo " found"
ngx_found=yes
if test -n "$ngx_feature_name"; then
have=$ngx_have_feature . auto/have
fi
else
echo " found but is not working"
fi
;;
value)
if /bin/sh -c $NGX_AUTOTEST >> $NGX_AUTOCONF_ERR 2>&1; then
echo " found"
ngx_found=yes
cat << END >> $NGX_AUTO_CONFIG_H
#ifndef $ngx_feature_name
#define $ngx_feature_name `$NGX_AUTOTEST`
#endif
END
else
echo " found but is not working"
fi
;;
bug)
if /bin/sh -c $NGX_AUTOTEST >> $NGX_AUTOCONF_ERR 2>&1; then
echo " not found"
else
echo " found"
ngx_found=yes
if test -n "$ngx_feature_name"; then
have=$ngx_have_feature . auto/have
fi
fi
;;
*)
echo " found"
ngx_found=yes
if test -n "$ngx_feature_name"; then
have=$ngx_have_feature . auto/have
fi
;;
esac
else
echo " not found"
echo "----------" >> $NGX_AUTOCONF_ERR
cat $NGX_AUTOTEST.c >> $NGX_AUTOCONF_ERR
echo "----------" >> $NGX_AUTOCONF_ERR
echo $ngx_test >> $NGX_AUTOCONF_ERR
echo "----------" >> $NGX_AUTOCONF_ERR
fi
rm -rf $NGX_AUTOTEST*
-
auto/cc/conf:这一步主要是检测编译器,并设置编译器相关的选项。它先调用auto/cc/name来得到编译器的名称,然后根据编译器选择执行不同的编译器相关的文件如gcc执行auto/cc/gcc来设置编译器相关的一些选项。
-
auto/include:这个工具用来检测是头文件是否支持。需要检测的头文件放在$ngx_include里面,如果支持,则$ngx_found变量的值为yes,并且会产生NGX_HAVE_{ngx_include}的宏定义。
-
auto/headers:生成头文件的宏定义。生成的定义放在objs/ngx_auto_headers.h里面。
ngx_include="unistd.h";      . auto/include
ngx_include="inttypes.h";    . auto/include
ngx_include="limits.h";      . auto/include
ngx_include="sys/filio.h";   . auto/include
ngx_include="sys/param.h";   . auto/include
ngx_include="sys/mount.h";   . auto/include
ngx_include="sys/statvfs.h"; . auto/include
ngx_include="crypt.h";       . auto/include
-
auto/os/conf:针对不同的操作系统平台特性的检测,并针对不同的操作系统,设置不同的CORE_INCS、CORE_DEPS、CORE_SRCS变量。nginx跨平台的支持就是在这个地方体现出来的。
-
auto/unix:针对unix体系的通用配置或系统调用的检测,如poll等事件处理系统调用的检测等。
继续configure:
. auto/modules
. auto/lib/conf
-
auto/modules:该脚本根据不同的条件,输出不同的模块列表,最后输出的模块列表的文件在objs/ngx_modules.c(生成的ngx_modules.c代码如下)
#include <ngx_config.h>
#include <ngx_core.h>
extern ngx_module_t ngx_core_module;
extern ngx_module_t ngx_errlog_module;
extern ngx_module_t ngx_conf_module;
extern ngx_module_t ngx_emp_server_module;
...
ngx_module_t *ngx_modules[] = {
	&ngx_core_module,
	&ngx_errlog_module,
	&ngx_conf_module,
	&ngx_emp_server_module,
	...
	NULL
};
这个文件会决定所有模块的顺序,这会直接影响到最后的功能。这个文件会加载我们的第三方模块,这也是我们值得关注的地方。
来看一下auto/modules中的部分内容:
if test -n "$DYNAMIC_ADDONS"; then
echo configuring additional dynamic modules
for ngx_addon_dir in $DYNAMIC_ADDONS
do
echo "adding module in $ngx_addon_dir"
ngx_module_type=
ngx_module_name=
ngx_module_incs=
ngx_module_deps=
ngx_module_srcs=
ngx_module_libs=
ngx_module_order=
ngx_module_link=DYNAMIC
if test -f $ngx_addon_dir/config; then
. $ngx_addon_dir/config
echo " + $ngx_addon_name was configured"
else
echo "$0: error: no $ngx_addon_dir/config was found"
exit 1
fi
done
fi
这段代码实现了nginx很强大的扩展性。
加载第三方模块,$ngx_addon_dir变量是在configure执行时,命令行从代码中,我们可以看到,它就是针对每一个第三方模块执行其目录下的config文件参数–add-module加入的,它是一个目录列表,每一个目录,表示一个第三方模块。
于是我们可以在config文件里面执行我们自己的检测逻辑,比如检测库依赖,添加编译选项等。
-
auto/lib/conf:该文件会针对nginx编译所需要的基础库的检测,比如rewrite模块需要的PCRE库的检测支持。
configure接下来定义一些宏常量,主要是是文件路径方面的:
case ".$NGX_PREFIX" in
    .)
        NGX_PREFIX=${NGX_PREFIX:-/usr/local/nginx}
        have=NGX_PREFIX value="\"$NGX_PREFIX/\"" . auto/define
    ;;

    .!)
        NGX_PREFIX=
    ;;

    *)
        have=NGX_PREFIX value="\"$NGX_PREFIX/\"" . auto/define
    ;;
esac

if [ ".$NGX_CONF_PREFIX" != "." ]; then
    have=NGX_CONF_PREFIX value="\"$NGX_CONF_PREFIX/\"" . auto/define
fi

have=NGX_SBIN_PATH value="\"$NGX_SBIN_PATH\"" . auto/define
have=NGX_CONF_PATH value="\"$NGX_CONF_PATH\"" . auto/define
have=NGX_PID_PATH value="\"$NGX_PID_PATH\"" . auto/define
have=NGX_LOCK_PATH value="\"$NGX_LOCK_PATH\"" . auto/define
have=NGX_ERROR_LOG_PATH value="\"$NGX_ERROR_LOG_PATH\"" . auto/define

if [ ".$NGX_ERROR_LOG_PATH" = "." ]; then
    have=NGX_ERROR_LOG_STDERR . auto/have
fi

have=NGX_HTTP_LOG_PATH value="\"$NGX_HTTP_LOG_PATH\"" . auto/define
have=NGX_HTTP_CLIENT_TEMP_PATH value="\"$NGX_HTTP_CLIENT_TEMP_PATH\""
. auto/define
have=NGX_HTTP_PROXY_TEMP_PATH value="\"$NGX_HTTP_PROXY_TEMP_PATH\""
. auto/define
have=NGX_HTTP_FASTCGI_TEMP_PATH value="\"$NGX_HTTP_FASTCGI_TEMP_PATH\""
. auto/define
have=NGX_HTTP_UWSGI_TEMP_PATH value="\"$NGX_HTTP_UWSGI_TEMP_PATH\""
. auto/define
have=NGX_HTTP_SCGI_TEMP_PATH value="\"$NGX_HTTP_SCGI_TEMP_PATH\""
. auto/define
configure最后的工作就是生成Makefile文件:
. auto/make
. auto/lib/make
. auto/install
. auto/stubs
have=NGX_USER value="\"$NGX_USER\"" . auto/define
have=NGX_GROUP value="\"$NGX_GROUP\"" . auto/define
if [ ".$NGX_BUILD" != "." ]; then
have=NGX_BUILD value="\"$NGX_BUILD\"" . auto/define
fi
. auto/summary
模块编译顺序
nginx模块的顺序很重要,会直接影响到程序的功能。而且,nginx和部分模块,也有着自己特定的顺序要求,比如ngx_http_write_filter_module模块一定要在filter模块的最后一步执行。想查看模块的执行顺序,可以在objs/ngx_modules.c这个文件中找到,这个文件在configure之后生成。
objs/ngx_modules.c文件示例:
ngx_module_t *ngx_modules[] = {
&ngx_core_module,
&ngx_errlog_module,
&ngx_conf_module,
&ngx_emp_server_module,
&ngx_emp_server_core_module,
&ngx_events_module,
&ngx_event_core_module,
&ngx_kqueue_module,
&ngx_regex_module,
&ngx_http_module,
&ngx_http_core_module,
&ngx_http_log_module
&ngx_http_upstream_module,
&ngx_http_static_module,
&ngx_http_autoindex_module,
&ngx_http_index_module,
&ngx_http_auth_basic_module,
&ngx_http_access_module,
&ngx_http_limit_conn_module,
&ngx_http_limit_req_module,
&ngx_http_geo_module,
&ngx_http_map_module,
&ngx_http_split_clients_module,
&ngx_http_referer_module,
&ngx_http_rewrite_module,
&ngx_http_proxy_module,
&ngx_http_fastcgi_module,
&ngx_http_uwsgi_module,
&ngx_http_scgi_module,
&ngx_http_memcached_module,
&ngx_http_empty_gif_module,
&ngx_http_browser_module,
&ngx_http_upstream_ip_hash_module,
&ngx_http_upstream_keepalive_module,
&ngx_http_write_filter_module,
&ngx_http_header_filter_module,
&ngx_http_chunked_filter_module,
&ngx_http_range_header_filter_module,
&ngx_http_gzip_filter_module,
&ngx_http_postpone_filter_module,
&ngx_http_ssi_filter_module,
&ngx_http_charset_filter_module,
&ngx_http_userid_filter_module,
&ngx_http_headers_filter_module,
&ngx_http_copy_filter_module,
&ngx_http_range_body_filter_module,
&ngx_http_not_modified_filter_module,
NULL
}
http handler模块与http filter模块的顺序很重要,我们主要关注一下这两类模块。
-
http handler模块:
对于content phase之前的handler,同一个阶段的handler,模块是顺序执行的。
比如上面的示例代码中,ngx_http_auth_basic_module与ngx_http_access_module这两个模块都是在access phase阶段,由于ngx_http_auth_basic_module在前面,所以会先执行。
由于content phase只会有一个执行,所以不存在顺序问题。另外,我们加载的第三方handler模块永远是在最后执行。
-
http filter模块:
filter模块会将所有的filter handler排成一个倒序链,所以在最前面的最后执行。
上面的例子中,ngx_http_write_filter_module最后执行,ngx_http_not_modified_filter_module最先执行。
注意:我们加载的第三方filter模块是在copy_filter模块之后,headers_filter模块之前执行。
结束!
本文内容由网友自发贡献,版权归原作者所有,本站不承担相应法律责任。如您发现有涉嫌抄袭侵权的内容,请联系:hwhale#tublm.com(使用前将#替换为@)