一、Docker Compose
1.1 Docker Compose 介绍
1.1.1 简介:
传统的 docker 服务,我们一般通过编写 Dockerfile 文件,通过 build 命令创建一个镜像,再通过 run 命令建立一个容器。这种对于单个应用来说可能比较方便和快捷,那么假设有一个项目,包含了 100 个微服务,这 100 个微服务之间还存在相互依赖关系,那以上的方式就显得特别鸡肋,费时费力。
因此,我们可以通过 Docker Compose 来轻松高效地管理容器(定义运行多个容器)
1.1.2 官方介绍
1.官方说明
Compose is a tool for defining and running multi-container Docker applications. With Compose, you use a YAML file to configure your application’s services. Then, with a single command, you create and start all the services from your configuration. To learn more about all the features of Compose, see the list of features.

Compose works in all environments: production, staging, development, testing, as well as CI workflows. You can learn more about each case in Common Use Cases.

Using Compose is basically a three-step process:

    1.Define your app’s environment with a Dockerfile so it can be reproduced anywhere.

    2.Define the services that make up your app in docker-compose.yml so they can be run together in an isolated environment.

    3.Run docker-compose up and Compose starts and runs your entire app.
2.中文理解:
Compose 是用于定义和运行多容器 Docker 应用程序的工具。通过 Compose,您可以使用 YAML 文件来配置应用程序的服务。然后,使用一个命令,就可以从配置中创建并启动所有服务。要了解有关 Compose 的所有功能的更多信息,请参阅功能列表。

Compose 可在所有环境中工作:生产,演示,开发,测试以及 CI 工作流。您可以在“ 通用用例”中了解有关每种用例的更多信息。

使用 Compose 基本上有三个过程:

1.使用定义您的应用环境,Dockerfile 以便可以在任何地方复制。

2.定义组成应用程序的服务,docker-compose.yml 以便它们可以在隔离的环境中一起运行。

3.运行 docker-compose up 和 Compose start 以运行您的整个应用程序。
3.其他说明
Compose 是 Docker 官方的开源项目,需要手动安装
Compose yml 文件编写例子如下(官网例子):
version: '2.0'
services:
  web:
    build: .
    ports:
    - "5000:5000"
    volumes:
    - .:/code
    - logvolume01:/var/log
    links:
    - redis
  redis:
    image: redis
volumes:
  logvolume01: {}
4.Compose 重要的两个概念
- 服务 Service :不同的容器(应用)组成项目(如:mysql、web、nginx 等)
- 项目 Project :即为一组关联的容器
1.2 Docker Compose 安装
1.下载 Compose
# 发现官网的下载不了,或者特别慢
[root@localhost ~]# curl -L "https://github.com/docker/compose/releases/download/1.26.2/docker-compose-$(uname -s)-$(uname -m)" -o /usr/local/bin/docker-compose
  % Total    % Received % Xferd  Average Speed   Time    Time     Time  Current
                                 Dload  Upload   Total   Spent    Left  Speed
  0     0    0     0    0     0      0      0 --:--:--  0:00:18 --:--:--     0
curl: (52) Empty reply from server
# 改用国内地址
[root@localhost ~]# curl -L http://get.daocloud.io/docker/compose/releases/download/1.25.5/docker-compose-`uname -s`-`uname -m` > /usr/local/bin/docker-compose
  % Total    % Received % Xferd  Average Speed   Time    Time     Time  Current
                                 Dload  Upload   Total   Spent    Left  Speed
100   421  100   421    0     0    284      0  0:00:01  0:00:01 --:--:--   284
100 16.7M  100 16.7M    0     0   466k      0  0:00:36  0:00:36 --:--:--  490k
[root@localhost ~]# ll /usr/local/bin/
total 17888
-rw-r--r--. 1 root root 17586312 Aug 18 16:51 docker-compose
2.赋予 docker-compose 执行权限
[root@localhost ~]# chmod +x /usr/local/bin/docker-compose
[root@localhost ~]# docker-compose version
docker-compose version 1.25.5, build 8a1c60f6
docker-py version: 4.1.0
CPython version: 3.7.5
OpenSSL version: OpenSSL 1.1.0l  10 Sep 2019
1.3 Docker Compose 体验
1.3.1 官方示例 Compose 项目体验
1.创建项目文件夹
[root@localhost home]# mkdir composetest
[root@localhost home]# cd composetest/
[root@localhost composetest]# ll
total 0
2.创建 python 文件(一个计数器程序)
[root@localhost composetest]# cat app.py
import time

import redis
from flask import Flask

app = Flask(__name__)
cache = redis.Redis(host='redis', port=6379)


def get_hit_count():
    retries = 5
    while True:
        try:
            return cache.incr('hits')
        except redis.exceptions.ConnectionError as exc:
            if retries == 0:
                raise exc
            retries -= 1
            time.sleep(0.5)


@app.route('/')
def hello():
    count = get_hit_count()
    return 'Hello World! I have been seen {} times.\n'.format(count)
3.创建引用文件
[root@localhost composetest]# cat requirements.txt
flask
redis
[root@localhost composetest]# ll
total 8
-rw-r--r--. 1 root root 516 Aug 19 09:51 app.py
-rw-r--r--. 1 root root  12 Aug 19 09:54 requirements.txt
4.创建 dockerfile 文件
[root@localhost composetest]# cat Dockerfile
FROM python:3.7-alpine
WORKDIR /code
ENV FLASK_APP app.py
ENV FLASK_RUN_HOST 0.0.0.0
RUN apk add --no-cache gcc musl-dev linux-headers
COPY requirements.txt requirements.txt
RUN pip install -r requirements.txt
EXPOSE 5000
COPY . .
CMD ["flask", "run"]
[root@localhost composetest]# ll
total 12
-rw-r--r--. 1 root root 516 Aug 19 09:51 app.py
-rw-r--r--. 1 root root 252 Aug 19 09:57 Dockerfile
-rw-r--r--. 1 root root  12 Aug 19 09:54 requirements.txt
5.创建 yml 文件定义服务
# 即可以通过 dockerfile build 一个服务(如下:web);
# 也可以通过官方镜像源创建(如下:redis)
[root@localhost composetest]# cat docker-compose.yml
version: '3'
services:
  web:
    build: .
    ports:
      - "5000:5000"
  redis:
    image: "redis:alpine"
[root@localhost composetest]# ll
total 16
-rw-r--r--. 1 root root 516 Aug 19 09:51 app.py
-rw-r--r--. 1 root root 109 Aug 19 09:59 docker-compose.yml
-rw-r--r--. 1 root root 252 Aug 19 09:57 Dockerfile
-rw-r--r--. 1 root root  12 Aug 19 09:54 requirements.txt
6.在当前目录下运行启动
# 执行流程如下:
#(1)创建 composetest_default 网络
#(2)执行 Docker-compose.yml 文件
#(3)启动对应服务
[root@localhost composetest]# docker-compose up
Creating network "composetest_default" with the default driver
Building web
Step 1/10 : FROM python:3.7-alpine
3.7-alpine: Pulling from library/python
df20fa9351a1: Pull complete
36b3adc4ff6f: Pull complete
4db9de03f499: Pull complete
cd38a04a61f4: Pull complete
6bbb0c43b470: Pull complete
Digest: sha256:d1375bf0b889822c603622dc137b24fb7064e6c1863de8cc4262b61901ce4390
Status: Downloaded newer image for python:3.7-alpine
 ---> 078114edb6be
Step 2/10 : WORKDIR /code
 ---> Running in 23f6f1628f75
Removing intermediate container 23f6f1628f75
 ---> f6a5b234df15
Step 3/10 : ENV FLASK_APP app.py
 ---> Running in 6e063da58e9a
Removing intermediate container 6e063da58e9a
 ---> e5010c845236
Step 4/10 : ENV FLASK_RUN_HOST 0.0.0.0
 ---> Running in 1a51148add26
Removing intermediate container 1a51148add26
 ---> a1cbf624300c
Step 5/10 : RUN apk add --no-cache gcc musl-dev linux-headers
 ---> Running in 62dc496a09cc
fetch http://dl-cdn.alpinelinux.org/alpine/v3.12/main/x86_64/APKINDEX.tar.gz
fetch http://dl-cdn.alpinelinux.org/alpine/v3.12/community/x86_64/APKINDEX.tar.gz
(1/13) Installing libgcc (9.3.0-r2)
(2/13) Installing libstdc++ (9.3.0-r2)
(3/13) Installing binutils (2.34-r1)
。。。。。。
(1)发现官方使用的 Dockerfile 文件,下载的时候特别慢,甚至直接停止了,所以这里我们修改 Dockerfile 再来启动
#(1)这里改成运行 app.py 程序,而不用 flask
[root@localhost composetest]# cat Dockerfile
FROM python:3.6-alpine
ADD . /code
WORKDIR /code
RUN pip install -r requirements.txt
CMD ["python", "app.py"]
#(2)修改 docker-compose.yml 添加挂载
[root@localhost composetest]# cat docker-compose.yml
version: '3.8'
services:
  web:
    build: .
    ports:
      - "5000:5000"
    volumes:
      - .:/code
  redis:
    image: "redis:alpine"
#(3)重启运行
[root@localhost composetest]# docker-compose up
Creating network "composetest_default" with the default driver
Building web
Step 1/5 : FROM python:3.6-alpine
3.6-alpine: Pulling from library/python
df20fa9351a1: Already exists
36b3adc4ff6f: Already exists
8ad3a11d3b57: Pull complete
46f8f816bc3b: Pull complete
0dadc02b9964: Pull complete
Digest: sha256:1aecd84e20860196525570a6cdc6016c2954ed241b1d254c0af3348382734082
Status: Downloaded newer image for python:3.6-alpine
 ---> 96b6b6d94572
Step 2/5 : ADD . /code
 ---> 9b319f69748d
Step 3/5 : WORKDIR /code
 ---> Running in 0117b468b03f
Removing intermediate container 0117b468b03f
 ---> 214cba4c2cfb
Step 4/5 : RUN pip install -r requirements.txt
 ---> Running in 209d87ac78b3
Collecting flask
  Downloading Flask-1.1.2-py2.py3-none-any.whl (94 kB)
Collecting redis
  Downloading redis-3.5.3-py2.py3-none-any.whl (72 kB)
Collecting Werkzeug>=0.15
  Downloading Werkzeug-1.0.1-py2.py3-none-any.whl (298 kB)
Collecting Jinja2>=2.10.1
  Downloading Jinja2-2.11.2-py2.py3-none-any.whl (125 kB)
Collecting click>=5.1
  Downloading click-7.1.2-py2.py3-none-any.whl (82 kB)
Collecting itsdangerous>=0.24
  Downloading itsdangerous-1.1.0-py2.py3-none-any.whl (16 kB)
Collecting MarkupSafe>=0.23
  Downloading MarkupSafe-1.1.1.tar.gz (19 kB)
Building wheels for collected packages: MarkupSafe
  Building wheel for MarkupSafe (setup.py): started
  Building wheel for MarkupSafe (setup.py): finished with status 'done'
  Created wheel for MarkupSafe: filename=MarkupSafe-1.1.1-py3-none-any.whl size=12627 sha256=8bb352e8fc85636b19c7df333338b848a942a98b63dd1710b3f23a10b5027c54
  Stored in directory: /root/.cache/pip/wheels/ca/85/2f/4c3a8ca6fb5eec7b43ec1e5666c7274dcdb86d6c32231aaa9d
Successfully built MarkupSafe
Installing collected packages: Werkzeug, MarkupSafe, Jinja2, click, itsdangerous, flask, redis
Successfully installed Jinja2-2.11.2 MarkupSafe-1.1.1 Werkzeug-1.0.1 click-7.1.2 flask-1.1.2 itsdangerous-1.1.0 redis-3.5.3
Removing intermediate container 209d87ac78b3
 ---> 304780c9bdf0
Step 5/5 : CMD ["python", "app.py"]
 ---> Running in 2afc9909f5e3
Removing intermediate container 2afc9909f5e3
 ---> 07e644c8e657
Successfully built 07e644c8e657
Successfully tagged composetest_web:latest
WARNING: Image for service web was built because it did not already exist. To rebuild this image you must use `docker-compose build` or `docker-compose up --build`.
Pulling redis (redis:alpine)...
alpine: Pulling from library/redis
df20fa9351a1: Already exists
9b8c029ceab5: Pull complete
e983a1eb737a: Pull complete
660ad543c5fc: Pull complete
823cbe4f5025: Pull complete
e3dd0c30e1c8: Pull complete
Digest: sha256:6972ee00fd35854dd2925904e23cb047faa004df27c62cba842248c7db6bd99d
Status: Downloaded newer image for redis:alpine
Creating composetest_redis_1 ... done
Creating composetest_web_1   ... done
Attaching to composetest_web_1, composetest_redis_1
redis_1  | 1:C 19 Aug 2020 05:38:42.527 # oO0OoO0OoO0Oo Redis is starting oO0OoO0OoO0Oo
redis_1  | 1:C 19 Aug 2020 05:38:42.527 # Redis version=6.0.6, bits=64, commit=00000000, modified=0, pid=1, just started
redis_1  | 1:C 19 Aug 2020 05:38:42.527 # Warning: no config file specified, using the default config. In order to specify a config file use redis-server /path/to/redis.conf
redis_1  | 1:M 19 Aug 2020 05:38:42.530 * Running mode=standalone, port=6379.
redis_1  | 1:M 19 Aug 2020 05:38:42.530 # WARNING: The TCP backlog setting of 511 cannot be enforced because /proc/sys/net/core/somaxconn is set to the lower value of 128.
redis_1  | 1:M 19 Aug 2020 05:38:42.530 # Server initialized
redis_1  | 1:M 19 Aug 2020 05:38:42.530 # WARNING overcommit_memory is set to 0! Background save may fail under low memory condition. To fix this issue add 'vm.overcommit_memory = 1' to /etc/sysctl.conf and then reboot or run the command 'sysctl vm.overcommit_memory=1' for this to take effect.
redis_1  | 1:M 19 Aug 2020 05:38:42.531 # WARNING you have Transparent Huge Pages (THP) support enabled in your kernel. This will create latency and memory usage issues with Redis. To fix this issue run the command 'echo never > /sys/kernel/mm/transparent_hugepage/enabled' as root, and add it to your /etc/rc.local in order to retain the setting after a reboot. Redis must be restarted after THP is disabled.
redis_1  | 1:M 19 Aug 2020 05:38:42.531 * Ready to accept connections
composetest_web_1 exited with code 0
(2)这里发现 web 还是没起来,最后发现是 app.py 的问题。
#(1)修改如下:增加了 if __name__== "__main__"
[root@localhost composetest]# vi app.py
import time

import redis
from flask import Flask

app = Flask(__name__)
cache = redis.Redis(host='redis', port=6379)


def get_hit_count():
    retries = 5
    while True:
        try:
            return cache.incr('hits')
        except redis.exceptions.ConnectionError as exc:
            if retries == 0:
                raise exc
            retries -= 1
            time.sleep(0.5)


@app.route('/')
def hello():
    count = get_hit_count()
    return 'Hello World! I have been seen {} times.\n'.format(count)
if __name__== "__main__":
    app.run(host="0.0.0.0", debug=True)
#(2)重新运行 compose,可以看到运行成功
[root@localhost composetest]# docker-compose up
Creating composetest_web_1   ... done
Creating composetest_redis_1 ... done
Attaching to composetest_web_1, composetest_redis_1
redis_1  | 1:C 19 Aug 2020 06:42:51.658 # oO0OoO0OoO0Oo Redis is starting oO0OoO0OoO0Oo
redis_1  | 1:C 19 Aug 2020 06:42:51.658 # Redis version=6.0.6, bits=64, commit=00000000, modified=0, pid=1, just started
redis_1  | 1:C 19 Aug 2020 06:42:51.658 # Warning: no config file specified, using the default config. In order to specify a config file use redis-server /path/to/redis.conf
redis_1  | 1:M 19 Aug 2020 06:42:51.662 * Running mode=standalone, port=6379.
redis_1  | 1:M 19 Aug 2020 06:42:51.662 # WARNING: The TCP backlog setting of 511 cannot be enforced because /proc/sys/net/core/somaxconn is set to the lower value of 128.
redis_1  | 1:M 19 Aug 2020 06:42:51.662 # Server initialized
redis_1  | 1:M 19 Aug 2020 06:42:51.662 # WARNING overcommit_memory is set to 0! Background save may fail under low memory condition. To fix this issue add 'vm.overcommit_memory = 1' to /etc/sysctl.conf and then reboot or run the command 'sysctl vm.overcommit_memory=1' for this to take effect.
redis_1  | 1:M 19 Aug 2020 06:42:51.662 # WARNING you have Transparent Huge Pages (THP) support enabled in your kernel. This will create latency and memory usage issues with Redis. To fix this issue run the command 'echo never > /sys/kernel/mm/transparent_hugepage/enabled' as root, and add it to your /etc/rc.local in order to retain the setting after a reboot. Redis must be restarted after THP is disabled.
redis_1  | 1:M 19 Aug 2020 06:42:51.662 * Ready to accept connections
web_1    |  * Serving Flask app "app" (lazy loading)
web_1    |  * Environment: production
web_1    |    WARNING: This is a development server. Do not use it in a production deployment.
web_1    |    Use a production WSGI server instead.
web_1    |  * Debug mode: on
web_1    |  * Running on http://0.0.0.0:5000/ (Press CTRL+C to quit)
web_1    |  * Restarting with stat
web_1    |  * Debugger is active!
web_1    |  * Debugger PIN: 236-854-049
7.测试访问
[root@localhost composetest]# docker ps
CONTAINER ID        IMAGE               COMMAND                  CREATED              STATUS              PORTS                    NAMES
f6831ee90551        redis:alpine        "docker-entrypoint.s…"   About a minute ago   Up About a minute   6379/tcp                 composetest_redis_1
185d868173b7        composetest_web     "python app.py"          About a minute ago   Up About a minute   0.0.0.0:5000->5000/tcp   composetest_web_1
[root@localhost composetest]# curl localhost:5000
Hello World! I have been seen 1 times.
[root@localhost composetest]# curl localhost:5000
Hello World! I have been seen 2 times.
8.停止
a. docker-compose stop
b. docker-compose down
c. ctrl + c
1.3.2 默认规则
1.默认的服务器名:文件名_服务名_num(num 即副本数量)
[root@localhost composetest]# docker ps
CONTAINER ID        IMAGE               COMMAND                  CREATED              STATUS              PORTS                    NAMES
f6831ee90551        redis:alpine        "docker-entrypoint.s…"   About a minute ago   Up About a minute   6379/tcp                 composetest_redis_1
185d868173b7        composetest_web     "python app.py"          About a minute ago   Up About a minute   0.0.0.0:5000->5000/tcp   composetest_web_1
2.自动构建镜像
[root@localhost composetest]# docker images
REPOSITORY          TAG                 IMAGE ID            CREATED             SIZE
composetest_web     latest              07e644c8e657        2 hours ago         52.1MB
1.网络规则(项目中的内容都在同一个网络环境,直接通过域名(容器名)访问)
[root@localhost composetest]# docker network ls
NETWORK ID          NAME                  DRIVER              SCOPE
26d7f43dd465        composetest_default   bridge              local
1.4 Docker Compose 配置编写规则
1.4.1 yaml 规则
1.docker-compose.yml 的核心就 3 层
(1)version   # 版本
(2)services  # 服务
        服务1:redis
           具体配置
        服务2:nginx
           具体配置
        服务3:web
           具体配置
(3)其他配置  网络/卷、全局规则
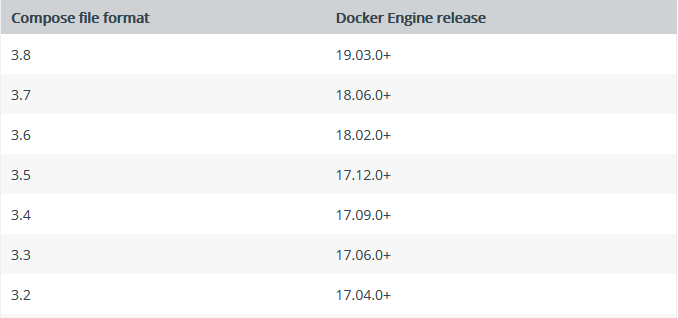
2.版本(向下兼容)
3.官方示例
version: "3.8"
services:

  redis:
    image: redis:alpine
    ports:
      - "6379"
    networks:
      - frontend
    deploy:
      replicas: 2
      update_config:
        parallelism: 2
        delay: 10s
      restart_policy:
        condition: on-failure

  db:
    image: postgres:9.4
    volumes:
      - db-data:/var/lib/postgresql/data
    networks:
      - backend
    deploy:
      placement:
        max_replicas_per_node: 1
        constraints:
          - "node.role==manager"

  vote:
    image: dockersamples/examplevotingapp_vote:before
    ports:
      - "5000:80"
    networks:
      - frontend
    depends_on:
      - redis
    deploy:
      replicas: 2
      update_config:
        parallelism: 2
      restart_policy:
        condition: on-failure

  result:
    image: dockersamples/examplevotingapp_result:before
    ports:
      - "5001:80"
    networks:
      - backend
    depends_on:
      - db
    deploy:
      replicas: 1
      update_config:
        parallelism: 2
        delay: 10s
      restart_policy:
        condition: on-failure

  worker:
    image: dockersamples/examplevotingapp_worker
    networks:
      - frontend
      - backend
    deploy:
      mode: replicated
      replicas: 1
      labels: [APP=VOTING]
      restart_policy:
        condition: on-failure
        delay: 10s
        max_attempts: 3
        window: 120s
      placement:
        constraints:
          - "node.role==manager"

  visualizer:
    image: dockersamples/visualizer:stable
    ports:
      - "8080:8080"
    stop_grace_period: 1m30s
    volumes:
      - "/var/run/docker.sock:/var/run/docker.sock"
    deploy:
      placement:
        constraints:
          - "node.role==manager"

networks:
  frontend:
  backend:

volumes:
  db-data:
1.5 Docker Compose 一键部署 WP 博客
官方示例 compose 实战项目
1.创建项目目录并进入
[root@localhost home]# mkdir my_wordpress
[root@localhost home]# cd my_wordpress/
[root@localhost my_wordpress]#
2.创建 docker-compose.yml 配置文件
[root@localhost my_wordpress]# vi docker-compose.yml
version: '3.3'

services:
   db:
     image: mysql:5.7
     volumes:
       - db_data:/var/lib/mysql
     restart: always
     environment:
       MYSQL_ROOT_PASSWORD: somewordpress
       MYSQL_DATABASE: wordpress
       MYSQL_USER: wordpress
       MYSQL_PASSWORD: wordpress

   wordpress:
     depends_on:
       - db
     image: wordpress:latest
     ports:
       - "8000:80"
     restart: always
     environment:
       WORDPRESS_DB_HOST: db:3306
       WORDPRESS_DB_USER: wordpress
       WORDPRESS_DB_PASSWORD: wordpress
       WORDPRESS_DB_NAME: wordpress
volumes:
    db_data: {}
3.后台启动项目
[root@localhost my_wordpress]# docker-compose up -d
Pulling db (mysql:5.7)...
5.7: Pulling from library/mysql
bf5952930446: Downloading [===========>                                       ]  6.259MB/27.09MB
bf5952930446: Pull complete
8254623a9871: Pull complete
938e3e06dac4: Pull complete
ea28ebf28884: Pull complete
f3cef38785c2: Pull complete
894f9792565a: Pull complete
1d8a57523420: Pull complete
5f09bf1d31c1: Pull complete
1b6ff254abe7: Pull complete
74310a0bf42d: Pull complete
d398726627fd: Pull complete
Digest: sha256:da58f943b94721d46e87d5de208dc07302a8b13e638cd1d24285d222376d6d84
Status: Downloaded newer image for mysql:5.7
Pulling wordpress (wordpress:latest)...
latest: Pulling from library/wordpress
bf5952930446: Already exists
a409b57eb464: Pull complete
3192e6c84ad0: Pull complete
43553740162b: Pull complete
d8b8bba42dea: Pull complete
eb10907c0110: Pull complete
10568906f34e: Pull complete
03fe17709781: Pull complete
98171b7166c8: Pull complete
3978c2fb05b8: Pull complete
71bf21524fa8: Pull complete
24fe81782f1c: Pull complete
7a2dfd067aa5: Pull complete
a04586f4f8fe: Pull complete
b8059b10e448: Pull complete
e5b4db4a14b4: Pull complete
48018c17c4e9: Pull complete
d09f106f9e16: Pull complete
289a459a6137: Pull complete
c4e8f9c90fda: Pull complete
Digest: sha256:6da8f886b20632dd05eeb22462f850a38e30600cedd894d2c6b1eb1a58e9763c
Status: Downloaded newer image for wordpress:latest
Creating my_wordpress_db_1 ... done
Creating my_wordpress_wordpress_1 ... done
[root@localhost my_wordpress]# docker ps
CONTAINER ID        IMAGE               COMMAND                  CREATED             STATUS              PORTS                  NAMES
e2955708d8a7        wordpress:latest    "docker-entrypoint.s…"   2 minutes ago       Up 2 minutes        0.0.0.0:8000->80/tcp   my_wordpress_wordpress_1
520ed8c9ccd6        mysql:5.7           "docker-entrypoint.s…"   2 minutes ago       Up 2 minutes        3306/tcp, 33060/tcp    my_wordpress_db_1
4.浏览器访问安装(继续填写信息就可以了)

二、Swarm 集群
2.1 Swarm 集群搭建
前提:准备 4 台至少 1核2g 的服务器,每台服务器都安装 docker 环境,安装过程可从基础篇查看。
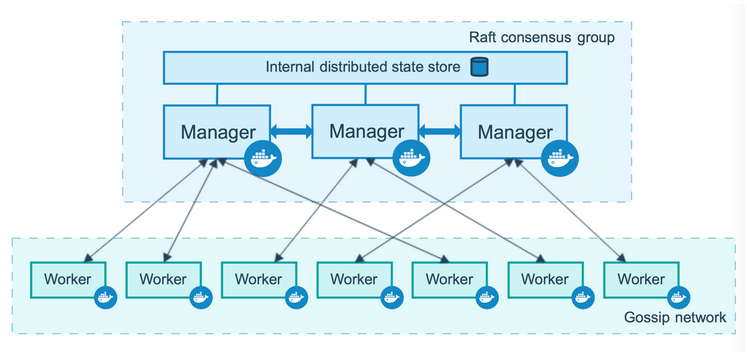
1.工作模式:包括管理节点(managers)和工作节点(workers)
2.搭建集群(双主双从)
(1)查看 swarm 相关命令
[root@localhost ~]# docker swarm --help

Usage:	docker swarm COMMAND

Manage Swarm

Commands:
  ca          Display and rotate the root CA          # 管理根ca
  init        Initialize a swarm                      # 初始化一个集群
  join        Join a swarm as a node and/or manager   # 加入集群作为工作/管理节点
  join-token  Manage join tokens                      # 管理加入令牌
  leave       Leave the swarm                         # 退出集群
  unlock      Unlock swarm                            # 解锁集群
  unlock-key  Manage the unlock key                   # 管理解锁秘钥
  update      Update the swarm                        # 更新集群
(2)这里我们需要初始化一个集群,看看相关帮助信息
[root@localhost ~]# docker swarm init --help

Usage:	docker swarm init [OPTIONS]

Initialize a swarm

Options:
      --advertise-addr string                  Advertised address (format: <ip|interface>[:port])                               # 广播地址
      --autolock                               Enable manager autolocking (requiring an unlock key to start a stopped manager)  # 自动锁定管理节点
      --availability string                    Availability of the node ("active"|"pause"|"drain") (default "active")           # 节点可用性
      --cert-expiry duration                   Validity period for node certificates (ns|us|ms|s|m|h) (default 2160h0m0s)       # 节点证书有效期
      --data-path-addr string                  Address or interface to use for data path traffic (format: <ip|interface>)       # 用于传输数据的地址或接口通道
      --data-path-port uint32                  Port number to use for data path traffic (1024 - 49151). If no value is set or is set to
                                               0, the default port (4789) is used.                                              # 用于传输数据的端口
      --default-addr-pool ipNetSlice           default address pool in CIDR format (default [])                                 # CIDR格式的默认地址池
      --default-addr-pool-mask-length uint32   default address pool subnet mask length (default 24)                             # 默认子网掩码地址池的长度
      --dispatcher-heartbeat duration          Dispatcher heartbeat period (ns|us|ms|s|m|h) (default 5s)                        # 调度心跳周期
      --external-ca external-ca                Specifications of one or more certificate signing endpoints                      # 规范的一个或多个证书签名的端点
      --force-new-cluster                      Force create a new cluster from current state                                    # 从当前状态创建一个新的集群
      --listen-addr node-addr                  Listen address (format: <ip|interface>[:port]) (default 0.0.0.0:2377)            # 侦听地址
      --max-snapshots uint                     Number of additional Raft snapshots to retain                                    # 额外的筏快照保留数量
      --snapshot-interval uint                 Number of log entries between Raft snapshots (default 10000)                     # 日志条目数量筏快照
      --task-history-limit int                 Task history retention limit (default 5)                                         # 任务历史记录保留限制
(3)初始化一个集群、使 docker1 其成为一个主节点
# 该操作在 docker1(192.168.67.100)上执行
[root@localhost ~]# docker swarm init --advertise-addr 192.168.67.100
Swarm initialized: current node (xswotmixakew5uqham7i4vbil) is now a manager.

To add a worker to this swarm, run the following command:

    docker swarm join --token SWMTKN-1-093mb730i895ku89wr8v4ris7ube2mx6hyjt5jbgu0kc3lkyyb-77kygs36glnpbbtwhpxcgnwwp 192.168.67.100:2377

To add a manager to this swarm, run 'docker swarm join-token manager' and follow the instructions.
通过初始化,可以得到几个命令信息:
- docker swarm join — 加入一个节点
- docker swarm join-token worker — 获取 worker 节点令牌
- docker swarm join-token manager — 获取 manager 节点令牌
(4)使 docker2 加入 docker1 这个集群(worker 节点)
# 该操作在 docker2(192.168.67.101)上执行
[root@localhost ~]# docker swarm join --token SWMTKN-1-093mb730i895ku89wr8v4ris7ube2mx6hyjt5jbgu0kc3lkyyb-77kygs36glnpbbtwhpxcgnwwp 192.168.67.100:2377
Error response from daemon: rpc error: code = Unavailable desc = all SubConns are in TransientFailure, latest connection error: connection error: desc = "transport: Error while dialing dial tcp 192.168.67.100:2377: connect: no route to host"
[root@localhost ~]# docker swarm join --token SWMTKN-1-093mb730i895ku89wr8v4ris7ube2mx6hyjt5jbgu0kc3lkyyb-77kygs36glnpbbtwhpxcgnwwp 192.168.67.100:2377
This node joined a swarm as a worker.
该地方第一次报错是因为 docker1 防火墙问题,开放端口或关闭后解决。可以在 docker1 上查看到新加进来的节点信息
# 该操作在 docker1(192.168.67.100)上执行
[root@localhost ~]# docker node ls
ID                            HOSTNAME                STATUS              AVAILABILITY        MANAGER STATUS      ENGINE VERSION
xel0p4uz8en3hgcjs32wih0yf     localhost.localdomain   Ready               Active                                  19.03.12
xswotmixakew5uqham7i4vbil *   localhost.localdomain   Ready               Active              Leader              19.03.12
(5)使 docker3 也加入 docker1 集群(worker 节点。可以通过命令重新获取令牌,或者复制 docker2 加入时的命令)
# 该操作在 docker1(192.168.67.100)上执行
[root@localhost ~]# docker swarm join-token worker
To add a worker to this swarm, run the following command:

    docker swarm join --token SWMTKN-1-093mb730i895ku89wr8v4ris7ube2mx6hyjt5jbgu0kc3lkyyb-77kygs36glnpbbtwhpxcgnwwp 192.168.67.100:2377
# 该操作在 docker3(192.168.67.102)上执行
[root@localhost ~]# docker swarm join --token SWMTKN-1-093mb730i895ku89wr8v4ris7ube2mx6hyjt5jbgu0kc3lkyyb-77kygs36glnpbbtwhpxcgnwwp 192.168.67.100:2377
This node joined a swarm as a worker.
# 该操作在 docker1(192.168.67.100)上执行
[root@localhost ~]# docker node ls
ID                            HOSTNAME                STATUS              AVAILABILITY        MANAGER STATUS      ENGINE VERSION
q192txxk3gsnsgwk9rst7p820     localhost.localdomain   Ready               Active                                  19.03.12
xel0p4uz8en3hgcjs32wih0yf     localhost.localdomain   Ready               Active                                  19.03.12
xswotmixakew5uqham7i4vbil *   localhost.localdomain   Ready               Active              Leader              19.03.12
(6)使 docker4 加入 docker1 集群(manager 节点)
# 该操作在 docker1(192.168.67.100)上执行
[root@localhost ~]# docker swarm join-token manager
To add a manager to this swarm, run the following command:

    docker swarm join --token SWMTKN-1-093mb730i895ku89wr8v4ris7ube2mx6hyjt5jbgu0kc3lkyyb-04uz8mbvvd9q2yrliln5fmo4l 192.168.67.100:2377
# 该操作在 docker4(192.168.67.103)上执行
[root@localhost ~]# docker swarm join --token SWMTKN-1-093mb730i895ku89wr8v4ris7ube2mx6hyjt5jbgu0kc3lkyyb-04uz8mbvvd9q2yrliln5fmo4l 192.168.67.100:2377
Error response from daemon: manager stopped: can't initialize raft node: rpc error: code = Unknown desc = could not connect to prospective new cluster member using its advertised address: rpc error: code = Unavailable desc = all SubConns are in TransientFailure, latest connection error: connection error: desc = "transport: Error while dialing dial tcp 192.168.67.103:2377: connect: no route to host"
[root@localhost ~]# firewall-cmd --zone=public --add-port=2377/tcp --permanent
success
[root@localhost ~]# firewall-cmd --reload
success
[root@localhost ~]# docker swarm join --token SWMTKN-1-093mb730i895ku89wr8v4ris7ube2mx6hyjt5jbgu0kc3lkyyb-04uz8mbvvd9q2yrliln5fmo4l 192.168.67.100:2377
This node joined a swarm as a manager.
# 该操作在 docker1(192.168.67.100)上执行
[root@localhost ~]# docker node ls
ID                            HOSTNAME                STATUS              AVAILABILITY        MANAGER STATUS      ENGINE VERSION
in8k98lp0rftjfn1l7oj10w11     localhost.localdomain   Ready               Active              Reachable           19.03.12
q192txxk3gsnsgwk9rst7p820     localhost.localdomain   Ready               Active                                  19.03.12
xel0p4uz8en3hgcjs32wih0yf     localhost.localdomain   Ready               Active                                  19.03.12
xswotmixakew5uqham7i4vbil *   localhost.localdomain   Ready               Active              Leader              19.03.12
注意:这里要加入成为主节点,同样要开放对应端口才能执行成功
到此集群搭建完毕,但是这里用的是双主双从的集群模式,一般是需要 3 个主节点的,这里只做测试。
2.2 Raft 一致性协议了解
1.问题:双主双从,假设一个节点挂了,其他节点是否可以用?
Raft 协议:保证大多数节点存活才可以使用。只要大于 1 台,集群至少大于 3 台
2.实验:
(1)将主节点 docker1 停用(宕机模拟),发现另外一个主节点 docker4 也不能正常使用了,恢复后 docker4 变成了 Leader ,而 docker1 变成了 Reachable。
# 该操作在 docker1(192.168.67.100)上执行
[root@localhost ~]# systemctl stop docker
# 该操作在 docker4(192.168.67.103)上执行
[root@localhost ~]# docker node ls
Error response from daemon: rpc error: code = DeadlineExceeded desc = context deadline exceeded
[root@localhost ~]# docker node ls
ID                            HOSTNAME                STATUS              AVAILABILITY        MANAGER STATUS      ENGINE VERSION
in8k98lp0rftjfn1l7oj10w11 *   localhost.localdomain   Ready               Active              Leader              19.03.12
q192txxk3gsnsgwk9rst7p820     localhost.localdomain   Ready               Active                                  19.03.12
xel0p4uz8en3hgcjs32wih0yf     localhost.localdomain   Ready               Active                                  19.03.12
xswotmixakew5uqham7i4vbil     localhost.localdomain   Ready               Active              Reachable           19.03.12
(2)对从(worker)节点进行断开,可以看到只是该节点 down 掉了,其他正常
# 该操作在 docker2(192.168.67.101)上执行
[root@localhost ~]# docker swarm leave
Node left the swarm.
# 该操作在 docker1(192.168.67.100)上执行
[root@localhost ~]# docker node ls
ID                            HOSTNAME                STATUS              AVAILABILITY        MANAGER STATUS      ENGINE VERSION
in8k98lp0rftjfn1l7oj10w11     localhost.localdomain   Ready               Active              Leader              19.03.12
q192txxk3gsnsgwk9rst7p820     localhost.localdomain   Ready               Active                                  19.03.12
xel0p4uz8en3hgcjs32wih0yf     localhost.localdomain   Down                Active                                  19.03.12
xswotmixakew5uqham7i4vbil *   localhost.localdomain   Ready               Active              Reachable           19.03.12
(3)我们把 down 掉的节点从新加入成为主(manager) 节点,并停掉其中一个主(manager)节点(docker4),发现这次虽然宕机了一台主(manager)节点,但是集群仍正常运转。
# 该操作在 docker4(192.168.67.103)上执行
[root@localhost ~]# docker swarm join-token manager
To add a manager to this swarm, run the following command:

    docker swarm join --token SWMTKN-1-093mb730i895ku89wr8v4ris7ube2mx6hyjt5jbgu0kc3lkyyb-04uz8mbvvd9q2yrliln5fmo4l 192.168.67.103:2377
# 该操作在 docker2(192.168.67.101)上执行
[root@localhost ~]# docker swarm join --token SWMTKN-1-093mb730i895ku89wr8v4ris7ube2mx6hyjt5jbgu0kc3lkyyb-04uz8mbvvd9q2yrliln5fmo4l 192.168.67.103:2377
This node joined a swarm as a manager.
# 该操作在 docker4(192.168.67.103)上执行
[root@localhost ~]# docker node ls
ID                            HOSTNAME                STATUS              AVAILABILITY        MANAGER STATUS      ENGINE VERSION
q015p91ntu45yjvwz5hkqdj8n                             Unknown             Active
in8k98lp0rftjfn1l7oj10w11 *   localhost.localdomain   Ready               Active              Leader              19.03.12
q192txxk3gsnsgwk9rst7p820     localhost.localdomain   Ready               Active                                  19.03.12
rkk7bxjmcji2plwi1ort01jzr     localhost.localdomain   Ready               Active              Reachable           19.03.12
xel0p4uz8en3hgcjs32wih0yf     localhost.localdomain   Down                Active                                  19.03.12
xswotmixakew5uqham7i4vbil     localhost.localdomain   Ready               Active              Reachable           19.03.12
[root@localhost ~]# systemctl stop docker
# 该操作在 docker2(192.168.67.101)上执行
[root@localhost ~]# docker node ls
ID                            HOSTNAME                STATUS              AVAILABILITY        MANAGER STATUS      ENGINE VERSION
q015p91ntu45yjvwz5hkqdj8n                             Down                Active
in8k98lp0rftjfn1l7oj10w11     localhost.localdomain   Down                Active              Unreachable         19.03.12
q192txxk3gsnsgwk9rst7p820     localhost.localdomain   Ready               Active                                  19.03.12
rkk7bxjmcji2plwi1ort01jzr *   localhost.localdomain   Ready               Active              Leader              19.03.12
xel0p4uz8en3hgcjs32wih0yf     localhost.localdomain   Down                Active                                  19.03.12
xswotmixakew5uqham7i4vbil     localhost.localdomain   Ready               Active              Reachable           19.03.12
注意:如果又停掉了一个主(manager)节点,集群又不可用了。所以,集群下至少有 3 个或者以上的主节点来保证服务的高可用。Raft 协议就是保证这种情况:即保证大多数节点存活才可以使用
2.3 Swarm 集群弹性创建服务
1.使用 docker swarm 后会有相关的 services 命令;服务(Services)是指一组任务的集合,服务定义了任务的属性。
[root@localhost ~]# docker service --help

Usage:	docker service COMMAND

Manage services

Commands:
  create      Create a new service
  inspect     Display detailed information on one or more services
  logs        Fetch the logs of a service or task
  ls          List services
  ps          List the tasks of one or more services
  rm          Remove one or more services
  rollback    Revert changes to a service's configuration
  scale       Scale one or multiple replicated services
  update      Update a service

Run 'docker service COMMAND --help' for more information on a command.
2.docker service 可以看成集群版的 docker run,而它们的区别在于
- docker run 是启动容器:它不具有扩缩容器
- docker server 是启动服务:它具有扩缩容器,滚动更新(灰度更新)
3.创建并查看
# 该操作在主节点上执行
[root@localhost ~]# docker service create -p 8888:80 --name my_nginx nginx
1hruoqxwlzikyqyjrnsjsiqgd
overall progress: 1 out of 1 tasks
1/1: running   [==================================================>]
verify: Service converged
[root@localhost ~]# docker service ps my_nginx
ID                  NAME                IMAGE               NODE                    DESIRED STATE       CURRENT STATE             ERROR                              PORTS
wfkxh0bnkk0w        my_nginx.1          nginx:latest        localhost.localdomain   Running             Running 12 minutes ago
msjui0wukmem
[root@localhost ~]# docker service ls
ID                  NAME                MODE                REPLICAS            IMAGE               PORTS
1hruoqxwlzik        my_nginx            replicated          1/1                 nginx:latest        *:8888->80/tcp
[root@localhost ~]# docker ps
CONTAINER ID        IMAGE               COMMAND             CREATED             STATUS              PORTS               NAMES
# 该操作在 docker2(192.168.67.101)上执行
[root@localhost ~]# docker ps
CONTAINER ID        IMAGE               COMMAND                  CREATED             STATUS              PORTS               NAMES
4138790786d6        nginx:latest        "/docker-entrypoint.…"   32 minutes ago      Up 32 minutes       80/tcp              my_nginx.1.wfkxh0bnkk0wt5fmkniy2zbia
[root@localhost ~]# curl 192.168.67.101:8888
<!DOCTYPE html>
<html>
<head>
<title>Welcome to nginx!</title>
<style>
    body {
        width: 35em;
        margin: 0 auto;
        font-family: Tahoma, Verdana, Arial, sans-serif;
    }
</style>
</head>
<body>
<h1>Welcome to nginx!</h1>
<p>If you see this page, the nginx web server is successfully installed and
working. Further configuration is required.</p>

<p>For online documentation and support please refer to
<a href="http://nginx.org/">nginx.org</a>.<br/>
Commercial support is available at
<a href="http://nginx.com/">nginx.com</a>.</p>

<p><em>Thank you for using nginx.</em></p>
</body>
</html>
可以看到,这里的 replicated(副本) 只有 1 个,通过 docker ps 却没有在该节点上看到服务,而在另外一个节点 docker2 上可以查看到,也就是这个副本被分配(随机)到了 docker2 上,在其他节点上通过 docker ps 是找不到的
4.通过 update 动态扩缩容,扩容到 3 个副本
# 该操作在主节点上执行
[root@localhost ~]# docker service update --replicas 3 my_nginx
my_nginx
overall progress: 3 out of 3 tasks
1/3: running   [==================================================>]
2/3: running   [==================================================>]
3/3: running   [==================================================>]
verify: Service converged
# 该操作在 docker1(192.168.67.100)上执行
[root@localhost ~]# docker ps
CONTAINER ID        IMAGE               COMMAND                  CREATED             STATUS              PORTS               NAMES
d8b4c9a6b305        nginx:latest        "/docker-entrypoint.…"   36 seconds ago      Up 33 seconds       80/tcp              my_nginx.2.hvfvjkxuoubipqhg0io94pnn7
# 该操作在 docker2(192.168.67.101)上执行
[root@localhost ~]# docker ps
CONTAINER ID        IMAGE               COMMAND                  CREATED             STATUS              PORTS               NAMES
4138790786d6        nginx:latest        "/docker-entrypoint.…"   38 minutes ago      Up 38 minutes       80/tcp              my_nginx.1.wfkxh0bnkk0wt5fmkniy2zbia
# 该操作在 docker3(192.168.67.102)上执行
[root@localhost ~]# docker ps
CONTAINER ID        IMAGE               COMMAND             CREATED             STATUS              PORTS               NAMES
# 该操作在 docker4(192.168.67.103)上执行
[root@localhost ~]# docker ps
CONTAINER ID        IMAGE               COMMAND                  CREATED             STATUS              PORTS               NAMES
181a8766b629        nginx:latest        "/docker-entrypoint.…"   46 seconds ago      Up 43 seconds       80/tcp              my_nginx.3.w17do9nfwyghbgmqytk1biu3e
可以看到,通过动态扩容后,只有在 docker3 上没查到相关运行容器,其他几个节点的 nginx 都能通过地址 + 端口 被访问到。
可以继续进行扩容,也可以用相同命令进行缩容!缩容后部分节点上的容器也将消失。
[root@localhost ~]# docker service update --replicas 10 my_nginx
my_nginx
overall progress: 10 out of 10 tasks
1/10: running   [==================================================>]
2/10: running   [==================================================>]
3/10: running   [==================================================>]
4/10: running   [==================================================>]
5/10: running   [==================================================>]
6/10: running   [==================================================>]
7/10: running   [==================================================>]
8/10: running   [==================================================>]
9/10: running   [==================================================>]
10/10: running   [==================================================>]
verify: Service converged
[root@localhost ~]# docker service update --replicas 2 my_nginx
my_nginx
overall progress: 2 out of 2 tasks
1/2: running   [==================================================>]
2/2: running   [==================================================>]
verify: Service converged
docker service update 和 docker service scale 命令的作用是一样的,scale 命令格式演示如下:
[root@localhost ~]# docker service scale my_nginx=4
my_nginx scaled to 4
overall progress: 4 out of 4 tasks
1/4: running   [==================================================>]
2/4: running   [==================================================>]
3/4: running   [==================================================>]
4/4: running   [==================================================>]
verify: Service converged
5.删除一个服务
[root@localhost ~]# docker service rm my_nginx
my_nginx
[root@localhost ~]# docker service ls
ID                  NAME                MODE                REPLICAS            IMAGE               PORTS
2.4 Swarm 概念学习总结
Swarm:集群的管理和编排(docker初始化一个 swarm 集群后,其他节点(管理节点 manager 和工作节点 worker)可以加入进来)。
Node:就是一个 docker 节点,多个节点就组成了一个网络集群。
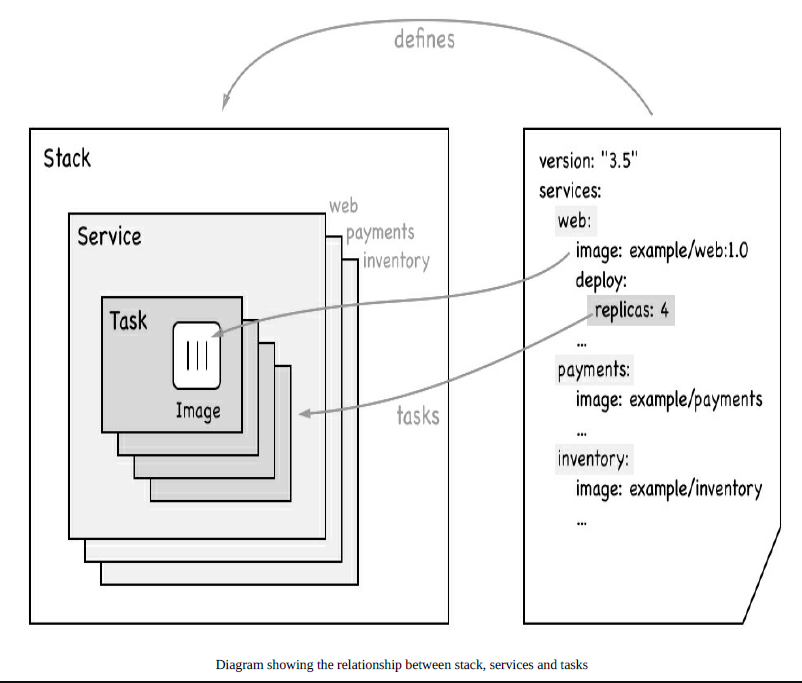
Service:任务,可以在管理节点或者工作节点来运行。它只是一个对运行在swarm集群上的应用服务,所期望状态的描述。
Task:容器内的命令,细节命令。task是一个部署的最小单元,task与容器是一对一的关系。
Stack:描述一系列相关services的集合。我们通过在一个YAML文件中来定义一个stack。
学习资料来源:哔哩哔哩搜索:狂神说Java 为他点赞关注转发 3 连
地址:【狂神说Java】Docker进阶篇超详细版教程通俗易懂_哔哩哔哩_bilibili
本文内容由网友自发贡献,版权归原作者所有,本站不承担相应法律责任。如您发现有涉嫌抄袭侵权的内容,请联系:hwhale#tublm.com(使用前将#替换为@)