文章目录
- 0x00 前言简述
- 0x01 快速安装配置
-
- 0x02 证书自动签发实践
- 1.acme.sh + Cloudflare 实现自动签发泛域名证书。
- 0x03 使用实例
-
- 0x04 入坑出坑
- 1.Cloudflare 的API 不技持 .cf, .ga, .gq, .ml, or .tk 的域名申请证书
- 0x04 其它参考
0x00 前言简述
描述: Let’s Encrypt 是免费、开放和自动化的证书颁发机构由Linux基金会(Linux Foundation)进行日常管理维护,它为1.8亿个网站提供TLS证书的非盈利性证书颁发机构, 通过它我们可以免费申请网站证书,并您的网站上启用 HTTPS (SSL/TLS) 提供支持。
前置需求:
- 域名所有者 : Let’s Encrypt 是一个证书颁发机构(CA), 要从 Let’s Encrypt 获取您网站域名的证书,您必须证明您对域名的实际控制权。
- ACME 协议软件 : 在Let’s Encrypt 使用 ACME 协议来验证您对给定域名的控制权并向您颁发证书, 要从Let’s Encrypt 获得证书,您需要选择一个要使用的 ACME 客户端软件。 例如官方推荐的客户端 Certbot 、或者使用得最多的 acme.sh
参考来源
Let’s Encrypt 网站: https://letsencrypt.org/
ACME 协议客户端: https://letsencrypt.org/zh-cn/docs/client-options/
acme.sh WIKI: https://wiki.acme.sh
certbot Github: https://github.com/certbot/certbot
原文地址: https://blog.weiyigeek.top/2022/3-11-589.html
0x01 快速安装配置
1.acme.sh
描述: 此处我们采用 acmesh-official 提供的 acme.sh 项目来快速搭建证书自动颁发、续签证书,其使用简单、强大且非常易于使用,它纯粹用 Shell(Unix shell)语言编写的 ACME 协议客户端,安装方式主要有二进制文件或者是acme.sh💕码头工人(https://github.com/acmesh-official/acme.sh/wiki/Run-acme.sh-in-docker)。
温馨提示: 签发的证书有效期为60天,我们可以设置cron 作业以检查和更新证书,通常证书将每60天自动更新一次。
快速安装:
安装参考地址: https://github.com/acmesh-official/acme.sh/wiki/How-to-install
git clone https://github.com/acmesh-official/acme.sh.git && cd ./acme.sh
./acme.sh --install -m master@weiyigeek.top
export email="master@weiyigeek.top"
alias acme.sh=~/.acme.sh/acme.sh
acme.sh --version
acme.sh --set-default-ca --server letsencrypt
至此,您现在可以发布证书了。
0x02 证书自动签发实践
1.acme.sh + Cloudflare 实现自动签发泛域名证书。
Q: 什么是通配符证书?
A: 在没有出现通配符证书之前,Let’s Encrypt 支持两种单域名证书、SAN证书。
1)单域名证书:证书仅仅包含一个主机。
2)SAN 证书:域名通配符证书类似 DNS 解析的泛域名概念,通配符证书就是证书中可以包含一个通配符(*.exmaple.com)。主域名签发的通配符证书可以在所有子域名中使用,比如 www.example.com、bbs.example.com。
申请通配符证书流程
步骤 01.如果您的 DNS 提供商支持 API 访问,我们可以使用该 API 自动颁发证书,目前 acme.sh 支持大多数 dns 提供者(https://github.com/acmesh-official/acme.sh/wiki/dnsapi),如果您的 dns 提供商不支持任何 api 访问,您只能手动添加 txt 记录。
步骤 02.此处我已经将 weiyigeek.top域名DNS解析商设置为 Cloudflare (免费),其DNS提供上支持API访问, 在使用 acme.sh 实现自动签发证书前,我们需要再Cloudflare网站上获取用于访问 Cloudflare API 的密钥,首先点击我的个人资料 -> API 令牌。

步骤 03.设置 acme.sh 用于访问 Cloudflare 的 dnsapi 的相关环境变量。
export CF_Email="dns@weiyigeek.top"
export CF_Key="be587222s8qa58asd87asd20b55a30cd653"
步骤 04.执行如下命令,可以实现自动颁发通配符&ECDSA格式证书,Let’s Encrypt 支持颁发 EC 格式证书,
acme.sh --issue --dns dns_cf -d weiyigeek.top -d *.weiyigeek.top --keylength ec-256
步骤 05.利用openssl查看颁发的CA及其证书。
$ acme.sh list
Main_Domain KeyLength SAN_Domains CA Created Renew
weiyigeek.top "ec-256" *.weiyigeek.top LetsEncrypt.org Thu 10 Mar 2022 06:38:32 AM UTC Mon 09 May 2022 06:38:32 AM UTC
$ openssl x509 -in ca.cer -noout -text
$ openssl x509 -in ca.cer -noout -text
$ openssl x509 -in weiyigeek.top.cer -noout -text
Certificate:
Data:
Version: 3 (0x2)
Serial Number:
03:74:0b:27:19:62:63:4e:99:cb:ce:fe:7b:74:35:1b:95:2c
Signature Algorithm: sha256WithRSAEncryption
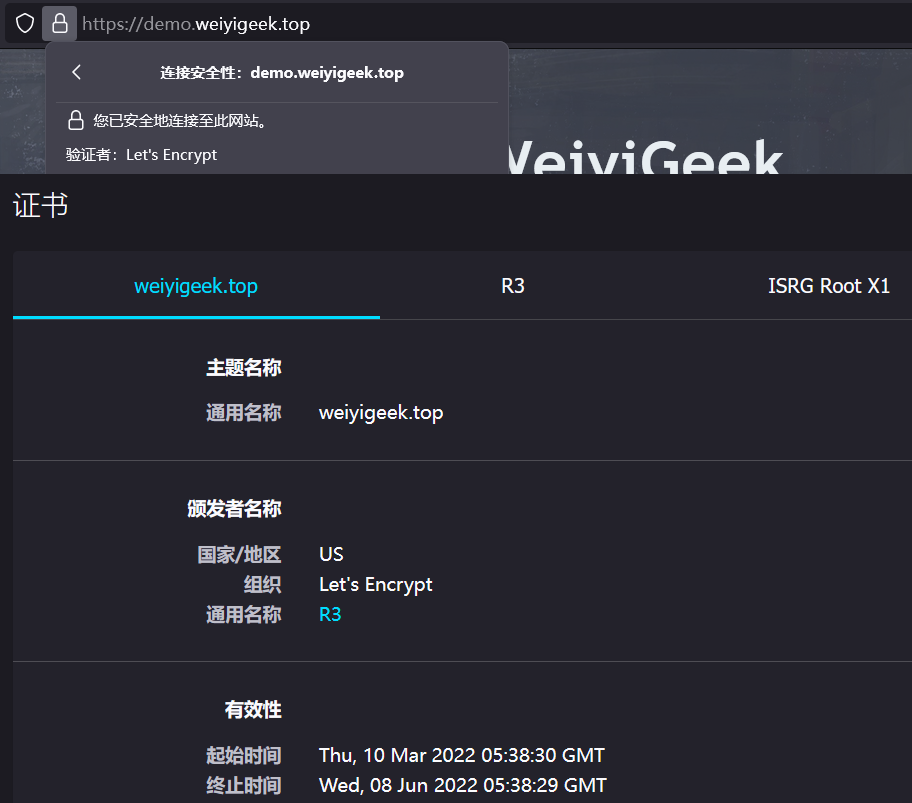
Issuer: C = US, O = Let's Encrypt, CN = R3
Validity
Not Before: Mar 10 05:38:30 2022 GMT
Not After : Jun 8 05:38:29 2022 GMT
步骤 06.使用签发的证书,ingress为指定主机名称设置tls, 然后通过浏览器访问 https://demo.weiyigeek.top 站点,验证tls配置是否正常。
kubectl create secret tls wildcard-weiyigeek-top --cert=weiyigeek.top.cer --key=weiyigeek.top.key -n devtest
$ kubectl edit ingress -n devtest demo-myweb-blog
spec:
tls:
- hosts:
- demo.weiyigeek.top
secretName: wildcard-weiyigeek-top
步骤 07.于此同时我们还可,修改 Nginx 配置文件启用 ssl,记得修改完成后需要重启下 Nginx。
acme.sh --installcert -d weiyigeek.top \
--ecc \
--key-file /etc/nginx/ssl/weiyigeek.top.key \
--fullchain-file /etc/nginx/ssl/fullchain.cer \
--reloadcmd "service nginx force-reload"
server {
listen 443 ssl;
server_name weiyigeek.top;
ssl on;
ssl_certificate /etc/nginx/ssl/fullchain.cer;
ssl_certificate_key /etc/nginx/ssl/weiyigeek.top.key;
root /home/wwwroot/weiyigeek.top;
index index.html;
location / {
try_files $uri $uri/ @router;
index index.html;
}
location @router {
rewrite ^.*$ /index.html last;
}
}
server {
listen 80;
server_name weiyigeek.top;
return 301 https://$server_name$request_uri;
}
温馨提示: Nginx 的配置 ssl_certificate 和 ssl_trusted_certificate 使用 fullchain.cer ,而非<domain>.cer,否则 SSL Labs 的测试会报 Chain issues Incomplete 错误
步骤 08.创建 cron 作业以检查和更新证书,添加force参数60天后强制更新。
20 0 */60 * * /root/.acme.sh/acme.sh --cron --force --home "/root/.acme.sh" > /dev/null
0x03 使用实例
1.简单示例
acme.sh --register-account -m tls@weiyigeek.top
acme.sh --issue -d example.com -w /home/wwwroot/example.com
acme.sh --issue -d example.com -d www.example.com -d cp.example.com -w /home/wwwroot/example.com
acme.sh --install-cert -d example.com \
--cert-file /path/to/certfile/in/apache/cert.pem \
--key-file /path/to/keyfile/in/apache/key.pem \
--fullchain-file /path/to/fullchain/certfile/apache/fullchain.pem \
--reloadcmd "service apache2 force-reload"
acme.sh --install-cert -d example.com \
--key-file /path/to/keyfile/in/nginx/key.pem \
--fullchain-file /path/to/fullchain/nginx/cert.pem \
--reloadcmd "service nginx force-reload"
/root/.acme.sh/acme.sh --installcert -d example.com \
--certpath /etc/pve/local/pveproxy-ssl.pem \
--keypath /etc/pve/local/pveproxy-ssl.key \
--capath /etc/pve/local/pveproxy-ssl.pem \
--reloadcmd "systemctl restart pveproxy"
acme.sh --issue --standalone -d example.com -d www.example.com -d cp.example.com
acme.sh --issue --alpn -d example.com -d www.example.com -d cp.example.com
acme.sh --issue --dns -d example.com -d www.example.com -d cp.example.com
acme.sh --issue -w /home/wwwroot/example.com -d example.com --keylength ec-256
acme.sh --issue -w /home/wwwroot/example.com -d example.com -d www.example.com --keylength ec-256
acme.sh --issue -d example.com -d '*.example.com' --dns dns_cf --keylength ec-256
acme.sh --cron --home ~/.acme.sh/
acme.sh --renew -d example.com --force [--ecc]
acme.sh --renew -d example.com --force
acme.sh --remove -d example.com [--ecc]
acme.sh --upgrade --auto-upgrade
acme.sh --upgrade --auto-upgrade 0
acme.sh --list
acme.sh remove <SAN_Domains>
2.扩展补充
Q: 将默认 CA 更改为 ZeroSSL?
A: 通常情况下acme.sh使用letsencrypt作为默认CA, 当前可以将默认CA更改为 ZeroSSL(https://github.com/acmesh-official/acme.sh/wiki/ZeroSSL.com-CA),但实际上并不建议这样做,因为,Let’s Encrypt 可以颁发 EC 证书,而 ZeroSSL.com 则不支持颁发。
Q: 如何颁发包含多个域的单个证书,每个域使用不同的验证方法多域、SAN模式、Hybrid模式。
$ acme.sh  --issue  \
-d aa.com  -w /home/wwwroot/aa.com \
-d bb.com  --dns dns_cf \
-d cc.com  --apache \
-d dd.com  -w /home/wwwroot/dd.com
Q: 如何生成pkcs12(pfx) 格式证书?
A: 颁发证书后可使用toPkcs命令将证书转换为 pkcs12(pfx) 格式,执行 acme.sh --toPkcs -d example.com [--password pfx-password] 命令即可。
Q: 如何从从现有 CSR 颁发证书?
A: 从 v2.4.4 开始,acme.sh 支持从现有 csr 颁发证书, 具体操作如下所示:
acme.sh --showcsr --csr /path/to/mycsr.csr
acme.sh --signcsr --csr /path/to/mycsr.csr -w /path/to/webroot/
acme.sh --signcsr --csr /path/to/mycsr/csr --dns dns_cf
Q: 如何进行证书签发通知?
A: acme.sh 可以在 cronjob 中发送通知, 通知可以是电子邮件或任何其他支持的方式,例如请求 webhook 等, 参考地址:https://github.com/acmesh-official/acme.sh/wiki/notify
export MAIL_FROM="xxx@xxx.com"
export MAIL_TO="xxx@xxx.com"
acme.sh --set-notify --notify-hook mailgun --notify-hook mail \
--notify-level 2 \
--notify-mode 0
export DINGTALK_WEBHOOK='https://oapi.dingtalk.com/robot/send?access_token=b05ccexxxxx'
export DINGTALK_KEYWORD=acme
acme.sh --set-notify --notify-hook dingtalk
* CQHTTP_TOKEN: 建议非空,将 CQHTTP 配置文件中您设置的 Access Token 填入。
* CQHTTP_USER: 必需,接收推送通知的 QQ 号码。您需要自行保证机器人号码可以向接收者的 QQ 号码发送消息。
* CQHTTP_APIROOT: 必需,您搭建的 CQHTTP 服务器的 URL (不包含斜杠结尾)。
* CQHTTP_CUSTOM_MSGHEAD: 可选,自定义的消息开头。默认值是 "A message from acme.sh:".
export CQHTTP_TOKEN="Itsjustat0ken,qwq"
export CQHTTP_USER="10086"
export CQHTTP_APIROOT="http://cqhttp-server.local:5700"
acme.sh --set-notify --notify-hook cqhttp
Q: acme.sh 除了支持Cloudflare还支持那些DNSAPI供应商
描述: acme.sh 目前支持 cloudflare, dnspod, cloudxns, godaddy 以及 ovh 等数十种解析商的自动集成。
- 使用万网/阿里云的 NDS 解析操作方法:点击右上角头像 -> 选择
AccessKey -> 点击开始使用子用户 AccessKey -> 起个自定义名称 -> 搜索 NDS -> 选择 系统 AliyunDNSFullAccess
export Ali_Key="YourKey"
export Ali_Secret="YourSecert"
- 使用的是 DNSPod 解析服务,那就登录 DNSPod 官网生,成所需的 api id 和 api key, 操作方法点击右上角头像 -> 我的账号 -> 账号中心 -> 密钥管理 -> 创建密钥
export DP_Id="YourID"
export DP_Key="YourKey"
安装部署RSA、ECC双证书(使用DNSPod API)
#!/bin/sh
DOMAIN="example.com"
CERT_FOLDER="/etc/nginx/certs"
export DP_Id="123456AbCdEfGh1234567890"
export DP_Key="aBcDEfGhHiJkLmNOpQrStUvWxYz234"
acme.sh --issue -d ${DOMAIN} -d *.${DOMAIN} --dns dns_dp --dnssleep 30 --ocsp --days 60 --keylength 2048
acme.sh --issue -d ${DOMAIN} -d *.${DOMAIN} --dns dns_dp --dnssleep 30 --ocsp --days 60 --keylength ec-256
mkdir ${CERT_FOLDER}/{rsa,ecc}
acme.sh --install-cert -d ${DOMAIN} \
--cert-file ${CERT_FOLDER}/rsa/cert.pem \
--key-file ${CERT_FOLDER}/rsa/key.pem \
--fullchain-file ${CERT_FOLDER}/rsa/fullchain.pem \
--reloadcmd "systemctl restart nginx"
acme.sh --install-cert -d ${DOMAIN} --ecc \
--cert-file ${CERT_FOLDER}/ecc/cert.pem \
--key-file ${CERT_FOLDER}/ecc/key.pem \
--fullchain-file ${CERT_FOLDER}/ecc/fullchain.pem \
--reloadcmd "systemctl restart nginx"
0x04 入坑出坑
1.Cloudflare 的API 不技持 .cf, .ga, .gq, .ml, or .tk 的域名申请证书
"errors": [{
  "code": 1038,
  "message": "You cannot use this API for domains with a .cf, .ga, .gq, .ml, or .tk TLD (top-level domain). To configure the DNS settings for this domain, use the Cloudflare Dashboard."
}],
- 解决办法: 不能自动申请则只能WEB页面上进行申请。
0x04 其它参考
- CertBot Ubuntu: https://certbot.eff.org/instructions?ws=nginx&os=ubuntufocal
- Let’s Encrypt + Nginx + CertBot 泛解析域名的一次实现 : https://blog.csdn.net/weixin_43558927/article/details/123046649
- Let’s Encrypt 配置泛域名通用证书 : https://www.jianshu.com/p/c6f6f277a23d
书写不易,如果您觉得这个专栏还不错的,请给这篇专栏 【点个赞、投个币、收个藏、关个注,转个发】(人间五大情),这将对我的肯定,谢谢支持!(๑′ᴗ‵๑) ❤
本文章来源 我的Blog站点 或 WeiyiGeek 公众账号 以及 我的BiliBili专栏 (技术交流、友链交换请邮我哟),
欢迎各位志同道合的朋友一起学习交流,如文章有误请留下您宝贵的知识建议,通过邮箱【master#weiyigeek.top】联系我哟!
本文内容由网友自发贡献,版权归原作者所有,本站不承担相应法律责任。如您发现有涉嫌抄袭侵权的内容,请联系:hwhale#tublm.com(使用前将#替换为@)