问题所在:
在小程序开发中,官网提供的表单组件不足以满足我们的需求,所以我们需要自定义组件。这里我们以按钮为例
需求:
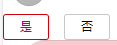
1、默认按钮都不选中,当点击一个按钮选中且按钮变色,选中另一个时,上一个选中的按钮恢复之前的颜色。
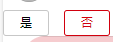
2、默认按钮都不选中,点击第一个按钮有对应的事件且按钮变色,选中另一个时,按钮也变色,且前一个选中的按钮不会变化。
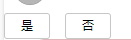
完成效果图:
默认状态
点击以后的效果
一、封装通用组件
1、js
Component({
properties: {
buttonList: {
type: Array,
value: []
},
defaultSelect: {
type: Number,
value: -1,
},
all: {
type: Boolean,
value: false
},
value: String
},
data: {
lengthStyle: "",
recordStyle: [],
selected: -1,
display: false
},
lifetimes: {
},
observers: {
"buttonList, defaultSelect": function (buttons, choose) {
if (buttons.length != 0) {
this._selectStyle();
this._initRecordStyle();
if(!this.data.all){
this.setSelected(choose);
}
}
}
},
methods: {
_selectStyle: function () {
switch (this.data.buttonList[0].text.length) {
case 1:
this.setData({
lengthStyle: "onelength"
});
break;
case 2:
this.setData({
lengthStyle: "twolength"
});
break;
case 3:
this.setData({
lengthStyle: "threelength"
});
break;
default:
this.setData({
lengthStyle: "threelength"
});
}
},
_initRecordStyle: function () {
if (this.data.all) {
this.data.value = []
}
this.data.buttonList.forEach(element => {
this.data.recordStyle.push(".unselected");
if (this.data.all) {
this.data.value.push(false)
}
});
},
_setSelected: function (event) {
this.setSelected(event.currentTarget.dataset.index);
this.triggerEvent('tapor', this.data.buttonList[event.currentTarget.dataset.index], {});
},
setUnselected: function (index) {
if(this.data.value[index]){
this.data.recordStyle[index] = '.unselected'
this.setData({
recordStyle: this.data.recordStyle
})
this.data.value[index] = !this.data.value[index]
}
},
setSelected: function (index) {
if (index < this.data.buttonList.length) {
if (this.data.all) {
if(!this.data.value[index]){
this.data.recordStyle[index] = '.selected'
this.setData({
recordStyle: this.data.recordStyle
})
this.data.value[index] = !this.data.value[index]
}
return
}
if (this.data.selected == index) {
return;
}
if (-1 == index) {
for (let index = 0; index < this.data.recordStyle.length; index++) {
this.data.recordStyle[index] = ''
this.setData({
selected: index,
value: '',
recordStyle: this.data.recordStyle
})
}
return;
}
this.data.recordStyle[this.data.selected] = ".unselected";
this.data.recordStyle[index] = ".selected";
this.setData({
selected: index,
value: this.data.buttonList[index].value,
recordStyle: this.data.recordStyle
});
} else {
throw "设置选中的下标越界"
}
},
getSelected: function () {
return this.data.value
}
}
})
2、json
{
  "component": true,
  "usingComponents": {}
}
3、wxml
<view class="container">
  <block wx:for="{{buttonList}}" wx:for-index="index" wx:for-item="item" wx:key="text">
    <view class="item {{lengthStyle}} {{recordStyle[index]}}" data-index="{{index}}" bindtap="_setSelected">
      <view class="content {{recordStyle[index]}}">{{item.text}}</view>
    </view>
  </block>
</view>
4、wcss
.container {
background-color: #ffffff;
display: inline-flex;
}
.item {
border: 1px solid #C7C7C7;
border-radius: 6rpx;
border-radius: 6rpx;
height: 48rpx;
margin-left: 30rpx;
display: flex;
align-items: center;
justify-content: center;
}
.item:nth-child(1) {
margin-left: 0rpx;
}
.content{
font-size: 24rpx;
}
.onelength{
width: 88rpx;
}
.twolength{
width: 112rpx;
}
.threelength{
width: 136rpx;
}
.selected{
color: #D1000E;
border-color: #D1000E;
}
.unselected{
color: #000000;
border-color: #C7C7C7;
}
二、使用该组件
1、json
需要我们在使用的页面先引入我们刚才创建的组件
{
  "usingComponents": {
    "a-or-b": "/lib/component-form/a-or-b/a-or-b"
  }
}
2、js
Page({
data: {
buttonList: [
{
text: "是",
value: "3"
}, {
text: "否",
value: "5"
}
],
defaultSelect: 0
},
ontapor: function (e) {
console.log(e);
},
})
3、wxml
在页面中使用该组件
<view>
 <a-or-b bind:tapor="ontapor" buttonList="{{buttonList}}"></a-or-b>
</view>
如果想默认就选中第一个按钮,需要加上defaultSelect="{{defaultSelect}}" 属性,在data中定义defaultSelect: 0即可。效果页面最前面已经展示过了,这里就不在展示。
如果两个按钮都想选中,需要加上all="{{true}}"属性。效果图如下: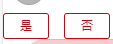
如果有收获!!! 希望老铁们来个三连,点赞、收藏、转发。
创作不易,别忘点个赞,可以让更多的人看到这篇文章,顺便鼓励我写出更好的博客
本文内容由网友自发贡献,版权归原作者所有,本站不承担相应法律责任。如您发现有涉嫌抄袭侵权的内容,请联系:hwhale#tublm.com(使用前将#替换为@)