本笔记主要参考文章:
https://www.yuque.com/xtdrone/manual_cn/basic_config#2qN28
自己整理,从个人笔记中移植过来,如有问题,欢迎讨论
目录
1.安装虚拟机软件VMWare
2.安装ubuntu18.04并换源
3.安装ROS
⒈、添加ROS软件源(TX2使用自带源即可,该步可省去)
2.添加公匙
3.更新
4. 检查cmake的版本,尽量升级到最新版本:
5.安装ros:
结果显示出错cannot download from:
7.打开一个新终端,设置环境
8.安装rosinstall,便利的工具
9、检验
参考教程:
4.没有catkin_ws,需要新建工作空间,之后除去PX4仿真环境启动外,其余ROS相关工程在此工作空间下管理。
5.Gazebo安装
1.安装虚拟机软件VMWare
2.安装ubuntu18.04并换源
https://www.bilibili.com/video/BV1ey4y1j7G3?spm_id_from=333.999.0.0
ubuntu18.04安装完毕后,换阿里云源,注意bionic版本,源代码:
deb http://mirrors.aliyun.com/ubuntu/ bionic main restricted universe multiverse
deb http://mirrors.aliyun.com/ubuntu/ bionic-security main restricted universe multiverse
deb http://mirrors.aliyun.com/ubuntu/ bionic-updates main restricted universe multiverse
deb http://mirrors.aliyun.com/ubuntu/ bionic-proposed main restricted universe multiverse
deb http://mirrors.aliyun.com/ubuntu/ bionic-backports main restricted universe multiverse
deb-src http://mirrors.aliyun.com/ubuntu/ bionic main restricted universe multiverse
deb-src http://mirrors.aliyun.com/ubuntu/ bionic-security main restricted universe multiverse
deb-src http://mirrors.aliyun.com/ubuntu/ bionic-updates main restricted universe multiverse
deb-src http://mirrors.aliyun.com/ubuntu/ bionic-proposed main restricted universe multiverse
deb-src http://mirrors.aliyun.com/ubuntu/ bionic-backports main restricted universe multiverse
代码来源:https://www.cnblogs.com/gentlemanwuyu/p/11621636.html
3.安装ROS
⒈、添加ROS软件源(TX2使用自带源即可,该步可省去)
桌面右键打开终端,paste添加命令
sudo sh -c 'echo "deb http://packages.ros.org/ros/ubuntu $(lsb_release -sc) main" > /etc/apt/sources.list.d/ros-latest.list'
显示结果:

2.添加公匙
sudo apt-key adv --keyserver 'hkp://keyserver.ubuntu.com:80' --recv-key C1CF6E31E6BADE8868B172B4F42ED6FBAB17C654
显示结果:

3.更新
sudo apt update
显示结果下方局部:

4. 检查cmake的版本,尽量升级到最新版本:
检查cmake版本:cmake -version
安装cmake:sudo apt install cmake,版本比较老3.10版本
新版本安装方法:https://blog.csdn.net/RNG_uzi_/article/details/107016899
cmake官网下载安装包:https://cmake.org/download/
下载后直接打开,提取解压到Home
5.安装ros:
sudo apt install ros-melodic-desktop-full
结果显示:

6.初始化 rosdep
sudo rosdep init
rosdep update
结果显示:

解决方法:
sudo apt install rospack-tools
解决完执行:
sudo rosdep init
结果显示出错cannot download from:

解决方法:https://blog.csdn.net/qq_44847636/article/details/115610906
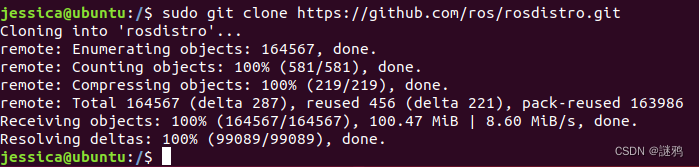
1.将 rosdistro下载到本地
sudo git clone https://github.com/ros/rosdistro.git
如果失败了尝试:git clone rosdistro: https://github.com/ros/rosdistro.git
成功则显示:
2.进入到 sources.list.d 文件夹,修改 gedit 20-default.list
注意:XXXX为你的用户名,我叫jessica


把rosdistro拖到Home下面,我的用户名为jessica
# cd /home/XXXX/rosdistro/rosdep/sources.list.d/
cd /home/jessica/rosdistro/rosdep/sources.list.d/
sudo gedit 20-default.list

将里面所有的 raw.githubusercontent.com地址,替换成本机 rosdistro的地址。
修改前的:
# os-specific listings first
yaml https://raw.githubusercontent.com/ros/rosdistro/master/rosdep/osx-homebrew.yaml osx
# generic
yaml https://raw.githubusercontent.com/ros/rosdistro/master/rosdep/base.yaml
yaml https://raw.githubusercontent.com/ros/rosdistro/master/rosdep/python.yaml
yaml https://raw.githubusercontent.com/ros/rosdistro/master/rosdep/ruby.yaml
gbpdistro https://raw.githubusercontent.com/ros/rosdistro/master/releases/fuerte.yaml fuerte

# newer distributions (Groovy, Hydro, ...) must not be listed anymore, they are being fetched from the rosdistro index.yaml instead
修改后:
注意:*XXXX为你的用户名
# os-specific listings first
yaml file:///home/XXXX/rosdistro/rosdep/osx-homebrew.yaml osx

# generic
yaml file:///home/XXXX/rosdistro/rosdep/base.yaml
yaml file:///home/XXXX/rosdistro/rosdep/python.yaml
yaml file:///home/XXXX/rosdistro/rosdep/ruby.yaml
gbpdistro file:///home/XXXX/rosdistro/releases/fuerte.yaml fuerte

# newer distributions (Groovy, Hydro, ...) must not be listed anymore, they are being fetched from the rosdistro index.yaml instead
我的显示:点击save,叉掉

3.进入到 rosdep2 文件夹,修改 gbpdistro_support.py
cd /usr/lib/python2.7/dist-packages/rosdep2/
sudo gedit gbpdistro_support.py

替换成自己的地址,修改后如下
***注意:*XXXX为你的用户名
FUERTE_GBPDISTRO_URL = 'file:///home/XXXX/rosdistro/releases/fuerte.yaml'
4.进入到 rosdep2 文件夹,修改 rep3.py
cd /usr/lib/python2.7/dist-packages/rosdep2/
sudo gedit rep3.py
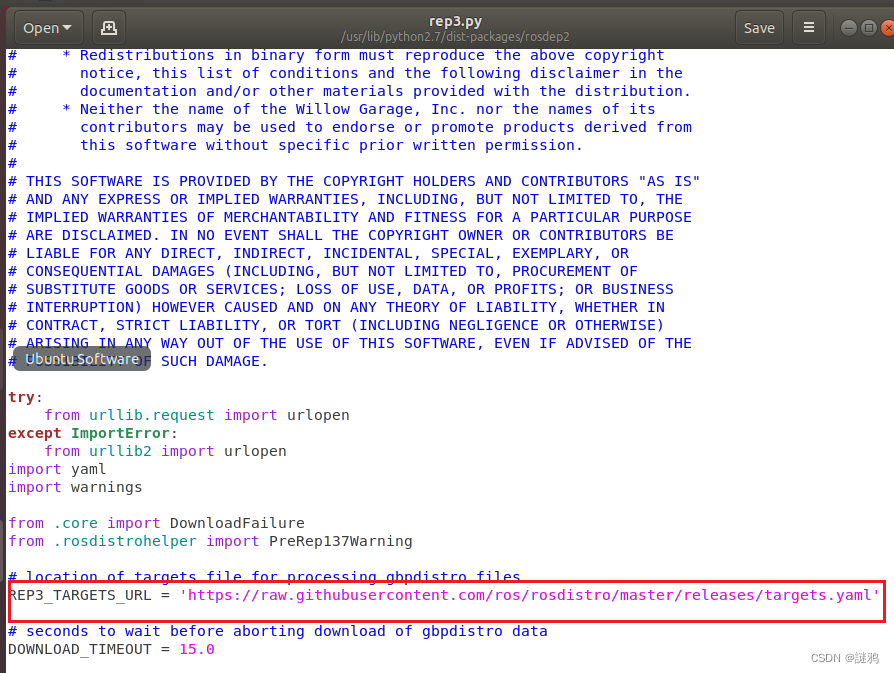
替换成自己的地址,修改后如下
***注意:*XXXX为你的用户名
REP3_TARGETS_URL = 'file:///home/XXXX/rosdistro/releases/targets.yaml'
改完后我的显示:

5.进入到 rosdistro 文件夹,修改 init.py
cd /usr/lib/python2.7/dist-packages/rosdistro/
sudo gedit __init__.py
 替换成自己的地址,修改后如下 ***注意:*XXXX为你的用户名
DEFAULT_INDEX_URL = 'file:///home/XXXX/rosdistro/index-v4.yaml'
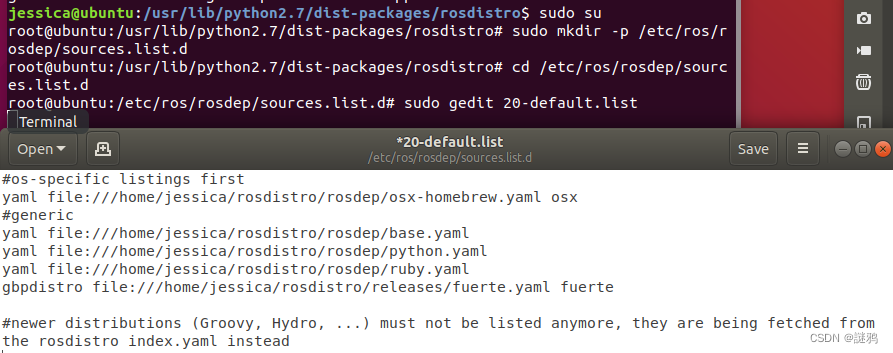
 6.切换到root用户
sudo su
新建 sources.list.d文件夹
sudo mkdir -p /etc/ros/rosdep/sources.list.d
进入到 sources.list.d文件夹,修改 20-default.list
cd /etc/ros/rosdep/sources.list.d
sudo gedit 20-default.list
将以下的内容复制进 20-default.list 中
#os-specific listings first
yaml file:///home/XXXX/rosdistro/rosdep/osx-homebrew.yaml osx
#generic
yaml file:///home/XXXX/rosdistro/rosdep/base.yaml
yaml file:///home/XXXX/rosdistro/rosdep/python.yaml
yaml file:///home/XXXX/rosdistro/rosdep/ruby.yaml
gbpdistro file:///home/XXXX/rosdistro/releases/fuerte.yaml fuerte

#newer distributions (Groovy, Hydro, ...) must not be listed anymore, they are being fetched from the rosdistro index.yaml instead
 7.最后打开新终端执行
rosdep update
如果出现如下提示则表示成功!XXXX为你的用户名
reading in sources list data from /etc/ros/rosdep/sources.list.d
Hit file:///home/XXXX/rosdistro/rosdep/osx-homebrew.yaml
Hit file:///home/XXXX/rosdistro/rosdep/base.yaml
Hit file:///home/XXXX/rosdistro/rosdep/python.yaml
Hit file:///home/XXXX/rosdistro/rosdep/ruby.yaml
Hit file:///home/XXXX/rosdistro/releases/fuerte.yaml
Query rosdistro index file:///home/XXXX/rosdistro/index-v4.yaml
Skip end-of-life distro "ardent"
Add distro "bouncy"
Add distro "crystal"
Add distro "dashing"
Add distro "eloquent"
Skip end-of-life distro "groovy"
Skip end-of-life distro "hydro"
Skip end-of-life distro "indigo"
Skip end-of-life distro "jade"
Add distro "kinetic"
Skip end-of-life distro "lunar"
Add distro "melodic"
updated cache in /home/XXXX/.ros/rosdep/sources.cache
7.打开一个新终端,设置环境
echo "source /opt/ros/melodic/setup.bash" >> ~/.bashrc
source ~/.bashrc
结果显示:

8.安装rosinstall,便利的工具
sudo apt-get install python-rosinstall python-rosinstall-generator python-wstool build-essential
使用下面命令安装ROS插件(包括3D包围框)
sudo apt install ros-melodic-jsk-rviz-plugins
结果显示:滚动,输入y,滚动,等加载,一般不会出错
9、检验
打开终端,输入roscore命令,可以看到ROS已经成功在ubuntu上运行起来。
roscore
结果显示:

参考教程:
Ubuntu18.04 melodic 安装与下载ROS(超详细教程) - 古月居
https://blog.csdn.net/weixin_50508111/article/details/119957272
https://blog.csdn.net/qq_44847636/article/details/115610906
4.没有catkin_ws,需要新建工作空间,之后除去PX4仿真环境启动外,其余ROS相关工程在此工作空间下管理。
mkdir -p ~/catkin_ws/src
mkdir -p ~/catkin_ws/scripts
cd catkin_ws/src && catkin_init_workspace # 使用catkin-tools话,则为cd catkin_ws && catkin init
cd .. && catkin_make # 使用catkin-tools话,则为catkin build
5.Gazebo安装
1.卸载之前的gazebo
sudo apt-get remove gazebo*
sudo apt-get remove libgazebo*
sudo apt-get remove ros-melodic-gazebo* #针对ubuntu18.04+melodic
2.选择step by step安装方法
打开gazebo官网,右上角有版本号,前面几步用最新版本的方法,后面几步出现gazebo+数字的需要右上角选gazebo9版本逐步安装。官网讲的很详细:
http://gazebosim.org/tutorials?tut=install_ubuntu&cat=install
3.验证gazebo安装状态, 出错
 需要输入:
需要输入:
sudo apt upgrade
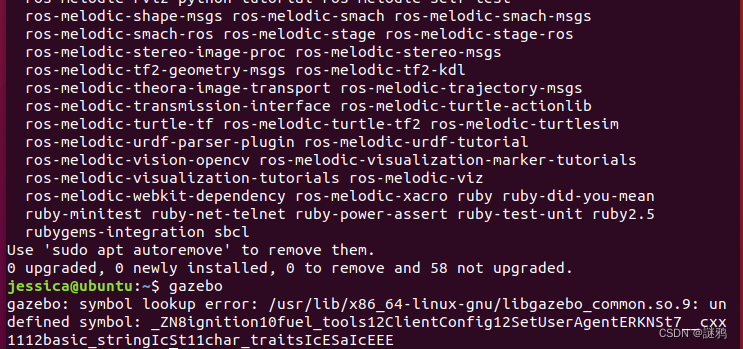
重新gazebo::
gazebo
又特么报错:

Vmware下虚拟机下打开gazebo报错,是虚拟机的bug,可以继续这样做来解决:
解决方法:加入环境变量
export SVGA_VGPU10=0
加入到用户的环境变量,这样每次启动就可以自动运行此码
echo "export SVGA_VGPU10=0" >> ~/.bashrc
参考文献:https://blog.csdn.net/weixin_43059285/article/details/108012524
重新运行gazebo:
gazebo
安装ROS的Gazebo插件,对于melodic
sudo apt install ros-melodic-gazebo-* #melodic
编译成功后执行如下两条指令,判断gazebo_ros是否安装成功
roscore
rosrun gazebo_ros gazebo
Gazebo有很多开源的模型文件,我们将一些需要的模型文件上传到附件中,供大家下载:
--> 请点击models.zip(632.9 MB)
https://www.yuque.com/xtdrone/manual_cn/basic_config#uFGnh
将该附件解压缩后放在~/.gazebo中,此时在~/.gazebo/models/路径下可以看到很多模型。如果不做这一步,之后运行Gazebo仿真,可能会缺模型,这时会自动下载,Gazebo模型服务器在国外,自动下载会比较久。
本文内容由网友自发贡献,版权归原作者所有,本站不承担相应法律责任。如您发现有涉嫌抄袭侵权的内容,请联系:hwhale#tublm.com(使用前将#替换为@)