golang exec 执行 shell 如何同步输出/得到执行结果

2023-05-16

背景

项目中需要执行shell命令,虽然exec包提供了CombinedOutput()方法,在shell运行结束会返回shell执行的输出,但是用户在发起一次任务时,可能在不停的刷新log,想达到同步查看log的目的,但是CombinedOutput()方法只能在命令完全执行结束才返回整个shell的输出,所以肯定达不到效果,所以,需要寻找其它方法达到命令一边执行log一边输出的目的。

1. 使用重定向

如果你的shell比较简单,并且log的文件路径也很容易确定,那么直接对shell执行的命令添加重定向最简单不过了,程序参考如下

package main

import (
	"fmt"
	"os/exec"
)

func main() {
	//定义一个每秒1次输出的shell
	cmdStr := `
#!/bin/bash
for var in {1..10}
do
	sleep 1
     echo "Hello, Welcome ${var} times "
done`
	cmd := exec.Command("bash", "-c",
		cmdStr+" >> file.log") //重定向
	err := cmd.Start()
	if err != nil {
		fmt.Println(err)
	}
	err = cmd.Wait()
	if err != nil {
		fmt.Println(err)
	}
}

上面程序定义了一个每秒1次的shell,但是在shell执行前,对shell进行了拼接,使用了重定向,所以我们可以在另外一个 terminal中实时的看到 log 的变化

2. 指定Shell执行时的输出

使用exec.Command创建一个Shell后,就具有了两个变量:

	// Stdout and Stderr specify the process's standard output and error.
	//
	// If either is nil, Run connects the corresponding file descriptor
	// to the null device (os.DevNull).
	//
	// If either is an *os.File, the corresponding output from the process
	// is connected directly to that file.
	//
	// Otherwise, during the execution of the command a separate goroutine
	// reads from the process over a pipe and delivers that data to the
	// corresponding Writer. In this case, Wait does not complete until the
	// goroutine reaches EOF or encounters an error.
	//
	// If Stdout and Stderr are the same writer, and have a type that can
	// be compared with ==, at most one goroutine at a time will call Write.
	Stdout io.Writer
	Stderr io.Writer

这两个变量是用来指定程序的标准输出和标准错误输出的位置,所以我们就利用这两个变量,直接打开文件,然后将打开的文件指针赋值给这两个变量即可将程序的输出直接输出到文件中,也能达到相同的效果,参考程序如下:

package main

import (
	"fmt"
	"os"
	"os/exec"
)

func main() {
	//定义一个每秒1次输出的shell
	cmdStr := `
#!/bin/bash
for var in {1..10}
do
	sleep 1
     echo "Hello, Welcome ${var} times "
done`
	cmd := exec.Command("bash", "-c", cmdStr)
	//打开一个文件
	f, _ := os.OpenFile("file.log", os.O_RDWR|os.O_CREATE|os.O_APPEND, 0666)
	defer f.Close()
	//指定输出位置
	cmd.Stderr = f
	cmd.Stdout = f
	err := cmd.Start()
	if err != nil {
		fmt.Println(err)
	}
	err = cmd.Wait()
	if err != nil {
		fmt.Println(err)
	}
}

3. 从shell执行结果的管道中获取输出

和第二种方法类似,exec.Shell不仅提供了StdoutStdin这两个变量,还有下面两个方法

// StdoutPipe returns a pipe that will be connected to the command's
// standard output when the command starts.
//
// Wait will close the pipe after seeing the command exit, so most callers
// need not close the pipe themselves; however, an implication is that
// it is incorrect to call Wait before all reads from the pipe have completed.
// For the same reason, it is incorrect to call Run when using StdoutPipe.
// See the example for idiomatic usage.
func (c *Cmd) StdoutPipe() (io.ReadCloser, error) {
	...
}

// StderrPipe returns a pipe that will be connected to the command's
// standard error when the command starts.
//
// Wait will close the pipe after seeing the command exit, so most callers
// need not close the pipe themselves; however, an implication is that
// it is incorrect to call Wait before all reads from the pipe have completed.
// For the same reason, it is incorrect to use Run when using StderrPipe.
// See the StdoutPipe example for idiomatic usage.
func (c *Cmd) StderrPipe() (io.ReadCloser, error) {
	...
}

上面两个方法会返回命令执行过程中标准输出和标准错误输出的两个管道,我们可以通过这个管道获取命令执行过程中的输出,参考程序如下:

package main

import (
	"fmt"
	"io"
	"os"
	"os/exec"
	"strings"
)

//通过管道同步获取日志的函数
func syncLog(reader io.ReadCloser) {
	f, _ := os.OpenFile("file.log", os.O_RDWR|os.O_CREATE|os.O_APPEND, 0666)
	defer f.Close()
	buf := make([]byte, 1024, 1024)
	for {
		strNum, err := reader.Read(buf)
		if strNum > 0 {
			outputByte := buf[:strNum]
			f.WriteString(string(outputByte))
		}
		if err != nil {
			//读到结尾
			if err == io.EOF || strings.Contains(err.Error(), "file already closed") {
				err = nil
			}
		}
	}
}

func main() {
	//定义一个每秒1次输出的shell
	cmdStr := `
#!/bin/bash
for var in {1..10}
do
	sleep 1
     echo "Hello, Welcome ${var} times "
done`
	cmd := exec.Command("bash", "-c", cmdStr)
	//这里得到标准输出和标准错误输出的两个管道,此处获取了错误处理
	cmdStdoutPipe, _ := cmd.StdoutPipe()
	cmdStderrPipe, _ := cmd.StderrPipe()
	err := cmd.Start()
	if err != nil {
		fmt.Println(err)
	}
	go syncLog(cmdStdoutPipe)
	go syncLog(cmdStderrPipe)
	err = cmd.Wait()
	if err != nil {
		fmt.Println(err)
	}
}

扩展 - 解决log格式乱的问题

上面第三种方式,我们直接是通过打开文件,然后将读取到的程序输出写入文件,但是实际上可能别人又已经封装好了一个logger,让你往logger里面写,比如,我这里就使用log包提供的log然后将程序的执行结果写入,但是因为使用了log包,所以写入的格式和log本身的格式造成格式会有部分的错乱,参考我的解决办法,解释都在注释里,如下:

package main

import (
	"fmt"
	"io"
	"log"
	"os"
	"os/exec"
	"strings"
)

//通过管道同步获取日志的函数
func syncLog(logger *log.Logger, reader io.ReadCloser) {
	//因为logger的print方法会自动添加一个换行,所以我们需要一个cache暂存不满一行的log
	cache := ""
	buf := make([]byte, 1024, 1024)
	for {
		strNum, err := reader.Read(buf)
		if strNum > 0 {
			outputByte := buf[:strNum]
			//这里的切分是为了将整行的log提取出来,然后将不满整行和下次一同打印
			outputSlice := strings.Split(string(outputByte), "\n")
			logText := strings.Join(outputSlice[:len(outputSlice)-1], "\n")
			logger.Printf("%s%s", cache, logText)
			cache = outputSlice[len(outputSlice)-1]
		}
		if err != nil {
			if err == io.EOF || strings.Contains(err.Error(), "file already closed") {
				err = nil
			}
		}
	}
}

func main() {
	//定义一个每秒1次输出的shell
	cmdStr := `
#!/bin/bash
for var in {1..10}
do
	sleep 1
     echo "Hello, Welcome ${var} times "
done`
	cmd := exec.Command("bash", "-c", cmdStr)
	//这里得到标准输出和标准错误输出的两个管道,此处获取了错误处理
	cmdStdoutPipe, _ := cmd.StdoutPipe()
	cmdStderrPipe, _ := cmd.StderrPipe()
	err := cmd.Start()
	if err != nil {
		fmt.Println(err)
	}
	//打开一个文件,用作log封装输出
	f, _ := os.OpenFile("file.log", os.O_RDWR|os.O_CREATE|os.O_APPEND, 0666)
	defer f.Close()
	//创建封装的log,第三个参数设置log输出的格式
	logger := log.New(f, "", log.LstdFlags)
	logger.Print("start print log:")
	oldFlags := logger.Flags()
	//为了保证shell的输出和标准的log格式不冲突,并且为了整齐,关闭logger自身的格式
	logger.SetFlags(0)
	go syncLog(logger, cmdStdoutPipe)
	go syncLog(logger, cmdStderrPipe)
	err = cmd.Wait()
	//执行完后再打开log输出的格式
	logger.SetFlags(oldFlags)
	logger.Print("log print done")
	if err != nil {
		fmt.Println(err)
	}
}

程序执行结果如下:
在这里插入图片描述
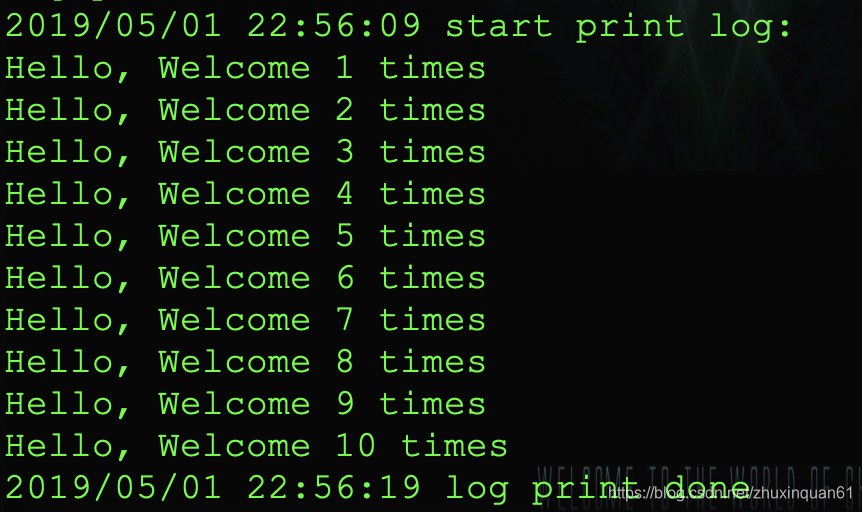
可以看到,shell的执行过程中的log是没有日志的前缀的,这样也保证了log的整齐:)

本文内容由网友自发贡献,版权归原作者所有,本站不承担相应法律责任。如您发现有涉嫌抄袭侵权的内容,请联系:hwhale#tublm.com(使用前将#替换为@)

golang exec 执行 shell 如何同步输出/得到执行结果 的相关文章

随机推荐

  • gnocchi 4.2.0 简介 配置 实际使用(全网首测)

    一 简介 gnocchi 主要用来提供资源索引和存储时序计量数据 xff0c 其架构如下图所示 xff1a 从图可以看出Gnocchi的服务主要包含两大服务 xff0c API和Metricd服务 同时可以看到有三个存储 xff0c 传入度
  • odoo13 win10 安装 源码 设置 开发环境

    一 环境准备 1 python3 Odoo13 requires Python gt 61 3 6 to run 上python官网下载安装文件https www python org ftp python 3 6 8 python 3 6
  • 远程桌面RDP C#使用Microsoft RDP Client Control 演示

    系统环境 xff1a window10 visual studio 2019 net framework 4 0 Microsoft RDP Client Control redistributable version 7 步骤 xff1a
  • kolla-ansible 安装 部署 openstack 开发 调试 环境

    一 原理 根据kolla ansible的资料 xff0c 其部署openstack开发环境的原理是 xff0c 先在本地部署all in one的openstack可执行环境 xff0c 在其基础上将需开发的项目源码clone到本地机器上
  • openstack - horizon - 14.1.0 安装 部署 源码 开发 测试 环境 centos7

    一 系统环境 CentOS Linux release 7 8 2003 Core Python 2 7 5 pip 20 2 from usr lib python2 7 site packages pip python 2 7 Pyth
  • 以传统程序员看Vue2.X开发-极简速成

    一 开发环境搭建 1 安装Node js 下载地址 xff1a https nodejs org zh cn download 按提示安装 xff0c 根据系统环境不同 xff0c 可能需要安装C 43 43 Build和Python 验证
  • 浅析软件架构

    一 软件架构的定义 用简单的定义来说 xff0c 架构就是对系统中的实体以及实体之间的关系所进行的抽象描述 在由人类所构建的系统中 xff0c 架构可以表述为一系列的决策 纯软件系统的架构可以理解为是对现实世界或期望中的运行模式或模型的抽象
  • 解决 GitHub 下载缓慢问题

    为了更加愉快地使用 全球最大同性交友网站 上的优质资源 xff0c 我们来做一些简单的本机上的调整 通过查看下载链接 xff0c 能够发现最终被指向到 Amazon 的服务器 xff08 http github cloud s3 amazo
  • IdentityServer4 (IDS4) 快速入门

    一 系统环境 win10 C Users zhoujy gt dotnet version 5 0 102 IdentityServer4 4 0 0 Microsoft Visual Studio Community 2019 版本 16
  • IdentityServer4 (IDS4) UI界面使用

    在本快速入门中 xff0c 将对通过OpenID Connect协议进行的交互式用户身份验证的支持添加到上一章中构建的IdentityServer中 实现后 xff0c 我们将创建一个将使用IdentityServer进行身份验证的MVC应
  • ML.NET 奇异谱分析(SSA Singular spectrum analysis)预测实践

    一 奇异谱分析 Singular Spectrum Analysis SSA 简介 奇异谱分析 Singular Spectrum Analysis SSA 是一种处理非线性时间序列数据的方法 xff0c 通过对所要研究的时间序列的轨迹矩阵
  • ASP .Net Core内置 Identity 简介 使用

    一 简介 1 概况 ASP NET Core Identity是一个成员身份系统 xff0c 可将用户注册和登录功能添加到 ASP NET Core Web UI 成员身份系统处理身份验证和授权问题 身份验证涉及你的身份 授权涉及允许你进行
  • sql 2008 安装失败 mof语法错误 处理

    这几天比较忧闷 xff0c 在一台比较老的win2003机器上安装sql2008一直出 MOF语法错误 安装失败 xff0c 浪费了我几天的时间才搞定 现把经历写出来以帮他人可以少走歪路 这台机器是一个平时当开发平台的机器 xff0c AM
  • 十年老撕鸡分享,五分钟搭建个人轻论坛

    点击 关注 爪哇笔记 给公众号标星置顶 更多精彩 第一时间直达 前言 09 年开始接触论坛 xff0c 那会微信还没有诞生 xff0c 也没有什么移动互联网 xff0c 大家还都在用功能机玩着 2G 的文字游戏 xff01 那会玩论坛的还比
  • sql server之在存储过程中利用OpenJson将Json字符串转化为表格

    在Sql server2016的版本后 xff0c 数据库增加了对Json格式的支持 xff0c 详细信息可以参考微软官方文档链接 应用背景 在线订餐系统中 xff0c 购物车的内容存储在浏览器缓存中 所以数据库关于订单的设计是订单表 xf
  • 生活大爆炸版 石头剪刀布

    如果大家认为写的不错 xff0c 请点赞关注收藏 xff01 题目描述 石头剪刀布是常见的猜拳游戏 xff1a 石头胜剪刀 xff0c 剪刀胜布 xff0c 布胜石头 如果两个人出拳一 样 xff0c 则不分胜负 在 生活大爆炸 第二季第8
  • debian10安装docker

    使用root登录 将已安装的软件包更新到最新版本 xff1a apt update apt upgrade 安装通过 HTTPS 添加新存储库所需的依赖项 xff1a apt install apt transport https ca c
  • 黑盒(功能)测试以及测试用例设计

    概念 xff1a 黑盒测试是把测试对象看做一个黑盒子 xff0c 利用黑盒测试法进行动态测试时 xff0c 需要测试软件产品已经实现的功能是否符合功能设计要求 xff0c 不需测试软件产品的内部结构和处理过程 黑盒测试注重于测试软件的功能性
  • 2018.09.27 网络协议(tarjan)

    描述 一些学校连接在一个计算机网络上 学校之间存在软件支援协议 每个学校都有它应支援的学校名单 xff08 学校 a 支援学校 b xff0c 并不表示学校 b 一定支援学校 a xff09 当某校获得一个新软件时 xff0c 无论是直接得
  • golang exec 执行 shell 如何同步输出/得到执行结果

    背景 项目中需要执行shell命令 xff0c 虽然exec包提供了CombinedOutput 方法 xff0c 在shell运行结束会返回shell执行的输出 xff0c 但是用户在发起一次任务时 xff0c 可能在不停的刷新log x