MyBatis学习结构

1. MyBatis框架简介
-
MyBatis是一款优秀的持久层框架
-
它支持定制化SQL、存储过程以及高级映射。
-
MyBatis避免了几乎所有的JDBC代码和手动设置参数以及获取结果集。
-
MyBatis可以使用简单的XML或注解来配置和映射原生类型、接口和Java的 POJO(Plain Old JavaObjects,普通老式Java对象)为数据库中的记录。
-
MyBatis 本是apache的一个开源项目iBatis,2010年这个项目由apache software foundation迁移到了google code,并且改名为MyBatis。
-
2013年11月迁移到Github。
-
MyBatis是一个开源、轻量级的数据持久化框架,它是JdbcTemplate和Hibernate的替代方案。
1.1 Mybatis配置依赖
MyBatis不是Spring框架提供可以独立于Spring容器,MyBatis也可以结合Spring容器一起使用,导入依赖:
<!-- MyBatis -->
<dependency>
    <groupId>org.mybatis</groupId>
    <artifactId>mybatis</artifactId>
    <version>3.5.10</version>
</dependency>
<!-- MyBatis-Spring -->
<dependency>
    <groupId>org.mybatis</groupId>
    <artifactId>mybatis-spring</artifactId>
    <version>2.0.7</version>
</dependency>
数据持久化: 持久化就是将程序的数据在持久状态和瞬时状态转化的过程 内存:断电即失 数据库(jdbc),io文件持久化
1.2 为什么使用MyBatis?
最重要的是:使用的人较多
2. 第一独立的MyBatis程序(单个mybatis使用不涉及spring)
以往自己做的MyBatis独立程序:
2.1 新建一个maven项目,并导入依赖
<dependency>
    <groupId>org.mybatis</groupId>
    <artifactId>mybatis</artifactId>
    <version>3.5.9</version>
    </dependency>
    <dependency>
    <groupId>mysql</groupId>
    <artifactId>mysql-connector-java</artifactId>
    <version>8.0.25</version>
    </dependency>
    <dependency>
    <groupId>junit</groupId>
    <artifactId>junit</artifactId>
    <version>4.13.2</version>
</dependency>
2.2下resources目录下编写MyBatis的核心配置文件
<?xml version="1.0" encoding="UTF-8" ?>
<!DOCTYPE configuration
PUBLIC "-//mybatis.org//DTD Config 3.0//EN"
"http://mybatis.org/dtd/mybatis-3-config.dtd">
<!--configuration核心配置文件-->
<configuration>
<!--environments配置环境组-->
<!--default默认环境-->
<environments default="mysql">
<!--environment单个环境-->
<environment id="mysql">
<!--transactionManager配置事务管理器-->
<transactionManager type="JDBC"/>
<!--配置连接池-->
<dataSource type="POOLED">
<property name="driver" value="com.mysql.jdbc.Driver"/>
<property name="url" value="jdbc:mysql://localhost:3306/test?serverTimezone=UTC&useSSL=true&useUnicode=true"/>
<property name="username" value="root"/>
<property name="password" value="123456"/>
</dataSource>
</environment>
</environments>
<!--每一个Mapper.xml需要在Mybatis核心配置文件中注册-->
<mappers>
<mapper resource="com/mybatis/example/dao/StudentMapper.xml"/>
</mappers>
</configuration>
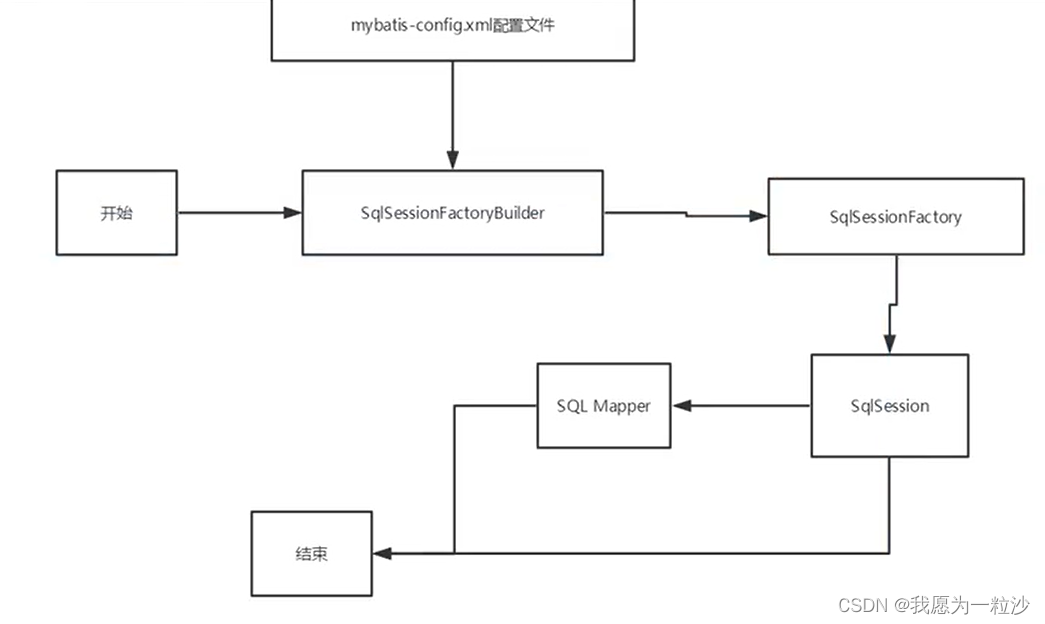
2.3 编写MyBatis工具类
//sqlSessionFactory--->sqlSession
public class MybatisUtil {
    private static SqlSessionFactory sqlSessionFactory;
    static {
        try{
            //使用mybatis第一步,获取sqlSessionFactroy对象
            String resource="/mybatis-config.xml";
            InputStream inputStream= Resources.getResourceAsStream(resource);
            sqlSessionFactory=new SqlSessionFactoryBuilder().build(inputStream);
        } catch (IOException e) {
            e.printStackTrace();
        }
    }
    /*
    既然有了SqlSessionFactory,顾名思义,我们就可以获取SqlSession的实例了,
    SqlSession完全包含了面向数据库执行SQL命令所需的所有方法。
     */
    public static SqlSession getSqlSession(){
        SqlSession sqlSession=sqlSessionFactory.openSession();
        return  sqlSession;
    }
}
2.4 编写实体类
/**
* 实体类Student,属性id,name,password,age
*/
public class Student {
private long id;
private String name;
private String password;
private String age;
public long getId() {
return id;
}
public void setId(long id) {
this.id = id;
}
public String getName() {
return name;
}
public void setName(String name) {
this.name = name;
}
public String getPassword() {
return password;
}
public void setPassword(String password) {
this.password = password;
}
public String getAge() {
return age;
}
public void setAge(String age) {
this.age = age;
}
@Override
public String toString() {
return "Student{" +
"id=" + id +
", name='" + name + '\'' +
", password='" + password + '\'' +
", age='" + age + '\'' +
'}';
}
}
2.5 编写Mapper接口和配置Mapper.xml
/dao接口在mybatis中是mapper接口
public interface StudentDao{
    //查询全部用户
    List<Student> getStudentList();
}
<?xml version="1.0" encoding="UTF-8" ?>
<!DOCTYPE mapper PUBLIC "-//mybatis.org//DTD Mapper 3.0//EN" "http://mybatis.org/dtd/mybatis-3-mapper.dtd" >
<!--namespace绑定一个对应的Dao/Mapper接口-->
<mapper namespace="com.mybatis.example.dao.StudentDao">
<!--select查询语句-->
<select id="getStudentList" resultType="com.mybatis.example.pojo.Student">
select * from student
</select>
</mapper>
2.6 使用原生或者工具类来做测试
//没有使用工具类
public class StudentDaoTest {
    @Test
    public void getStu() throws IOException {
        //1.读取配置文件
        InputStream in = Resources.class.getResourceAsStream("/mybatis.xml");
        //2.创建SqlSessionFactory工厂
        SqlSessionFactoryBuilder builder = new SqlSessionFactoryBuilder();
        SqlSessionFactory factory = builder.build(in);
        //3.使用工厂生产SqlSession对象
        SqlSession session = factory.openSession();
        //4.使用SqlSession创建Dao接口的代理对象
        StudentDao studentDao = session.getMapper(StudentDao.class);
        //5.使用代理对象执行方法
        List<Student> users = studentDao.getStudentList();
        for (Student user:users) {
            System.out.println(user);
        }
        //6.释放资源
        session.close();
        in.close();
    }
}
//使用该工具类
public class Test {
    @org.junit.Test
    public void test(){
        //第一步,获得SqlSession对象
        SqlSession sqlSession= MybatisUtil.getSqlSession();
        //第二步,执行sql语句
        StudentDao  studentDao = sqlSession.getMapper(StudentDao.class);
        List<Student> users = studentDao.getStudentList();
        for (Student user:users) {
            System.out.println(user);
        }
        //释放资源
        sqlSession.close();
    }
}
SqlSession ==> SqlSessionFactory.openSession() ==> SqlSessionFactoryBuilder.build(InputStream)
如果我们的配置文件Mapper.xml放在了编写java程序文件下,那么我们需要注意我们的配置文件的一个资源加载问题,(maven约定大于配置,因此我们可能遇到写的配置文件无法被导入或者生效问题,解决方案如下):
<build>
    <resources>
        <resource>
            <directory>src/main/resources</directory>
            <includes>
                <include>**/*.properties</include>
                <include>**/*.xml</include>
            </includes>
            <filtering>true</filtering>
        </resource>
        <resource>
            <directory>src/main/java</directory>
            <includes>
                <include>**/*.properties</include>
                <include>**/*.xml</include>
            </includes>
            <filtering>true</filtering>
        </resource>
    </resources>
</build>
问题总结:
-
配置文件没有注册
-
绑定接口错误
-
方法名不对
-
返回类型不对
-
Maven导出资源问题
格外CRUD操作
1.namespace
namespace中的包名要和接口中的包名一致!
基本步骤:
1、编写接口
public interface StudentMapper{
Student getStudentById(int id);
}
2、编写对应mapper中的sql
<select id="getStudentById" parameterType="int" resultType="com.mybatis.example.pojo.Student">
   select * from student where id=#{id}
</select>
3、测试
@org.junit.Test
public void test1(){
   SqlSession sqlSession=null;
   try{
       sqlSession=MybatisUtil.getSqlSession();
       StudentMapper studentDao=sqlSession.getMapper(StudentMapper.class);
       Student student=studentDao.getStudentById(1);
       System.out.println(student);

   }catch (Exception e){
       e.printStackTrace();
   }finally {
       sqlSession.close();
   }
}
2.select
选择,查询语句;
3.insert
//编写接口
public interface StudentMapper{
   int addStudent(Student student);
}
//编写对应mapper中的sql
<insert id="addStudent" parameterType="com.mybatis.example.pojo.Student">
       insert into student(name,password,age) value(#{name},#{password},#{age})
   </insert>
//测试
 @org.junit.Test
   public void add(){
       Student student=new Student();
       student.setName("胡进");
       student.setPassword("787878");
       student.setAge("18");
       SqlSession sqlSession=null;
       try{
           sqlSession=MybatisUtil.getSqlSession();
           StudentMapper studentDao=sqlSession.getMapper(StudentMapper.class);
           int i=studentDao.addStudent(student);
           System.out.println(i);
           //提交事务
           sqlSession.commit();
       }catch (Exception e){
           e.printStackTrace();
       }finally {
           sqlSession.close();
       }
   }
4.update
//编写接口
public interface StudentMapper{
    int updateStudent(Student student);
}
//编写接口对应mapper的sql
<update id="updateStudent" parameterType="com.mybatis.example.pojo.Student">
       update student set name=#{name},password=#{password},age=#{age} where id=#{id}
   </update>
//测试
@org.junit.Test
   public void update(){
       Student student1=new Student();
       student1.setId(1);
       student1.setName("小李");
       student1.setAge("12");
       student1.setPassword("123982");
       SqlSession sqlSession=null;
       try{
           sqlSession=MybatisUtil.getSqlSession();
           StudentMapper studentDao=sqlSession.getMapper(StudentMapper.class);
           int i=studentDao.updateStudent(student1);
           //提交事务
           sqlSession.commit();
           System.out.println(i);
       }catch (Exception e){
           e.printStackTrace();
       }finally {
           sqlSession.close();
       }
   }
5.delete
//编写接口
public interface StudentMapper{
   int deleteStudent(int id);
}
//编写接口mapper对应的sql
<delete id="deleteStudent" parameterType="int">
       delete from student where id=#{id}
   </delete>
//测试
@org.junit.Test
   public void del(){
       SqlSession sqlSession=null;
       try{
           sqlSession=MybatisUtil.getSqlSession();
           StudentMapper studentDao=sqlSession.getMapper(StudentMapper.class);
           int i=studentDao.deleteStudent(1);
           System.out.println(i);
           sqlSession.commit();
       }catch (Exception e){
           e.printStackTrace();
       }finally {
           sqlSession.close();
       }
   }
注意点:
6.万能的Map
假设我们实体类,数据库中的表,字段或者参数过多,我们应当考虑使用Map!
//map的使用
//第一步,编写接口
public interface StudentMapper{
   int adstu();
}
//第二步,编写mapper对应的sql
<insert id="adStu" parameterType="map">
       insert into student(name,password,age) values (#{stName},#{stPassword},#{stAge})
   </insert>
//测试
@org.junit.Test
   public void adds(){
       SqlSession sqlSession=null;
       try{
           sqlSession=MybatisUtil.getSqlSession();
           StudentMapper studentDao=sqlSession.getMapper(StudentMapper.class);
           Map<String,Object> map=new HashMap<String, Object>();
           map.put("stName","朝朝");
           map.put("stPassword","7787878");
           map.put("stAge","18");
           int i=studentDao.adStu(map);
           System.out.println(i);
           sqlSession.commit();
       }catch (Exception e){
           e.printStackTrace();
       }finally {
           sqlSession.close();
       }
7.模糊查询
1、java执行的时候传递%
List<Student> students=studentDao.getLikeStudent("%胡%");
2、%在sql拼接中使用
//编写接口
public interface StudentMapper{
   List<Student> getLikeStudent(String value);
}
//编写接口mapper对应接口
<select id="getLikeStudent" resultType="com.mybatis.example.pojo.Student" parameterType="String">
       select * from student where name like "%"#{value}"%"
   </select>
//测试
@org.junit.Test
   public void like(){
       SqlSession sqlSession=null;
       try{
           sqlSession=MybatisUtil.getSqlSession();
           StudentDaoImpl studentDao=sqlSession.getMapper(StudentDaoImpl.class);
           List<Student> students=studentDao.getLikeStudent("胡");
           for (Student student:students) {
               System.out.println(student);
           }
       }catch (Exception e){
           e.printStackTrace();
       }finally {
           sqlSession.close();
       }
   }
2.7 MyBatis核心配置文件标签
2.7.1 核心配置文件
configuration(配置)
properties(属性)
settings(设置)
typeAliases(类型别名)
typeHandlers(类型处理器)
objectFactory(对象工厂)
plugins(插件)
environments(环境配置)
environment(环境变量)
transactionManager(事务管理器)
dataSource(数据源)
databaseIdProvider(数据库厂商标识)
mappers(映射器)
2.7.2 环境配置environments
2.7.3 属性(properties)
#编写一个配置文件 db.peoperties
driver=com.mysql.jdbc.Driver
url=jdbc:mysql://localhost:3306/test?serverTimezone=UTC&useSSL=true&useUnicode=true
username=root
password=123456
<?xml version="1.0" encoding="UTF-8" ?>
<!DOCTYPE configuration
        PUBLIC "-//mybatis.org//DTD Config 3.0//EN"
        "http://mybatis.org/dtd/mybatis-3-config.dtd">
<configuration>
    <properties resource="db.properties">
    </properties>
    <environments default="development">
        <environment id="development">
            <transactionManager type="JDBC"/>
            <dataSource type="POOLED">
                <property name="driver" value="${driver}"/>
                <property name="url" value="${url}"/>
                <property name="username" value="${username}"/>
                <property name="password" value="${password}"/>
            </dataSource>
        </environment>
    </environments>
    <mappers>
        <mapper resource="com/mybatis/cn/dao/Mapper.xml"/>
    </mappers>
</configuration>
将部分引入:
#编写一个配置文件 db.peoperties
url=jdbc:mysql://localhost:3306/test?serverTimezone=UTC&useSSL=true&useUnicode=true
username=root
password=123456

<?xml version="1.0" encoding="UTF-8" ?>
<!DOCTYPE configuration
        PUBLIC "-//mybatis.org//DTD Config 3.0//EN"
        "http://mybatis.org/dtd/mybatis-3-config.dtd">
<configuration>
    <properties resource="db.properties">
    	<property name="driver" value="com.mysql.cj.jdbc.Driver"/>
    </properties>
    <environments default="development">
        <environment id="development">
            <transactionManager type="JDBC"/>
            <dataSource type="POOLED">
                <property name="driver" value="${driver}"/>
                <property name="url" value="${url}"/>
                <property name="username" value="${username}"/>
                <property name="password" value="${password}"/>
            </dataSource>
        </environment>
    </environments>
    <mappers>
        <mapper resource="com/mybatis/cn/dao/Mapper.xml"/>
    </mappers>
</configuration>
知识点:
com.mysql.jdbc.Driver与com.mysql.cj.jdbc.Driver的区别
如果外部和内部引用出现相同的字段,则优先选择外部引用。
2.7.4 类型别名(typeAliases)
-
类型别名是为java类型设置一个短的名字
-
存在的意思仅在于用来减少类完全限定名的冗余
1、类别名
//mybatis-config.xml
<typeAliases>
        <typeAlias type="com.mybatis.cn.pojo.Student" alias="student"></typeAlias>
    </typeAliases>
//mapper.xml
<select id="getStudentList" resultType="student"> //student不用写完全限定名
        select * from student
    </select>
2、包别名(mybatis会自动扫描java bean)
//mybatis-config.xml
<typeAliases>
        <package name="com.mybatis.cn.pojo"/>
    </typeAliases>
//mapper.xml
<select id="getStudentList" resultType="Student"> //会在包下自动扫面实体类
        select * from student
    </select>
使用分析:在实体类较少时,使用第一种;实体类较多时,使用第二种。第一种可以自定义别名,第二种不行。
第二种如果非要改,则可以在实体类上增加注解
@Alias("hello")
public class Student {
    //实体类
}
//mapper.xml
 <select id="getStudentList" resultType="hello"> //hello就是注解取的别名
        select * from student
 </select>
2.7.5 设置(setting)


2.7.6 其他配置
typeHandlers(类型处理器)
objectFactory(对象工厂)
plugins(插件)
     1.mybatis-generator-coreo
     2.mybatis-plus
     3.通用mapper
2.7.7 映射器(mappers)
MapperRegistry:注册绑定我们的Mapper文件;
方式一:
<mappers>
    <mapper resource="com/mybatis/cn/dao/Mapper.xml"/>
</mappers>
方式二:使用class绑定文件
<mappers>
    <mapper class="com.mybatis.cn.dao.StudentMapper"/>
</mappers>
注意点:
方式三:使用扫描包进行绑定注入(注意点与方式二一致)
<mappers>
    <package name="com.mybatis.cn.dao"/>
</mappers>
2.7.8 生命周期和作用域

这里面每一个mappper都代表一个业务!
-
不同作用域和生命周期类别是至关重要的,因为错误的使用会导致非常严重的并发问题。
-
SqlSessionFactory一旦创建,就没用了,局部变量
-
SqlSessionFactory 一旦被创建就应该在应用的运行期间一直存在,没有任何理由丢弃它或重新创建另一个实例。
-
SqlSession用完要关闭

2.8 日志文件
2.8.1 日志工厂
日志是数据库排错最好的帮手!
曾经:sout debug
现在:日志工厂
Mybatis 通过使用内置的日志工厂提供日志功能。内置日志工厂将会把日志工作委托给下面的实现之一:
在mybatis中具体是用哪个日志,在设置(setting 核心配置文件)中实现!
<!--默认的标准日志工厂-->
 <settings>
        <setting name="logImpl" value="STDOUT_LOGGING"/>
 </settings>
2.8.2 log4j
<!--外部引入pom.xml-->
<dependency>
            <groupId>log4j</groupId>
            <artifactId>log4j</artifactId>
            <version>1.2.17</version>
        </dependency>
<!--mybatis.config.xml-->
 <settings>
        <setting name="logImpl" value="LOG4J"/>
    </settings>
-
Log4j是Apache的一个开源项目,通过使用Log4j,我们可以控制日志信息输送的目的地是控制台、文件、GUI组件,甚至是套接口服务器、NT的事件记录器、UNIX Syslog守护进程等;
-
我们也可以控制每一条日志的输出格式;
-
通过定义每一条日志信息的级别,我们能够更加细致地控制日志的生成过程。
-
最令人感兴趣的就是,这些可以通过一个配置文件来灵活地进行配置,而不需要修改应用的代码。
建立配置文件:log4j.properties
#将等级为DEBUG的日志信息输出到console和file这两个目的地, console 和file的定义在下面的代码
log4j.rootLogger=DEBUG, console,file
#控制台输出的相关设置
1og4j.appender.console = org.apache.log4j.consoleAppender
log4j.appender.console.Target = System.out
log4j.appender.console.Threshold=DEBUG
log4j.appender.console.layout = org.apache.log4j.PatternLayout
log4j.appender.console.layout.conversionPattern=[%c ]-%m%n
文件每出的相关没置
1og4j.appender.file = org.apache.1og4j.RollingFileAppender
1og4j.appender.file.File=./iog/kuang. log
log4j.appender.file.MaxFilesize=1Bmb
1og4j.appender.file.Threshold=DEBUG
1og4j.appender.file.layout=org.apache.log4j.PatternLayout
1og4j.appender.file.1ayout.conversionPattern=[%p][%d{yy-M-dd}][%c ]Xm%n
#日志输出级别
log4j.logger.org.mybatis=DEBUG
1og4j.logger.java.sq1=DEBUG
1og4j.logger.java.sq1.statement=DEBUG
log4j.logger.java.sq1.ResultSet=DEBUG
1og4j.logger.java.sq1.PreparedStatement=DEBUG
log4j的简单使用:
log4j如同输出一般,简单理解,但还有更多功能:
logger.info("")//普通的输出
logger.debeg("")//debeg的输出
logger.error("")//错误的输出
public void test(){
    logger.info("info:输出");
}
3. MyBatis融于Spring容器开发测试
3.1 配置MyBatis
<!-- mybatis配置文件 -->
<?xml version="1.0" encoding="UTF-8"?>
<!DOCTYPE configuration
        PUBLIC "-//mybatis.org//DTD Config 3.0//EN"
        "http://mybatis.org/dtd/mybatis-3-config.dtd">
<configuration>
    <settings>
        <!-- 启用驼峰命名法和智能转换 -->
        <setting name="mapUnderscoreToCamelCase" value="true"/>
        <setting name="logImpl" value="STDOUT_LOGGING"/>
    </settings>
</configuration>
<!-- mybatis-spring配置文件 -->
<?xml version="1.0" encoding="UTF-8"?>
<beans xmlns="http://www.springframework.org/schema/beans"
xmlns:xsi="http://www.w3.org/2001/XMLSchema-instance"
xsi:schemaLocation="http://www.springframework.org/schema/beans
http://www.springframework.org/schema/beans/spring-beans.xsd">
<!-- 配置数据源-->
<!-- 配置数据源 -->
<bean id="dataSource" class="org.springframework.jdbc.datasource.DriverManagerDataSource">
<!-- 数据库驱动 -->
<property name="driverClassName" value="com.mysql.cj.jdbc.Driver"/>
<!-- 数据库地址 -->
<property name="url" value="jdbc:mysql://localhost:3306/sql_study?useUnicode=true&characterEncoding=utf-8&serverTimezone=GMT%2B8"/>
<!-- 连接数据的账号 -->
<property name="username" value="root"/>
<!-- 连接数据库的密码 -->
<property name="password" value="123456"/>
</bean>
<!-- 配置MyBatis的Sql会话工厂 -->
<bean id="sqlSessionFactory" class="org.mybatis.spring.SqlSessionFactoryBean" autowire="byName">
<!-- 核心配置路径 -->
<property name="configLocation" value="classpath:mybatis-config.xml"/>
<!-- mapper文件路径 -->
<property name="mapperLocations" value="classpath:mapper/*.xml"/>
</bean>
<!-- mybatis扫描-->
<bean class="org.mybatis.spring.mapper.MapperScannerConfigurer">
<!-- mapper接口包路径,包与类的路劲引用.与/-->
<property name="basePackage" value="com.ssm.mga.mapper"/>
</bean>
</beans>
3.2 测试案例
创建一个interface,并添加@Mapper 注解,如:
@Mapper
public interface UserMapper {
    这里就是抽象方法
}
pom.xml文件注解说明(自己理解):
<!--  依赖导入库-->
  <dependencies>
    <!-- 单元测试 -->
    <dependency>
      <groupId>junit</groupId>
      <artifactId>junit</artifactId>
      <version>4.12</version>
      <scope>test</scope>
    </dependency>
      <!-- 下面涉及web容器及webapplicationcontext -->
      <dependency>
      <groupId>org.springframework</groupId>
      <artifactId>spring-web</artifactId>
      <version>5.3.23</version>
    </dependency>
    <dependency>
      <groupId>org.springframework</groupId>
      <artifactId>spring-webmvc</artifactId>
      <version>5.3.23</version>
    </dependency>
    <!--  spring依赖  -->
    <dependency>
      <groupId>org.springframework</groupId>
      <artifactId>spring-core</artifactId>
      <version>5.3.23</version>
    </dependency>
      <!-- spring上下文bean的注入加载 -->
    <dependency>
      <groupId>org.springframework</groupId>
      <artifactId>spring-context</artifactId>
      <version>5.3.23</version>
    </dependency>
      <!-- 数据源配置需要用到 -->
    <dependency>
      <groupId>org.springframework</groupId>
      <artifactId>spring-jdbc</artifactId>
      <version>5.3.23</version>
    </dependency>
      <!-- 测试需要用到 -->
    <dependency>
      <groupId>org.springframework</groupId>
      <artifactId>spring-test</artifactId>
      <version>5.3.23</version>
    </dependency>
    <!-- MyBatis -->
    <dependency>
      <groupId>org.mybatis</groupId>
      <artifactId>mybatis</artifactId>
      <version>3.5.10</version>
    </dependency>
     <!-- mybatis相关配置注入spring容器加载 -->
    <dependency>
      <groupId>org.mybatis</groupId>
      <artifactId>mybatis-spring</artifactId>
      <version>2.0.7</version>
    </dependency>
    <!-- MySQL -->
    <dependency>
      <groupId>mysql</groupId>
      <artifactId>mysql-connector-java</artifactId>
      <version>8.0.18</version>
    </dependency>
    <!--  json-->
    <dependency>
      <groupId>com.alibaba</groupId>
      <artifactId>fastjson</artifactId>
      <version>1.2.83</version>
    </dependency>
    <!-- 日志文件输入 -->
    <dependency>
      <groupId>org.slf4j</groupId>
      <artifactId>slf4j-api</artifactId>
      <version>1.7.36</version>
    </dependency>
    <dependency>
      <groupId>org.slf4j</groupId>
      <artifactId>slf4j-log4j12</artifactId>
      <version>1.7.36</version>
      <scope>compile</scope>
    </dependency>
    <dependency>
      <groupId>ch.qos.logback</groupId>
      <artifactId>logback-core</artifactId>
      <version>1.2.11</version>
    </dependency>
    <dependency>
      <groupId>ch.qos.logback</groupId>
      <artifactId>logback-classic</artifactId>
      <version>1.2.11</version>
    </dependency>
    <!-- 可以解决json格式的乱码 -->
    <dependency>
      <groupId>com.fasterxml.jackson.core</groupId>
      <artifactId>jackson-databind</artifactId>
      <version>2.9.8</version>
    </dependency>
    <!-- 简化实体类的sertter和getter及构造方法 -->
    <dependency>
      <groupId>org.projectlombok</groupId>
      <artifactId>lombok</artifactId>
      <version>1.18.24</version>
    </dependency>
    <!-- 下面两个都会用于jsr303验证等 -->
    <dependency>
      <groupId>javax</groupId>
      <artifactId>javaee-api</artifactId>
      <version>8.0.1</version>
    </dependency>
    <dependency>
      <groupId>org.hibernate</groupId>
      <artifactId>hibernate-validator</artifactId>
      <version>6.1.0.Final</version>
    </dependency>
  </dependencies>
构建实体类:
@Data
@NoArgsConstructor
@AllArgsConstructor
public class Student {
 private int id;
 private String studentName;
 private String password;
 private LocalDate birthday;
 private int classId;
}
创建mapper接口:
@Mapper
public interface IStudentMapper {
 List<Student> students();
}
编写sql语句在xml文件:
<?xml version="1.0" encoding="UTF-8"?>
<!DOCTYPE mapper PUBLIC "-//mybatis.org//DTD Mapper 3.0//EN"
     "http://mybatis.org/dtd/mybatis-3-mapper.dtd">
<mapper namespace="com.ssm.mga.mapper.IStudentMapper">

 <resultMap id="student" type="com.ssm.mga.entity.Student">
     <result property="id" column="id"/>
     <result property="studentName" column="studentName"/>
     <result property="birthday" column="birthday"/>
     <result property="password" column="password"/>
     <result property="birthday" column="birthday"/>
 </resultMap>
 <select id="students" resultMap="student">
     select * from student
 </select>
</mapper>
单元测试:
@WebAppConfiguration
@Slf4j
@RunWith(SpringJUnit4ClassRunner.class)
@ContextConfiguration("classpath:applicationContext.xml")
public class MyTest {
 @Resource
 IStudentMapper studentMapper;
 @Test
 public void test_01(){
     List<Student> students = studentMapper.students();
     for (Student student : students) {
         System.out.println((student.toString()));
     }
 }
}
4. MyBatis的XML文件使用(动态SQL嵌入)
4.1 Mapper.xml文件结构
我们可以在resources/mapper目录下创建xml文件,该文件里就包含了我们所需要的SQL语句。格式如下:
<?xml version="1.0" encoding="UTF-8"?>
<!DOCTYPE mapper PUBLIC "-//mybatis.org//DTD Mapper 3.0//EN"
        "http://mybatis.org/dtd/mybatis-3-mapper.dtd">
<mapper namespace="">

</mapper>
4.2 Mapper.xml的CRUD操作
select标签
查询语句,最常用、最复杂的元素之一,可以自定义参数,返回结果集。
标签属性:
    id                  它对应的是@Mapper接口里的方法名,是唯一不重复
    resultMap           它是映射体的引用,对应的是在本配置文件里的创建的<resultMap>标签的id
    resultType          如果返回的数据类型不是ORM映射集(比如一个整数、一个字符串),就需要设置resultType="返回类型的完整类型",
                        如:resultType="java.lang.Integer"
格式:select * from 表名 left join 表名 on 表.字段=表.字段 where 条件 group by ... having ... orderBy ... limit index,size;
insert标签
插入语句
标签属性:
    id                  它对应的是@Mapper接口里的方法名,是唯一不重复
    keyProperty         该属性的作用是将插入操作的主键值赋给JavaBean的某个属性,通常为主键对应的属性。
    useGeneratedKeys    该属性用于设置是否使用JDBC提供的getGenereatedKeys()方法,
                        获取数据库内部产生的主键并赋值到keyProperty属性设置的请求对象的属性中,例如:数据库自动增长的ID字段,其默认为false
返回值:影响行数
格式:insert into 表 values(字段1,字段2,字段3,...)
update标签
修改语句
标签属性:
    id                  它对应的是@Mapper接口里的方法名,是唯一不重复
返回值:影响行数
update 表 set 字段=值,... where 条件
delete标签
删除语句
标签属性:
    id                  它对应的是@Mapper接口里的方法名,是唯一不重复
返回值:影响行数
delete from 表 where 条件
4.3 解决字段与实体类映射问题
1.可以利用给字段定义别名如:select student_name as name from student where ...
2.使用ResultMap标签:
    配置@Mapper接口与数据库表的ORM映射,用于描述JavaBean的属性与数据库字段的关系
    标签属性
        id                  唯一的标识
        type                对应的JavaBean的全名称
    result 子标签
        通过该标签,可以手动指定JavaBean的属性与数字库字段的映射关系
        <result property="JavaBean的属性" column="数据表的字段"/>
4.4 解决参问题
一个参数时:
通过 #{任何字符串}  来获取参数
注意:如果参数为一个JavaBean对象时,我们应该通过 #{属性} 来获取参数
多个参数时:
通过 #{字符串} 来获取参数,其中”字符串“需要跟@Mapper接口的方法的参数的@Param()注解配置的值一一对应
4.5 动态构建SQL语句
if标签
单条件分支判断语句
<if test="判断条件">
    拼接的SQL语句
</if>
choose-when-otherwise标签
判断语句,相当于Java中的if else if else,多条件分支判断
<choose>
    <when test="判断条件1">
        拼接的SQL语句1
    </when>
    <when test="判断条件2">
        拼接的SQL语句
    </when>
    <otherwise>
        拼接的SQL语句
    </otherwise>
</choose>
当判断条件1成立的时候,则执行“拼接的SQL语句1”,后面不再进行判断。
foreach标签
循环语句,用于in 这个条件语句
and id in
<foreach collection="ids" item="id" open="(" close=")" separator=",">
    #{id}
</foreach>
其中ids就是一个传递进来的数组或者集合
where标签
辅助元素,用于处理SQL条件字段拼接时的问题,如:去掉多余的小逗号,用于select语句
set标签
作用和where类似,区别就是用于update语句中更新字段的拼接问题
bind标签
辅助元素,自定义绑定参数
练习测试CRDU及SQL动态
1.实体类
@Data
@NoArgsConstructor
@AllArgsConstructor
public class Student {
    private Integer id;
    private String studentName;
    private String password;
    private LocalDate birthday;
    private int classId;
}
2.mapper接口
@Mapper
public interface IStudentMapper {

    /**
     * 根据名字和密码获取用户信息
     * @param studentName
     * @param password
     * @return
     */
    Student getStudent(@Param("studentName") String studentName, @Param("password") String password);

    /**
     * student列表查询
     * @return
     */
    List<Student> students();

    /**
     * 添加学生
     * @param student
     * @return
     */
    int insert(Student student);

    /**
     * 修改学生信息
     * @param student
     * @return
     */
    int update(Student student);

    /**
     * 删除学生
     * @param id
     * @return
     */
    int delete(int id);

    /**
     * 使用万能Map接受值
     * 根据学生姓名或者班级名字查询
     * @param studentName
     * @param clazzName
     * @return
     */
    List<Map<String,Object>> ByStuNameAndClazzName(
            @Param("studentName") String studentName,@Param("clazzName") String clazzName);

    /**
     * 传递对象时,都可以加上@Param注解,以免找不到
     * 根据id序列批量查询
     * @param ids
     * @return
     */
    List<Student> ByListId(@Param("ids") List<Integer> ids);
}
3.mapper.xml文件
<?xml version="1.0" encoding="UTF-8"?>
<!DOCTYPE mapper PUBLIC "-//mybatis.org//DTD Mapper 3.0//EN"
        "http://mybatis.org/dtd/mybatis-3-mapper.dtd">
<mapper namespace="com.ssm.mga.mapper.IStudentMapper">
    <resultMap id="student" type="com.ssm.mga.entity.Student">
        <result property="id" column="id"/>
        <result property="studentName" column="studentName"/>
        <result property="birthday" column="birthday"/>
        <result property="password" column="password"/>
        <result property="birthday" column="birthday"/>
    </resultMap>

    <insert id="insert">
        insert into student(id,studentName,password,birthday,classID)
        values(default ,#{studentName},#{password},#{birthday},#{classId})
    </insert>

    <update id="update">
        update student
        <set>
            studentName=#{studentName},
            password=#{password},
            birthday=#{birthday},
            classID=#{classId}
        </set>
         where id=#{id}
    </update>

    <delete id="delete">
        delete from student where id=#{id}
    </delete>

    <select id="students" resultMap="student">
        select * from student
    </select>

    <!--  如果实体类与数据库表字全部相对应就不需要使用resultMap  -->
    <select id="getStudent" resultType="com.ssm.mga.entity.Student">
        select * from student where studentName=#{studentName} and password=#{password}
    </select>

    <select id="ByStuNameAndClazzName" resultType="java.util.Map">
        select student.id as studentId,studentName,className from student
        left join class on student.classID=class.id
        <where>
            <if test="clazzName != ''">
                and className=#{clazzName}
            </if>
            <bind name="stuName" value="'%'+studentName+'%'"/>
            <if test="studentName != ''">
                and studentName like #{stuName}
            </if>
        </where>
    </select>

    <select id="ByListId" resultType="com.ssm.mga.entity.Student">
        select * from student
        <where>
            <if test="ids.size()>0">
                and id in
                <foreach collection="ids" item="Id" open="(" close=")" separator=",">
                   #{Id}
                </foreach>
            </if>
        </where>
    </select>
</mapper>
4.测试
@WebAppConfiguration
@Slf4j
@RunWith(SpringJUnit4ClassRunner.class)
@ContextConfiguration("classpath:applicationContext.xml")
public class MyTest {
    @Resource
    IStudentMapper studentMapper;
    @Test
    public void test_01(){
        List<Student> students = studentMapper.students();
        for (Student student : students) {
            System.out.println((student.toString()));
        }
    }

    @Test
    public void test_02(){
        Student student = studentMapper.getStudent("李四", "123456");
        System.out.println(student.toString());
    }

    @Test
    public void test_03(){
        Student student=new Student(null, "jack", "123456", LocalDate.now(), 2);
        int count = studentMapper.insert(student);
        System.out.println(count);
    }

    @Test
    public void test_04(){
        Student student=new Student(13, "jack", "123456", LocalDate.now(), 2);
        int count = studentMapper.update(student);
        System.out.println(count);
    }

    @Test
    public void test_05(){
        List<Map<String, Object>> maps = studentMapper.ByStuNameAndClazzName("张", "");
        for (Map<String, Object> map : maps) {
            System.out.println(map.toString());
        }
    }

    @Test
    public void test_06(){
        List<Integer> integers=new ArrayList<>();
        integers.add(1);
        integers.add(2);
        List<Student> students = studentMapper.ByListId(integers);
        for (Student student : students) {
            System.out.println(student.toString());
        }
    }
}
以上没有对 choose-when-otherwise标签做练习,基本使用就是if-elseif-else
5. MyBatis注解使用(动态SQL嵌入-->不支持)
MyBatis为了简化XML的配置,也提供了注解功能,通过注解也能完成对@Mapper接口方法的实现
@Select("select * from 表 left join 表 on 条件 where "):用于查询
@Insert("insert into 表 (表字段...) value(#{参数}) "):用于插入
@Update("update 表 set 字段名=#{值}... where 条件"):用于修改
@Delete("delete from 表 where 条件"):用于删除
@Options:用于配置一些选项(如插入后获取id,是否开启缓存等) 语法: @Options( 选项1 = 选项值, 选项2 = 选项值 )
@Results 用于配置JavaBean与数据表字段的ORM映射, 注意:如果一个Mapper接口内有多个@Results注解,则这些注解的ID属性不能重复,必须是唯一值。
@ResultMap 用于引入@Result,只需要输入本Mapper类中已经定义的@Results中的id值即可。 写法: @ResultMap("anResult")
@ResultType 如果返回的数据类型不是ORM映射集(比如一个整数、一个字符串),就可能设置resultType="类型.class" 写法: @ResultType(Integer.class)
因为MyBatis的XML与注解实现有冲突,所以我们在映入mapper.xml文件的xml文件时注解了。不然会报错。 具体实现根据上面的XML实现来,具体修改了mapper层,其他不变。
@Mapper
public interface IStudentMapper {

    /**
     * 根据名字和密码获取用户信息
     * @param studentName
     * @param password
     * @return
     */
    @Select("select * from student where studentName=#{studentName} and password=#{password}")
    Student getStudent(@Param("studentName") String studentName, @Param("password") String password);

    /**
     * student列表查询
     * @return
     */
    @Results(
            id = "student",
            value = {
                    @Result(property = "studentName",column = "studentName"),
                    @Result(property = "password",column = "password")
            }
    )
    @Select("select * from student")
    List<Student> students();

    /**
     * 添加学生
     * @param student
     * @return
     */
    @Insert("insert into student(id,studentName,password,birthday,classID)" +
            "values(default ,#{studentName},#{password},#{birthday},#{classId})")
    int insert(Student student);

    /**
     * 修改学生信息
     * @param student
     * @return
     */
    @Update("update student set studentName=#{studentName}," +
            "password=#{password},birthday=#{birthday},classID=#{classId} where id=#{id}")
    int update(Student student);

    /**
     * 删除学生
     * @param id
     * @return
     */
    @Delete("delete from student where id=#{id}")
    int delete(int id);

    /**
     * 使用万能Map接受值
     * 根据学生姓名或者班级名字查询
     * @param studentName
     * @param clazzName
     * @return
     */
    @ResultType(Map.class)
    @Select("<script>" +
            "select student.id as studentId,studentName,className from student\n" +
            "        left join class on student.classID=class.id\n" +
            "        <where>\n" +
            "            <if test=\"clazzName != ''\">\n" +
            "                and className=#{clazzName}\n" +
            "            </if>\n" +
            "            <bind name=\"stuName\" value=\"'%'+studentName+'%'\"/>\n" +
            "            <if test=\"studentName != ''\">\n" +
            "                and studentName like #{stuName}\n" +
            "            </if>\n" +
            "        </where>" +
            "</script>")
    List<Map<String,Object>> ByStuNameAndClazzName(
            @Param("studentName") String studentName,@Param("clazzName") String clazzName);

    /**
     * 传递对象时,都可以加上@Param注解,以免找不到
     * 根据id序列批量查询
     * @param ids
     * @return
     */
    @ResultMap("student")
    @Select("<script>" +
            "select * from student\n" +
            "        <where>\n" +
            "            <if test=\"ids.size()>0\">\n" +
            "                and id in\n" +
            "                <foreach collection=\"ids\" item=\"Id\" open=\"(\" close=\")\" separator=\",\">\n" +
            "                   #{Id}\n" +
            "                </foreach>\n" +
            "            </if>\n" +
            "        </where>" +
            "</script>")
    List<Student> ByListId(@Param("ids") List<Integer> ids);
}
6. MyBatis缓存(这里浅提,具体Redis缓存)
6.1 MyBatis缓存
我们通过MyBatis去查询数据,有可能会重复性的查询相同的数据。如果每次查询都去数据库里面执行,则会增加数据库压力。
我们就可以使用缓存技术来实现对查询数据的临时存储,当我们第一次查询若干数据的时候,会从数据库里获取。
当后面查询相同数据的时候,则不需要再从数据库里获取,而是直接从缓存里获取即可。即————缓存技术
缓存技术分为一级缓存和二级缓存。
6.2 一级缓存
是基于HashMap的本地缓存,作用范围为一个request,当一个请求结束后,该request中所有缓存就会被清空。
在参数和SQL语句完全一样的情况下,我们使用同一个sqlSession对象调用同一个mapper的方法,往往只需要执行一次SQL。
因为SQLSerssion第一次查询后,MyBatis会将其放在缓存中,再次查询时,如果没有刷新,并且缓存没有超时的情况下,
SQLSession会取出当前缓存的数据,而不是再次发SQL到数据库,这个不用我们来开启,MyBatis自带支持一级缓存。
前提:是请求的方法需要事务的支持
开启事务支持,可以在一个request实现一级缓存。
6.2 二级缓存
原理和一级缓存类似,是全局性缓存,作用范围比一级缓存高,是真正的Session级别的缓存。
默认是关闭,如果需要开启二级缓存,需要进行相应配置。
实现二级缓存:
1.mybatis-config.xml配置文件
在mybatis-config.xml配置
<setting name="cacheEnabled" value="true"/>
2.基于XML文件实现
是在mapperXML里面配置
<cache/>
属性说明:
eviction 代表的是缓存回收策略,可选:
LRU【默认】 使用较少,移除最长时间不用的对象;
FIFO 先进先出,按对象进入缓存的顺序来移除它们;
flushInterval 刷新间隔时间,单位为毫秒。如果省略该配置,那么只有当 SQL 被执行的时候才会刷新缓存。
size 引用数目,正整数,代表缓存最多可以存储多少个对象,不宜设置过大。设置过大会导致内存溢出。
readOnly 只读,默认值为 false,意味着缓存数据只能读取而不能修改,这样设置的好处是可以快速读取缓存,缺点是没有办法修改缓存。
配置之后,所在mapper文件里的所有<select>SQL语句会自动应用二级缓存。
如果某一个<select>不需要二级缓存,可以设置属性useCache="false"
3.基于注解实现
添加注解
@CacheNamespace(
     eviction = LruCache.class,
     flushInterval = 100,
     size = 100,
     readWrite = false       //读写,如果需要设置为只读,则设置为false
)
如果某一个@Select注解不需要二级缓存,可以在其@Options注解中设置useCache=false
总结
对于 MyBatis 内置二级缓存仅作了解即可,因为面对一定规模的数据量,内置的 Cache 方式就派不上用场了,
并且对查询结果集做缓存并不是 MyBatis 所擅长的,它专心做的应该是 ORM 映射。
而专门做二级缓存我可以使用Redis等专业的缓存服务器来做更合理。
注意:缓存不适用于需要精密计算的数据查询
本文内容由网友自发贡献,版权归原作者所有,本站不承担相应法律责任。如您发现有涉嫌抄袭侵权的内容,请联系:hwhale#tublm.com(使用前将#替换为@)