目录
1.IP地址的规划
2.拓扑结构的搭建
3.IP地址的配置
4.静态路由的配置
5.动态路由的配置
6.EBGP的配置
7.IBGP的配置
8.路由反射器的配置,宣告
9.重发布和路由优化
10.测试
实验要求:

实验步骤:
1.IP地址的规划
R1到R2为12.1.1.0/24网段
R7到R8为78.1.1.0/24网段
每个路由器都有两个环回,一个用于建邻,一个用于通讯
R1的建邻环回的IP地址为1.1.1.1/32,通讯为11.1.1.1/24
R8的建邻环回的IP地址为8.8.8.8/32,通讯为88.1.1.1/24
整个AS2区域的网段地址为172.16.0.0/16网段
将172.16.0.0/16划分为
建邻环回为172.16.0.1/32 172.16.0.2/32 172.16.0.3/32 172.16.0.4/32 172.16.0.5/32 172.16.0.6/32
通讯环回为172.16.1.1/24 172.16.2.1/24 172.16.3.1/24 172.16.4.1/24 172.16.5.1/24 172.16.6.1/24
骨干链路的网段为172.16.3.0/30 172.16.3.4/30 172.16.3.8/30 172.16.3.12/30 172.16.3.16/30 172.16.3.20/30
2.拓扑结构的搭建

3.IP地址的配置
以R1和R8为例
R1:
[r1]int g0/0/0
[r1-GigabitEthernet0/0/0]ip address 12.1.1.1 24
[r1-GigabitEthernet0/0/0]q
[r1]interface LoopBack 0
[r1-LoopBack0]ip address 1.1.1.1 24
[r1-LoopBack0]interface LoopBack 1
[r1-LoopBack1]ip address 11.1.1.1 24
R8:
[r1]interface GigabitEthernet0/0/0
[r1-GigabitEthernet0/0/0]ip address 78.1.1.2 24
[r1-GigabitEthernet0/0/0]q
[r1]interface LoopBack0
[r1-LoopBack0]ip address 8.8.8.8 32
[r1-LoopBack0]interface LoopBack1
[r1-LoopBack1]ip address 88.1.1.1 24
4.静态路由的配置
R1和R2之间
[r1]ip route-static 172.16.0.1 32 12.1.1.2
[r2]ip route-static 1.1.1.1 32 12.1.1.1
R7和R8之间
[r7]ip route-static 8.8.8.8 32 78.1.1.2
[r8]ip route-static 172.16.0.6 32 78.1.1.1
5.动态路由的配置
AS2中起OSPF,以R2为例
[r2]ospf 1 router-id 2.2.2.2
[r2-ospf-1]area 0.0.0.0
[r2-ospf-1-area-0.0.0.0]network 172.16.0.0 0.0.255.255
6.EBGP的配置
R1和R2之间
[r1]bgp 1
[r1-bgp]router-id 1.1.1.1
[r1-bgp]peer 172.16.0.1 as-number 2
[r1-bgp]peer 172.16.0.1 connect-interface LoopBack 0
[r1-bgp]peer 172.16.0.1 ebgp-max-hop 2

[r2]bgp 666
[r2-bgp]confederation id 2
[r2-bgp]peer 1.1.1.1 as-number 1
[r2-bgp]peer 1.1.1.1 connect-interface LoopBack 0
[r2-bgp]peer 1.1.1.1 ebgp-max-hop 2
R7和R8之间
[r7]bgp 857
[r7-bgp]confederation id 2
[r7-bgp]peer 8.8.8.8 as-number 3
[r7-bgp]peer 8.8.8.8 connect-interface LoopBack 0
[r7-bgp]peer 8.8.8.8 ebgp-max-hop 2

[r8]bgp 3
[r8-bgp]router-id 3.3.3.3
[r8-bgp]peer 172.16.0.6 as-number 2
[r8-bgp]peer 172.16.0.6 connect-interface LoopBack 0
[r8-bgp]peer 172.16.0.6 ebgp-max-hop 2
AS2内联邦的配置
联邦:将一个真实的大AS,逻辑的分为多个小AS;小AS的编号建议为私有编号;小AS间构建联邦内的EBGP邻居关系,可以向真实EBGP关系一样传递路由条目,但不修改属性; 对于该大AS外的其他AS,是不知道内部的小AS情况;
R2和R5之间
[r2]bgp 666
[r2-bgp]confederation id 2
[r2-bgp]confederation peer-as 857
[r2-bgp]peer 172.16.0.4 as-number 867
[r2-bgp]peer 172.16.0.4 connect-interface LoopBack 0
[r2-bgp]peer 172.16.0.4 ebgp-max-hop 2

[r5]bgp 857
[r5-bgp]confederation id 2
[r5-bgp]confederation peer-as 666
[r5-bgp]peer 172.16.0.1 as-number 666
[r5-bgp]peer 172.16.0.1 connect-interface LoopBack 0
[r5-bgp]peer 172.16.0.1 ebgp-max-hop 2
R4和R7之间
[r4]bgp 666
[r4-bgp]confederation id 2
[r4-bgp]confederation peer-as 857
[r4-bgp]peer 172.16.0.6 as-number 857
[r4-bgp]peer 172.16.0.6 connect-interface LoopBack 0
[r4-bgp]peer 172.16.0.6 ebgp-max-hop 2

[r7]bgp 857
[r7-bgp]confederation id 2
[r7-bgp]confederation peer-as 666
[r7-bgp]peer 172.16.0.3 as-number 666
[r7-bgp]peer 172.16.0.3 connect-interface LoopBack 0
[r7-bgp]peer 172.16.0.3 ebgp-max-hop 2
7.IBGP的配置
R2、R3、R4之间
[r2]bgp 666
[r2-bgp]peer 172.16.0.2 as-number 666
[r2-bgp]peer 172.16.0.2 connect-interface LoopBack 0

[r3]bgp 666
[r3-bgp]confederation id 2
[r3-bgp]peer 172.16.0.1 as-number 666
[r3-bgp]peer 172.16.0.1 connect-interface LoopBack 0
[r3-bgp]peer 172.16.0.1 next-hop-local
[r3-bgp]peer 172.16.0.3 as-number 666
[r3-bgp]peer 172.16.0.3 connect-interface LoopBack 0
[r3-bgp]peer 172.16.0.3 next-hop-local

[r4]bgp 666
[r4-bgp]peer 172.16.0.2 as-number 666
[r4-bgp]peer 172.16.0.2 connect-interface LoopBack 0
[r4-bgp]peer 172.16.0.2 next-hop-local
R5、R6、R7之间
[r5]bgp 857
[r5-bgp]peer 172.16.0.5 as-number 857
[r5-bgp]peer 172.16.0.5 connect-interface LoopBack 0
[r5-bgp]peer 172.16.0.5 next-hop-local

[r6]bgp 857
[r6-bgp]confederation id 2
[r6-bgp]peer 172.16.0.4 as-number 857
[r6-bgp]peer 172.16.0.4 connect-interface LoopBack 0
[r6-bgp]peer 172.16.0.4 next-hop-local
[r6-bgp]peer 172.16.0.6 as-number 857
[r6-bgp]peer 172.16.0.6 connect-interface LoopBack 0
[r6-bgp]peer 172.16.0.6 next-hop-local

[r7]bgp 857
[r7-bgp]peer 172.16.0.5 as-number 857
[r7-bgp]peer 172.16.0.5 connect-interface LoopBack 0
[r7-bgp]peer 172.16.0.5 next-hop-local
8.路由反射器的配置,宣告
将R3设为反射器,R4为客户端
[r2-bgp]peer 172.12.0.3 reflect-client
将R6设为反射器,R7为客户端
[r6-bgp]peer 172.16.0.6 reflect-client
将R1和R8上的环回1进行宣告
[r1]bgp 1
[r1-bgp]network 11.1.1.0 24

[r8]bgp 3
[r8-bgp]network 88.1.1.0 24
9.重发布和路由优化
在R2和R7上进行重发布
[r2-bgp]import-route ospf 1

[r7-bgp]import-route ospf 1
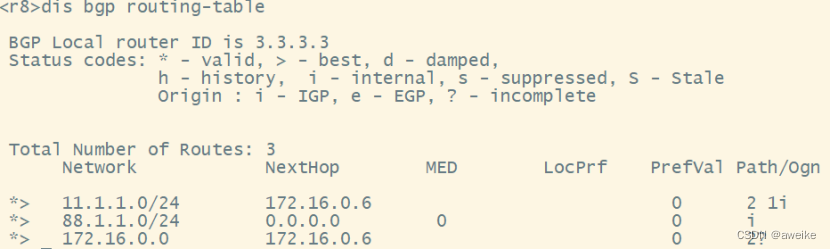
R1和R8的路由表


进行路由汇总后
[r2-bgp]aggregate 172.16.0.0 16 detail-suppressed

[r7-bgp]aggregate 172.16.0.0 16 detail-suppressed
R1和R8的路由表

10.测试
R1的环回pingR8的环回
