在TensorRT 2.1.2中提供了MNIST的model,这里拿来用Caffe的代码调用实现,原始的mnist_mean.binaryproto文件调整为了纯二进制文件mnist_tensorrt_mean.binary,测试结果与使用TensorRT调用(http://blog.csdn.net/fengbingchun/article/details/78552908)一致:
测试代码如下:
#include "funset.hpp"
#include <memory>
#include <fstream>
#include <tuple>
#include "common.hpp"

int mnist_tensorrt_predict()
{
#ifdef CPU_ONLY
	caffe::Caffe::set_mode(caffe::Caffe::CPU);
#else
	caffe::Caffe::set_mode(caffe::Caffe::GPU);
#endif

	const std::string deploy_file{ "E:/GitCode/Caffe_Test/test_data/model/mnist/mnist_tensorrt.prototxt" };
	const std::string model_filename{ "E:/GitCode/Caffe_Test/test_data/model/mnist/mnist_tensorrt.caffemodel" };
	const std::string mean_file{ "E:/GitCode/Caffe_Test/test_data/model/mnist/mnist_tensorrt_mean.binary" };
	const std::string image_path{ "E:/GitCode/Caffe_Test/test_data/images/handwritten_digits/" };

	caffe::Net<float> caffe_net(deploy_file, caffe::TEST);
	caffe_net.CopyTrainedLayersFrom(model_filename);

	// print net info
	fprintf(stdout, "input blob num: %d, output blob num: %d\n", caffe_net.num_inputs(), caffe_net.num_outputs());
	const boost::shared_ptr<caffe::Blob<float> > blob_by_name = caffe_net.blob_by_name("data");
	int image_num = blob_by_name->num();
	int image_channel = blob_by_name->channels();
	int image_height = blob_by_name->height();
	int image_width = blob_by_name->width();
	fprintf(stdout, "inpub blob shape(num, channels, height, width): %d, %d, %d, %d\n",
		image_num, image_channel, image_height, image_width);

	fprintf(stdout, "layer names: ");
	for (int i = 0; i < caffe_net.layer_names().size(); ++i) {
		fprintf(stdout, "  %s  ", caffe_net.layer_names()[i].c_str());
	}
	fprintf(stdout, "\nblob names: ");
	for (int i = 0; i < caffe_net.blob_names().size(); ++i) {
		fprintf(stdout, "  %s  ", caffe_net.blob_names()[i].c_str());
	}
	fprintf(stdout, "\nlayer types: ");
	for (int i = 0; i < caffe_net.layers().size(); ++i) {
		fprintf(stdout, "  %s  ", caffe_net.layers()[i]->type());
	}
	const std::vector<caffe::Blob<float>*> output_blobs = caffe_net.output_blobs();
	fprintf(stdout, "\noutput blobs num: %d, blob(num, channel, heihgt, width): %d, %d, %d, %d\n",
		output_blobs.size(), output_blobs[0]->num(), output_blobs[0]->channels(), output_blobs[0]->height(), output_blobs[0]->width());

	const int image_size{ image_num * image_channel * image_height * image_width };
	std::unique_ptr<float[]> mean_values(new float[image_size]);
	std::ifstream in(mean_file.c_str(), std::ios::in | std::ios::binary);
	if (!in.is_open()) {
		fprintf(stderr, "read mean file fail: %s\n", mean_file.c_str());
		return -1;
	}
	in.read((char*)mean_values.get(), image_size * sizeof(float));
	in.close();

	const std::vector<int> target{ 0, 1, 2, 3, 4, 5, 6, 7, 8, 9 };
	typedef std::tuple<int, float> result;
	std::vector<result> results;

	for (const auto& num : target) {
		std::string str = std::to_string(num);
		str += ".png";
		str = image_path + str;

		cv::Mat mat = cv::imread(str.c_str(), 0);
		if (!mat.data) {
			fprintf(stderr, "load image error: %s\n", str.c_str());
			return -1;
		}

		cv::resize(mat, mat, cv::Size(image_width, image_height));
		mat.convertTo(mat, CV_32FC1);

		float* p = (float*)mat.data;
		for (int i = 0; i < image_size; ++i) {
			p[i] -= mean_values.get()[i];
		}

		const std::vector<caffe::Blob<float>*>& blob_input = caffe_net.input_blobs();
		blob_input[0]->set_cpu_data((float*)mat.data);

		const std::vector<caffe::Blob<float>*>& output_blob_ = caffe_net.Forward(nullptr);
		const float* output = output_blob_[0]->cpu_data();

		float tmp{ -1.f };
		int pos{ -1 };

		for (int j = 0; j < output_blobs[0]->count(); j++) {
			if (tmp < output[j]) {
				pos = j;
				tmp = output[j];
			}
		}

		result ret = std::make_tuple(pos, tmp);
		results.push_back(ret);
	}

	for (auto i = 0; i < target.size(); i++)
		fprintf(stdout, "actual digit is: %d, result digit is: %d, probability: %f\n",
			target[i], std::get<0>(results[i]), std::get<1>(results[i]));

	fprintf(stdout, "predict finish\n");

	return 0;
}
测试图像如下:

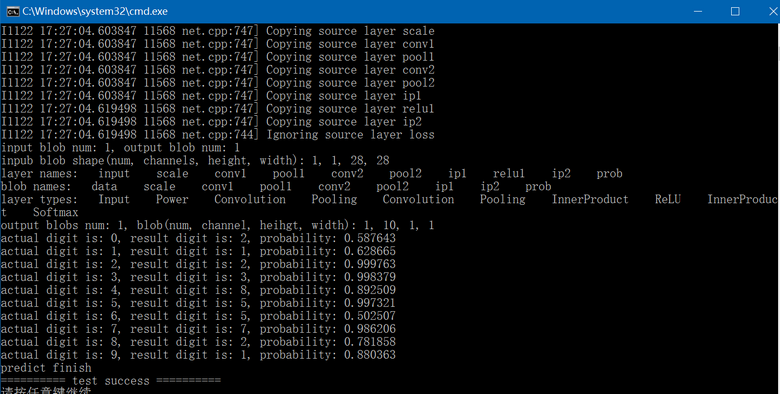
执行结果如下:
GitHub: https://github.com/fengbingchun/Caffe_Test