IPython 是 Python 的交互式命令行界面。 Jupyter Notebook 为多种语言提供了交互式 Web 界面,包括 IPython。
本文将引导您设置服务器来运行 Jupyter Notebook,并教您如何连接和使用该笔记本。 Jupyter 笔记本(或简称笔记本)是由 Jupyter Notebook 应用程序生成的文档,其中包含计算机代码(例如 Python)和丰富的文本元素(段落、方程、图形、链接等),有助于呈现可重复的研究。
在本指南结束时,您将能够使用在远程服务器上运行的 Ipython 和 Jupyter Notebook 来运行 Python 2.7 代码。出于本教程的目的,使用 Python 2 (2.7.x),因为许多数据科学、科学计算和高性能计算库支持 2.7 而不是 3.0+。
要学习本教程,您将需要以下内容:
- Ubuntu 16.04 小滴
- 具有 sudo 权限的非 root 用户(使用 Ubuntu 16.04 进行初始服务器设置解释了如何设置。)
本教程中的所有命令都应以非 root 用户身份运行。如果该命令需要 root 访问权限,则前面将显示sudo. 使用 Ubuntu 16.04 进行初始服务器设置解释如何添加用户并授予他们 sudo 访问权限。
在本节中,我们将安装 Python 2.7 和 Pip。
首先,更新系统的包索引。这将确保旧的或过时的软件包不会干扰安装。
接下来,安装 Python 2.7、Python Pip 和 Python Development:
-
sudo apt-get -y installpython2.7 python-pip python-dev
安装中python2.7将更新到最新版本的Python 2.7,并且python-pip将安装 Pip,它允许我们管理我们想要使用的 Python 包。 Jupyter 的一些依赖项可能需要编译,在这种情况下,您需要能够编译 Python C 扩展,因此我们正在安装python-dev以及。
要验证您是否已安装 python:
这将输出:
Output
Python 2.7.11+
根据 Python 2.7 的最新版本,输出可能会有所不同。
您还可以使用以下命令检查 pip 是否已安装:
您应该类似于以下内容:
Output
pip 8.1.1 from /usr/lib/python2.7/dist-packages (python 2.7)
同样,根据您的 pip 版本,输出可能会略有不同。
在本节中,我们将安装 Ipython 和 Jupyter Notebook。
首先,安装Ipython:
-
sudo apt-get -y installipython ipython-笔记本
现在我们可以继续安装 Jupyter Notebook:
根据 Ubuntu apt-get 存储库中 pip 的版本,您在尝试安装 Jupyter 时可能会收到以下错误:
Output
You are using pip version 8.1.1, however version 8.1.2 is available.
You should consider upgrading via the 'pip install --upgrade pip' command.
如果是这样,您可以使用pip将pip升级到最新版本:
-
sudo -H pip install - 升级 pip
升级 pip,然后再次尝试安装 Jupyter:
您现在拥有运行 Jupyter Notebook 所需的一切!要运行它,请执行以下命令:
如果您在安装了 JavaScript 的系统上运行 Jupyter,它仍然会运行,但可能会出现错误,指出 Jupyter Notebook 需要 JavaScript:
Output
Jupyter Notebook requires JavaScript.
Please enable it to proceed.
...
要忽略该错误,您可以按Q然后按Y确认。
A log of the activities of the Jupyter Notebook will be printed to the terminal. When you run Jupyter Notebook, it runs on a specific port number. The first notebook you are running will usually run on port 8888. To check the specific port number Jupyter Notebook is running on, refer to the output of the command used to start it:
Output
[I NotebookApp] Serving notebooks from local directory: /home/sammy
[I NotebookApp] 0 active kernels
[I NotebookApp] The Jupyter Notebook is running at: http://localhost:8888/
[I NotebookApp] Use Control-C to stop this server and shut down all kernels (twice to skip confirmation).
If you are running Jupyter Notebook on a local Linux computer (not on a Droplet), you can simply navigate to localhost:8888 to connect to Jupyter Notebook. If you are running Jupyter Notebook on a Droplet, you will need to connect to the server using SSH tunneling as outlined in the next section.
此时,您可以保持 SSH 连接打开并保持 Jupyter Notebook 运行,也可以退出应用程序并在设置 SSH 隧道后重新运行它。让我们保持简单并停止 Jupyter Notebook 进程。一旦 SSH 隧道工作正常,我们将再次运行它。要停止 Jupyter Notebook 进程,请按CTRL+C, type Y,并击中ENTER确认。将显示以下内容:
Output
[C 12:32:23.792 NotebookApp] Shutdown confirmed
[I 12:32:23.794 NotebookApp] Shutting down kernels
在本节中,我们将学习如何使用 SSH 隧道连接到 Jupyter Notebook Web 界面。由于 Jupyter Notebook 运行在 Droplet 上的特定端口上(例如:8888, :8889等),SSH 隧道使您能够安全地连接到 Droplet 的端口。
接下来的两小节介绍如何从 1) Mac 或 Linux 和 2) Windows 创建 SSH 隧道。请参阅您本地计算机的小节。
如果您使用的是 Mac 或 Linux,创建 SSH 隧道的步骤类似于如何使用 Linux 或 Mac 将 SSH 密钥与 DigitalOcean Droplet 结合使用指南中除了添加了其他参数外ssh命令。本小节将概述所需的附加参数ssh命令隧道成功。
可以通过运行以下 SSH 命令来完成 SSH 隧道:
-
ssh -L 8000:localhost:8888 your_server_username@your_server_ip
The ssh command opens an SSH connection, but -L specifies that the given port on the local (client) host is to be forwarded to the given host and port on the remote side (Droplet). This means that whatever is running on the second port number (i.e. 8888) on the Droplet will appear on the first port number (i.e. 8000) on your local computer. You should change 8888 to the port which Jupyter Notebook is running on. Optionally change port 8000 to one of your choosing (for example, if 8000 is used by another process). Use a port greater or equal to 8000 (ie 8001, 8002, etc.) to avoid using a port already in use by another process. server_username is your username (i.e. sammy) on the Droplet which you created and your_server_ip is the IP address of your Droplet. For example, for the username sammy and the server address 111.111.111.111, the command would be:
-
ssh -L 8000:localhost:8888 sammy@111.111.111.111
如果运行后没有出现错误ssh -L命令,您可以运行 Jupyter Notebook:
Now, from a web browser on your local machine, open the Jupyter Notebook web interface with http://localhost:8000 (or whatever port number you chose).
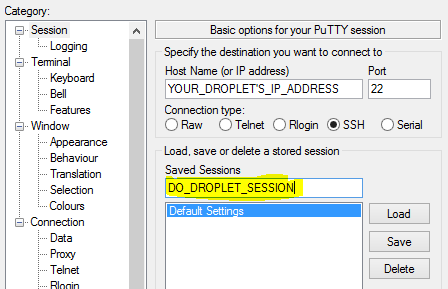
如果您使用的是 Windows,您还可以使用 Putty 轻松创建 SSH 隧道,如中所述如何在 DigitalOcean Droplet 上通过 PuTTY 使用 SSH 密钥(Windows 用户).
首先,输入服务器 URL 或 IP 地址作为主机名,如下所示:
Next, click SSH on the bottom of the left pane to expand the menu, and then click Tunnels. Enter the local port number to use to access Jupyter on your local machine. Choose 8000 or greater (ie 8001, 8002, etc.) to avoid ports used by other services, and set the destination as localhost:8888 where :8888 is the number of the port that Jupyter Notebook is running on. Now click the Add button, and the ports should appear in the Forwarded ports list:
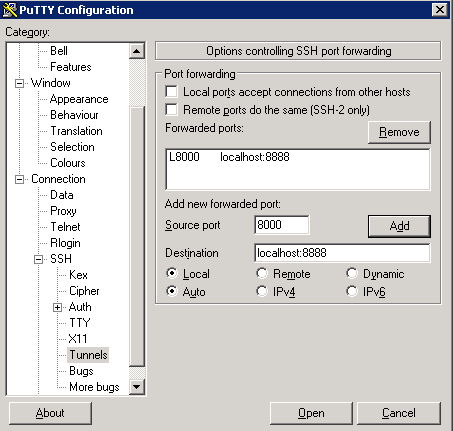
Finally, click the Open button to connect to the server via SSH and tunnel the desired ports. Navigate to http://localhost:8000 (or whatever port you chose) in a web browser to connect to Jupyter Notebook running on the server.
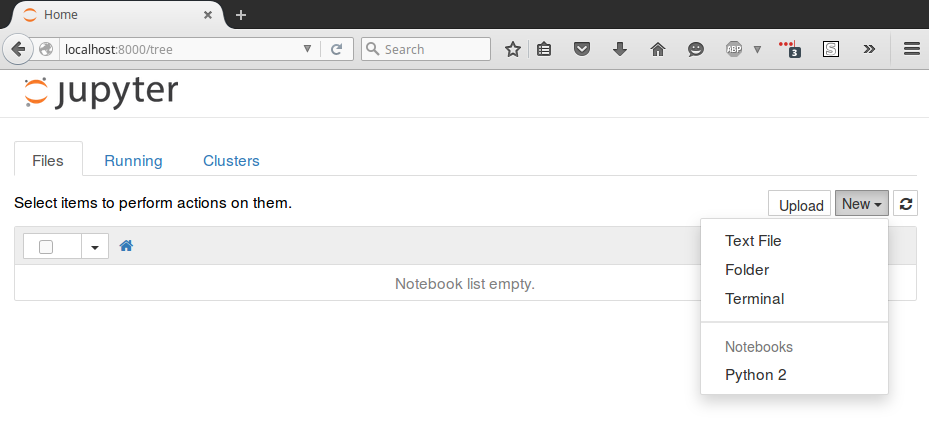
本节介绍使用 Jupyter Notebook 的基础知识。此时,您应该已经运行了 Jupyter Notebook,并且您应该使用 Web 浏览器连接到它。 Jupyter Notebook 非常强大,具有很多功能。本节将概述一些帮助您开始使用笔记本的基本功能。 Jupyter Notebook 将自动显示其运行目录中的所有文件和文件夹。
要创建新的笔记本文件,请选择New > Python 2从右上角的下拉菜单中:
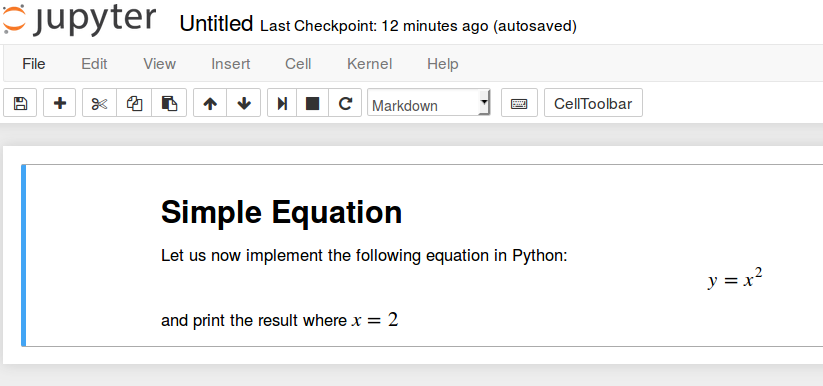
这将打开一个笔记本。我们现在可以在单元格中运行 Python 代码或将单元格更改为 markdown。例如,通过单击更改第一个单元格以接受 MarkdownCell > 细胞类型 > Markdown从顶部导航栏。我们现在可以使用 Markdown 编写笔记,甚至可以将用 LaTeX 编写的方程式放在$$符号。例如,将其更改为 markdown 后,在单元格中键入以下内容:
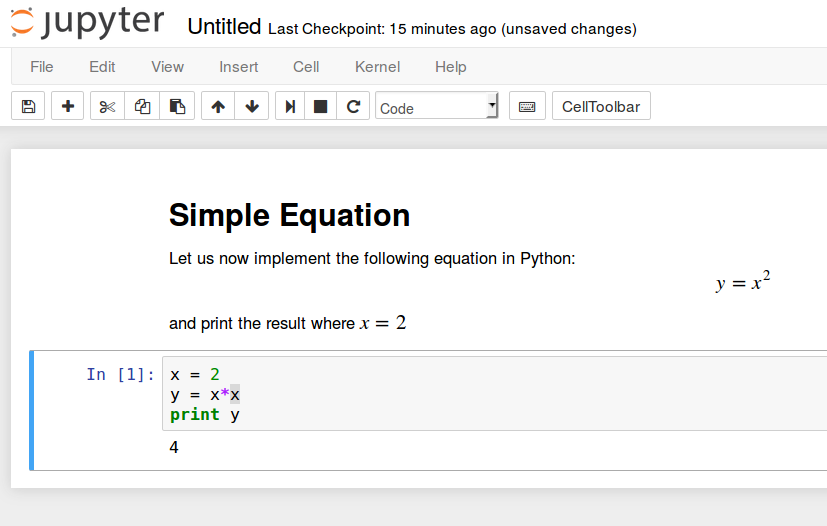
# Simple Equation

Let us now implement the following equation:
$$ y = x^2$$

where $x = 2$
要将 Markdown 转换为富文本,请按CTRL+ENTER,结果应如下:
您可以使用 Markdown 单元格来做笔记并记录您的代码。让我们实现这个简单的方程并打印结果。选择Insert > 在下面插入单元格插入单元格并输入以下代码:
x = 2
y = x*x
print y
要运行代码,请按CTRL+ENTER。结果应该如下:
您现在可以像使用任何其他 Python 开发环境一样包含库并使用笔记本!
恭喜!您现在应该能够使用在 Droplet 上运行的 Jupyter 笔记本使用 Markdown 编写可重现的 Python 代码和注释。要快速浏览 Jupyter Notebook,请选择Help > 用户界面导览从顶部导航菜单。