一、实验目的:
- 通过Mininet模拟搭建基于不同数据中心的网络拓扑;
- 掌握多数据中心网络拓扑的构建;
- 熟悉网络性能测试工具lperf,根据实验测试SDN网络的性能;
- 通过程序生成真实网络流量。
二、数据中心拓扑逻辑网络
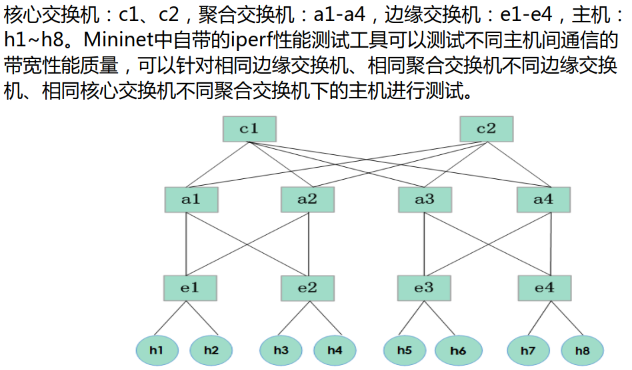
存在线路冗余(多条链路可达),容错能力强-----胖树拓扑
三、Mininet数据中心应用价值
- 树状拓扑结构容错能力强
- 降低数据中心成本消耗
- 提供重新排列的全带宽无阻碍路径
- 提高带宽利用率
- 分析数据中心网络流量性能
- 为真实数据中心和仿真测试床提供有用信息
Mininet最常用的场景就是数据中心。
因为Mininet可以模拟出很复杂的网络拓扑,而不需要硬件的支持,就可以搭建出不同的数据中心的拓扑。
可以为真正的数据中心网络的搭建起到模拟预测实验作用,为真实的数据中心的成本带来一定的节省。
四、流量模拟介绍
网络性能评估中一个巨大的挑战就是如何生成真实的网络流量,可以通过程序来创造人工的网络流量,通过建立测试环境来模拟真实的状况。此应用主要以数据中心网络为目标场景,在mininet仿真环境中尽可能地还原数据中心内部的真实流量情况。
五、流量随机模型在Mininet中的应用
- 流量随机模型︰主机向在网络中的另一任意主机以等概率发送数据包。
- 使用mininet中的iperf工具在网络中生成UDP流量,iperf客户端传送数据流到iperf的服务端,由服务端接收并记录相关信息。
- 我们需要实现的是将批处理流的自定义命令添加到mininet中,在mininet中使用此自定义命令,实现上述功能。
六、Mininet自定义命令拓展实现
在mininet中进行自定义命令功能拓展主要分为4步:
- 修改mininet/net.py ##功能代码实现
- 修改mininet/cli.py ##注册命令
- 修改bin/mn ##加入到可执行文件中
- 重新安装Mininet核心文件: ~/mininet/util/install.sh -n
1.修改net.py
在net.py文件中添加下列代码。
def iperf_single( self,hosts=None, udpBw='10M', period=60, port=5001):
        """Run iperf between two hosts using UDP.
           hosts: list of hosts; if None, uses opposite hosts
           returns: results two-element array of server and client speeds
        """
        if not hosts:
            return
        else:
            assert len( hosts ) == 2
        client, server = hosts
        filename = client.name[1:] + '.out'
        output( '*** Iperf: testing bandwidth between ' )
        output( "%s and %s\n" % ( client.name, server.name ) )
        iperfArgs = 'iperf -u '
        bwArgs = '-b ' + udpBw + ' '
        print "***start server***"
        server.cmd( iperfArgs + '-s -i 1' + ' > /home/smyyy/temp_log/' + filename + '&')
        #/home/smyyy/temp.log/ 字段是自己系统里真实存在的文件夹,需要自己创建和修改代码
        print "***start client***"
        client.cmd(
            iperfArgs + '-t '+ str(period) + ' -c ' + server.IP() + ' ' + bwArgs
            +' > /home/smyyy/temp_log/' + 'client' + filename +'&')


    def iperfMulti(self, bw, period=60):
        base_port = 5001
        server_list = []
        client_list = [h for h in self.hosts]
        host_list = []
        host_list = [h for h in self.hosts]

        cli_outs = []
        ser_outs = []

        _len = len(host_list)
        for i in xrange(0, _len):
            client = host_list[i]
            server = client
            while( server == client ):
                server = random.choice(host_list)
            server_list.append(server)
            self.iperf_single(hosts = [client, server], udpBw=bw, period= period, port=base_port)
            sleep(.05)
            base_port += 1

        sleep(period)
        print("test has done")

这是我添加的位置。
2.修改cli.py将 iperfmulti 命令在CLI类中注册
在cli.py文件中添加下列代码。
def do_iperfmulti( self, line ):
        """
        Multi iperf UDP test between nodes
        """
        args = line.split()
        if len(args) == 1:
            udpBw = args[0]
            self.mn.iperfMulti(udpBw)
        elif len(args) == 2:
            udpBw = args[0]
            period = args[1]
            self.mn.iperfMulti(udpBw,float(period))
        else:
            error( 'invalid number of args: iperfMulti udpBw period\n '+
                    'udpBw examples:1M 120\n' )

这是我添加的位置。
3.在mininet/bin/mn文件中加入iperfmulti可执行命令

图示为添加位置
4.重新编译mininet —— 因为我们修改了mininet内核文件
进入mininet/util目录,重新编译安装mininet。
因为我们已经安装OpenFlow协议和openvswitch,所以不需要再加3V

5.测试修改成果
重新创建网络,输入 iperf ,用 Tab 键补全,如果可补全命令中出现 iperfmulti 命令,说明已经修改成功

七、实现网络拓扑 —— 按照结构实现,代码不唯一
from mininet.topo import Topo
from mininet.net import Mininet
from mininet.node import RemoteController
from mininet.link import TCLink
from mininet.util import dumpNodeConnections

class MyTopo(Topo):

    def __init__(self):
        super(MyTopo,self).__init__()

        #Marking the number of switch for per level
        L1 = 2;
        L2 = L1*2
        L3 = L2

        #Starting create the switch
        c = []    #core switch
        a = []    #aggregate switch
        e = []    #edge switch

        #notice: switch label is a special data structure
        for i in range(L1):
            c_sw = self.addSwitch('c{}'.format(i+1))    #label from 1 to n,not start with 0
            c.append(c_sw)

        for i in range(L2):
            a_sw = self.addSwitch('a{}'.format(L1+i+1))
            a.append(a_sw)

        for i in range(L3):
            e_sw = self.addSwitch('e{}'.format(L1+L2+i+1))
            e.append(e_sw)

        #Starting create the link between switchs
        #first the first level and second level link
        for i in range(L1):
            c_sw = c[i]
            for j in range(L2):
                self.addLink(c_sw,a[j])

        #second the second level and third level link
        for i in range(L2):
            self.addLink(a[i],e[i])
            if not i%2:
                self.addLink(a[i],e[i+1])
            else:
                self.addLink(a[i],e[i-1])

        #Starting create the host and create link between switchs and hosts
        for i in range(L3):
            for j in range(2):
                hs = self.addHost('h{}'.format(i*2+j+1))
                self.addLink(e[i],hs)


topos = {"mytopo":(lambda:MyTopo())}
测试网络拓扑脚本,文件名为 fattree.py

八、进行网络测试
1.开始Ryu —— 为了防止广播风暴,使用生成树协议 STP
ryu-manager simple_switch_stp_13.py
我使用的 simple_switch_stp_13.py ,因为simple_switch_stp.py不成功。

2.Mininet启动网络拓扑
sudo mn --custom ./fattree.py --topo=mytopo --controller=remote,ip=127.0.0.1,port=6633
3.使用iperf命令,进行TCP带宽测试
1)在测试之前先多ping几次 <h1 ping h2> ,直到 ping 通一次,这样 pingall 就可以 ping 通了

2)同一交换机内部的主机间连通性及通信带宽测试
iperf h1 h2

3)相同汇聚交换机下不同机架的主机间测试

4)相同核心交换机不同汇聚交换机下的主机间测试

4.使用iperfmulti命令,进行UDP带宽测试
iperfmulti 0.025M

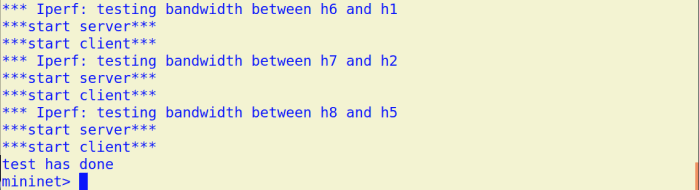
查看流量日志(路径为 net.py 中修改的路径)
