Dimensions
面对现代手机五花八门的屏占比 不知道宽度的情况下可以使用
import { Dimensions } from 'react-native';
const DimenStyle = Dimensions.get('window');
//屏幕宽度
DimenStyle.width;
//高度
DimenStyle.height;
组件
// 手机端独有组件是状态栏展示
StatusBar
// 手机loading提示信息
Activitylndicator
核心组件使用
Alert Button 按钮 弹框
import {Button, Alert} from 'react-native';
<Botton
	title='' // 名称
	color='' // 按钮的颜色
	onPress={() => {
		// 原生alert也可以使用
		alert('我是一个按钮')
		// 组件 不带title
		Alert.alert('我是一个按钮');
		Alert.alert(
			'警告提示',
			'警告内容',
			[{ // 顺序会影响按钮布局 样式部分手机生效
				text: '取消',
				onPress:() => console.log('取消'),
				style: 'cancel'
			},{
				text: '确认',
				onPress:() => console.log('确认'),
				style: 'default'
			},{
				text: '稍后再试',
				onPress:() => console.log('稍后再试'),
			}]
		)
	}} // 类似于点击事件
>
</Botton>
StatusBar Switch 状态栏 开关
import {Switch, StatusBar, View} from 'react-native';
const statusBar = false;
<View>
	<StatusBar
		hidden={true} // true 隐藏手机状态条 默认为false
		backgroundColor='' // 尽在安卓有效 状态栏颜色
		barStyle=''
		//三个选项 bark-content 变成黑色图标 light-content 白色图标
	/>
	//开关
	<Switch
		tackColor={{false: 'red', true: 'green'}} // 背景颜色
		thumbColor={'blue'} // 前景颜色
		value={statusBar}
		onValueChange={() => {statusBar = !statusBar}}
	/>
</View>
ActivityIndicator Platform 加载效果 识别机型
import {View, ActivityIndicator, Platform} from 'react-native';
if(Platform.OS === 'android') {
	安卓应用
} else if(Platform.OS === 'ios') {
	苹果应用
}
<View>
	<ActivityIndicator
		color='' // 颜色
		// 数字指定大小仅限于安卓
		size='' // 大 large 小 small 数值也可以

	/>
</View>
安装 和 苹果显示不同
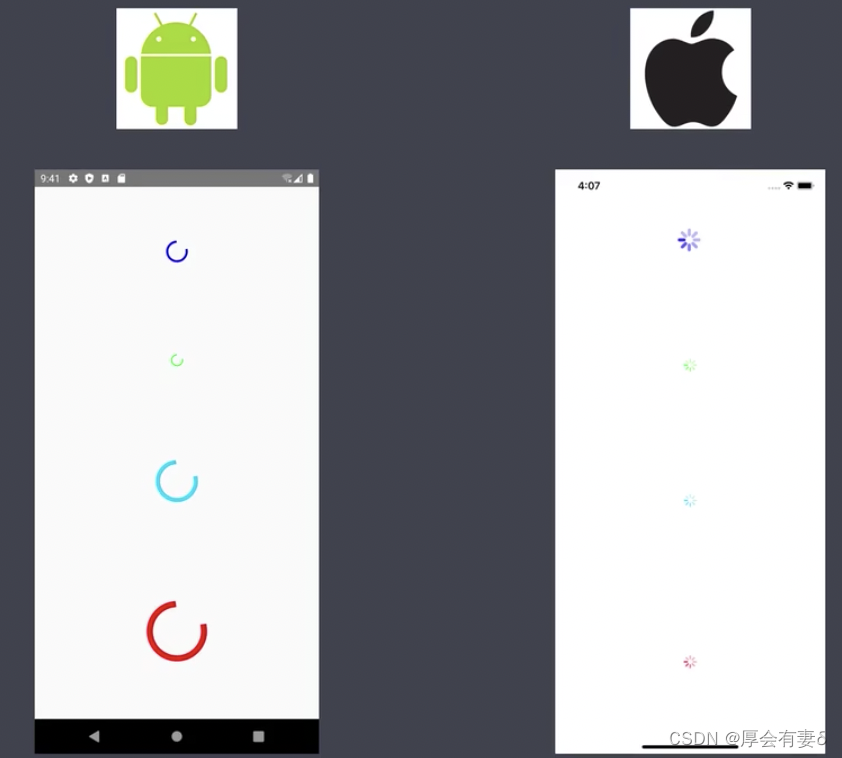
Image 图片
import {View, Image} from 'react-native';
// marginVertical 外边距
// paddingHorizontal 水平方向内边距
<View>
	<Image
		style={} // 样式
		source={ //图片路径
			// require('./2.jpg') //本地图片
			uri: 'http://xxx.png' // 线上网址或者base64格式的图片

		}
	/>
</View>
TextInput 输入框
import {View, TextInput} from 'react-native';

<View>
	<TextInput // 输入框,默认没有边框
		style='' //样式
		placeholder='' //提示信息
		value='' // 展示信息
		// 键盘类型 就会调起数字键盘 更多请看官网
		keyboardType='number-pad'
		multilint={true} // 启用多行
		numberOfLines={5} // 多行数
		textAilgnVertical='top' // 统一 文字位置
		secureTextEntry={true} // 密码属性
		onValueChange={() => {}} // 方法
	/>
</View>
Touchable
import {
	View,
	TouchableHighlight,
	TouchableOpacity,
	TouchableWithoutFeedback
} from 'react-native';

<View>
	<TouchableHighlight
		onPress={()=> { // 触碰时方式
		}}
	>
		<View>触碰高亮</View>
	</TouchableHighlight>
	<TouchableOpacity
		onPress={()=> { // 触碰时透明底变化
		}}
	>
		<View>透明底变化</View>
	</TouchableOpacity>
	<TouchableWithoutFeedback
		onPress={()=> { // 触碰时无响应
		}}
	>
		<View>无响应</View>
	</TouchableWithoutFeedback>
</View>

ScrollView SafeAreaView 滑动组件
import {View, ScrollView, SafeAreaView} from 'react-native';
<View>// 安卓 无法滑动到最底部 需要最底下有标签高度
<ScrollView // 内容超出滚动
style={}
contentContainerStyle={} // 针对内容的样式
showVerticalScrollIndcator={} // 隐藏滚动条
horizontal={true} //横向滚动
>
</ScrollView>
</View>
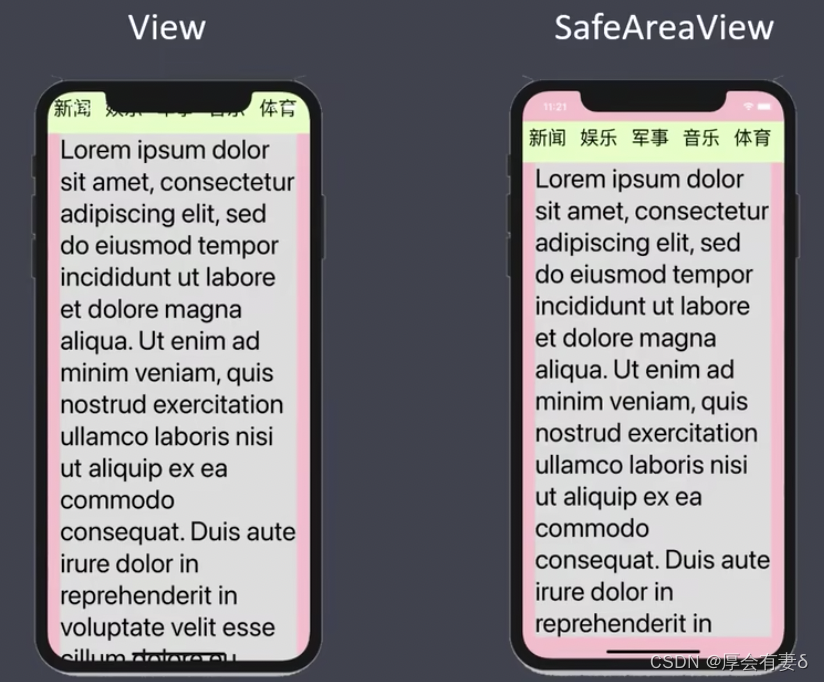
安全视图
SafeAreaView
SafeAreaView不隐藏倒刘海之下 让出安全距离
SectionList SafeAreaView 高性能列表组件
import React from "react";
import { StyleSheet, Text, View, SafeAreaView, SectionList, StatusBar } from "react-native";

const DATA = [
  {
    title: "标题1", // 标题
    data: ["Pizza", "Burger", "Risotto"] // 数据
  }
];

const Item = (item:any) => (
  <View style={styles.item}>
    <Text style={styles.title}>{item.title}</Text>
  </View>
);

const App = () => (
  <SafeAreaView style={styles.container}>
    <SectionList
      sections={DATA}//存放数据
      keyExtractor={(item, index) => item + index} //key
      renderItem={({ item }) => <Item title={item} />} // 每一个列表项的默认渲染器
      renderSectionHeader={({ section }) => { // 展示title
        return  <Text style={styles.header}>{section.title}</Text>
      }}
       // 添加列表头部
        ListHeaderComponent={() => (
            <Text>我列表标题</Text>
        )}
        // 添加列表底部
        ListFooterComponent={() => (
            <Text>到底了!!!!</Text>
        )}
        // 触发下拉刷新到底部 0.1 -----> 10%
        onEndReachedThreshold={0.1}
        // 触发下拉事件
        onEndReached={() => {
            console.log('到底了???')
        }}
        // loading 效果
        refreshing={isLoading}
        // 上拉触发事件
        onRefresh={onRefresh}
        // 没有数据时展示
        ListEmptyComponent={() => (
            <Text>空空如也</Text>
        )}
        // 分隔符每一项的
        ItemSeparatorComponent={() => (
            <View style={[styles.separator]}/>
        )}
    />
  </SafeAreaView>
);

const styles = StyleSheet.create({
  container: {
    // flex: 1,
    paddingTop: StatusBar.currentHeight,
    marginHorizontal: 16
  },
  item: {
    backgroundColor: "#f9c2ff",
    padding: 20,
    marginVertical: 8
  },
  header: {
    fontSize: 32,
    backgroundColor: "#fff"
  },
  title: {
    fontSize: 24
  }
});

export default App;
FlatList 高性能的简单列表组件
import React, {useState} from 'react';
import { SafeAreaView, View, FlatList, StyleSheet, Text, StatusBar, Platform ,TouchableOpacity} from 'react-native';

const DATA = [
    {
    id: 'bd7a11113abb28ba',
    title: '1头条',
    ];


const App = () => {
    const [isLoading, setIsLoading]= useState(false)
    const [selsetdID, setSelsetdID]= useState(null);
    const renderItem = ({ item }:any) => {
        const backgroundColor = item.id  === selsetdID ? 'blue' : 'pink'
        return (
            <TouchableOpacity
                style={styles.item}
                onPress={() => setSelsetdID(item.id)}
            >
                <Text style={[styles.title, { backgroundColor }]}>{item.title}</Text>
            </TouchableOpacity>
        );
      };
    const onRefresh = (cal?: any) => {
        console.log('触发下拉刷新')
        setIsLoading(true);
        setTimeout(() => {
            setIsLoading(false);
            console.log('刷新列表成功');
        }, 3000)
    }
  return (
    <SafeAreaView style={styles.container}>
      <FlatList
        data={DATA}
        renderItem={renderItem}
        keyExtractor={item => item.id}
        // 默认滚动位置
        initialScrollIndex={1}
        // 默认提前加载
        initialNumToRender={4}
        // 列数
        numColumns={1}
        // 反转倒置
        inverted={false}
        // 默认选中ID
        extraData={selsetdID}
        // 水平模式
        // horizontal={true}
        // 添加列表头部
        ListHeaderComponent={() => (
            <Text>我列表标题</Text>
        )}
        // 添加列表底部
        ListFooterComponent={() => (
            <Text>到底了!!!!</Text>
        )}
        // 触发下拉刷新到底部 0.1 -----> 10%
        onEndReachedThreshold={0.1}
        // 触发下拉事件
        onEndReached={() => {
            console.log('到底了???')
        }}
        // loading 效果
        refreshing={isLoading}
        // 上拉触发事件
        onRefresh={onRefresh}
        // 没有数据时展示
        ListEmptyComponent={() => (
            <Text>空空如也</Text>
        )}
        // 分隔符每一项的
        ItemSeparatorComponent={() => (
            <View style={[styles.separator]}/>
        )}
      />
    </SafeAreaView>
  );
}

const styles = StyleSheet.create({
  container: {
    flex: 1,
    marginTop: StatusBar.currentHeight || 0,
  },
  item: {
    backgroundColor: '#f9c2ff',
    padding: 20,
    marginVertical: 8,
    marginHorizontal: 16,
  },
  title: {
    fontSize: 32,
  },
  separator: {
    borderWidth: 1,
    borderColor: 'red',
    margin: 10
  }
});

export default App;
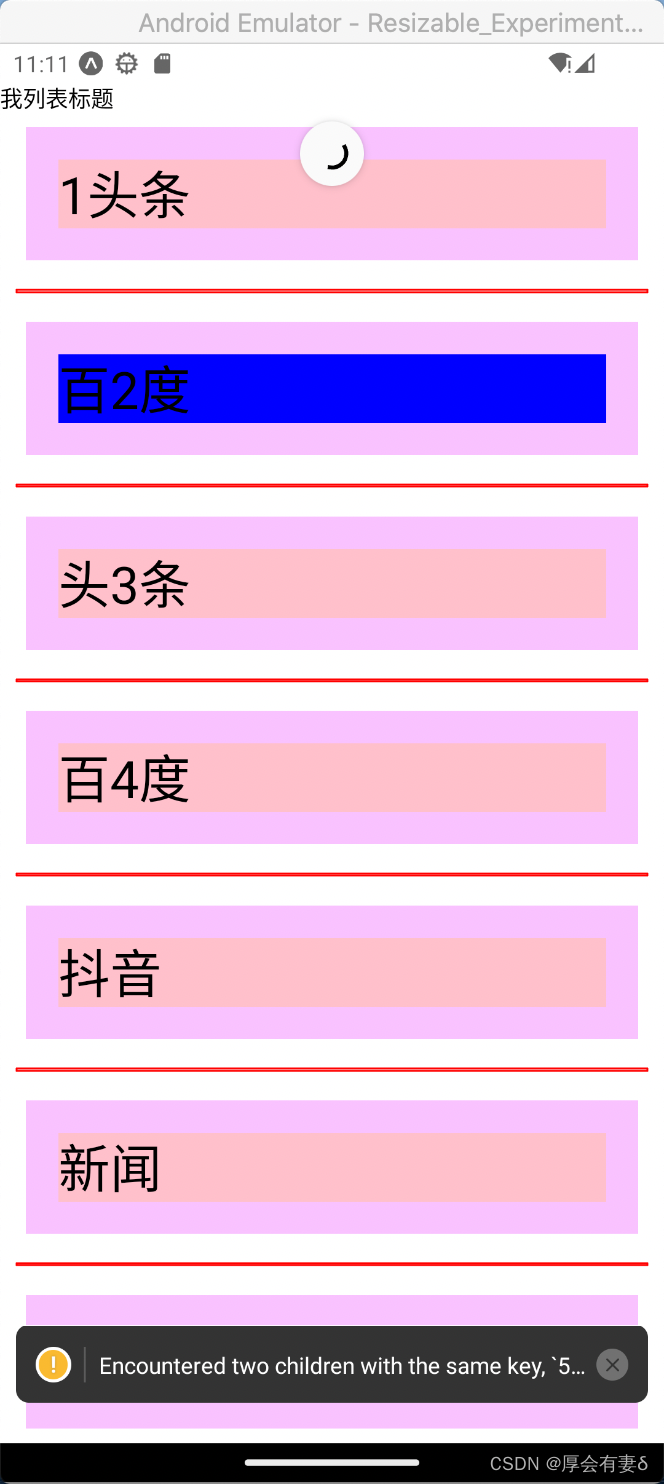
开启水平的会变成横向的

动画
基础内容
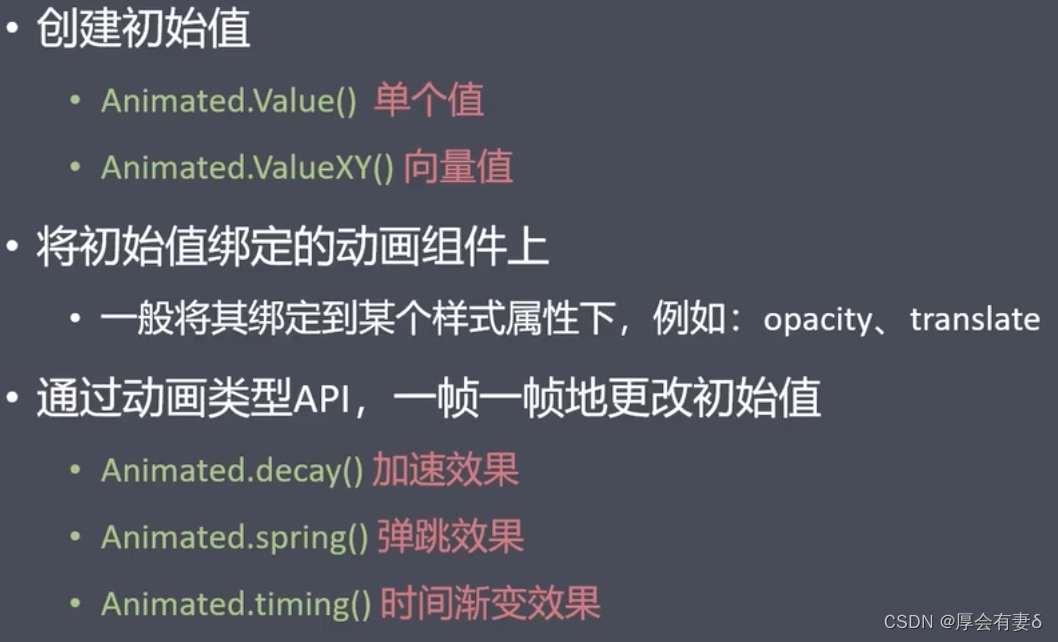
import React, { useEffect, useRef } from "react";
import { Animated, Text, View, StyleSheet, Button } from "react-native";
const App = () => {
// fadeAnim will be used as the value for opacity. Initial Value: 0
const fadeAnim = useRef(new Animated.Value(0)).current;
const containerAnim = useRef(new Animated.Value(0)).current;
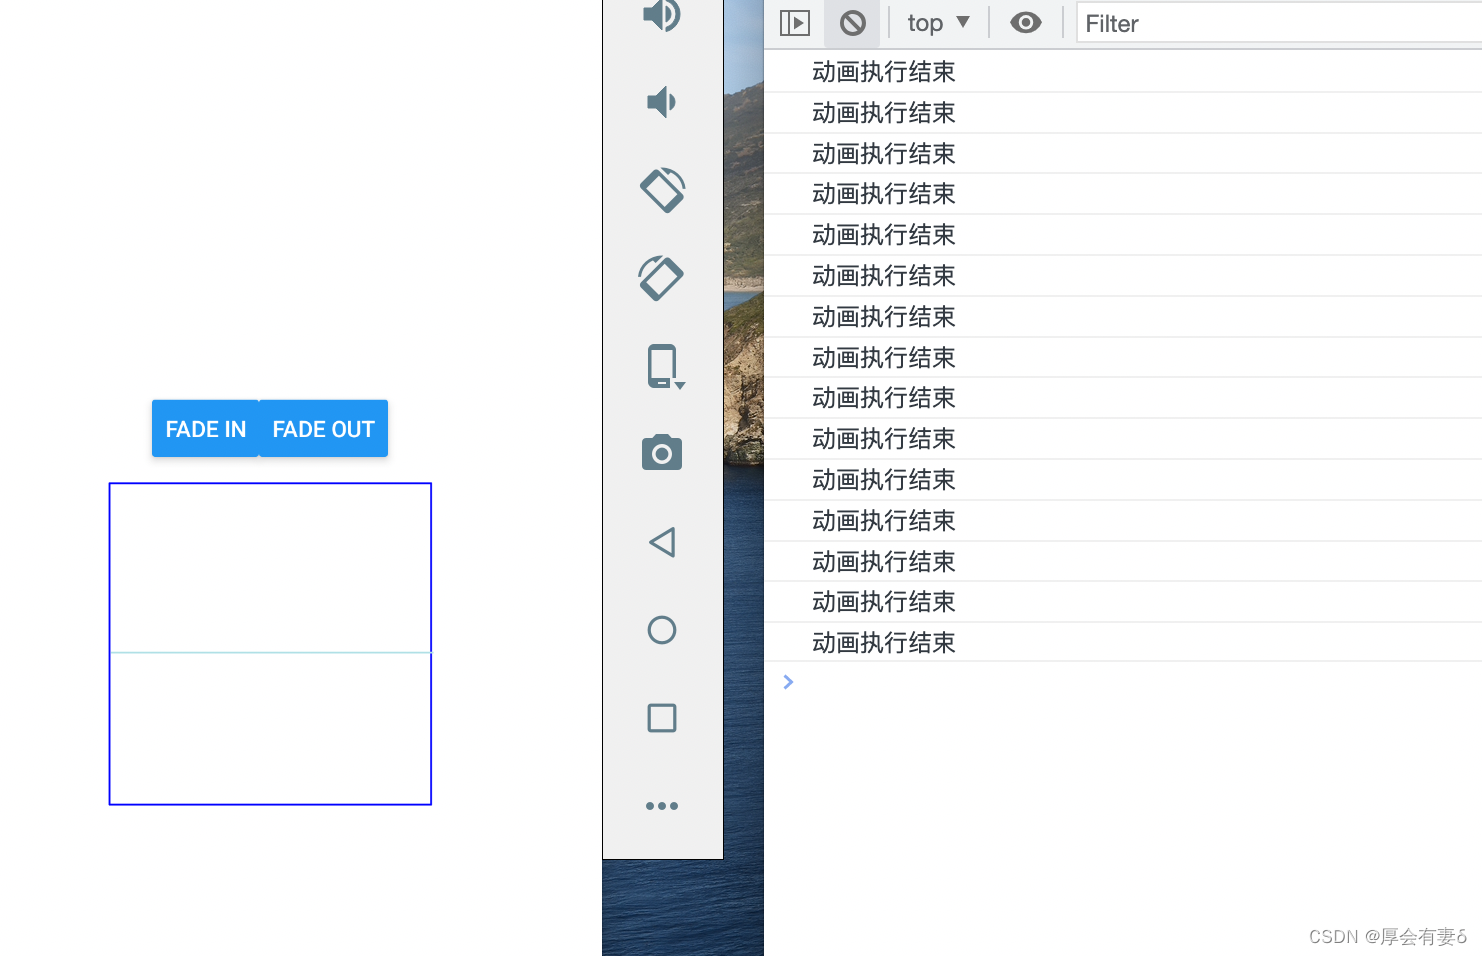
const fadeIn = () => {
Animated.timing(fadeAnim, {
toValue: 1, // 目标值
duration: 3000, // 时间
useNativeDriver: true // 启用原生模式
}).start();// 启动
};
const fadeOut = () => {
Animated.timing(fadeAnim, {
toValue: 0,
duration: 3000,
useNativeDriver: true
}).start(() => {// 结束执行
console.log('动画执行结束');
});
};
// 组件加载 开启动画
useEffect(() => {
scanMove()
}, []);
const scanMove = () => {
Animated.timing(containerAnim, {
toValue: 200,
duration: 2000,
useNativeDriver: true
}).start(() => {// 结束执行
console.log('动画执行结束');
scanMoveEnd()
});
}
const scanMoveEnd = () => {
Animated.timing(containerAnim, {
toValue: 0,
duration: 2000,
useNativeDriver: true
}).start(() => {// 结束执行
console.log('动画执行结束');
scanMove()
});
}
return (
<View style={styles.container}>
<Animated.View
style={[
styles.fadingContainer,
{
opacity: fadeAnim
}
]}
>
<Text style={styles.fadingText}>Fading View!</Text>
</Animated.View>
<View style={styles.buttonRow}>
<Button title="Fade In" onPress={fadeIn} />
<Button title="Fade Out" onPress={fadeOut} />
</View>
<View style={styles.scanningContainer}>
<Animated.View
style={[
styles.containerStyle,
{
transform:[{
translateY: containerAnim
}]
}
]}
/>
</View>
</View>
);
}
const styles = StyleSheet.create({
container: {
flex: 1,
alignItems: "center",
justifyContent: "center"
},
containerStyle: {
height: 1,
width: 200,
backgroundColor: "powderblue"
},
fadingContainer: {
paddingVertical: 8,
paddingHorizontal: 16,
backgroundColor: "powderblue"
},
fadingText: {
fontSize: 28,
textAlign: "center",
margin: 10
},
buttonRow: {
flexDirection: "row",
marginVertical: 16
},
scanningContainer: {
width: 200,
height: 200,
borderColor: 'blue',
borderWidth: 1
}
});
export default App;
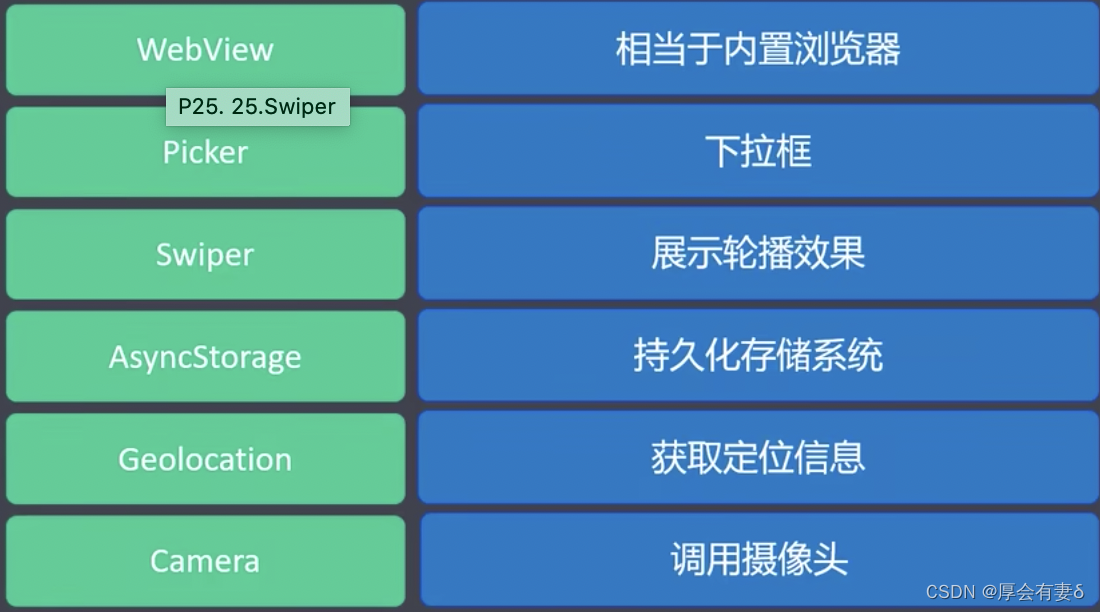
第三方组件
 npm install react-native-webview
//---------
     const [url,setUrl] = useState('http://www.baidu.com');
     const webView:any = useRef(null)
     const [urlInput,setUrlInput] = useState(url);

     //页面加载完成触发
     const webViewOnLoad = (syntheticEvent: { nativeEvent: any; }) => {
         const {nativeEvent} = syntheticEvent;
         const curl = nativeEvent.url;
         //根据url地址判断刚才已经完成什么操作
         const jmurl = decodeURIComponent(curl);
         setUrlInput(jmurl);
         console.log("网页加载完成,地址是:"+jmurl)
     };

     //接收web发送过来的信息
     const onMessage = (event: { nativeEvent: { data: any; }; }) => {
         const rep = event.nativeEvent.data;
         //console.log('-----------webview返回结果--------------');
         let minLog = rep;
         if (rep.length > 300) {
             minLog = rep.substring(0, 290);    //日志太长影响观感
         }
         console.log(minLog);
     };
     return (
         <SafeAreaView style={{flex:1}}>
             <View style={{height:40,flexDirection:'row',justifyContent:'space-between'}}>
                 <TextInput
                     style={{flex:1, height: 40, borderColor: 'gray', borderWidth: 1 }}
                     onChangeText={text => setUrlInput(text)}
                     value={urlInput}
                 />
                 <Button title={"转到"} onPress={()=>{
                     setUrl(urlInput);
                 }}/>
             </View>
             <WebView source={{uri: url}}
                      ref={(webVieww) => {webView.current = webVieww}}
                    //   sharedCookiesEnabled={true}
                    //   startInLoadingState={true}
                    //   onLoad={webViewOnLoad}
                    //   onMessage={onMessage}
                      onError={syntheticEvent => {
                          const {nativeEvent} = syntheticEvent;
                          console.log('网络连接失败!');
                          console.warn('WebView error: ', nativeEvent);
                      }}
             />
             <View style={{flexDirection:'row',justifyContent:'space-between',height:40,backgroundColor:'white'}}>
                 <Button title={"主页"} onPress={()=>{
                     setUrl('http://www.baidu.com?t='+new Date().getTime());
                 }}/>
                 <Button title={"后退"} onPress={()=>{
                     webView.current.goBack();
                 }}/>

                 <Button title={"前进"} onPress={()=>{
                     webView.current.goForward();
                 }}/>

                 <Button title={"刷新"} onPress={()=>{
                     webView.current.reload();
                 }}/>
             </View>

         </SafeAreaView>);
 };

//-----------
<WebView
   originWhitelist={['*']}
   source={{html: '<h1>11111</h1>'}}
/>
百度输入地址可投入 手机页面上 也支持 html 详情参照

Picker (下拉框)
yarn add @react-native-picker/picker
// 注意安卓和ios不同效果
// 需要不同配置
import React, { useState } from 'react'
import { StyleSheet, Text, View } from 'react-native'
import { Picker } from '@react-native-picker/picker';
const App = () =>
{
    let users = [
        { label: '请选择常用的聊天软件', value: '' },
        { label: 'QQ', value: '
本文内容由网友自发贡献,版权归原作者所有,本站不承担相应法律责任。如您发现有涉嫌抄袭侵权的内容,请联系:hwhale#tublm.com(使用前将#替换为@)