下载所需要的包:
 wget http://mirrors.tuna.tsinghua.edu.cn/apache//httpd/httpd-2.4.54.tar.gz
 wget http://mirrors.tuna.tsinghua.edu.cn/apache//apr/apr-1.7.0.tar.gz
 wget http://mirrors.tuna.tsinghua.edu.cn/apache//apr/apr-util-1.6.1.tar.gz
 wget https://jaist.dl.sourceforge.net/project/pcre/pcre/8.43/pcre-8.43.tar.gz --no-check-certificate
解压
tar -zxvf apr-1.7.0.tar.gz && tar -zxvf apr-util-1.6.1.tar.gz && tar -zxvf httpd-2.4.54.tar.gz && tar -zxvf pcre-8.43.tar.gz
1.安装apr包
cd apr-1.7.0
./configure --prefix=/usr/local/apr
安装过程中会报错:如下
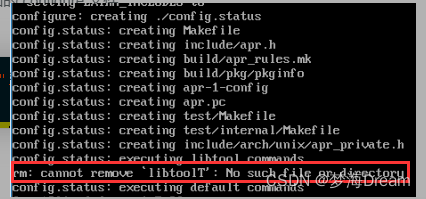
解决方案:
vim /apr-1.7.0/configure
注释掉31880行的内容
保存退出
重新执行:./configure --prefix=/usr/local/apr
最后执行:
make && make install
2.按住强apr-util-1.6.1包
cd apr-util-1.6.1/
./configure --prefix=/usr/local/apr-util --with-apr=/usr/local/apr/bin/apr-1-config
make && make install
安装过程中会报错:如下:

解决方式:
yum install expat-devel
重新执行:
make && make install
3.安装pcre-8.43
cd pcre-8.43
./configure --prefix=/usr/local/pcre --with-apr=/usr/local/apr/bin/apr-1-config
make && make install
过程中可能报错:

解决方式:
yum install -y gcc-c++
重新执行:
./configure --prefix=/usr/local/pcre --with-apr=/usr/local/apr/bin/apr-1-config
make && make install
4.安装http-2.4.39
cd httpd-2.4.54/
./configure --prefix=/usr/local/httpd --with-pcre=/usr/local/pcre --with-apr=/usr/local/apr --with-apr-util=/usr/local/apr-util
make && make install
5.修改端口号
为了防止和 Nginx 冲突 抢占 80 端口的风险发生 我们将 Apache 的默认端口号改为 8080 我是把 Nginx 和 Apache 安装到了同一台机器上才这么做的
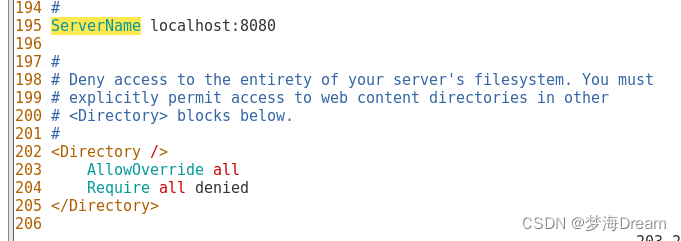
 vim /usr/local/httpd/conf/httpd.conf
 将52行的监听的端口号改为8080
 将195行改为 ServerName localhost:8080
具体如下:
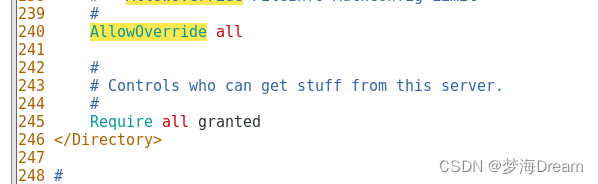
还需要允许将站点目录指向其他目录下的权限 AllowOverride 后边改成 all,
表示虚拟主机的目录允许覆盖掉配置里面的默认路径 usr/local/httpd/htdocs
6.启动Apache
cd /usr/local/httpd/bin
./apachectl start
7.将链接apachectl复制到系统目录下并命名为httpd
cp /usr/local/httpd/bin/apachectl /etc/rc.d/init.d/httpd
到此,其实已经可以使用 service httpd start 等命令,但在 linux 服务列表还没有注册,还不能使用 systemctl 命令启动 httpd, 我们打开刚刚复制的那个文件
vim /etc/rc.d/init.d/httpd
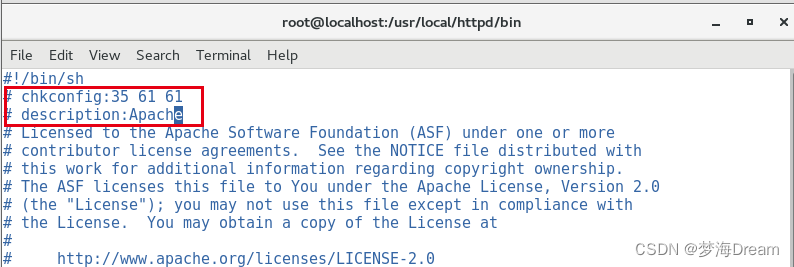
将 httpd 配置开机自启动并加入 linux 服务监控
chkconfig --add httpd
至此,apache 安装完毕,可以使用 systemctl restart httpd 重启 apache 试一试
访问一下:
虚拟机net模式下,可能没办法访问:
需要改成桥接模式:
ip -4 addr
如果看到virbr0记得删掉:

 ifconfig virbr0 down
brctl delbr virbr0
brctl show
一下过程具体看:
具体过程
centos设置静态ip
首先进入这个目录,在这个目录下面有若干个文件:
/etc/sysconfig/network-scripts
ifcfg-ens33是网卡配置文件,编辑ifcfg-ens33文件
vim ifcfg-ens33
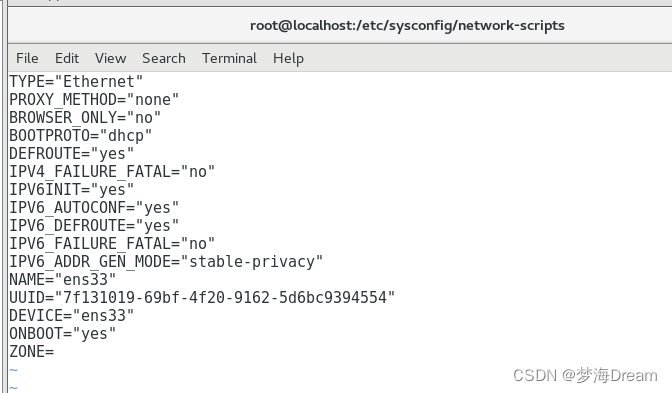
把BOOTPROTO=DHCP改为BOOTPROTO=static,即将地址分配方式从动态分配改为静态地址,然后在文件下面追加内容:
根据自己的物流主机进行配置即可
IPADDR=10.10.20.90
NETMASK=255.255.255.0
GETWAY=10.10.20.1
DNS1=8.8.8.8
重启网络服务
service network restart
在网络配置文件 /etc/sysconfig/network 中添加网关地址
 vim /etc/sysconfig/network
写入内容:
GETEWAY=自己物理的默认网关
保存好之后:
重启网关service network restart
将所以的服务进行重启即可
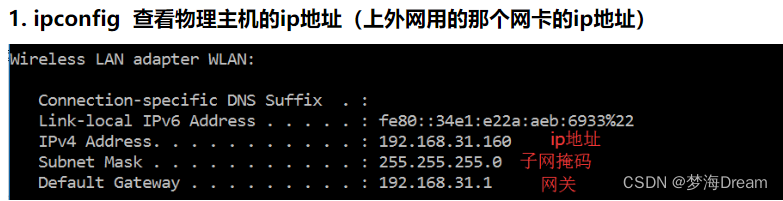
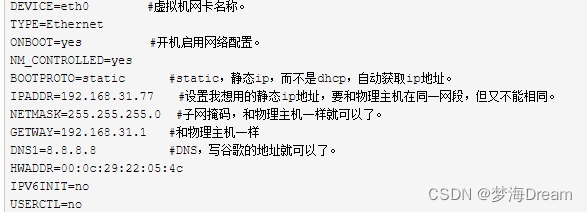
虚拟机和物理机之间相互访问
php5.6.40安装
wget http://cn2.php.net/distributions/php-5.6.40.tar.gz
tar -zxvf  http://cn2.php.net/distributions/php-5.6.40.tar.gz
cd php-5.6.40

yum install -y epel-release
yum install -y libmcrypt-devel
yum install -y gcc bison bison-devel zlib-devel libmcrypt-devel mcrypt mhash-devel openssl-devel libxml2 libxml2-devel libcurl-devel bzip2-devel readline-devel libedit-devel sqlite-devel jemalloc jemalloc-devel

./configure --prefix=/usr/local/php56 \
--with-config-file-path=/usr/local/php56/etc \
--enable-inline-optimization --disable-debug \
--disable-rpath --enable-shared --enable-opcache \
--enable-fpm --with-fpm-user=www \
--with-fpm-group=www \
--with-mysql=mysqlnd \
--with-mysqli=mysqlnd \
--with-pdo-mysql=mysqlnd \
--with-gettext \
--enable-mbstring \
--with-iconv \
--with-mcrypt \
--with-mhash \
--with-openssl \
--enable-bcmath \
--enable-soap \
--with-libxml-dir \
--enable-pcntl \
--enable-shmop \
--enable-sysvmsg \
--enable-sysvsem \
--enable-sysvshm \
--enable-sockets \
--with-curl --with-zlib \
--enable-zip \
--with-bz2 \
--with-freetype-dir \
--with-readline \
--with-gd \
--with-apxs2=/usr/local/httpd/bin/apxs

# 默认php.ini配置文件
cp /usr/local/php-5.6.40/php.ini-development /usr/local/php56/etc/php.ini

# 默认php-fpm.conf配置文件
cp /usr/local/php56/etc/php-fpm.conf.default /usr/local/php56/etc/php-fpm.conf

# 设置php开机自启动
cp /usr/local/php-5.6.40/sapi/fpm/init.d.php-fpm /etc/init.d/php5-fpm
chmod +x /etc/init.d/php5-fpm
chkconfig --add php5-fpm
chkconfig php5-fpm on

#启动php-fpm
service php5-fpm start