一、WSL2(Ubuntu18.04安装)
1、开启“适用于Linux的Windows子系统”
找到控制面板-程序和功能-启用或关闭Windows功能,选中“适用于Linux的Windows子系统”和“虚拟机平台”,然后点击确定;
然后立即重启电脑;

2、下载内核更新包并安装

3、在 Microsoft Store 中下载 Windows Terminal;

下载成功后,打开Windows Terminal,输入wsl --set-default-version 2;
wsl --set-default-version 2
4、在 Microsoft Store 中下载 Ubuntu18.04;

下载成功后,打开ubuntu,根据提示输入用户名和密码(加载时间可能会比较久)
参考文档
二、换源
1、将原来的源做一个备份:
sudo cp /etc/apt/sources.list /etc/apt/sources.list.bak
2、然后编辑源文件,删除文件中的所有内容,将下面的内容复制进去;
sudo vim /etc/apt/sources.list
deb https://mirrors.ustc.edu.cn/ubuntu/ bionic main restricted universe multiverse
deb-src https://mirrors.ustc.edu.cn/ubuntu/ bionic main restricted universe multiverse
deb https://mirrors.ustc.edu.cn/ubuntu/ bionic-updates main restricted universe multiverse
deb-src https://mirrors.ustc.edu.cn/ubuntu/ bionic-updates main restricted universe multiverse
deb https://mirrors.ustc.edu.cn/ubuntu/ bionic-backports main restricted universe multiverse
deb-src https://mirrors.ustc.edu.cn/ubuntu/ bionic-backports main restricted universe multiverse
deb https://mirrors.ustc.edu.cn/ubuntu/ bionic-security main restricted universe multiverse
deb-src https://mirrors.ustc.edu.cn/ubuntu/ bionic-security main restricted universe multiverse
deb https://mirrors.ustc.edu.cn/ubuntu/ bionic-proposed main restricted universe multiverse
deb-src https://mirrors.ustc.edu.cn/ubuntu/ bionic-proposed main restricted universe multiverse
deb https://mirrors.tuna.tsinghua.edu.cn/ubuntu/ bionic main restricted universe multiverse
deb-src https://mirrors.tuna.tsinghua.edu.cn/ubuntu/ bionic main restricted universe multiverse
deb https://mirrors.tuna.tsinghua.edu.cn/ubuntu/ bionic-updates main restricted universe multiverse
deb-src https://mirrors.tuna.tsinghua.edu.cn/ubuntu/ bionic-updates main restricted universe multiverse
deb https://mirrors.tuna.tsinghua.edu.cn/ubuntu/ bionic-backports main restricted universe multiverse
deb-src https://mirrors.tuna.tsinghua.edu.cn/ubuntu/ bionic-backports main restricted universe multiverse
deb https://mirrors.tuna.tsinghua.edu.cn/ubuntu/ bionic-security main restricted universe multiverse
deb-src https://mirrors.tuna.tsinghua.edu.cn/ubuntu/ bionic-security main restricted universe multiverse
deb https://mirrors.tuna.tsinghua.edu.cn/ubuntu/ bionic-proposed main restricted universe multiverse
deb-src https://mirrors.tuna.tsinghua.edu.cn/ubuntu/ bionic-proposed main restricted universe multiverse
deb http://mirrors.aliyun.com/ubuntu/ bionic main restricted universe multiverse
deb http://mirrors.aliyun.com/ubuntu/ bionic-security main restricted universe multiverse
deb http://mirrors.aliyun.com/ubuntu/ bionic-updates main restricted universe multiverse
deb http://mirrors.aliyun.com/ubuntu/ bionic-proposed main restricted universe multiverse
deb http://mirrors.aliyun.com/ubuntu/ bionic-backports main restricted universe multiverse
deb-src http://mirrors.aliyun.com/ubuntu/ bionic main restricted universe multiverse
deb-src http://mirrors.aliyun.com/ubuntu/ bionic-security main restricted universe multiverse
deb-src http://mirrors.aliyun.com/ubuntu/ bionic-updates main restricted universe multiverse
deb-src http://mirrors.aliyun.com/ubuntu/ bionic-proposed main restricted universe multiverse
deb-src http://mirrors.aliyun.com/ubuntu/ bionic-backports main restricted universe multiverse
3、更新镜像源
sudo apt-get update
4、更新软件
sudo apt-get upgrade
参考文件
三、安装miniconda3
1、下载miniconda3
wget https://repo.anaconda.com/miniconda/Miniconda3-latest-Linux-x86_64.sh

2、安装miniconda3
bash Miniconda3-latest-Linux-x86_64.sh

- 一直回车,知道问你是否接收协议,选yes

- 询问安装位置
Miniconda3 现在将安装到此位置: /home/cxl/miniconda3
- 按 ENTER 确认位置
- 按 CTRL-C 中止安装
- 或在下方指定不同的位置

你希望安装程序初始化 Miniconda3
通过运行 conda init? [是|否]
如果选中 No,需要手动初始化,将miniconda加入环境变量

3、检查miniconda3安装成功没有:
conda activate
报错:

错误原因:
~/.bashrc文件没有配置好,需要在 ~/.bashrc 文件的最后一行加上miniconda3的bin路径
export PATH=$PATH:/home/cxl/anaconda3/bin


启用新的文件
source ~/.bashrc
四、安装Mysql数据库
1、下载mysql
sudo apt-get install mysql-client-core-5.7
sudo apt-get install mysql-client-5.7
sudo apt-get install mysql-server-5.7
2、设置密码
使用client的user和password登录
sudo cat /etc/mysql/debian.cnf

mysql -u debian-sys-maint -p
update mysql.user set authentication_string=password('123456') where user='root' and Host ='localhost';
update user set plugin="mysql_native_password";
flush privileges;
quit;
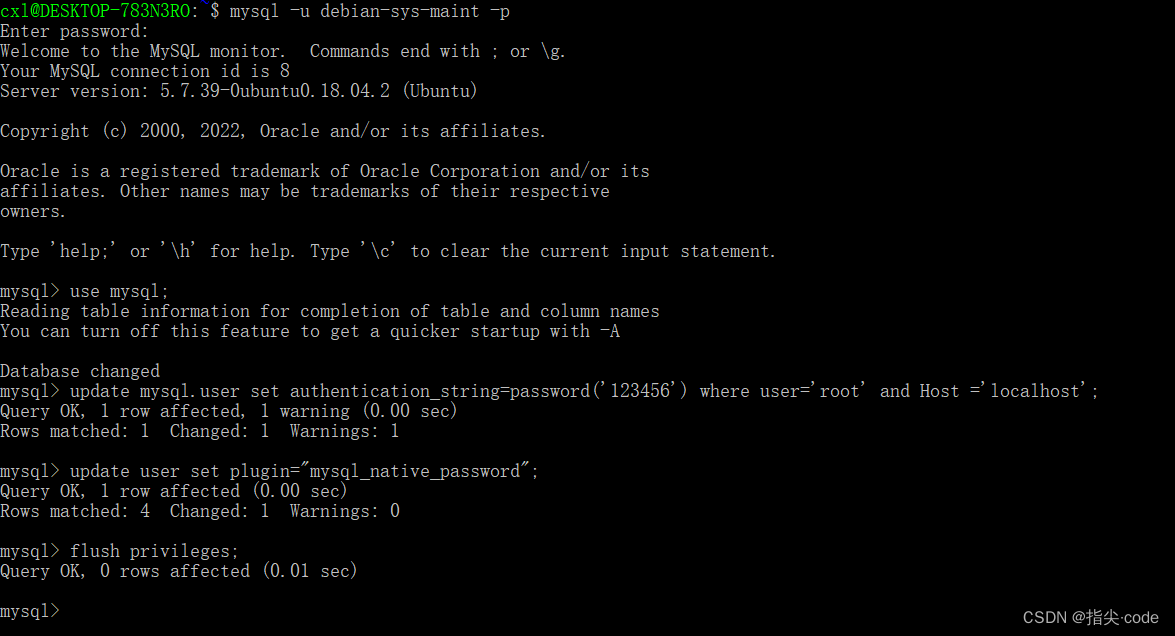
重启mysql,就可以用新密码登录了;
sudo service mysql restart;
mysql -u root -p
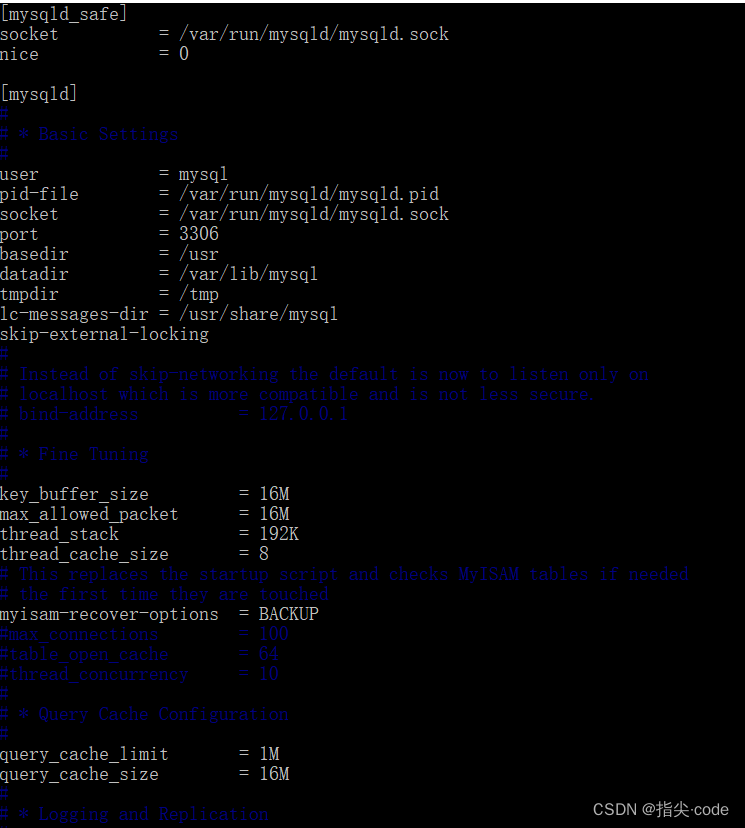
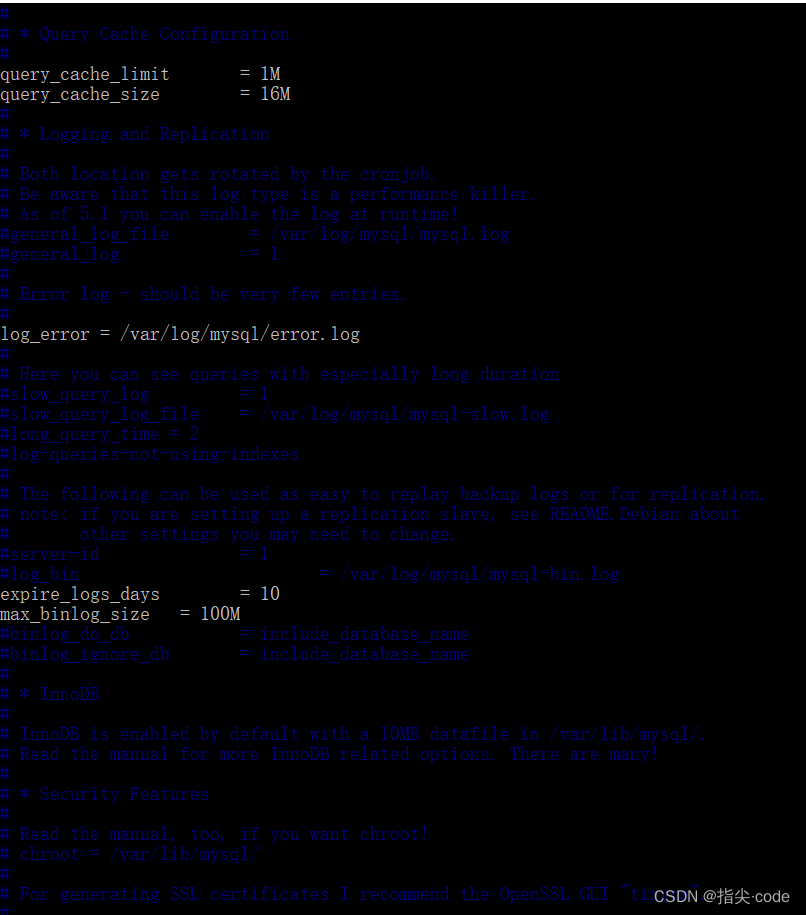
3、远程连接设置
编辑 mysqld.cnf 文件,注释掉 bind-address = 127.0.0.1
sudo vim /etc/mysql/mysql.conf.d/mysqld.cnf
重启mysql服务
sudo service mysql restart
给root用户授权
GRANT ALL PRIVILEGES ON *.* TO 'root'@'%'IDENTIFIED BY '123456' WITH GRANT OPTION;
flush privileges;


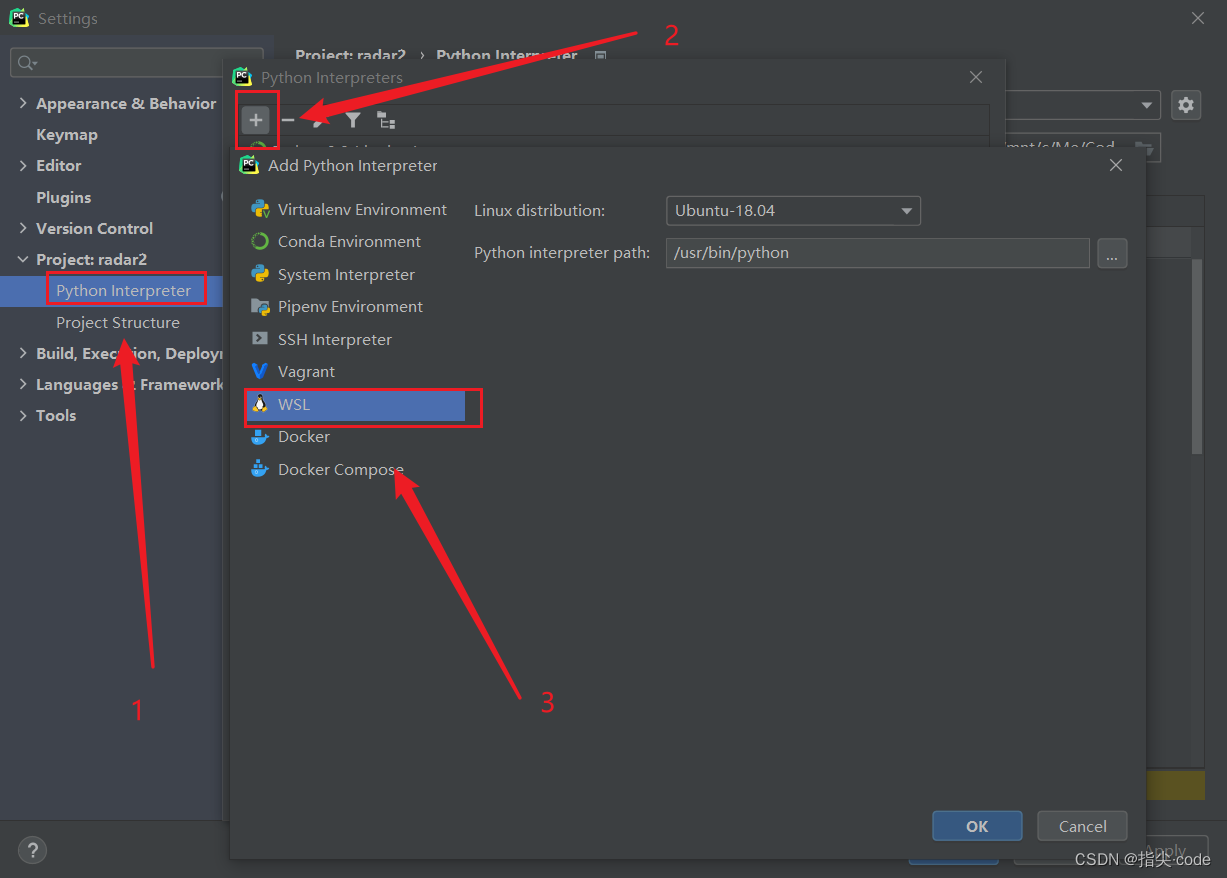
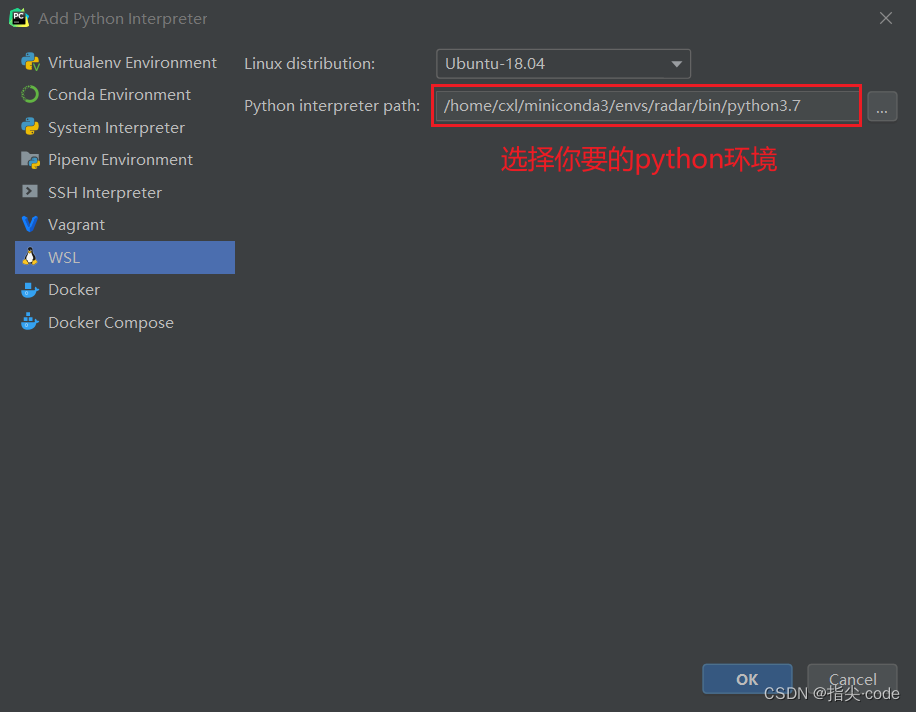
五、windows pycharm连接wsl
1、pycharm – setting – project:XXX – python Interpreter
本文内容由网友自发贡献,版权归原作者所有,本站不承担相应法律责任。如您发现有涉嫌抄袭侵权的内容,请联系:hwhale#tublm.com(使用前将#替换为@)