环境:python3.8.5 ,64位,Visual Studio 2017,SWIG 4.0.2
一,安装SWIG:https://www.swig.org/download.html
下载windows 预编译好的文件,解压后把swig.exe所在目录添加到环境变量Path中,验证:
打开cmd,敲入swig -help
二,编写C++类,如:
CppDll.h:
#pragma once
#include <string>
#include <vector>
struct cppStruct
{
    int a = 0;
    int b = 2;
};
class CppDllClass
{
public:
    int addFunc(int a, int b);
    std::string getName();
    void setName(std::string newname)
    {
        m_name = newname;
    }
    cppStruct getS()
    {
        auto a = cppStruct();
        a.a = 100;
        return a;
    }
    std::vector<int> getV()
    {
        std::vector<int> ret;
        ret.push_back(9);
        return ret;
    }

    // 如果成员变量要暴露给python,则改为public
private:
    std::string m_name = "default name";


};
CppDll.cpp:
#include "CppDll.h"

int CppDllClass::addFunc(int a, int b)
{
    return a+b;
}

std::string CppDllClass::getName()
{
    return m_name + "tt";
}
三,编写.i文件:
%include "std_string.i"
%include "std_vector.i"
using namespace std;

namespace std {
  %template(IntVector) vector<int>;
}
%module CppDll
%{
#include "CppDll.h"
%}
%include "CppDll.h"
保存到CppDll.cpp所在目录;
关于更多模板类的使用,请参考:用SWIG向Python提供C++里STL的容器 · 零壹軒·笔记
https://www.swig.org/Doc3.0/SWIGPlus.html
四,打开cmd,进入CppDll.cpp所在目录,敲入:
swig -python -c++ CppDll.i
命令执行完后会在CppDll.cpp所在目录 生成CppDll_wrap.cxx、CppDll.py文件
五,下一步编译成python能导入的模块文件(.pyd).
新建一个.py文件,名字随意(必须是英文),例如compile.py,输入以下内容:
from distutils.core import setup, Extension

CppDll_module = Extension('_CppDll',
                           sources=['CppDll_wrap.cxx', 'CppDll.cpp'],
                           )
setup (name = 'CppDll',
       version = '0.1',
       author      = "beshar",
       description = """Simple swig example from docs""",
       ext_modules = [CppDll_module],
       py_modules = ["CppDll"],
       )
这里模块名为CppDll,按照实际情况改为自己的模块名。
六,打开cmd,进入compile.py所在目录,敲入:
D:\ProgramData\anaconda3\python.exe compile.py build_ext --inplace
我的机器上,命令执行成功后,会生成_CppDll.cp38-win_amd64.pyd,手动改为_CppDll.pyd
七,验证C++模块
打开cmd,cd到_CppDll.pyd所在目录,敲入python,进入python开发环境,然后导入模块并调用C++模块的函数:
import CppDll
class1 = CppDll.CppDllClass()
class1.setName('name1')
class1.getName()
八,.pyd的也可以用vs来生成:
新建一个c++ dll工程,把CppDll.cpp,CppDll_wrap.cxx添加到工程里,修改工程属性:
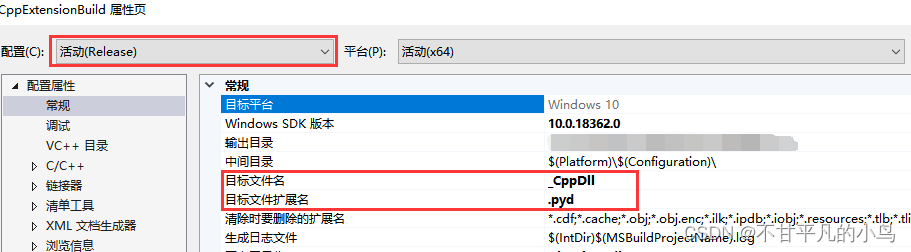

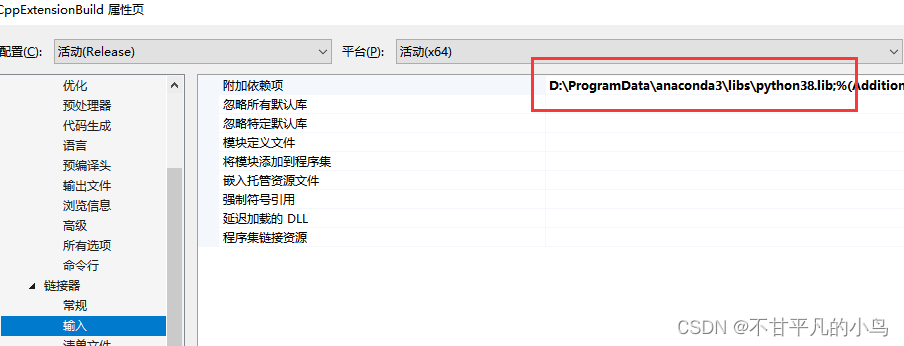
由于安装python的时候没有安装Debug的库,因此这里使用Release配置。
点击生成,即可生成.pyd文件。这一步可以替代上文的第五~第七步。