SpringMVC总结
一、配置
1、SpringMVC.xml配置文件
<?xml version="1.0" encoding="UTF-8"?>
<beans xmlns="http://www.springframework.org/schema/beans"
       xmlns:xsi="http://www.w3.org/2001/XMLSchema-instance"
       xmlns:context="http://www.springframework.org/schema/context"
       xmlns:mvc="http://www.springframework.org/schema/mvc"
       xsi:schemaLocation="http://www.springframework.org/schema/beans http://www.springframework.org/schema/beans/spring-beans.xsd http://www.springframework.org/schema/context http://www.springframework.org/schema/context/spring-context.xsd http://www.springframework.org/schema/mvc http://www.springframework.org/schema/mvc/spring-mvc.xsd">
<!--1、配置springmvc的处理器对象的扫描路径-->
    <context:component-scan base-package="com.qf.j2102.controller"/>
<!--2、设置springmvc处理方式-->
    <mvc:annotation-driven/>
<!--3、设置对常见资源请求的处理方式-->
    <mvc:default-servlet-handler/>
<!--4、配置视图解析器-->
    <bean class="org.springframework.web.servlet.view.InternalResourceViewResolver">
        <property name="prefix" value="/"/>
        <property name="suffix" value=".jsp"/>
    </bean>
</beans>
2、web.xml文件配置
<!DOCTYPE web-app PUBLIC
 "-//Sun Microsystems, Inc.//DTD Web Application 2.3//EN"
 "http://java.sun.com/dtd/web-app_2_3.dtd" >

<web-app>
  <display-name>Archetype Created Web Application</display-name>

  <servlet>
    <servlet-name>helloController</servlet-name>
    <servlet-class>org.springframework.web.servlet.DispatcherServlet</servlet-class>
    <init-param>
      <param-name>contextConfigLocation</param-name>
      <param-value>classpath:springmvc.xml</param-value>
    </init-param>
    <load-on-startup>1</load-on-startup>
  </servlet>
  <servlet-mapping>
    <servlet-name>helloController</servlet-name>
    <url-pattern>/</url-pattern>
  </servlet-mapping>
</web-app>
3、依赖
  <dependency>
      <groupId>org.springframework</groupId>
      <artifactId>spring-webmvc</artifactId>
      <version>4.3.6.RELEASE</version>
    </dependency>
    <dependency>
      <groupId>org.springframework</groupId>
      <artifactId>spring-test</artifactId>
      <version>4.3.6.RELEASE</version>
    </dependency>
二、常用标签
1、@Controller 在控制器类上加,表示为一个控制器,共SpringMVC扫描
2、@RequestMapping(“/控制器名称”) ----相当于路径别名
(1)、加在控制器方法上,在浏览器输入地址时 /控制器名称 可进入对应的方法中
(2)、加在控制器类上,在浏览器输入地址时 /控制器名称/控制器方法 可进入到对应的方法中
一般用于区别不同控制器类,但方法名相同时
三、传参
1、基本类型参数
浏览器地址:Http://localhost:8080/参数名=参数值
控制器接收:
(1)、直接接收
@RequestMapping("/控制器名")
public String 方法 (参数类型  参数名){

}
(2)、@RequestParam标签
@RequestMapping("/控制器名")
public String 方法 (@RequestParam(value="参数名",defaultValue="默认值") 参数类型 参数名){

}
注:(1)、@RequestParam中的参数名与形参名进行绑定
(2)、@RequestParam 标签接收前端页面的值,并将值赋给参数
(3)、若浏览器地址中没有参数,则defaultValue中的值充当默认值,并将其赋值给形参。
(4)、@RequestParam 只用于接收请求行的参数
(5)、若请求行中参数与形参一致,则可省略
(3)、接收时间类型
SpringMVC默认的时间类型为:“yyyy-MM-dd HH:mm:ss”
通过 @DateTimeFormat 标签可改变其格式
浏览器地址:Http://localhost:8080/date=2021-3-16
控制器接收:
@RequestMapping("/控制器名")
public String 方法 (@DateTimeFormat(pattern="yyyy-MM-dd")Date date){

}
注:可将@DataTimeFormt标签加载实体类的属性上,可设置date类型参数的接收格式,且只用设置一次
(4)@JsonFormt
此标签可设置后端传参给前端Json串时,date类型的格式
@Data
@AllArgsConstructor
@NoArgsConstructor
public class Comment {
    private Integer id;
    private String comment;
    @JsonFormat(pattern = "yyyy-MM-dd hh:mm",timezone = "GMT+8")
    private Date date;
}
注:timezone参数可设置时区为东八区
2、实体传参
先创建一个实体类:
public class Person {
    private Integer id;
    private String name;
    private Integer age;
    private Date birth;

    public String getBirth(){
        return new SimpleDateFormat("yyyy-MM-dd").format(birth);
    }
}
浏览器地址:Http://localhost:8080/id=xxx&name=xxx&age=xxx&birth=yyyy-MM-dd HH:mm:ss
在控制器中接收
@RequestMapping("/控制器名")
public String 方法 (Person person){

}
注:1、SpringMVC可自动识别浏览器中的地址,并将其自动封装为一个对象
2、若参数中的字段与对象属性名不一致,可在对象成员变量上加入@JsonProperty(“参数名”)标签
3、数组传参
浏览器地址:Http://localhost:8080/控制器?变量名=变量值&变量名=变量值
在控制器中接收:
@RequestMapping("/控制器名")
public String 方法 (数组类型[] 数组变量名){

}
注:数组类型一般为:8种基本类型,String类型
4、路径传参
浏览器地址:Http://localhost:8080/参数1/参数2
路径传参需要 @RequestMapping(“/控制器名/{参数名}/{参数名}”)
在控制器中接收:
@RequestMapping("/控制器名/{参数1}/{参数2}")
public String 方法(@PathVariable("参数名") 参数类型 参数名){

}
注:(1)、@PathVariable标签可以自动匹配路径中的参数{参数},并将其赋值给参数。因此@RequestParam 中的参数与@PathVariable中的参数进行绑定,并将其赋值给形参。
(2)、若@RequestMapping中的参数与形参名相同,可将@PathVariable()简写为@PathVariable
(3)、@RequestMapping中参数 [控制器名/{参数}] 的匹配能力与 [控制器名/*] 匹配能力相同
四、请求重定向与请求转发
1、在方法中返回的字符串会被SpringMVC拦截,并将其加上前缀与后缀,从而生成一个完整的请求地址,从而在浏览器中进行跳转。
<!--配置视图解析器-->
    <bean class="org.springframework.web.servlet.view.InternalResourceViewResolver">
        <property name="prefix" value="/"/>   前缀
        <property name="suffix" value=".jsp"/>  后缀
    </bean>
注:若页面在不同的包中可在方法返回值中加入(root/index) ----> /root/index.jsp
2、一般默认为请求转发,在返回值中开头加上 “redirect : 页面” 可进行请求重定向。
3、请求重定向与请求转发的区别:
(1)、请求转发是转发的模式视图 (ModelView),请求重定向发送的一个地址
(2)、在SpringMVC中,请求重定向不能直接跳转页面,需要先跳转到另一个控制器中,再通过请求转发进行页面跳转。
4、请求转发向 Request 域中插入数据
(1)、在方法的参数列表加入 Model model 参数,通过Spring向其中注入一个对象,通过 model.addAttribute(“参数名”,值)的方式,向 Request 域中加入数据
@RequestMapping("/控制器名")
public String 方法 (Model model){
    model.addAttribute("参数名",值)
}
(2)、在方法中 new 一个 ModelAndView 对象,再调用其 modelAndView.addObject(“参数名”,值)的方式向Request域中加入数据。
@RequestMapping("/控制器名")
public String 方法 (){
	//创建一个模型视图对象
    ModelAndView modelAndView = new ModelAndView();
    //设置逻辑视图名
    modelAndView.setViewName("名称");
    //设置传到视图中的数据(默认为Request域)
    modelAndView.addObject("参数名",值);
    return modelAndView;
}
注:最后根据逻辑视图名进行跳转
五、Ajax
1、通过HttpServletResponse发送AJAX请求
(1)、首先获取 Response 对象
可在参数列表中通过Spring注入 Resonse 对象
(2)、获取到 Response 对象后与 Servlet 用法相同
@RequestMapping("/控制器名称")
public String 方法 (Response response){
    Writer writer = response.getWriter();
    writer.writer(值);
    writer.flush();
    writer.close();
}
2、通过@ResponseBody 标签发送AJAX请求
直接return 的就就是JSON数据
六、向Session域中插入数据
1、同过形参注入 HttpSession 对象
@RequestMapping("控制器名称")
public String 方法 (HttpSession session){
    session.setAttribute("参数名",值);
}
2、在类上添加 @SessionAttributes( {“参数名1”,“参数名2”} ) 标签,在方法中通过 model.addAttribute(“参数名”,值) 向Session域中加入值。
@Controller
@SessionAttribute({"参数名1","参数名2"})
public class 类 {
    @RequestMapping("/控制器名")
    public String 方法 (Model model){
        model.addAttribute("参数名",值);
    }
}
注:model.addAttribute(“参数名”,值) 中的参数名必须与 @SessionAttribute 标签中的参数名相同
七、SpringMVC上传文件
1、依赖
 <dependency>
      <groupId>commons-io</groupId>
      <artifactId>commons-io</artifactId>
      <version>2.4</version>
    </dependency>
    <dependency>
      <groupId>commons-fileupload</groupId>
      <artifactId>commons-fileupload</artifactId>
      <version>1.4</version>
    </dependency>
2、Spring配置文件
<!--配置文件解析器-->
    <bean id="multipartResolver" class="org.springframework.web.multipart.commons.CommonsMultipartResolver">
        <property name="defaultEncoding" value="utf-8"/>
    </bean>
3、前端使用标签
<form action="路径" method="post" enctype="multipart/form-data">
    <input type="file" name="file">
</form>
注:form表单中必须用post提交
4、控制器接收
//在参数列表中注入MultiparfFile
public String onload(MultipartFile imgFile){
    //1、截取上传文件的后缀名,生成新的文件名
    String oriFileName=imgFile.getOriginalFilename();
    String ext=oriFileName.substring(originalFilename.lastIndexOf("."));
    String fileName=UUID+ext;
    //2、获取imgs目录在服务器的路径
    String dir=request.getServletContext().getRealPath("imgs");
    String savePath=dir+"/"+fileName;
    //3、保存文件
    imgFile.transferTo(new File(savePath));
    //4、将文件名存入数据库
    对象.set(savePath);
    调用service方法;

}
5、MultipartFile类实现多文件上传
 @RequestMapping("fileImgSave")
	public String  fileImgSave(@RequestParam("filename") MultipartFile[] files,HttpServletRequest request){
		//保存文件的路径
		String realPath = request.getSession().getServletContext().getRealPath("/imgssss");
		File path = new File(realPath);
		if(!path.exists()){
			path.mkdirs();
		}
                //判断file数组不能为空并且长度大于0
                if(files != null && files.length > 0){
                    //循环获取file数组中得文件
                    for(int i = 0;i < files.length;i++){
                        MultipartFile file = files[i];
                        //保存文件
                        if (!file.isEmpty()){
    	                    try {
    	                        //转存文件  file.getOriginalFilename();文件原名称包括后缀名
    	                        file.transferTo(new File(realPath+"/img"+i+".png"));
    	                    } catch (IOException e) {
    	                        e.printStackTrace();
    	                    }
    	                }
                    }
                }

		return "ok";
	}
八、SpringMVC文件下载
1、前端缩略图
<div class="row">
    <div class="col-xs-6 col-md-3">
        <a href="#" class="thumbnail">
            <img src="..." alt="...">
        </a>
    </div> ...
</div>
注:标签中的href属性为服务器控制器路径,响应方式为AJAX请求
2、通过流传输文件(本地不保存)
@RequestMapping("/download")
public void downloadImg(String fname,HttpServletRequest request,HttpServletResponse response){
	//1、从服务器目录找到当前文件
	String dir=request.getServletContext().getRealPaht("服务器文件名");
	String filePath=dir+"/"+fname;
	FileInputStream fileImputStream =new FileInputStream(filePath);

	//2、将服务器文件流复制到用户流
	IOUtils.copy(fileInputStream,response.getOutPutStream());
}
3、通过流传输文件(本地保存)
@RequestMapping("/download")
public void downloadImg(String fname,HttpServletRequest request,HttpServletResponse response){
	//1、从服务器目录找到当前文件
	String dir=request.getServletContext().getRealPaht("服务器文件名");
	String filePath=dir+"/"+fname;
	FileInputStream fileImputStream =new FileInputStream(filePath);

    //2、设置响应头
    response.setContextType("application/exe");
    response.addHeader("content-disposition","attachment;filename="+fname);

	//2、将服务器文件流复制到用户流
	IOUtils.copy(fileInputStream,response.getOutPutStream());
}
九、解决中文乱码
1、JSP
<%@ page contentType="text/html;charset=UTF-8" language="java" pageEncoding="UTF-8" isELIgnored="false" %>
2、Html
<head>
    <meta charset="UTF-8">
    <title>Title</title>
</head>
3、TmoCat
<Connector connectionTimeout="20000" port="8080"
			   protocol="HTTP/1.1" redirectPort="8443"  URIEncoding="UTF-8"/>
通过Mevan插件部署Tomcat解决乱码问题
<plugins>
      <plugin>
        <groupId>org.apache.tomcat.maven</groupId>
        <artifactId>tomcat7-maven-plugin</artifactId>
        <version>2.2</version>
        <configuration>
          <path>/</path>
          <port>8080</port>
          <uriEncoding>UTF-8</uriEncoding>
        </configuration>
      </plugin>
    </plugins>
注:解决解决过程乱码问题,特别是 get 的提交方式
4、设置控制器编码
在 web.xml 文件设置全局过滤器,通过过滤器设置编码格式
 <filter>
    <filter-name>encoding</filter-name>
    <filter-class>org.springframework.web.filter.CharacterEncodingFilter</filter-class>
    <init-param>
      <param-name>encoding</param-name>
      <param-value>utf-8</param-value>
    </init-param>
    <init-param>
      <param-name>forceEncoding</param-name>
      <param-value>true</param-value>
    </init-param>
  </filter>
  <filter-mapping>
    <filter-name>encoding</filter-name>
    <url-pattern>/*</url-pattern>
  </filter-mapping>
十、请求方式
1、请求行提交参数
(1)、form 表单提交
(2)、get与post都是请求行传值,post隐藏参数,get不隐藏
(3)、标签提交,URL提交,也是请求行传参
2、AJAX提交
$.ajad{
    url:"", //请求行传参
    headers:"", //请求头传参
    contextType:"application/json", //参数类型,若请求体为对象类型,则需要定义json类型
   	data:{}, //请求体传参
        success(function({

        }) )
}
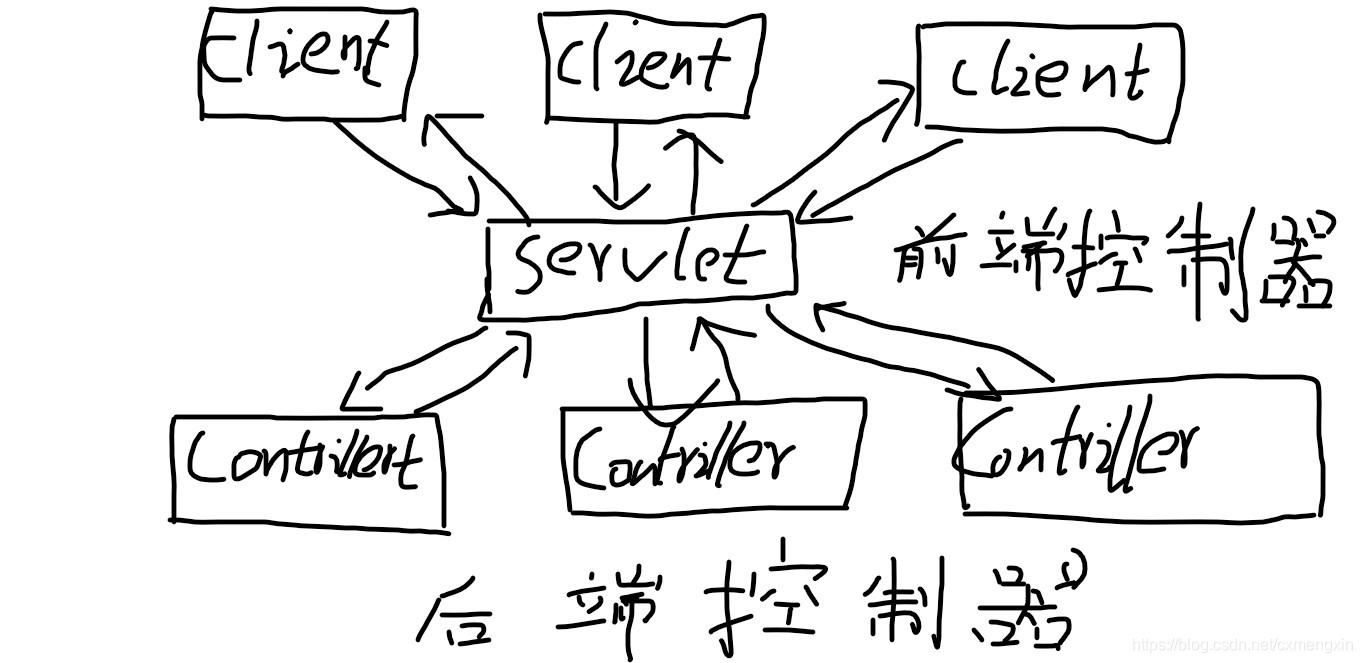
十一、SpringMVC前端控制器
1、前端控制器的作用
SpringMVC中只有一个Servlet,这个Servlet用于接收所有的非页面跳转,在接收到其请求后,根据他的RequestURI跳调用其具体的业务类的方法,最后将返回值返回到这个Servlet中进行跳转。因此,SpringMVC的前端控制器主要是起到到一个调度与分发请求与相应的作用;即SpringMVC的前端控制器的作用类似于大堂经理的作用。
2、实现流程
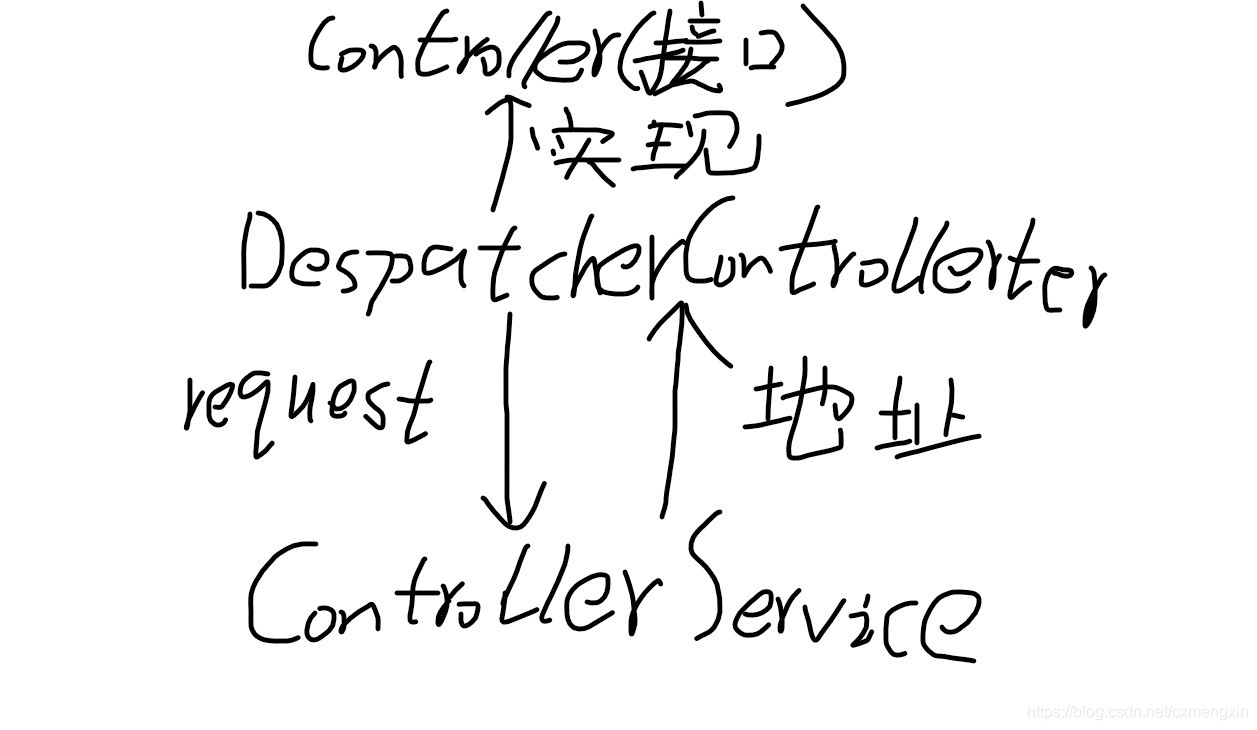
Controller接口
public interface Controller {
    String handlerRequest(HttpServletRequest request, HttpServletResponse response);
}
DespatcherServlert控制器
@WebServlet({"/input","/save"})
public class DispatcherServlet extends HttpServlet {
    private final String INPUTURI="input";
    private final String SAVEURI="save";
    private String prefix="/WEB-INF/root/";
    private String suffix=".jsp";

    @Override
    protected void doPost(HttpServletRequest req, HttpServletResponse resp) throws ServletException, IOException {
        String path="";
        Controller controller=null;
        String requestURI = req.getRequestURI();
        String uri = requestURI.substring(requestURI.lastIndexOf("/") + 1);
        if (uri.equalsIgnoreCase(INPUTURI)){
            controller=new InputServlet();
        }else if (uri.equalsIgnoreCase(SAVEURI)){
            controller=new SaveServlet();
        }
        path = controller.handlerRequest(req, resp);
        req.getRequestDispatcher(prefix+path+suffix).forward(req,resp);
    }

    @Override
    protected void doGet(HttpServletRequest req, HttpServletResponse resp) throws ServletException, IOException {
        doPost(req, resp);
    }
}
ControllerService控制器
public class SaveServlet implements Controller {
    @Override
    public String handlerRequest(HttpServletRequest request, HttpServletResponse response) {
        Student student=new Student();
        String sid1 = request.getParameter("sid");
        Integer sid = request.getParameter("sid")==""?0:Integer.valueOf( request.getParameter("sid"));
        String sname = request.getParameter("sname");
        String birth1 = request.getParameter("birth");
        Date birth= birth1==""?null:DateTool.dateFormat(birth1);
        Double money = request.getParameter("money")==""?0:Double.valueOf(request.getParameter("money"));

        Check check=new Check(sname,birth,money);
        CheckEnty checkEnty=new CheckEnty();
        Map<String, String> errors = checkEnty.check(check);

        if (errors.size()==0){
            student.setSid(sid);
            student.setSname(sname);
            student.setBirth(birth);
            student.setMoney(money);
            request.setAttribute("student",student);
            return "save";
        }else {
            request.setAttribute("err",errors);
            request.setAttribute("val",check);
            return "input";
        }

    }
}
十二、通过Spring代理SpringMVC
1、依赖
需要 spring-webmvc依赖
 <dependency>
      <groupId>org.springframework</groupId>
      <artifactId>spring-webmvc</artifactId>
      <version>4.3.6.RELEASE</version>
</dependency>
2、通过Spring.xml文件代理SpringMVC
Spring代理了SpringMVC的DispatcherController类,因此需要在Spring.xm文件中注册业务Controller,以及定义请求全路径的前缀与后缀。
<?xml version="1.0" encoding="UTF-8"?>
<beans xmlns="http://www.springframework.org/schema/beans"
       xmlns:xsi="http://www.w3.org/2001/XMLSchema-instance" xmlns:p="http://www.springframework.org/schema/p"
       xmlns:context="http://www.springframework.org/schema/context"
       xmlns:mvc="http://www.springframework.org/schema/mvc"
       xsi:schemaLocation="http://www.springframework.org/schema/beans http://www.springframework.org/schema/beans/spring-beans.xsd http://www.springframework.org/schema/context http://www.springframework.org/schema/context/spring-context.xsd http://www.springframework.org/schema/mvc http://www.springframework.org/schema/mvc/spring-mvc.xsd">
    //注册业务Controller
    <bean class="com.qf.controller.DeptAllController" name="/all"/>
    <bean class="com.qf.controller.DeptDeleteController" name="/delete"/>
	//定义请求全路径的前缀与后缀
    <bean class="org.springframework.web.servlet.view.InternalResourceViewResolver" p:prefix="/WEB-INF/root/" p:suffix=".jsp"/>
    //加载静态资源
    <mvc:default-servlet-handler/>
</beans>
在实体Controller中仍然要实现Controller类的HandlerReuqest方法,并只要在该方法写业务逻辑即可,最终返回ModelAndView对象
public class DeptAllController implements Controller {
    DeptService deptService=new DeptServiceImpl();

    @Override
    public ModelAndView handleRequest(HttpServletRequest request, HttpServletResponse response) throws Exception {
        List<Dept> depts = deptService.selectAll();
        return new ModelAndView("AllDepts","depts",depts);
    }
}
注:若在Spring.xml文件中定义了请求全路径的前缀与后缀,就需要定义处理静态资源的标签,通过此标签可使Spring处理静态资源,即可以直接加载欢迎页面
3、ModelAndView类详解
(1)Model为数据,即给请求域中加入的数据;View为视图,即需要跳转的页面名
(2)单参控制器
ModelAndView ma=new ModelAndView("页面名");
(2)三参控制器
ModelAndView ma=new ModelAndView("页面名","数据别名","数据");
注:1、若在Spring.xml文件中定义了请求全路径的前缀以及后缀,只需要写页面名即可;若没有定义则需要写页面的请求全路径,但通过此方法只能传入单个参数
2、通过 ma.addObject(“数据别名”,“数据”) 向请求域中加入多个数据
(3)Model类
Model m=new Model();
m.addAttribute("数据别名","数据");
通过 m.addAttribute() 方法也可向请求域中加入数据
4、通过注解代理SpringMVC
(1)通过代理的方式代理SpringMVC需要需要在Spring.xml文件中定义扫描器扫描Controller,还需要开启标签模式,以及定义请求全路径的前缀与后缀,和设置加载静态资源
<?xml version="1.0" encoding="UTF-8"?>
<beans xmlns="http://www.springframework.org/schema/beans"
       xmlns:xsi="http://www.w3.org/2001/XMLSchema-instance" xmlns:p="http://www.springframework.org/schema/p"
       xmlns:context="http://www.springframework.org/schema/context"
       xmlns:mvc="http://www.springframework.org/schema/mvc"
       xsi:schemaLocation="http://www.springframework.org/schema/beans http://www.springframework.org/schema/beans/spring-beans.xsd http://www.springframework.org/schema/context http://www.springframework.org/schema/context/spring-context.xsd http://www.springframework.org/schema/mvc http://www.springframework.org/schema/mvc/spring-mvc.xsd">
 	//定义扫描器
    <context:component-scan base-package="com.qf.controller"/>
	//加载静态资源
    <mvc:default-servlet-handler/>
	//开启标签模式
    <mvc:annotation-driven/>
	//定义请求全路径的前缀与后缀
    <bean class="org.springframework.web.servlet.view.InternalResourceViewResolver" p:prefix="/WEB-INF/root/" p:suffix=".jsp"/>

</beans>
(2)常用标签
在控制器中需要 @Controller 标签来声明一个控制器,由于@Controller 标签中就包含 @Component 标签,因此不需要在定义 @Component 标签;还需要@RequestMapping(“Servlet名”) 标签来定义一个Servlet的请求路径,可以定义在控制器上也可定义在方法上(可以不定义在控制器上但必须定义在方法上)
@Controller
public class DeptController {
    DeptService deptService=new DeptServiceImpl();
	//路径传参
    @RequestMapping("/one/{did}")
    public String selectOne(@PathVariable("did") Integer did, HttpServletRequest request){
        Dept dept = deptService.selectOne(did);
        request.setAttribute("dept",dept);
        return "Dept";
    }
	//问号传参
    @RequestMapping("/update")
    public String update(Dept dept){
        deptService.update(dept);
        return "redirect:/all";
    }
}
(3)返回值
标签模式可以返回一个字符串,也可返回一个ModelAndView对象;若返回字符串则默认请求转发,即返回一个ModelAndView对象;若需要请求重定向,则需要在请求名中加入“redirect:”的前缀,但只能跳转到控制器中,不能直接跳转到页面中。
(4)参数的注入
需要什么对象就在参数列表中定义即可,Spring可以注入该对象
十二、RestFul风格
1、随着前端越来越多,如移动端、平板等,需要统一后端的访问接口;其思想是将网络链接都看作一种网络资源,前后端交互时,是访问后端的网络资源
2、RestFul风格是用于前后端分离的一种编程风格,在RestFul风格下后端给前端传的值都为Json串
3、在控制器上加标签@RestController标签,可将该控制器下所有的方法的返回值都设置为Json串
在方法上添加标签@ResponseBoday标签,可将该方法的返回值设置为Json串
4、由于前端访问后端的资源,因此访问时使用Http动词,常用的Http动词如下:
Get:查询
Post:新增
Put:修改
Delete:删除
其对应的后端控制器为:
GetMapping (“name”)
PostMapping(“name”)
Put(“name”)
Delete(“name”)
十三、校验与国际化
1、SpringMVC中的Validator类可以校验用户输入的值的合法性
2、自定义Validate类并继承Validator类,并实现supports(Class<?> aClass)方法与validate(Object o, Errors errors)方法
public class DeptValiDate implements Validator {
    @Override
    public boolean supports(Class<?> aClass) {
        return aClass.isAssignableFrom(Dept.class);
    }

    @Override
    public void validate(Object o, Errors errors) {
        Dept dept = (Dept) o;
		//获取需要校验的值
        String dname = dept.getDname();
        Integer count = dept.getCount();
		//非空校验
        ValidationUtils.rejectIfEmpty(errors, "dname", "dname");
        ValidationUtils.rejectIfEmpty(errors, "count", "count");
		//正确性校验
        if (count != null && count < 0) {
            errors.rejectValue("count", "count.invalidate");
        }
    }
}
注:1、其中需要supports()方法的返回值为true,才会继续调用validate方法进行校验
2、rejectIfEmpty(),第一个参数为错误信息的类,第二个参数为需要校验的类,第三个参数为错误码
3、rejectValue()方法只需要两个参数,第一个参数为需要校验的类,第二个参数为错误码
4、其中,错误码会匹配 webapp/WEB-INF/msg.properties 文件中的key,输出错误信息
3、在Spring.xml文件中定义节点
<bean class="org.springframework.context.support.ReloadableResourceBundleMessageSource" id="messageSource">
        <property name="basename" value="/WEB-INF/msg"/>
    </bean>
注:1、该bean一定要有id,且id名一定要为messageSource
2、basename属性定义的为msg.properties文件的路径
4、在controller中调用
	@RequestMapping("/add")
    public String add(Dept dept, BindingResult bindingResult, Model model) {
        DeptValiDate valiDate = new DeptValiDate();
        //校验
        valiDate.validate(dept, bindingResult);
        //判定校验是否通过
        if (bindingResult.hasErrors()) {
            //校验未通过,向request中存一个空构造
            model.addAttribute("dept", dept);
            return "Save";
        }
        deptService.add(dept);
        return "redirect:/all";
    }
注:1、在参数列表中注入BindingResult对象,作为errors错误信息
2、如果信息有误,需要向页面中传递一个空的构造器,因此需要向request域中存一个空构造
5、在JSP页面中的使用
需要先在头部页面中引入form标签
<%@taglib prefix="f" uri="http://www.springframework.org/tags/form" %>
使用form标签
<%--
  Created by IntelliJ IDEA.
  User: dell
  Date: 2021-06-10
  Time: 20:58
  To change this template use File | Settings | File Templates.
--%>
<%@ page contentType="text/html;charset=UTF-8" language="java" pageEncoding="UTF-8" isELIgnored="false" %>
<%@taglib prefix="c" uri="http://java.sun.com/jsp/jstl/core" %>
<%@taglib prefix="f" uri="http://www.springframework.org/tags/form" %>
<html>
<head>
    <meta charset="UTF-8">
    <title>Title</title>
    <link rel="stylesheet" href="https://cdn.bootcdn.net/ajax/libs/twitter-bootstrap/3.3.4/css/bootstrap.min.css">
    <link rel="stylesheet" href="https://cdn.bootcdn.net/ajax/libs/twitter-bootstrap/3.3.4/css/bootstrap-theme.min.css">
</head>
<body>
<f:form class="form-horizontal" action="/add" method="post" commandName="dept">
    <div class="form-group">
        <label for="inputPassword3" class="col-sm-2 control-label">部门名称</label>
        <div class="col-sm-10">
            <f:input type="text" class="form-control" id="inputPassword3" placeholder="请输入部门名称" path="dname"/><font
                color="red"><f:errors path="dname"/></font>
        </div>
    </div>
    <div class="form-group">
        <label for="inputPassword4" class="col-sm-2 control-label">部门人数</label>
        <div class="col-sm-10">
            <f:input type="text" class="form-control" id="inputPassword4" placeholder="请输入部门人数" path="count"/><font
                color="red"><f:errors path="count"/></font>
        </div>
    </div>
    <div class="form-group">
        <div class="col-sm-offset-2 col-sm-10">
            <button type="submit" class="btn btn-default">提交</button>
        </div>
    </div>
</f:form>
</body>
</html>
注:1、一定要在form标签中加入 method="post" commandName="dept"
2、在form标签内,name需要写成path
3、<f:errors path="count"/>标签在有错误信息时,可自动渲染为错误信息
6、国际化
(1)、msg.properties文件
在 /webapp/WEB-INF/msg.properties 文件中定义错误信息
dname=the dname not be Empty
count=the count not be Empty
count.invalidate=the count id illegal
validate类将会在 msg.properties 文件中根据key匹配value
(2)、国际化
同样是在 /web/WEB-INF 路径下,创建带国际化标识的的 msg.properties 文件
例如中文国际化就需要创建 msg_zh_CN.properties 文件
注:1、若为中文国际化,则需要把 msg_zh_CN.properties 文件的编码设为 utf-8
2、或者输入转换过的字符集 (通过JDK自带工具中的 native2ascii 转换)
(3)常见的国际化标识
简体中文(中国)        zh_CN
繁体中文(台湾地区)     zh_TW
繁体中文(香港)        zh_HK
英语(香港)            en_HK
英语(美国)            en_US
英语(英国)            en_GB
英语(全球)    en_WW
英语(加拿大)    en_CA
英语(澳大利亚)    en_AU
英语(爱尔兰)    en_IE
英语(芬兰)    en_FI
芬兰语(芬兰)    fi_FI
英语(丹麦)    en_DK
丹麦语(丹麦)    da_DK
英语(以色列)    en_IL
希伯来语(以色列)    he_IL
英语(南非)    en_ZA
英语(印度)    en_IN
英语(挪威)    en_NO
英语(新加坡)    en_SG
英语(新西兰)    en_NZ
英语(印度尼西亚)    en_ID
英语(菲律宾)    en_PH
英语(泰国)    en_TH
英语(马来西亚)    en_MY
英语(阿拉伯)    en_XA
韩文(韩国)    ko_KR
日语(日本)    ja_JP
荷兰语(荷兰)    nl_NL
荷兰语(比利时)    nl_BE
葡萄牙语(葡萄牙)    pt_PT
葡萄牙语(巴西)    pt_BR
法语(法国)    fr_FR
法语(卢森堡)    fr_LU
法语(瑞士)    fr_CH
法语(比利时)    fr_BE
法语(加拿大)    fr_CA
西班牙语(拉丁美洲)    es_LA
西班牙语(西班牙)    es_ES
西班牙语(阿根廷)    es_AR
西班牙语(美国)    es_US
西班牙语(墨西哥)    es_MX
西班牙语(哥伦比亚)    es_CO
西班牙语(波多黎各)    es_PR
德语(德国)    de_DE
德语(奥地利)    de_AT
德语(瑞士)    de_CH
俄语(俄罗斯)    ru_RU
意大利语(意大利)    it_IT
希腊语(希腊)    el_GR
挪威语(挪威)    no_NO
匈牙利语(匈牙利)    hu_HU
土耳其语(土耳其)    tr_TR
捷克语(捷克共和国)    cs_CZ
斯洛文尼亚语    sl_SL
波兰语(波兰)    pl_PL
瑞典语(瑞典)    sv_SE
西班牙语 (智利)    es_CL