准备
上架步骤
- 一、创建App ID
- 二、创建证书请求文件 (CSR文件)
- 三、创建发布证书 (CER)
- 四、创建Provisioning Profiles配置文件 (PP文件)
- 五、在App Store创建应用
- 六、打包上架
一、创建App ID
![](https://img-blog.csdnimg.cn/img_convert/6fc6506d9b1b684ed37aacb90dac556e.png)
![](https://img-blog.csdnimg.cn/img_convert/afd3f9f25b6cddbe2b5aa55a195870e5.webp?x-oss-process=image/format,png)
![](https://img-blog.csdnimg.cn/img_convert/f90686f13243e4b789a6a6c603effffb.webp?x-oss-process=image/format,png)
![](https://img-blog.csdnimg.cn/img_convert/06e71c619b22598b1ff6bad8ce806d71.webp?x-oss-process=image/format,png)
![](https://img-blog.csdnimg.cn/img_convert/a1893f3265a80fbc8d25123666326991.webp?x-oss-process=image/format,png)
二、创建证书请求文件(CSR文件)
CRS文件主要用于 绑定你的电脑的
- 1 点开LaunchPad,在其他中找到打开钥匙串访问
![](https://img-blog.csdnimg.cn/img_convert/fae68e69fa2e0897867775a35b288fe8.webp?x-oss-process=image/format,png)
- 2 点击电脑左上角的钥匙串访问–证书助理–从证书颁发机构请求证书
![](https://img-blog.csdnimg.cn/img_convert/8f26d2413d497fd6f7c9b036ea06d9ef.webp?x-oss-process=image/format,png)
![](https://img-blog.csdnimg.cn/img_convert/1ca7062845a6917be4dfe83c1bfe16b5.webp?x-oss-process=image/format,png)
![](https://img-blog.csdnimg.cn/img_convert/fc25cbecba9c00c6cf8c95595b3701fb.webp?x-oss-process=image/format,png)
![](https://img-blog.csdnimg.cn/img_convert/3d99d033a85bf29523c2fdb92b085955.webp?x-oss-process=image/format,png)
![](https://img-blog.csdnimg.cn/img_convert/9a4e65aeddfe8c5fd0671c3563233670.png)
三、创建发布证书 (CER文件)
- 1 找到Certificates ,点击All,然后点击右上角 + 号
![](https://img-blog.csdnimg.cn/img_convert/08fcf410a64ce2c317b802ba700677fe.webp?x-oss-process=image/format,png)
![](https://img-blog.csdnimg.cn/img_convert/987343333816cb018d979ce939474061.webp?x-oss-process=image/format,png)
发布证书和开发者证书需要分别创建,操作两次,开发者证书用于真机调试,发布证书用于提交到AppStore。
![](https://img-blog.csdnimg.cn/img_convert/366a2866831ba46edf39b98b2ab468d3.webp?x-oss-process=image/format,png)
![](https://img-blog.csdnimg.cn/img_convert/2c98b2ae930fd550a0e78d72eedf3596.webp?x-oss-process=image/format,png)
- 5.** 点击choose File.. 选择创建好的证书请求文件:CertificateSigningRequest.certSigningRequest 文件,点击Generate**
![](https://img-blog.csdnimg.cn/img_convert/92a99a885a325712b9f86877f8e0121f.webp?x-oss-process=image/format,png)
- 6.** 点击Download下载创建好的发布证书(cer后缀的文件),然后点击Done,你创建的发布证书就会存储在帐号中。**
![](https://img-blog.csdnimg.cn/img_convert/e4f7c3133bd4ab0eace1657bc1c414ac.webp?x-oss-process=image/format,png)
- 7.** 双击安装。如果安装不上,可以直接将证书文件拖拽到钥匙串访问的列表中**
重点
: 一般一个开发者帐号创建一个发布证书就够了,如果以后需要在其他电脑上上架App,只需要在钥匙串访问中创建p12文件,把p12文件安装到其他电脑上。这相当于给予了其他电脑发布App的权限。
四、创建Provisioning Profiles文件
- 找到Provisioning Profiles ,点击All,然后点击右上角 + 号
![](https://img-blog.csdnimg.cn/img_convert/a9999c350d1970eac9f421820cf1b27e.webp?x-oss-process=image/format,png)
2.** 选择App Store,点击Continue**
![](https://img-blog.csdnimg.cn/img_convert/cfcc3debf8d61b6e441813b03171ccd2.webp?x-oss-process=image/format,png)
该流程也需要进行两次,分别创建开发用的PP证书和发布的PP证书。
- 3.在App ID 这个选项栏里面找到你刚刚创建的:App IDs(Bundle ID) 类型的套装,点击Continue
![](https://img-blog.csdnimg.cn/img_convert/c31aeed823ef0a20ffdadf38dc07fbad.webp?x-oss-process=image/format,png)
- 4.选择你刚创建的发布证书(或者生成p12文件的那个发布证书),点击Continue
![](https://img-blog.csdnimg.cn/img_convert/b266394b36bb57db0226a2a411de1eab.webp?x-oss-process=image/format,png)
- 5.在Profile Name栏里输入一个名字(这个是PP文件的名字,可随便输入,在这里我用工程名字,便于分别),然后点击Generate
![](https://img-blog.csdnimg.cn/img_convert/1217458b66207d2a0d5ddd85e7c99318.webp?x-oss-process=image/format,png)
注意:wildCard格式的证书没有推送,PassCard等服务的应用,慎重选择。因为PP证书的开发者证书需要真机调试,所以我们需要绑定真机,这里因为之前添加过一些设备,所以这里就可以直接全选添加,如果没有的话,需要将真机的udid复制出来在此添加。在发布PP文件中,是没有这一步的。
- 6.Download生成的PP文件,然后点击Done
![](https://img-blog.csdnimg.cn/img_convert/1e8d12ffd31dc1c364b2ba06922917ef.webp?x-oss-process=image/format,png)
双击就添加到Xcode中,这样在真机调试或者发布时,就可以分别有不同的PP证书与其对应。其实可以不用下载保存
五、在App Store创建应用
1、回到Account,点击iTunes Connect
![](https://img-blog.csdnimg.cn/img_convert/b994cef1fff0e278e9f3ae42e7c4c03a.webp?x-oss-process=image/format,png)
2、点击我的App
![](https://img-blog.csdnimg.cn/img_convert/ffa1726d33fd914361a8ce96bc7f07d5.webp?x-oss-process=image/format,png)
3、点击新建 iOSApp
![](https://img-blog.csdnimg.cn/img_convert/b3e968179ed0cd94e1053b25749ca799.webp?x-oss-process=image/format,png)
4、依次按提示填入对应信息,然后点击创建
![](https://img-blog.csdnimg.cn/img_convert/f54bff8dc8a77d70af4946e8a32bc57d.webp?x-oss-process=image/format,png)
5、依次把不同尺寸的App截图拉入到对应的里面
![](https://img-blog.csdnimg.cn/img_convert/a9f1874cb5783edd919dcaf7256cafd1.webp?x-oss-process=image/format,png)
6、填入App简介
![](https://img-blog.csdnimg.cn/img_convert/c154474a0da425d23db449c9772232c7.webp?x-oss-process=image/format,png)
7、按提示依次输入
![](https://img-blog.csdnimg.cn/img_convert/83eca009a3935439e2f4add2f056a5ee.webp?x-oss-process=image/format,png)
此时这个构建版本还没有生成,我们先把基本信息填写完毕,然后再进入Xcode中把项目打包发送到过来。注意:填写完一定要点击右上角的保存。
![](https://img-blog.csdnimg.cn/img_convert/688b98e13dd042115c0e042dbbf13a09.webp?x-oss-process=image/format,png)
不要忘记填写测试账号,否则会被拒的,而且一定要跟服务器同事说好,不要删除测试账号,否则同样被拒
六、打包上架
在Xcode中打包工程找到你刚刚下载的发布证书(后缀为.cer)或者p12文件,和PP文件,双击,看起来没反应,但是他们已经加入到你的钥匙串中。如果之前步骤已操作过,可省略此步。
1、打开Xcode,配置项目环境,点击+可以选择Add Apple ID;点击View Details可以查看该Apple Id下的Certificates和Provisioning Profile证书文件,在这里你可以点击下载。在项目Targets下的Identity中,Team选择对应的Apple ID 即可。
特别注意: 这里填写的Apple ID 不是你自己手机上创建的Apple ID 一定要是 开发者账号的 账号和密码 (QAQ 我就在这里被坑过)
![](https://img-blog.csdnimg.cn/img_convert/35176b4a9bb15c7889f6f850023fe3b6.webp?x-oss-process=image/format,png)
2、选择模拟器为iOS Device,按照下图提示操作
![](https://img-blog.csdnimg.cn/img_convert/598db5dc1d9de9a57c9f7a7864b3473f.webp?x-oss-process=image/format,png)
![](https://img-blog.csdnimg.cn/img_convert/ed3f55377bb554404056a54179d15a87.webp?x-oss-process=image/format,png)
![](https://img-blog.csdnimg.cn/img_convert/35755c4ee933aeda71c4ccb573fb95ca.webp?x-oss-process=image/format,png)
3、修改.plist文件,两个.plist文件都要修改
![](https://img-blog.csdnimg.cn/img_convert/a6a4f9875dcfad022a2dfa8d6fb638ee.webp?x-oss-process=image/format,png)
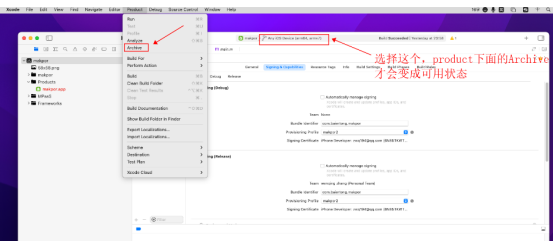
4、Archive在线打包,在真机状态下选择Product——>Archive,如果不是真机状态下,Archive会是灰色不可用的)。
![](https://img-blog.csdnimg.cn/img_convert/9df8590debdc0d58c9e78db65337a4a4.webp?x-oss-process=image/format,png)
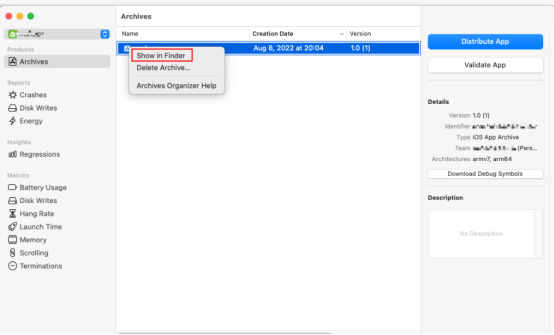
5、打包之后会生成一个 ipa文件 ,然后返回我的App~~在构建版本处,点击Application Loader 就会将其下载下来,然后通过该 软件把ipa文件上传到 appstore上。
![](https://img-blog.csdnimg.cn/img_convert/0f24e038a4b124cd6d070a759573e7ba.webp?x-oss-process=image/format,png)
![](https://img-blog.csdnimg.cn/img_convert/edcbb9808d7cbe56ed3b7f8ad5212cf5.webp?x-oss-process=image/format,png)
![](https://img-blog.csdnimg.cn/img_convert/ef5a563250dfdce6dda6da9d226ad6a3.webp?x-oss-process=image/format,png)
![](https://img-blog.csdnimg.cn/img_convert/2e727c04073f90fc65da19b7af2fa8f3.webp?x-oss-process=image/format,png)
我们这边介绍一个简便的打包工具appuploader。
众所周知,在开发苹果应用时需要使用签名(证书)才能进行打包安装苹果IPA,作为刚接触ios开发的同学,只是学习ios app开发内测,并没有上架appstore需求,对于苹果开发者账号认证需要支付688,真的是极大的浪费,使用appuploader,只需要注册苹果普通的账号,不需要688认证,就可以打包自己开发的ios应用,自己真机测试,下面是详细教程:
访问以下网址,按照提示注册即可,因为不需要支付688认证苹果开发者,所以没什么好讲的。 注册地址:Apple Developer Apple Developer (简体中文)
下载地址: Appuploader官网--IOS ipa上传发布工具,证书制作工具跨平台版,windows,linux,mac系统都可用 (applicationloader.net) Appuploader home -- A tool improve ios develop efficiency such as submit ipa to appstore and manage ios certificate
我这里是VMware虚拟机安装的mac系统,所以下载了mac安装包,直接解压,双击appuploader即可启动,看下图:
![](https://img-blog.csdnimg.cn/img_convert/2aed8644f5b3aba9e08c112c4344ec55.png)
主界面如下:
![](https://img-blog.csdnimg.cn/img_convert/4d3bf750842f5a2c0f3b25bcbc83bf4a.png)
简单介绍一下,这块工具的使用方法:
1、登录,由于没有支付688认证,所以登录的时候,注意勾选未支付688:
![](https://img-blog.csdnimg.cn/img_convert/fcd42f68a28756f6221615cbc34428fb.png)
2、功能介绍,我这里主要使用了工具的三个功能部分:
![](https://img-blog.csdnimg.cn/img_convert/73c68dacac8eb02f535f058602787a00.png)
证书部分:主要是通过工具生成.p12证书文件,后面这个证书要导入mac系统。 描述文件:这个文件主要包含了证书,公钥,设备信息等,和app绑定。
测试设备:主要是录入要内测的ios手机,主要是udid,udid可以理解为设备的一个唯一标识码,iphone手机udid的获取,可以安装驱动后通过appuploader工具自动获取
其他功能模块我这也没有用到,具体可以通过工具软件的帮助文档详细了解,帮助文档也列出了常见的问题以及解决方法: Appuploader常见问题 (applicationloader.net),下载链接:Appuploader常见问题
1、mac系统导入appuploader生成的p12证书,导入方法入下图:
双击下载到的p12 文件,系统提示输入密码之类的,按照提示输入密码即可。
![](https://img-blog.csdnimg.cn/img_convert/96a82b7ca66a2be34fb6c8b9b457fbba.png)
2、关键部分,xcode使用这个p12证书,进行打包ipa:
xcode添加好了苹果开发者账号,个人p12证书有了,接下来就是xcode打包ios应用:
![](https://img-blog.csdnimg.cn/img_convert/cd0b2f41d7cc14b1e5b5132c1d452250.png)
记得取消勾选automatically manage signing
![](https://img-blog.csdnimg.cn/img_convert/82db0f5efaad42a88f6d798d20c50fab.png)
![](https://img-blog.csdnimg.cn/img_convert/23daa48e4b8ef38972aa31a7be9e7f4d.png)
![](https://img-blog.csdnimg.cn/img_convert/fcf8a77caa16f8df72f24192ed7720e5.png)
xcode编译没有问题,就会弹出一下界面
![](https://img-blog.csdnimg.cn/img_convert/df0e68137d935c437b10c8a4a2e92d11.png)
![](https://img-blog.csdnimg.cn/img_convert/b116c01472ced2b304e55aa292e79ab7.png)
![](https://img-blog.csdnimg.cn/img_convert/8db8e4d26fd1a672e4c7015ee044fdec.png)
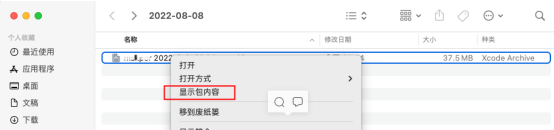
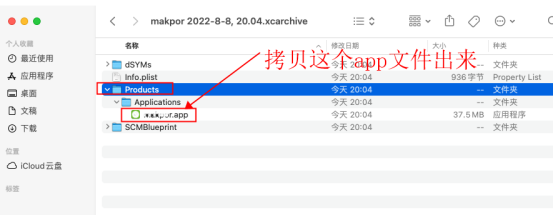
在Products目录下,把xxx.app文件拷贝出来,新建Playload文件夹,压缩Playload文件夹,得到Playload.zip文件,修改
Playload.zip文件为Playload.ipa文件,至此ios应用安装文件就弄好了.
打包过程中 会出现的问题
application Loader 上传出现的错误
解决方案:ERROR ITMS-90158:"The following URL schemes found in your app are not in the current format:[XXX]." 删除 schemes 中的XXX 路径 如下图
![](https://img-blog.csdnimg.cn/img_convert/7e4b5493ede203c98309132dc0608fc2.webp?x-oss-process=image/format,png)
6.发送成功后返回到我的App,刷新页面,在构建版本处就会有个 + 号,点击 + 号把发送过来的程序添加上去就行了