flex布局换行之后,下面一行的布局会异常
.homeItemBox{
display: flex;
flex-wrap: wrap;
 justify-content: flex-start;
 }
.homeItem{
  display: flex;
  width: calc((100% - 20rpx) / 4);
 flex-direction: column;  align-items: center;
 flex-shrink: 0;
 margin-top:30rpx;
 }

.homeItem:nth-of-type(4n+0){margin-right: 0;}  //每一行的第四个margin right是0
nth-of-type(4n+0)
- 4n+0 就是每隔四个
- odd even关键词表示奇偶数这个是算术表达式
p:nth-of-type(3n+0)使用公式 (an + b)。
描述:表示周期的长度,n 是计数器(从 0 开始),b 是偏移值。在这里,
我们指定了下标是 3 的倍数的所有 p 元素的背景色
flex-shrink: 0;
倘若给父元素设置了flex布局后,若要其子元素的width有效果,必须给子元素设置flex-shrink为0
来固定元素不被挤压
filter
filter:brightness 亮度/曝光度
filter:brightness(0.2)
filter: opacity( %) ---- 透明度
filter: drop-shadow(offset-x offset-y blur color) ---- 阴影
filter:drop-shadow(10px 15px 20px #000)
filter: grayscale( %) ---- 灰度图像
filter: sepia( %) ---- 深褐色
filter: hue-rotate( deg ) ---- 色相旋转
filter: invert( %) ---- 反转图像 使用invert滤镜可以把对象的可视化属性全部翻转,包括色彩、饱和度和亮度值
filter: saturate( %) ---- 饱和度
filter: contrast( %) ---- 对比度 值0%代表全灰色图像,而100%代表原始图像
filter: blur( px) ---- 高斯模糊
全站置灰
html {
filter: grayscale(.95);
-webkit-filter: grayscale(.95);
}
filter VS backdrop-filter
- filter:该属性将模糊或颜色偏移等图形效果应用于元素。
- backdrop-filter:该属性可以让你为一个元素后面区域添加图形效果(如模糊或颜色偏移)。它适用于元素背后的所有元素,为了看到效果,必须使元素或其背景至少部分透明。
- 两者之间的差异,filter 是作用于元素本身,而 backdrop-filter 是作用于元素背后的区域所覆盖的所有元素。而它们所支持的滤镜种类是一模一样的。
- backdrop-filter 最为常见的使用方式是用其实现毛玻璃效果。
filter 和 backdrop-filter 使用上最明显的差异在于:
filter 作用于当前元素,并且它的后代元素也会继承这个属性
backdrop-filter 作用于元素背后的所有元素
仔细区分理解,一个是当前元素和它的后代元素,一个是元素背后的所有元素。
inset
inset 属性只作用于定位元素
inset 属性用作定位元素的 top、right、bottom、left 这些属性的简写。类似于 margin 和 padding 属性,依照“上右下左”的顺序。
置灰网站的首屏
兼容更好的混合模式
 html{
 position:relative;
 width: 100%;
 height: 100%;
 overflow: scroll;
 background-color: #fff;
 }
  html::before{
   content:"";
   position:absolute;
   inset:0;
   background: rgba(0,0,0,1);
                      /* mix-blend-mode: color; 颜色*/
                      /* mix-blend-mode: hue; 色相*/
    mix-blend-mode: saturation;  //饱和度
            以上三种模式都可
     pointer-events: none;             /* 点击穿透 */
      z-index:10;
    }
     .box{
       background: url('./one.png'),url('./two.png');
       background-size: cover;
        width: 400px;
        height: 400px;
        background-blend-mode:lighten;
     }
backdrop-filter 实现一种遮罩滤镜效果
 html {
  width: 100%;
   height: 100%;
    position: relative;
     overflow: scroll;
     }
        html::before {
         content: '';
          position: absolute;
           width: 100%;
            height: 100%;
              z-index: 10;
               inset: 0;
               backdrop-filter: grayscale(0.9);
                pointer-events: none;
                }
table使用
子元素均分父元素的长度
display:table-row; //padding和margin会失效
父元素设置display: table时; 注意padding会失效
子元素设置 display: table-cell; //margin会失效
h3{
 display: table-cell;
}
nav{
 display: table;
 width:100%;
position: sticky;
  top:0;
background-color: red;
}
 <nav>
  <h3>导航1</h3>
<h3>导航2</h3>
 <h3>导航3</h3>
 </nav>
利用table居中
.parentBox{
 display: table;
width: 100vw;
 height: 600rpx;
 border:1px solid #AAA;
 }
 .sonItem{
 display: table-cell;
 vertical-align: middle;
  text-align: center;
  }
吸顶
注意如果父元素设置了overflow-hidden 则吸顶会失效
  width:100%;
   position: sticky;
   top:0;
滚动视差 background-attachment
视差滚动(Parallax Scrolling)是指让多层背景以不同的速度移动,形成立体的运动效果,带来非常出色的视觉体验
     <div class="gImg gImg1"></div>
  <div class="gImg gImg2"></div>
  <div class="gImg gImg3"></div>

.gImg{
        height: 100vh;
        width: 100%;
        background-attachment:fixed;
        background-size: cover;
        background-position: center center;
    }
    .gImg1{
        background-image: url('./one.png');
    }
    .gImg2{
        background-image: url('./two.png');
    }
    .gImg3{
        background-image: url('./three.png');
    }
效果大概就是

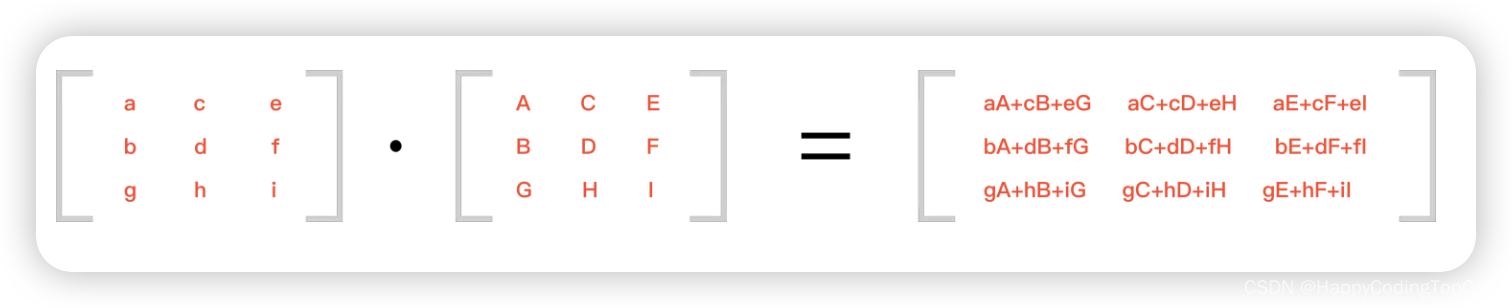
CSS3 transform 中的 matrix
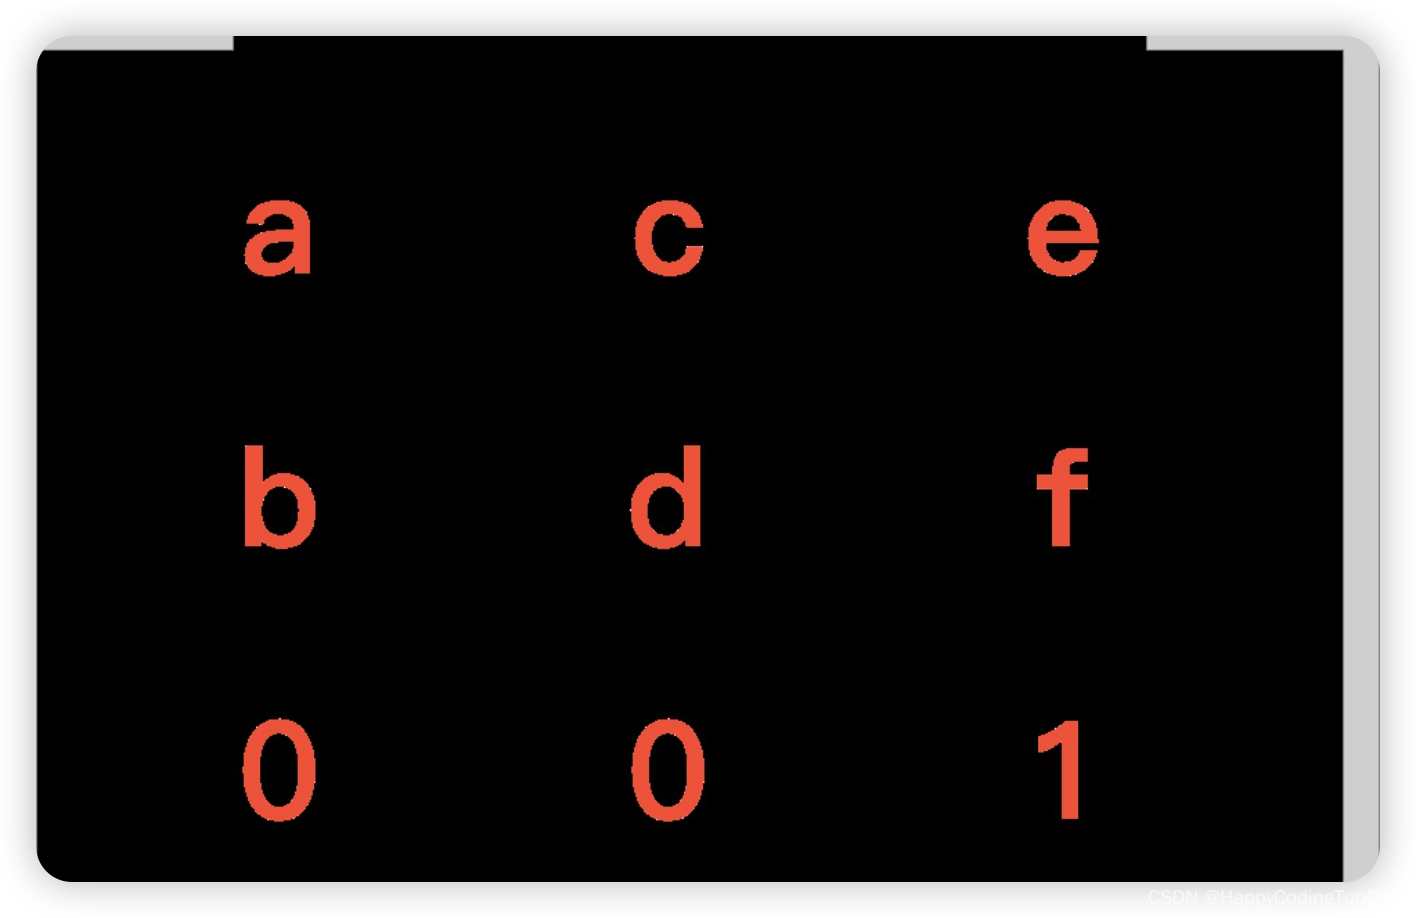
2D 的转换是由一个 3*3 的矩阵表示的,前两行代表转换的值,分别是 a b c d e f,要注意是竖着排的,第一行代表 x 轴发生的变化,第二行代表 y 轴发生的变化,第三行代表 z 轴发生的变化,因为这里是 2D 不涉及 z 轴,所以这里是 0 0 1。
-
缩放 scale对应的是矩阵中的 a 和 d,x 轴的缩放比例对应 a,y 轴的缩放比例对应 d,
-
平移 translate对应的是矩阵中的 e 和 f,平移的 x 和 y 分别对应 e 和 f。
-
偏移 skew对应矩阵中的 c 和 b x 对应 c,y 对应 b, 这个对应并不是相等,需要对 skew 的 x 值 和 y 值进行 tan 运算。transform: matrix(a, tan(30deg), tan(20deg), d, e, f)
-
旋转 rotate影响的是a/b/c/d四个值 a=cosθ b=sinθ c=-sinθ d=cosθ
将 30° 转换为弧度,传递给三角函数计算
// 弧度和角度的转换公式:弧度=π/180×角度
const radian = Math.PI / 180 * 30 // 算出弧度
const sin = Math.sin(radian) // 计算 sinθ
const cos = Math.cos(radian) // 计算 cosθ
所以这个: transform: scale(1,5, 1.5) translate(0, 190.5)
对应: transform: matrix(1.5, 0, 0, 1.5, 0, 190.5);
如果旋转+缩放+偏移+位移一起的话
按照transform里面rotate/scale/skew/translate所写的顺序相乘。
利用js控制css
通过js修改body的css变量
body{
  width:100vw;
  height:100vh;
  overflow: hidden;
  background-color: #111;
  perspective: 1000px;
  --c-eyeSocket:rgb(41,104,217);
  --c-eyeSocket-outer:#02ffff;
  --c-eyeSocket-outer-shadow:transparent;
  --c-eyeSocket-inner:rgb(35,22,140);
}

// 通过js修改body的css变量
     document.body.style.setProperty('--c-eyeSocket','rgba(255,187,255)');

//css使用css变量
.eyeSocket::before {
  width: calc(100% + 20px);
  height: calc(100% + 20px);
  border: 6px solid var(--c-eyeSocket);
}
js控制设置当前的元素上面的类名来控制动画
this.$refs.bigEye.className = 'eyeSocket eyeSocketSleeping'


.eyeSocket {
  position: absolute;
  left: calc(50%-75px);
  top: calc(50%-75px);
  width: 150px;
  aspect-ratio: 1;
  border-radius: 50%;
  z-index: 1;
  border: 4px solid var(--c-eyeSocket);
  box-shadow: 0px 0px 50px var(--c-eyeSocket-outer-shadow);
  /* 当生气时添加红色外发光,常态则保持透明 */
  transition: border 0.5s ease-in-out,box-shadow 0.5s ease-in-out;
  /* 添加过渡效果 */
}
.eyeSocket::before,
.eyeSocket::after {
  content: '';
  position: absolute;
  top: 50%;
  left: 50%;
  transform: translate(-50%, -50%);
  border-radius: 50%;
  box-sizing: border-box;
  transition: all 0.5s ease-in-out;
}
.eyeSocket::before {
  width: calc(100% + 20px);
  height: calc(100% + 20px);
  border: 6px solid var(--c-eyeSocket-outer);
}
.eyeSocket::after {
  width: 100%;
  height: 100%;
  border: 4px solid var(--c-eyeSocket-inner);
  box-shadow: inset 0px 0px 30px var(--c-eyeSocket-inner);
}
.eyeSocketSleeping{
  animation:sleeping 6s infinite;
}
@keyframes sleeping {
  0%{
    transform: scale(1);
  }
  50%{
    transform: scale(1.2);
  }
  100%{
    transform: scale(1);
  }
}