目录
引子:
雏形:
库的选择:
实施过程:
1. 导入并改造ImageHorizonLibrary,使其支持中文路径和中文名称:
2. 基于目录结构的Page Object封装:
3. 通过传统手段选获取页面文字内容的方法:
1. 通过鼠标三击获取字符串内容:
2. 通过鼠标圈选获取文本内容:
4. 通过OCR获取可视文本内容:
5. 保存EMBED图像:
6. 基本关键字的封装:
① 开启/关闭应用:
② 发送(文字):
③ 等待(图片):
引子:
由于最近有一个分量很重的windows Client需要测试,所以开始研究C/S的自动化。
其实一开始知道这个客户端是基于Node.js,并且使用Chromium内核,我是想使用Selenium的Webdriver驱动的。但是经过各种努力,发现无法突破第三方给Chromium自定义套的壳,且内核是不完整chromium,遂放弃。
也考虑过直接使用AutoIt来操作windows窗口,无奈在这种套壳Chromium下,窗口对象都是一团,无法操作。
也考虑过WindowsApplicationDriver,使用inspect或者FlaUInspect进行定位,或者使用windows更新推出的Accessibility Insights For Windows,但这些工具配套非常贫瘠,基本都没法用。
最后还是决定使用这类客户端自动化的最终解决方案 --- Robot Framework+图像比对和识别
雏形:
一个合格的UI自动化,需要以下几个要素:
1.元素定位方法
2.操作方法,最少包括鼠标和键盘操作
3.获取页面数据的方法
4.断言的方法
库的选择:
老牌的图像比对和操作库,是大名鼎鼎的sikuli,但是sikuli后来专心去做sikulix去了,老的sikuli版本已经很久没有人维护了,所以主力图像识别库使用了RF官网首页上的ImageHorizonLibrary,反正大家都用的是opencv,虽然关键字比sikuli少一些,但是够用了(虽然后来还是做了很多二次开发)。
鼠标和键盘的操作,还是使用了AutoItLibrary,因为这个库可以补足ImageHorizonLibrary,通过图片获取其页面上的定位,然后操作坐标。
获取页面数据,考虑了很久,还是引入了OCR,通过Python的opencv库,对截图进行文字识别,由此,遇到了若干个坑:
1.获取验证码的方法,最后使用dddd库解决
2.封装获取指定区域的截图,通过坐标或左上角图片,指定高和宽的矩形截图方法
3.灰化图像,忽略轻微色差造成的颜色差别
4.使用easyOCR库对图片内文字进行提取
5.编写解析EMBED的图像并保存的方法
6.编写在robot的html的log中插入本地截图的方法
7.编写基于特征的图片比对方法,根据阈值设定图像相似度
8.修改源代码,使其支持中文路径和中文图片名称
实施过程:
1. 导入并改造ImageHorizonLibrary,使其支持中文路径和中文名称:
使用python的pip安装,只需要一行命令即可,需要注意的是,会安装多个依赖库:
pip install robotframework-imagehorizonlibrary
安装完成后,直接引入即可,常用的库参数有三个:
1. reference_folder=xxxxxx(None) ----指定源图片文件夹,但是只能指定单文件夹
2. screenshot_folder=xxxxxx(None) ----指定放置截图图片的文件夹
3. keyword_on_failure=ImageHorizonLibrary.Take A Screenshot(keyword) ----指定失败后的动作(可以跟自定义关键字)
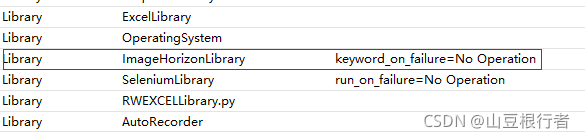
笔者上图选择了失败后不做任何操作,主要原因是RF中一些忽略错误的循环语句中,也会判定为失败,会截取大量的无用截图。
引入后发现无论是路径中有中文,还是图片文件名中有中文,python都会报错。我们用RF,就是为了RF能使用中文关键字,中文资源文件,只好做了中文化支持的改造,具体方法为:
..\Lib\site-packages\pyscreeze\__init__.py
def _load_cv2(img, grayscale=None):
    """
    TODO
    """
    # load images if given filename, or convert as needed to opencv
    # Alpha layer just causes failures at this point, so flatten to RGB.
    # RGBA: load with -1 * cv2.CV_LOAD_IMAGE_COLOR to preserve alpha
    # to matchTemplate, need template and image to be the same wrt having alpha

    if grayscale is None:
        grayscale = GRAYSCALE_DEFAULT
    if isinstance(img, (str, unicode)):
        # The function imread loads an image from the specified file and
        # returns it. If the image cannot be read (because of missing
        # file, improper permissions, unsupported or invalid format),
        # the function returns an empty matrix
        # http://docs.opencv.org/3.0-beta/modules/imgcodecs/doc/reading_and_writing_images.html
        if grayscale:
            #img_cv = cv2.imread(img, LOAD_GRAYSCALE)
            img_cv = cv2.imdecode(np.fromfile(img, dtype=np.uint8), LOAD_GRAYSCALE)
        else:
            #img_cv = cv2.imread(img, LOAD_COLOR)
            img_cv = cv2.imdecode(np.fromfile(img, dtype=np.uint8), LOAD_COLOR)
        if img_cv is None:
            raise IOError("Failed to read %s because file is missing, "
                          "has improper permissions, or is an "
                          "unsupported or invalid format" % img)
    elif isinstance(img, numpy.ndarray):
        # don't try to convert an already-gray image to gray
        if grayscale and len(img.shape) == 3:  # and img.shape[2] == 3:
            img_cv = cv2.cvtColor(img, cv2.COLOR_BGR2GRAY)
        else:
            img_cv = img
    elif hasattr(img, 'convert'):
        # assume its a PIL.Image, convert to cv format
        img_array = numpy.array(img.convert('RGB'))
        img_cv = img_array[:, :, ::-1].copy()  # -1 does RGB -> BGR
        if grayscale:
            img_cv = cv2.cvtColor(img_cv, cv2.COLOR_BGR2GRAY)
    else:
        raise TypeError('expected an image filename, OpenCV numpy array, or PIL image')
    return img_cv
需求:由于imagehorizonlibrary默认只能操作图片中心点,在某些情况下,我们需要图片左上角坐标,增加了图片定位左上角坐标的关键字:
..\Lib\site-packages\ImageHorizonLibrary\recognition\_recognize_images.py
新增加_locate_con和locate_top_left_corner:
def _locate_con(self, reference_image, log_it=True):
    is_dir = False
    try:
        if isdir(self.__normalize(reference_image)):
            is_dir = True
    except InvalidImageException:
        pass
    is_file = False
    try:
        if isfile(self.__normalize(reference_image)):
            is_file = True
    except InvalidImageException:
        pass
    reference_image = self.__normalize(reference_image)

    reference_images = []
    if is_file:
        reference_images = [reference_image]
    elif is_dir:
        for f in listdir(self.__normalize(reference_image)):
            if not isfile(self.__normalize(path_join(reference_image, f))):
                raise InvalidImageException(
                                        self.__normalize(reference_image))
            reference_images.append(path_join(reference_image, f))

    def try_locate_con(ref_image):
        location = None
        with self._suppress_keyword_on_failure():
            try:
                if self.has_cv and self.confidence:
                    location = ag.locateOnScreen(ref_image,
                                                 confidence=self.confidence)
                else:
                    if self.confidence:
                        LOGGER.warn("Can't set confidence because you don't "
                                    "have OpenCV (python-opencv) installed "
                                    "or a confidence level was not given.")
                    location = ag.locateOnScreen(ref_image)
            except ImageNotFoundException as ex:
                LOGGER.info(ex)
                pass
        return location

    location = None
    for ref_image in reference_images:
        location = try_locate_con(ref_image)
        if location != None:
            break

    if location is None:
        if log_it:
            LOGGER.info('Image "%s" was not found '
                        'on screen.' % reference_image)
        self._run_on_failure()
        raise ImageNotFoundException(reference_image)
    if log_it:
        LOGGER.info('Image "%s" found at %r' % (reference_image, location))
    center_point = ag.center(location)
    x = center_point.x
    y = center_point.y
    if self.has_retina:
        x = x / 2
        y = y / 2
    return location
需求:由于ImageHorizonLibrary只支持获取第一个符合图片的坐标,所以需要修改对应的代码,实现定位所有符合图片坐标的支持。
思路:ag.locateAllOnScreen可以获取所有符合图片生成器,我们需要转成列表,结果是[Box(left=352, top=1044, width=29, height=29)]这样的数据结构,然后使用"结果[0][0]"来获取left的值“352”
目标文件地址:\Lib\site-packages\ImageHorizonLibrary\recognition\_recognize_images.py
def _locate_all(self, reference_image, log_it=True):
    is_dir = False
    try:
        if isdir(self.__normalize(reference_image)):
            is_dir = True
    except InvalidImageException:
        pass
    is_file = False
    try:
        if isfile(self.__normalize(reference_image)):
            is_file = True
    except InvalidImageException:
        pass
    reference_image = self.__normalize(reference_image)

    reference_images = []
    if is_file:
        reference_images = [reference_image]
    elif is_dir:
        for f in listdir(self.__normalize(reference_image)):
            if not isfile(self.__normalize(path_join(reference_image, f))):
                raise InvalidImageException(
                                        self.__normalize(reference_image))
            reference_images.append(path_join(reference_image, f))

    def try_locate_all(ref_image):
        location = None
        location_list = []
        with self._suppress_keyword_on_failure():
            try:
                if self.has_cv and self.confidence:
                    location = ag.locateOnScreen(ref_image,
                                                 confidence=self.confidence)
                else:
                    if self.confidence:
                        LOGGER.warn("Can't set confidence because you don't "
                                    "have OpenCV (python-opencv) installed "
                                    "or a confidence level was not given.")
                    location = list(ag.locateAllOnScreen(ref_image))
                    # for ne in location:
                    #     print(ne)
                    #     location_list.append(ne)
                    #     print(location_list)

            except ImageNotFoundException as ex:
                LOGGER.info(ex)
                pass
        return location

    location = None
    for ref_image in reference_images:
        location = try_locate_all(ref_image)
        if location != None:
            break

    if location is None:
        if log_it:
            LOGGER.info('Image "%s" was not found '
                        'on screen.' % reference_image)
        self._run_on_failure()
        raise ImageNotFoundException(reference_image)
    if log_it:
        LOGGER.info('Image "%s" found at %r' % (reference_image, location))
    # center_point = ag.center(location)
    # x = center_point.x
    # y = center_point.y
    # if self.has_retina:
    #     x = x / 2
    #     y = y / 2
    print(location)
    return location
至此,对于imagehorizonlibrary的基本改造已经完成。
2. 基于目录结构的Page Object封装:
这次,有别于基于Selenium的PO封装,我们的封装是基于图片的,所以这些图片文件必须按照模块-页面的目录结构进行保存,方便维护。
这就带来另一个问题,有大量可能重复名字的图片的时候,怎么办?
还好imagehorizonlibrary自带一个可以设置图片目录的关键字:
Set Reference Folder ${图片所在文件夹}
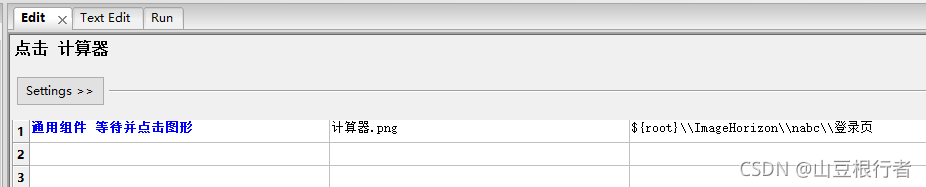
我们可以把这个封装到等待中去,这样,每次会指向目标文件夹:
通用组件 等待图形
    [Arguments]    ${图片名称}    ${图片所在文件夹}    ${等待时间}=${默认等待时间}    ${鼠标是否挪开}=是
    Set Reference Folder    ${图片所在文件夹}
    Run Keyword If    '${鼠标是否挪开}'=='是'    Mouse Move    0    500
    Display Img    ${图片所在文件夹}/${图片名称}
    wait for    ${图片名称}    ${等待时间}
调用的时候是这样的:
3. 通过传统手段选获取页面文字内容的方法:
我们解决了基于图像的定位方法,也要解决在客户端上获取页面内容的方法,其中最有效也是最简单的方法就是通过选中目标文字,复制并获取剪贴板内容的方式:
1. 通过鼠标三击获取字符串内容:
不清楚三击有什么用的同学,可以在本文任何文字上三击下试试效果~
imagehorizonlibrary提供了“三击并Ctrl+C”的功能,可以在指定图片的偏移量下三击:
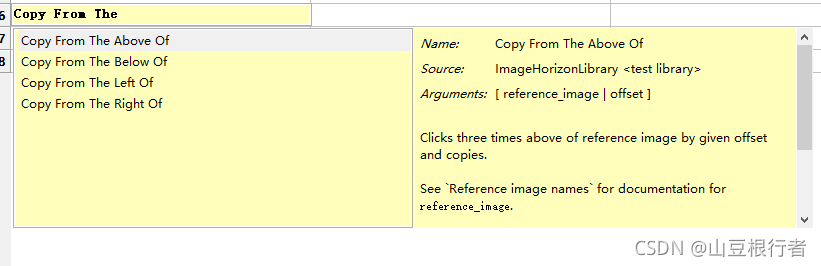
再加上imagehorizonlibrary提供的另一个关键字Get Clipboard Content,就可以把文本内容取出来:
 把上面的合起来,再加上等待,就组成一个新的轮子:
通用组件 获取图片上方三击选取文本内容
    [Arguments]    ${参考系图片}    ${图片所在文件夹}    ${偏移量}    ${等待时间}=${默认等待时间}
    通用组件 等待图形    ${参考系图片}    ${图片所在文件夹}    ${等待时间}
    Copy From The Above Of    ${参考系图片}    ${偏移量}
    ${三击选中的文字}    Get Clipboard Content
    [Return]    ${三击选中的文字}
然后把四个方向都加上,这样就能凑足4个轮子:

2. 通过鼠标圈选获取文本内容:
有的时候,我们需要通过鼠标圈选更大范围并获取其中文本内容,方法如下:
imagehorizonlibrary提供了Mouse Click Drag,Copy,Get Clipboard Content三个关键字,我们只要把他们组合起来即可:
通用组件 根据坐标定位获取矩形框选文本内容
    [Arguments]    ${左上角横坐标}    ${左上角纵坐标}    ${右下角横坐标}    ${右下角纵坐标}
    Mouse Click Drag    \    ${左上角横坐标}    ${左上角纵坐标}    ${右下角横坐标}    ${右下角纵坐标}
    Copy
    ${鼠标框选文本内容}    Get Clipboard Content
    [Return]    ${鼠标框选文本内容}
但是只是这样是不够的,因为我们知道“坐标”其实是个绝对位置,绝对位置会导致自动化用例不稳定,我们要想办法增加绝对位置,所以又增加了这个关键字:
通用组件 根据图片定位获取矩形框选文本内容
    [Arguments]    ${左上角图片名称}    ${图片所在文件夹}    ${矩形宽度}    ${矩形高度}    ${等待时间}=${默认等待时间}
    通用组件 等待图形    ${左上角图片名称}    ${图片所在文件夹}    ${等待时间}
    ${图片位置}    Locate Top Left Corner    ${左上角图片名称}
    log    ${图片位置}
    log    ${图片位置}[0]
    log    ${图片位置}[1]
    ${右下角横坐标}    Evaluate    ${图片位置}[0]+${矩形宽度}
    ${右下角纵坐标}    Evaluate    ${图片位置}[1]+${矩形高度}
    Mouse Click Drag    \    ${图片位置}[0]    ${图片位置}[1]    ${右下角横坐标}    ${右下角纵坐标}
    Copy
    ${鼠标框选文本内容}    Get Clipboard Content
    [Return]    ${鼠标框选文本内容}
这就用到了我们上面改源码增加的“获取图片左上角坐标位置”的改造。
4. 通过OCR获取可视文本内容:
OCR (Optical Character Recognition,光学字符识别)是指电子设备(例如扫描仪或数码相机)检查纸上打印的字符,通过检测暗、亮的模式确定其形状,然后用字符识别方法将形状翻译成计算机文字的过程。
我们要实现OCR其实有两个方面要做的:
1. 获取页面指定范围的图像的截图(并把这个截图放在log里,方便定位问题)
2. OCR这个截图,获取其中的文字
获取图片不难,但是要在log中展示,特别是在Jenkins的job history中展示,其实还是要处理很多逻辑的,由于SeleniumLibrary已经在这方面做的很好的,我们可以借鸡下蛋,直接把图片保存封装到SeleniumLibrary中去:
OCR工具库我们选择了最简单好用的EasyOCR(pip install easyocr),并也封装到SeleniumLibrary中(如果要安装easyocr,最好手动添加镜像站,否则会很慢):
..\Lib\site-packages\SeleniumLibrary\keywords\screenshot.py
# Copyright 2008-2011 Nokia Networks
# Copyright 2011-2016 Ryan Tomac, Ed Manlove and contributors
# Copyright 2016-     Robot Framework Foundation
#
# Licensed under the Apache License, Version 2.0 (the "License");
# you may not use this file except in compliance with the License.
# You may obtain a copy of the License at
#
#    http://www.apache.org/licenses/LICENSE-2.0
#
# Unless required by applicable law or agreed to in writing, software
# distributed under the License is distributed on an "AS IS" BASIS,
# WITHOUT WARRANTIES OR CONDITIONS OF ANY KIND, either express or implied.
# See the License for the specific language governing permissions and
# limitations under the License.
import os
from typing import Union
from selenium.webdriver.remote.webelement import WebElement
from SeleniumLibrary.base import LibraryComponent
from SeleniumLibrary.utils.path_formatter import _format_path
from robot.api.deco import keyword
from robot.api import logger
from robot.utils import get_link_path
import easyocr
import ddddocr
import pyautogui
import cv2
import imutils
from skimage.metrics import structural_similarity as compare_ssim
import base64
import numpy as np

DEFAULT_FILENAME_PAGE = "selenium-screenshot-{index}.png"
DEFAULT_FILENAME_ELEMENT = "selenium-element-screenshot-{index}.png"
EMBED = "EMBED"


def _cap_img(x, y, w, h, path):
    # 截取范围图像
    img = pyautogui.screenshot(region=[x, y, w, h])
    # 保存截图
    img.save(path)


class ScreenshotKeywords(LibraryComponent):
    ROBOT_LIBRARY_SCOPE = "GLOBAL"
    ROBOT_AUTO_KEYWORDS = False
    # 创建text_reader对象
    text_reader = easyocr.Reader(['ch_sim', 'en'])
    # 创建captcha_reader对象
    captcha_reader = ddddocr.DdddOcr()

    @keyword
    def set_screenshot_directory(self, path: Union[None, str]) -> str:
        """Sets the directory for captured screenshots.

        ``path`` argument specifies the absolute path to a directory where
        the screenshots should be written to. If the directory does not
        exist, it will be created. The directory can also be set when
        `importing` the library. If it is not configured anywhere,
        screenshots are saved to the same directory where Robot Framework's
        log file is written.

        If ``path`` equals to EMBED (case insensitive) and
        `Capture Page Screenshot` or `capture Element Screenshot` keywords
        filename argument is not changed from the default value, then
        the page or element screenshot is embedded as Base64 image to
        the log.html.

        The previous value is returned and can be used to restore
        the original value later if needed.

        Returning the previous value is new in SeleniumLibrary 3.0.
        The persist argument was removed in SeleniumLibrary 3.2 and
        EMBED is new in SeleniumLibrary 4.2.
        """
        if path is None:
            path = None
        elif path.upper() == EMBED:
            path = EMBED
        else:
            path = os.path.abspath(path)
            self._create_directory(path)
        previous = self._screenshot_root_directory
        self._screenshot_root_directory = path
        return previous

    @keyword
    def capture_page_screenshot(self, filename: str = DEFAULT_FILENAME_PAGE) -> str:
        """Takes a screenshot of the current page and embeds it into a log file.

        ``filename`` argument specifies the name of the file to write the
        screenshot into. The directory where screenshots are saved can be
        set when `importing` the library or by using the `Set Screenshot
        Directory` keyword. If the directory is not configured, screenshots
        are saved to the same directory where Robot Framework's log file is
        written.

        If ``filename`` equals to EMBED (case insensitive), then screenshot
        is embedded as Base64 image to the log.html. In this case file is not
        created in the filesystem.

        Starting from SeleniumLibrary 1.8, if ``filename`` contains marker
        ``{index}``, it will be automatically replaced with an unique running
        index, preventing files to be overwritten. Indices start from 1,
        and how they are represented can be customized using Python's
        [https://docs.python.org/3/library/string.html#format-string-syntax|
        format string syntax].

        An absolute path to the created screenshot file is returned or if
        ``filename``  equals to EMBED, word `EMBED` is returned.

        Support for EMBED is new in SeleniumLibrary 4.2

        Examples:
        | `Capture Page Screenshot` |                                        |
        | `File Should Exist`       | ${OUTPUTDIR}/selenium-screenshot-1.png |
        | ${path} =                 | `Capture Page Screenshot`              |
        | `File Should Exist`       | ${OUTPUTDIR}/selenium-screenshot-2.png |
        | `File Should Exist`       | ${path}                                |
        | `Capture Page Screenshot` | custom_name.png                        |
        | `File Should Exist`       | ${OUTPUTDIR}/custom_name.png           |
        | `Capture Page Screenshot` | custom_with_index_{index}.png          |
        | `File Should Exist`       | ${OUTPUTDIR}/custom_with_index_1.png   |
        | `Capture Page Screenshot` | formatted_index_{index:03}.png         |
        | `File Should Exist`       | ${OUTPUTDIR}/formatted_index_001.png   |
        | `Capture Page Screenshot` | EMBED                                  |
        | `File Should Not Exist`   | EMBED                                  |
        """
        if not self.drivers.current:
            self.info("Cannot capture screenshot because no browser is open.")
            return
        if self._decide_embedded(filename):
            return self._capture_page_screen_to_log()
        return self._capture_page_screenshot_to_file(filename)

    def _capture_page_screenshot_to_file(self, filename):
        path = self._get_screenshot_path(filename)
        self._create_directory(path)
        if not self.driver.save_screenshot(path):
            raise RuntimeError(f"Failed to save screenshot '{path}'.")
        self._embed_to_log_as_file(path, 800)
        return path

    def _capture_page_screen_to_log(self):
        screenshot_as_base64 = self.driver.get_screenshot_as_base64()
        self._embed_to_log_as_base64(screenshot_as_base64, 800)
        return EMBED

    @keyword
    def capture_frame_screenshot(self, x, y, w, h, filename: str = DEFAULT_FILENAME_PAGE):
        """范围截图专用"""
        self._capture_frame_screenshot_to_file(x, y, w, h, filename)

    def _capture_frame_screenshot_to_file(self, x, y, w, h, filename):
        path = self._get_screenshot_path(filename)
        self._create_directory(path)
        _cap_img(x, y, w, h, path)
        self._embed_to_log_as_file(path, 800)
        return path

    @keyword('Save Base64 Img')
    def save_base64_img(self, data, filename: str = DEFAULT_FILENAME_PAGE):
        """保存验证码图像专用"""
        # 获取文件保存路径
        path = self._get_screenshot_path(filename)
        self._create_directory(path)
        # 获取解码后的数据
        data = data.split(',')[1]
        img_data = base64.b64decode(data)
        # 打开空文件后写入
        with open(path, 'wb') as f:
            f.write(img_data)
        self._embed_to_log_as_file(path, 200)
        return path

    @keyword('Get Captcha OCR')
    def get_captcha_ocr(self, filename):
        """识别验证码专用"""
        # 获取文件保存路径
        path = self._get_screenshot_path(filename)
        self._create_directory(path)
        # 读取图像
        with open(path, 'rb') as f:
            img_bytes = f.read()
        # 结果
        result = self.captcha_reader.classification(img_bytes)
        print('验证码识别结果:', result)
        return result

    @keyword('Display Img')
    def display_image(self, filename):
        """在log中显示图片"""
        # 获取文件保存路径
        self._create_directory(filename)
        # 打印图片到log
        self._embed_to_log_as_file(filename, 'original')

    @keyword('Get Img Ssim')
    def get_img_ssim(self, img_act_path, img_exp_path, color_num=2, zoom=0.5):
        """获取图像相似率。输入两张图片路径,在两张图片上标识差异"""
        print("颜色模式:", color_num, "色模式,开始比对!")
        # 读取图像
        img_exp = cv2.imread(img_exp_path)  # 预期图像
        img_act = cv2.imread(img_act_path)  # 实际图像
        # 获取图像尺寸
        img_exp_sp = img_exp.shape
        img_act_sp = img_act.shape
        print("预期图像,高度、宽度::", img_exp_sp)
        print("实际图像,高度、宽度::", img_act_sp)
        # 缩放图像尺寸
        print("缩放比例:", zoom)
        img_exp = cv2.resize(img_exp, (int(img_exp_sp[1] * zoom), int(img_exp_sp[0] * zoom)))
        img_act = cv2.resize(img_act, (int(img_act_sp[1] * zoom), int(img_act_sp[0] * zoom)))
        # 如果图像尺寸不同
        if img_exp_sp != img_act_sp:
            # 按照原图宽、高,重设对比图大小
            # print("对比图像尺寸不同!将按原图尺寸强行拉伸,可能降低相似性。")
            # img_con = cv.resize(img_con, (img_ori_shape[1], img_ori_shape[0]))
            print("对比图像尺寸不同!停止比对。")
            return 0
        # 获取灰度图像,并减色处理
        m = 256 // color_num
        img_ori_sub = cv2.cvtColor(img_exp, cv2.COLOR_BGR2GRAY) // m * m + m // 2
        img_con_sub = cv2.cvtColor(img_act, cv2.COLOR_BGR2GRAY) // m * m + m // 2
        # 比较图像,获取 结构相似性指数SSIM(范围[-1,1],越大越相似)、差异图像
        ssim, img_diff = compare_ssim(img_ori_sub, img_con_sub, full=True)
        print("结构相似性指数SSIM:", ssim)
        if ssim == 1.0:
            print("比对结果:原图与对比图完全匹配,不存在差异!")
        else:
            print("比对结果:原图与对比图存在差异")
            img_diff = (img_diff * 255).astype('uint8')
            # 对差异图像进行二值化处理,突出显示差异
            img_thresh = cv2.threshold(img_diff, 0, 255, cv2.THRESH_BINARY_INV | cv2.THRESH_OTSU)[1]
            # 获取差异图像轮廓,标识序号、绘制边框
            cents = cv2.findContours(img_thresh.copy(), cv2.RETR_EXTERNAL, cv2.CHAIN_APPROX_SIMPLE)
            cents = imutils.grab_contours(cents)
            color, font = (0, 0, 255), cv2.FONT_HERSHEY_SIMPLEX  # 设置颜色、字体
            for cent in cents:
                x, y, w, h = cv2.boundingRect(cent)
                cv2.rectangle(img_exp, (x, y), (x + w, y + h), color, 1)
                cv2.rectangle(img_act, (x, y), (x + w, y + h), color, 1)
            # 写入图像
            cv2.imwrite(img_act_path, img_exp)
            cv2.imwrite(img_exp_path, img_act)
            print("差异标识完成!")
            # 展示图像
            # cv2.imshow('img_ori', img_exp)  # 原图1
            # cv2.imshow('img_con', img_act)  # 对比图像
            # cv2.imshow('img_ori_sub', img_ori_sub)  # 原图减色图像
            # cv2.imshow('img_con_sub', img_con_sub)  # 对比图减色图像
            # cv2.imshow('img_diff', img_diff)  # 差异图像
            # cv2.imshow('img_thresh', img_thresh)  # 突出差异图像
            # cv2.waitKey(0)
        return ssim

    @keyword('Get Text OCR')
    def get_text_ocr(self, img_path, color_mode=True):
        """识别图片中的文本,不能用于识别验证码。输入图片路径,返回数组。
        默认彩色模式color_mode=True,color_mode=False可能提升性能"""
        # 读取、识别图像
        if color_mode:
            img = cv2.imread(str(img_path))
            print("彩色模式")
            results = self.text_reader.readtext(img_path)
        else:
            # 灰度处理
            img = cv2.imread(str(img_path), 0)
            img_gray_path = img_path.split('.')[0] + "_gray.png"
            cv2.imwrite(img_gray_path, img)
            print("灰度模式,已生成灰度图像:", img_gray_path)
            results = self.text_reader.readtext(img_gray_path)
        # 识别结果
        i = 0
        print('OCR识别结果:')
        # 打印log,在图像上标识识别对象
        for result in results:
            print('第' + str(i) + '行:', result)
            # 设置颜色、设置字体、左上角坐标、右下角坐标
            color, font = (0, 0, 255), cv2.FONT_HERSHEY_SIMPLEX
            c1 = (int(result[0][0][0]), int(result[0][0][1]))
            c2 = (int(result[0][2][0]), int(result[0][2][1]))
            # 绘制矩形、文字
            cv2.rectangle(img, c1, c2, color, 1)
            cv2.putText(img, str(i), (c1[0] - 10, c1[1] + 7), font, 0.9, color, 2)
            i = i + 1
        # 保存图像
        img_ocr_path = img_path.split('.')[0] + "_ocr.png"
        cv2.imwrite(img_ocr_path, img)
        # 展示图像
        # cv.imshow(img_ocr_path, img)
        # cv.waitKey(0)
        return results

    @keyword('Get Img Matches')
    def get_img_matches(self, img_act_path, img_exp_path, color_num=8, zoom=1, filter_rate=0.75):
        # 读取图像
        img_exp = cv2.imread(img_exp_path, 0)
        img_act = cv2.imread(img_act_path, 0)
        img_exp_sp = img_exp.shape
        img_act_sp = img_act.shape
        print("预期图像:{},高度、宽度:{}".format(img_exp_path, img_exp_sp))
        print("实际图像:{},高度、宽度:{}".format(img_act_path, img_act_sp))
        # 缩放、颜色化简
        print("颜色模式:", color_num, "色模式")
        print("缩放比例:", zoom)
        m = 256 // color_num
        n = m // 2
        img_exp = cv2.resize(img_exp, (int(img_exp_sp[1] * zoom), int(img_exp_sp[0] * zoom))) // m * m + n
        img_act = cv2.resize(img_act, (int(img_act_sp[1] * zoom), int(img_act_sp[0] * zoom))) // m * m + n

        # 提取特征点、描述,使用 ORB 算法
        orb = cv2.ORB_create()
        kp1, des1 = orb.detectAndCompute(img_exp, None)
        kp2, des2 = orb.detectAndCompute(img_act, None)

        # 匹配特征点,使用 BFMatcher 算法
        bf = cv2.BFMatcher()
        matches = bf.knnMatch(des1, des2, k=2)

        # 筛选特征点,使用 最邻近、次临近特征点的比率 筛选
        good_matches = []
        for m, n in matches:
            if m.distance < filter_rate * n.distance:
                good_matches.append(m)
        # 再次筛选特征点,使用 RANSAC透视关系 筛选
        if len(good_matches) > 10:
            print("匹配到特征点 - %d 个" % len(good_matches))
            src_pts = np.float32([kp1[m.queryIdx].pt for m in good_matches]).reshape(-1, 1, 2)
            dst_pts = np.float32([kp2[m.trainIdx].pt for m in good_matches]).reshape(-1, 1, 2)
            m, mask = cv2.findHomography(src_pts, dst_pts, cv2.RANSAC, 5.0)
            matches_mask = mask.ravel().tolist()
        else:
            print("未匹配到足够特征点 - %d/%d" % (len(good_matches), 10))
            matches_mask = None

        # 画出匹配的特征点
        img_result = cv2.drawMatches(img_exp, kp1, img_act, kp2, good_matches, None, matchesMask=matches_mask, flags=2)
        # 展示图像,如果图像过大,缩放图像
        zoom = 0.8
        if img_result.shape[1] >= 1920:
            zoom = 0.4
        elif img_result.shape[1] >= 2560:
            zoom = 0.2
        img_result = cv2.resize(img_result, (int(img_result.shape[1] * zoom), int(img_result.shape[0] * zoom)))
        cv2.imshow('img_exp - img_act', img_result)
        cv2.waitKey(0)
        # 写入图像
        img_matches_path = img_exp_path.split('.')[0] + "_" + img_act_path.split('.')[0] + "_matches.png"
        cv2.imwrite(img_matches_path, img_result)
        print("已生成匹配图像!")
        matchers_num = len(good_matches)
        return matchers_num

    @keyword('Img Should Match')
    def img_should_match(self, img_act, img_exp_part, img_exp_whole):
        part_check = self.get_img_matches(img_act, img_exp_part, color_num=2, zoom=1, filter_rate=0.75)
        # 局部图像匹配验证
        if part_check > 10:
            print("局部匹配 验证通过!")
            # 全部图像匹配验证
            whole_check = self.get_img_matches(img_act, img_exp_whole, color_num=2, zoom=1, filter_rate=0.75)
            if whole_check > 10:
                print("全屏匹配 验证通过!")
                return True
            else:
                print("全屏匹配 验证失败!")
                return False
        else:
            print("局部匹配 验证失败!")
            return False

    @keyword
    def capture_element_screenshot(
            self,
            locator: Union[WebElement, None, str],
            filename: str = DEFAULT_FILENAME_ELEMENT,
    ) -> str:
        """Captures a screenshot from the element identified by ``locator`` and embeds it into log file.

        See `Capture Page Screenshot` for details about ``filename`` argument.
        See the `Locating elements` section for details about the locator
        syntax.

        An absolute path to the created element screenshot is returned.

        Support for capturing the screenshot from an element has limited support
        among browser vendors. Please check the browser vendor driver documentation
        does the browser support capturing a screenshot from an element.

        New in SeleniumLibrary 3.3. Support for EMBED is new in SeleniumLibrary 4.2.

        Examples:
        | `Capture Element Screenshot` | id:image_id |                                |
        | `Capture Element Screenshot` | id:image_id | ${OUTPUTDIR}/id_image_id-1.png |
        | `Capture Element Screenshot` | id:image_id | EMBED                          |
        """
        if not self.drivers.current:
            self.info(
                "Cannot capture screenshot from element because no browser is open."
            )
            return
        element = self.find_element(locator, required=True)
        if self._decide_embedded(filename):
            return self._capture_element_screen_to_log(element)
        return self._capture_element_screenshot_to_file(element, filename)

    def _capture_element_screenshot_to_file(self, element, filename):
        path = self._get_screenshot_path(filename)
        self._create_directory(path)
        if not element.screenshot(path):
            raise RuntimeError(f"Failed to save element screenshot '{path}'.")
        self._embed_to_log_as_file(path, 400)
        return path

    def _capture_element_screen_to_log(self, element):
        self._embed_to_log_as_base64(element.screenshot_as_base64, 400)
        return EMBED

    @property
    def _screenshot_root_directory(self):
        return self.ctx.screenshot_root_directory

    @_screenshot_root_directory.setter
    def _screenshot_root_directory(self, value):
        self.ctx.screenshot_root_directory = value

    def _decide_embedded(self, filename):
        filename = filename.lower()
        if (
                filename == DEFAULT_FILENAME_PAGE
                and self._screenshot_root_directory == EMBED
        ):
            return True
        if (
                filename == DEFAULT_FILENAME_ELEMENT
                and self._screenshot_root_directory == EMBED
        ):
            return True
        if filename == EMBED.lower():
            return True
        return False

    def _get_screenshot_path(self, filename):
        if self._screenshot_root_directory != EMBED:
            directory = self._screenshot_root_directory or self.log_dir
        else:
            directory = self.log_dir
        filename = filename.replace("/", os.sep)
        index = 0
        while True:
            index += 1
            formatted = _format_path(filename, index)
            path = os.path.join(directory, formatted)
            # filename didn't contain {index} or unique path was found
            if formatted == filename or not os.path.exists(path):
                return path

    def _create_directory(self, path):
        target_dir = os.path.dirname(path)
        if not os.path.exists(target_dir):
            os.makedirs(target_dir)

    def _embed_to_log_as_base64(self, screenshot_as_base64, width):
        # base64 image is shown as on its own row and thus previous row is closed on
        # purpose. Depending on Robot's log structure is a bit risky.
        self.info(
            '</td></tr><tr><td colspan="3">'
            '<img alt="screenshot" class="robot-seleniumlibrary-screenshot" '
            f'src="https://img-blog.csdnimg.cn/2022010616360881508.png" width="{width}px">',
            html=True,
        )

    def _embed_to_log_as_file(self, path, width):
        # Image is shown on its own row and thus previous row is closed on
        # purpose. Depending on Robot's log structure is a bit risky.
        src = get_link_path(path, self.log_dir)
        if "original" == str(width):
            self.info(
                '</td></tr><tr><td colspan="3">'
                f'<a href="{src}"><img src="{src}"></a>',
                html=True,
            )
        elif "%" in str(width):
            self.info(
                '</td></tr><tr><td colspan="3">'
                f'<a href="{src}"><img src="{src}" width="{width}"></a>',
                html=True,
            )
        else:
            self.info(
                '</td></tr><tr><td colspan="3">'
                f'<a href="{src}"><img src="{src}" width="{width}px"></a>',
                html=True,
            )
这样,我们可以在引用SeleniumLibrary时使用以下关键字:
通用组件 根据坐标定位获取矩形图片文本内容
    [Arguments]    ${保存图片路径和名称}    ${左上角横坐标}    ${左上角纵坐标}    ${右下角横坐标}    ${右下角纵坐标}
    通用组件 截取矩形区域    ${保存图片路径和名称}    ${左上角横坐标}    ${左上角纵坐标}    ${右下角横坐标}    ${右下角纵坐标}
    ${text}    Get Text OCR    ${保存图片路径和名称}
    log    ${text}
    [Return]    ${text}
通用组件 根据图片定位获取矩形图片文本内容
    [Arguments]    ${左上角图片名称}    ${图片所在文件夹}    ${保存图片路径和名称}    ${矩形宽度}    ${矩形高度}    ${等待时间}=${默认等待时间}
    通用组件 等待图形    ${左上角图片名称}    ${图片所在文件夹}    ${等待时间}
    ${图片位置}    Locate Top Left Corner    ${左上角图片名称}
    log    ${图片位置}
    log    ${图片位置}[0]
    log    ${图片位置}[1]
    Capture Frame Screenshot    ${图片位置}[0]    ${图片位置}[1]    ${矩形宽度}    ${矩形高度}    ${保存图片路径和名称}
    ${text}    Get Text OCR    ${保存图片路径和名称}
    log    ${text}
    [Return]    ${text}
需求:easyocr调用cv2时,不支持中文路径和中文文件名,需要改造。
思路:不使用imread,imwrite等不支持中文的函数,使用numpy读取文件后使用imencode和imdecode进行操作。
目标文件地址:\Lib\site-packages\easyocr\utils.py
try:
    import cv2, numpy
    useOpenCV = True
    RUNNING_CV_2 = cv2.__version__[0] < '3'
except ImportError:
    useOpenCV = False

RUNNING_PYTHON_2 = sys.version_info[0] == 2
if useOpenCV:
    if RUNNING_CV_2:
        LOAD_COLOR = cv2.CV_LOAD_IMAGE_COLOR
        LOAD_GRAYSCALE = cv2.CV_LOAD_IMAGE_GRAYSCALE
    else:
        LOAD_COLOR = cv2.IMREAD_COLOR
        LOAD_GRAYSCALE = cv2.IMREAD_GRAYSCALE

if sys.version_info[0] == 2:
    from six.moves.urllib.request import urlretrieve
else:
    from urllib.request import urlretrieve


def reformat_input(image):
    if type(image) == str:
        if image.startswith('http://') or image.startswith('https://'):
            tmp, _ = urlretrieve(image , reporthook=printProgressBar(prefix = 'Progress:', suffix = 'Complete', length = 50))
            img_cv_grey = cv2.imread(tmp, cv2.IMREAD_GRAYSCALE)
            os.remove(tmp)
        else:
            #img_cv_grey = cv2.imread(image, cv2.IMREAD_GRAYSCALE)
            img_cv_grey = cv2.imdecode(np.fromfile(image, dtype=np.uint8), LOAD_GRAYSCALE)  #先使用numpy.fromfile读取图片到内存,再使用cv2.imdecode读取图片内容
            image = os.path.expanduser(image)
        img = loadImage(image)  # can accept URL
    elif type(image) == bytes:
        nparr = np.frombuffer(image, np.uint8)
        img = cv2.imdecode(nparr, cv2.IMREAD_COLOR)
        img = cv2.cvtColor(img, cv2.COLOR_BGR2RGB)
        img_cv_grey = cv2.cvtColor(img, cv2.COLOR_BGR2GRAY)

    elif type(image) == np.ndarray:
        if len(image.shape) == 2: # grayscale
            img_cv_grey = image
            img = cv2.cvtColor(image, cv2.COLOR_GRAY2BGR)
        elif len(image.shape) == 3 and image.shape[2] == 1:
            img_cv_grey = np.squeeze(image)
            img = cv2.cvtColor(img_cv_grey, cv2.COLOR_GRAY2BGR)
        elif len(image.shape) == 3 and image.shape[2] == 3: # BGRscale
            img = image
            img_cv_grey = cv2.cvtColor(image, cv2.COLOR_BGR2GRAY)
        elif len(image.shape) == 3 and image.shape[2] == 4: # RGBAscale
            img = image[:,:,:3]
            img = cv2.cvtColor(img, cv2.COLOR_RGB2BGR)
            img_cv_grey = cv2.cvtColor(img, cv2.COLOR_BGR2GRAY)
    elif type(image) == JpegImagePlugin.JpegImageFile:
        image_array = np.array(image)
        img = cv2.cvtColor(image_array, cv2.COLOR_RGB2BGR)
        img_cv_grey = cv2.cvtColor(img, cv2.COLOR_BGR2GRAY)
    else:
        raise ValueError('Invalid input type. Supporting format = string(file path or url), bytes, numpy array')

    return img, img_cv_grey
5. 保存EMBED图像:
乱入一个webui自动化的解决方案:
有时候,验证码是通过EMBED方式展现的,其实EMBED可以保存各种媒体格式,不过我们这里只讨论Base64编码的图片,如何解码并保存。
我们的操作对象是有可能是这样的:
 我们看到了,这个验证码图片是使用Base64编码后嵌入网页源代码的,这种图片,我们即使想对其进行ocr分析,也不方便。
所以,我们可以拿到src属性的内容,解码后保存为图片,再对其进行分析。
具体代码在上面04中,搜索Save Base64 Img这个方法即可。
6. 基本关键字的封装:
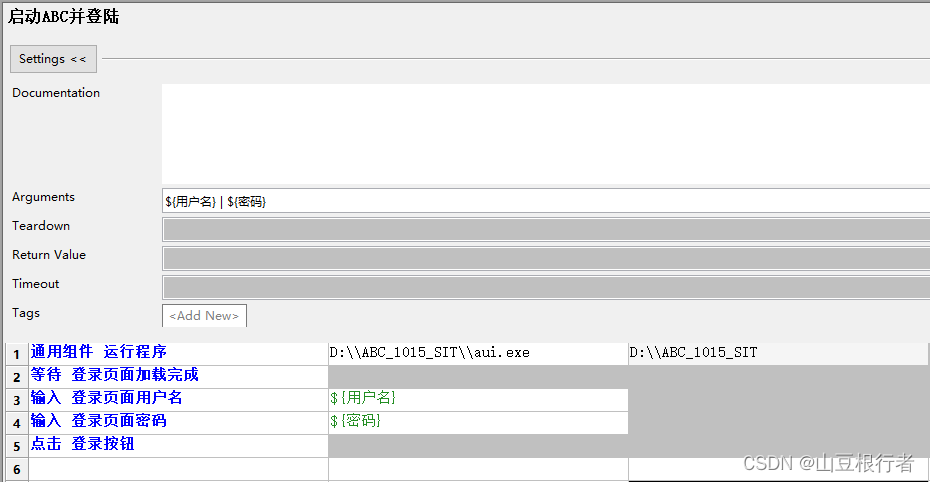
① 开启/关闭应用:
首先是打开程序,很多c/s框架下的client,都是需要更新文件的,如果不像下图这样指定workspace,会导致更新文件更新的工程目录,影响自动化测试。
这里,说明下为什么这么简单的操作也要封装,而不是直接调用AutoIt的run:在自动化中,对经常要使用的操作,一定要封装,即使当时感觉封装完全没有必要。原因是当你后期发现这个操作里要加一些操作的时候,如果没有封装,就要找到上百个这个操作并修改。
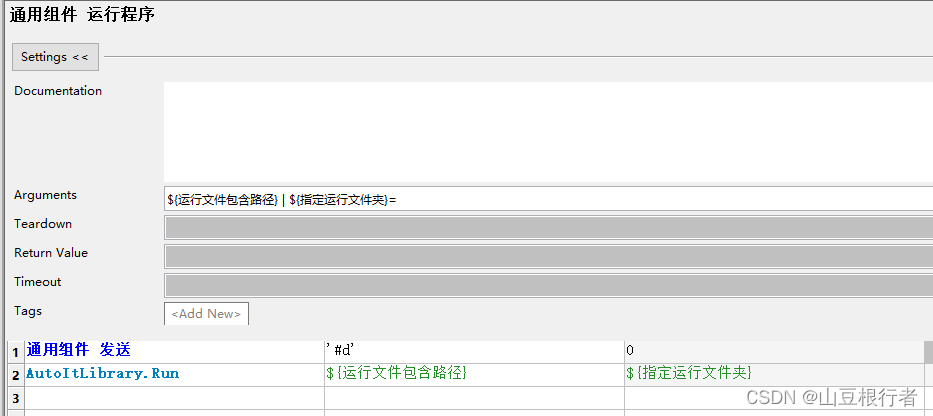
比如上面的关键字,“通用组件 发送” 就发送了一个WIN键+D键的组合键,大家都知道,这个快捷键的功能是显示桌面,这样做就能防止打开的程序没有展示在最前端,这个就是后来优化的时候才加的小功能。
具体调用的时候是这样的:
关闭程序的时候,首先我们封装个关闭程序的方法(windows下使用的是这个杀死进程组):
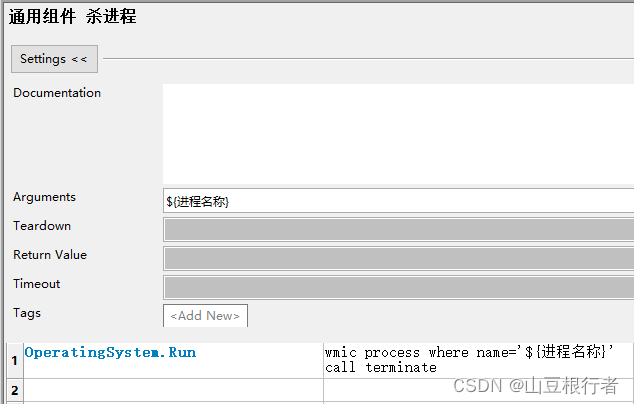
框架自带的OperatingSystem可以完美控制windows,MAC和linux系统,推荐下。
具体调用的时候是这样的:

我们在关闭程序前,截取一张整个屏幕截图,为了方便定位问题。
② 发送(文字):
上面讲打开进程的时候,我们也提到了发送的关键字,这个关键字目前主要实现两个方面的发送:
文本发送:字母,字符,数字,中英文等等
按键发送:回车,TAB,backspace,del,以及各种组合键等等
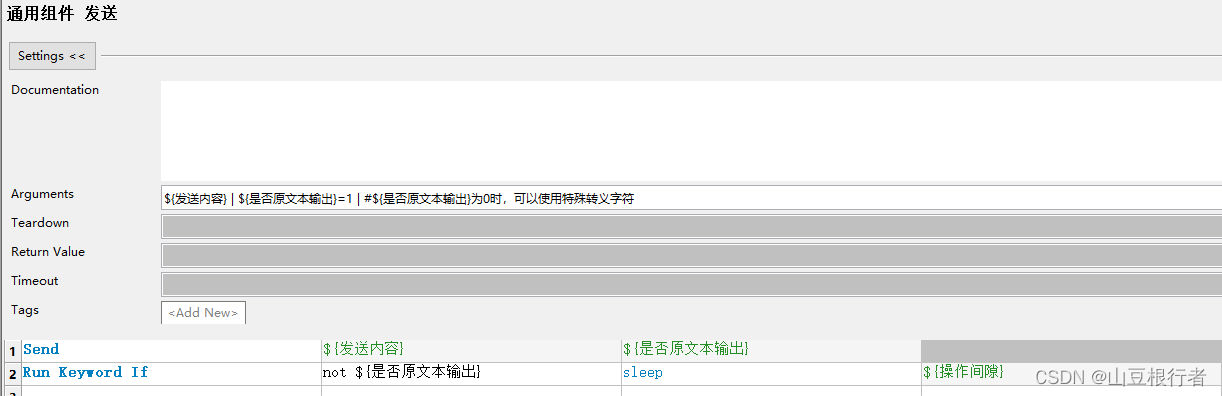
具体用法,下面这个实例中,都有体现:
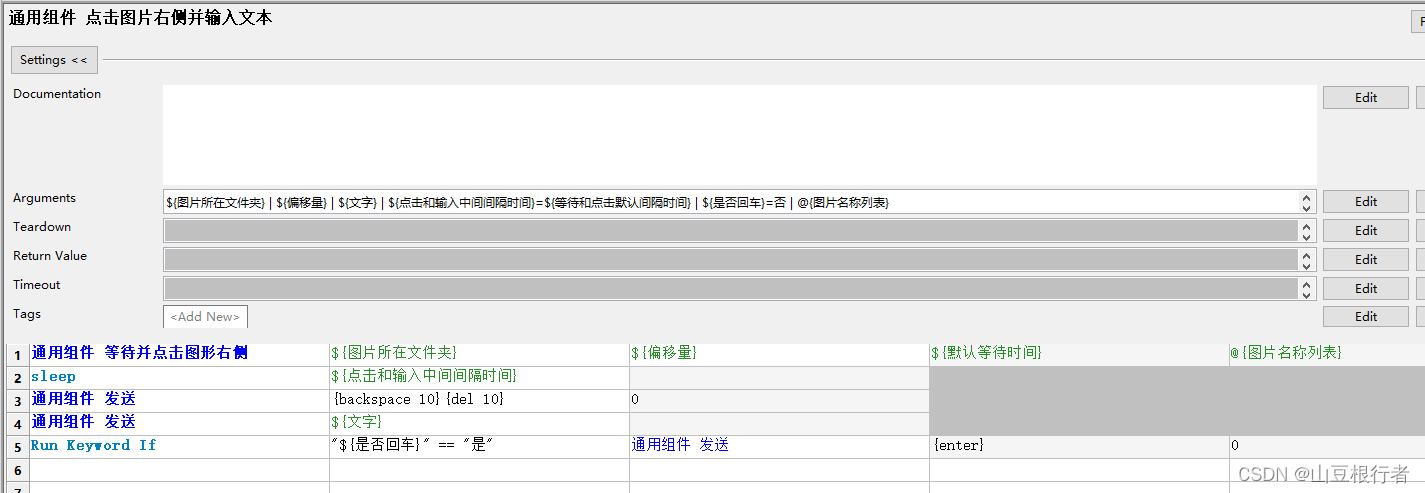
③ 等待(图片):
在c/s的自动化中,最常用,也是最好用,最万能的等待只有一个,那就是等待图片,因为“等待看到xxx” 后再操作,就是人类的方式。
但是,因为它常用,所以很容易在这出问题,我们要加很多必要的手段,增加稳定性和兼容性:
1. 鼠标的悬浮可能会影响等待目标的展示,比如有些按钮,鼠标悬浮是深色,不悬浮是浅色,我们如果截图的按钮是浅色,当鼠标悬浮的时候就找不到了。
2. 等待的时候,要寻找的照片要支持多张,这样,即使页面有变化,也可以做一些兼容,比如老版本的回退,各个分辨率的兼容等等
3. 使用老版本图片成功的时候,要有能知道使用了备选图片。
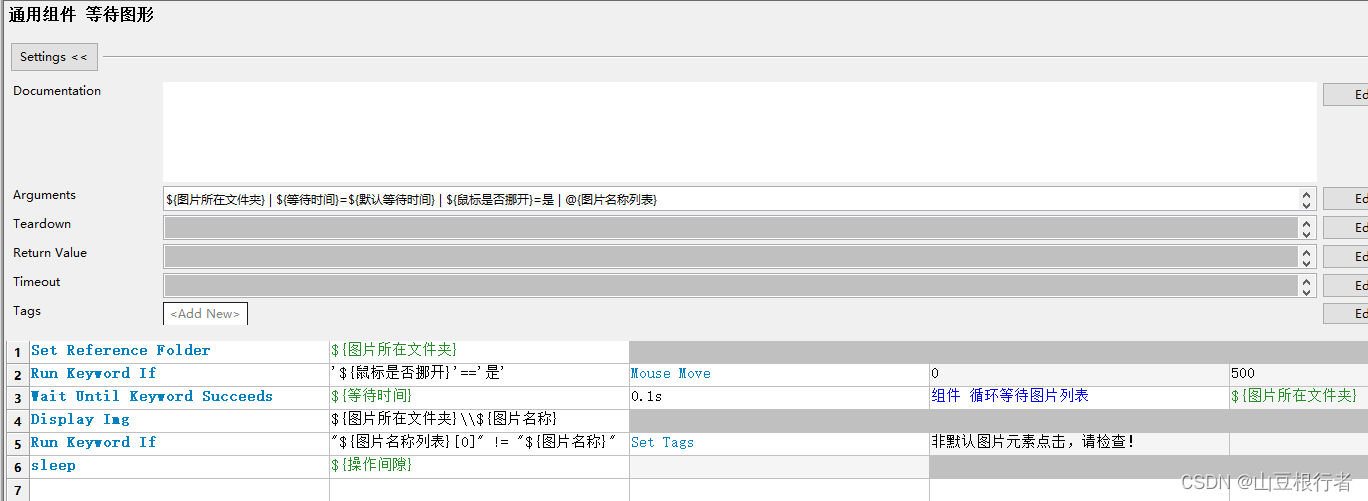
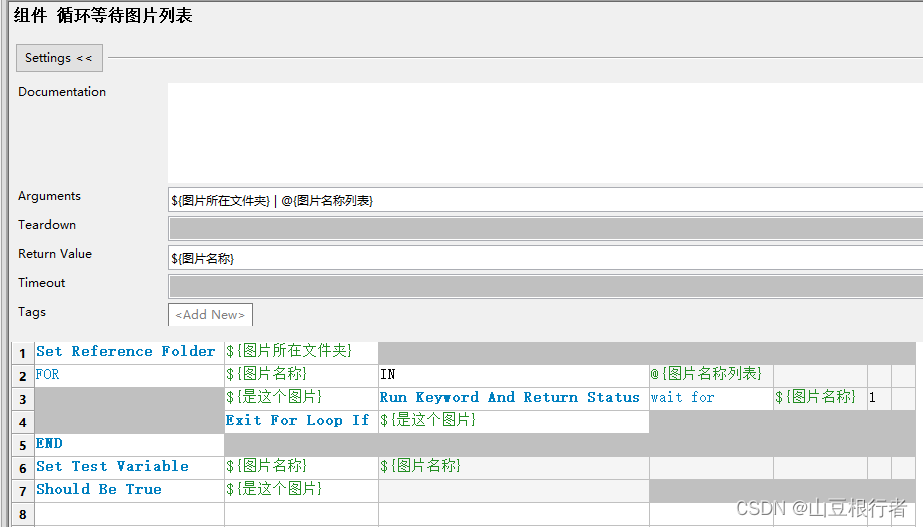
如上图所示,使用参数来控制鼠标是否主动移动到屏幕边缘(autoIt不允许移动到四个角,具体原因不知道,我猜是角落的逻辑比较特殊或者害怕触发了关闭)
并且使用了Wait Until Keyword Succeeds来调用循环图片列表的关键字,用来达到可以循环遍历指定图片的目的。
如果找到的图片不是图片名称列表第一个元素,我们就给这个用例打一个tag,让我们知道。
---------to be continued