转自:https://blog.csdn.net/yiyihuazi/article/details/78557216
这里说下自己遇到一个坑.
1. 如果在公司内部, 虚拟机上网可能 需要设置代理, 方法如下:
在文件后面加上
http_proxy=http://xxxx export http_proxy #保存退出,执行source /etc/profile立即生效 [root@localhost ~]# source /etc/profile |
2.安装时, 由于进行软件选择, 所以默认为最小安装, 这样很多Linux自带的软件都
无法使用, 如vim, resource等等. 所以安装时一定要进行选择.
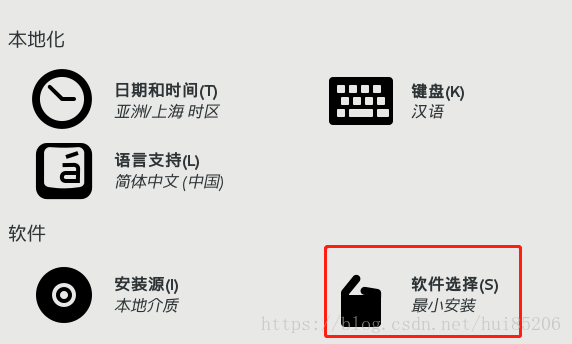
![](https://img-blog.csdn.net/20180612232905864?watermark/2/text/aHR0cHM6Ly9ibG9nLmNzZG4ubmV0L2h1aTg1MjA2/font/5a6L5L2T/fontsize/400/fill/I0JBQkFCMA==/dissolve/70)
软件选择可参考如下:
Desktop :基本的桌面系统,包括常用的桌面软件,如文档查看工具。 Minimal Desktop:基本的桌面系统,包含的软件更少。 Minimal:基本的系统,不含有任何可选的软件包。 Basic Server :安装的基本系统的平台支持,不包含桌面。 Database Server:基本系统平台,加上MySQL和PostgreSQL数据库,无桌面。 Web Server:基本系统平台,加上PHP,Web server,还有MySQL和PostgreSQL数据库的客户端,无桌面。 Virtual Host:基本系统加虚拟平台。 GNOME: GNOME是一个直观和友好的桌面环境. Software Development Workstation:包含软件包较多,基本系统,虚拟化平台,桌面环境,开发工具。 而安装Linux基本是用来构建服务器的,所以基本上选择Basic Server即可。 (测试人员建议安装GNOME). |
============================================
VMware Workstation14安装CentOS7.0 详情教程
1.准备工作
a)下载VMware workstation14
b)下载CentOS7
c)下载SSH Secure Shell Client
2.虚拟机配置
a)打开虚拟机软件“VMware Workstation”,选择“创建新的虚拟机”
![新手学Linux:在VMware14中安装CentOS7详细教程](http://p1.pstatp.com/large/46d4000095e29faf3428)
b)选择“典型”选项,点击“下一步”
![新手学Linux:在VMware14中安装CentOS7详细教程](http://p1.pstatp.com/large/46ce00059874f3d3fe9e)
c)选择“稍后安装操作系统”,点击“下一步”
![新手学Linux:在VMware14中安装CentOS7详细教程](http://p3.pstatp.com/large/46d100026ee36985e977)
d)客户机操作选择“Linux”,版本选择“CentOS 7 64位”,点击“下一步”
![新手学Linux:在VMware14中安装CentOS7详细教程](http://p1.pstatp.com/large/46d000028e9ab87f46f6)
e)输入“虚拟机名称”;点击“浏览”按钮,选择虚拟机文件保存的位置;点击“下一步
![新手学Linux:在VMware14中安装CentOS7详细教程](http://p3.pstatp.com/large/46ce000599f40d08e7ad)
f)默认设置,选择“下一步”
![新手学Linux:在VMware14中安装CentOS7详细教程](http://p1.pstatp.com/large/46cf0002a866532d666d)
g)自定义硬件配置
![新手学Linux:在VMware14中安装CentOS7详细教程](http://p1.pstatp.com/large/46d00002904c9303e206)
h)选择“新CD/DVD”, 选择“使用ISO镜像文件”,然后点击“浏览”,找到刚才下载的centOS7镜像文件,然后点击下面的确定
![新手学Linux:在VMware14中安装CentOS7详细教程](http://p1.pstatp.com/large/46d30002467425c8973e)
i)点击“完成”
![新手学Linux:在VMware14中安装CentOS7详细教程](http://p9.pstatp.com/large/46d400009ab80a7d9388)
3.安装centOs7
a)开启虚拟机
![新手学Linux:在VMware14中安装CentOS7详细教程](http://p3.pstatp.com/large/46d3000248498f090f45)
如果出现下图的错误,需要到BIOS中设置
![新手学Linux:在VMware14中安装CentOS7详细教程](http://p3.pstatp.com/large/46d400009c8b9ee7fe1f)
b)Windows10进入BIOS的方法
打开“设置”,选择“更新和安全
![新手学Linux:在VMware14中安装CentOS7详细教程](http://p3.pstatp.com/large/46d200025c9c1ed4b695)
选择“恢复”,点击“立即重启”
![新手学Linux:在VMware14中安装CentOS7详细教程](http://p9.pstatp.com/large/46d3000249e8837c48e4)
选择“疑难解答”
![新手学Linux:在VMware14中安装CentOS7详细教程](http://p9.pstatp.com/large/46d0000296143c0e4d32)
点击疑难解答->高级选项->UEFI固件设置->重启
![新手学Linux:在VMware14中安装CentOS7详细教程](http://p1.pstatp.com/large/46d100027767b9d444fe)
![新手学Linux:在VMware14中安装CentOS7详细教程](http://p1.pstatp.com/large/46d300024c9ffb5b4009)
![新手学Linux:在VMware14中安装CentOS7详细教程](http://p3.pstatp.com/large/46d1000277c178415462)
进入BIOS后,选择“Intel Virtualization Technology”,按“Enter”键,选择“Enabled”,最后按“F10”保存退出BIOS,重新启动虚拟机
![新手学Linux:在VMware14中安装CentOS7详细教程](http://p3.pstatp.com/large/46d40000a10ffbc4ea34)
c)选择语言“中文-简体中文”
![新手学Linux:在VMware14中安装CentOS7详细教程](http://p9.pstatp.com/large/46d0000298cff48c9e58)
d)接下来显示“安装信息摘要”页面;
点击其中的每一项进行设置,也可以使用默认设置;
软件选择:决定了系统安装后包括哪些功能,如果使用默认值,那么系统安装后是没有图形界面的;选择“GNOME 桌面”,会显示图形界面;本着学习的目的,这里选择默认设置“最小安装”
![新手学Linux:在VMware14中安装CentOS7详细教程](http://p9.pstatp.com/large/46d1000279a945f0a973)
安装目标位置:自动配置分区
![新手学Linux:在VMware14中安装CentOS7详细教程](http://p3.pstatp.com/large/46ce0005a4615ae6faee)
网络和主机名:打开连接开关,记住IP地址,SSH登录时使用,设置主机名,点击“应用”生效
![新手学Linux:在VMware14中安装CentOS7详细教程](http://p3.pstatp.com/large/46d2000262aa7918eac9)
开始安装
![新手学Linux:在VMware14中安装CentOS7详细教程](http://p1.pstatp.com/large/46d2000264296f1a4a30)
设置ROOT密码
![新手学Linux:在VMware14中安装CentOS7详细教程](http://p3.pstatp.com/large/46ce0005a679d54bd173)
安装
![新手学Linux:在VMware14中安装CentOS7详细教程](http://p1.pstatp.com/large/46d000029c3c2ab6a728)
按照成功后,进行登录
![新手学Linux:在VMware14中安装CentOS7详细教程](http://p3.pstatp.com/large/46d100027d852af68ee6)
4.ssh登录
a)打开SSH,点击“Quick Connect”
![新手学Linux:在VMware14中安装CentOS7详细教程](http://p3.pstatp.com/large/46d000029e2e4e99e99b)
b)配置连接
根据安装CentOS配置的以太网,获取IP地址:192.168.106.129
![新手学Linux:在VMware14中安装CentOS7详细教程](http://p1.pstatp.com/large/46d3000254a1435762de)
![新手学Linux:在VMware14中安装CentOS7详细教程](http://p1.pstatp.com/large/46ce0005a9b10618eca7)
输入root的密码
![新手学Linux:在VMware14中安装CentOS7详细教程](http://p3.pstatp.com/large/46cf0002b8043f356800)
登录成功
![新手学Linux:在VMware14中安装CentOS7详细教程](http://p3.pstatp.com/large/46ce0005aaad16f7aaea)