(新手上路,诸多不足与错误,请优雅指正,轻喷)
Spring6是一个里程碑的Spring框架。
首先要明白为什么要出现框架:在程序的开发中,一直追求高内聚,低耦合,快速,高效,易于维护,spring框架就是满足这些要求出现的一个开源框架。
在学习框架前,我们要掌握Maven的知识,学会导入需要的包。
一,明白Spring的主要功能
<1>把new对象交给Spring<2>把维护对象之间关系交给Spring
二,开始Spring尝试
第一步:在pom.xml中配置 仓库,因为spring6是抢先版,所以相比其他的dependency,需要多配置一个仓库
<repositories>
    <repository>
        <id>repository.spring.milestone</id>
        <name>Spring Milestone Repository</name>
        <url>https://repo.spring.io/milestone</url>
    </repository>
然后配置依赖
<dependencies>
<dependency>
<groupId>org.springframework</groupId>
        <artifactId>spring-context</artifactId>
        <version>6.0.0-M2</version>
    </dependency>
如果只想用 Spring的AOP ,Bean等的部分功能,我们只需要引入spring-context即可。
第二步
编写一个实体类:
public class Account {
    public Account(){
    }
}
第三步:在resources下创建关于bean的配置文件XXXX.xml
<?xml version="1.0" encoding="UTF-8"?>
<beans xmlns="http://www.springframework.org/schema/beans"
       xmlns:xsi="http://www.w3.org/2001/XMLSchema-instance"
       xsi:schemaLocation="http://www.springframework.org/schema/beans http://www.springframework.org/schema/beans/spring-beans.xsd">
      <bean id="accountBean" class="com.chenchen.dao.Account"></bean>
</beans>
其中 id=“ ”是可以自己起名字的,class需要写下自己类的路径
第四步:在程序中采用如下方法,读取配置文件(其实读取的过程中,对象已经被实例化了)
ApplicationContext applicationContext = new ClassPathXmlApplicationContext("spring.xml");
然后采用一下方法返回实例化的对象
Object accountBean = applicationContext.getBean("accountBean");
对象实例化后,Spring会采用Map的数据结构来存储对象
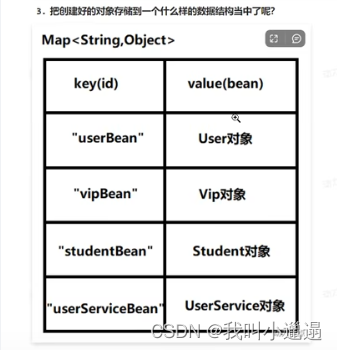
applicationContext.getBen("),就是拿出实例化对象的过程。
同时值得注意的是: Spring在new对象的过程中,采用的是反射机制,调用类无参的构造方法
通过这种方式,Spring实现类IOC,控制反转,方便我们对项目后续功能的扩充。
如上就是把创建对象交给Spring的过程
本文内容由网友自发贡献,版权归原作者所有,本站不承担相应法律责任。如您发现有涉嫌抄袭侵权的内容,请联系:hwhale#tublm.com(使用前将#替换为@)