摘要
GAN is a generative model, which consists of a generator-discriminator. The generator generates data according to random noise, and the discriminator is responsible for distinguishing the real data and the data generated by the generator. They fight against each other and grow with each other. Unet is a semantic segmentation model, which consists of an encoder and a decoder. The encoder will compress the image size and increase the channel in order to improve the receptive field of the model. The decoder restores the image size through the convolution stage and the upsampling stage. The output obtained in the encoder convolution stage is spliced with the output obtained in the decoder upsampling stage, similar to the Resnet approach, which eliminates the gradient disappearance caused by the network being too deep.
GAN是一个生成模型,由生成器—判别器组成,生成器根据随机noise生成数据,判别器负责辨别真实的数据和生成器生成的数据,两者相互对抗,互相成长。Unet是一个语义分割模型,由编码器和解码器组成,编码器将将图片大小压缩,增大通道,以便于提高模型感受野,解码器通过卷积阶段与上采样阶段,还原图片大小,同时编码器卷积阶段得到的输出和编码器上采样阶段得到的输出拼接,类似Resnet的做法,消除了网络过深而导致的梯度消失。
一、GAN
GAN是一个生成模型,由生成器G和判别器D组成,在2014年被提出。
1.1 输入—输出
- 在生成器中输入一个噪音
noise,输出生成的数据g_data(g_data = G(noise));
- 在判别器中输入生成器生成的数据
g_data与真实real_data的数据,分别输出两个概率D(g_data)和D(real_data)。
1.2 优化目标
- 优化判别器时,希望能够辨别真实数据与生成器生成的数据,即
D(real_data)越接近1越好,D(g_data)越解决0越好;
- 优化生成器时,希望生成的数据能够骗过判别器,即
D(g_data)越接近1越好。
最终目标: 希望得到一个生成器,它生成的数据,判别器无法辨别真假。
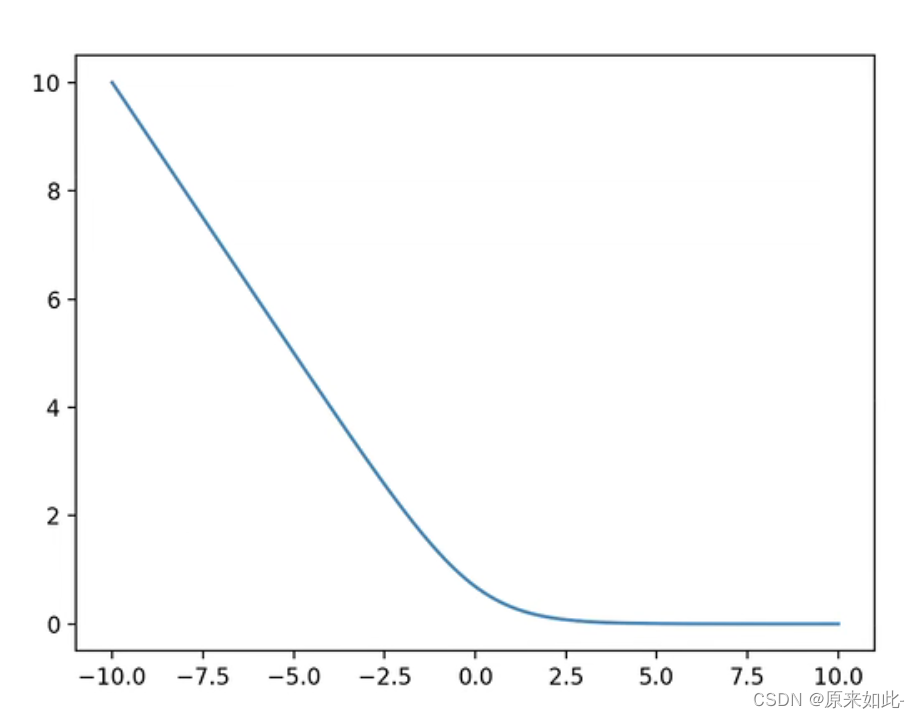
1.3 缺点
- 根据噪音生成数据所加的先验约束小,数据生成的随机性较大。
- 标准GAN的辨别器采用
sigmoid的交叉熵损失函数,梯度消失,导致模型无法训练的现象存在。
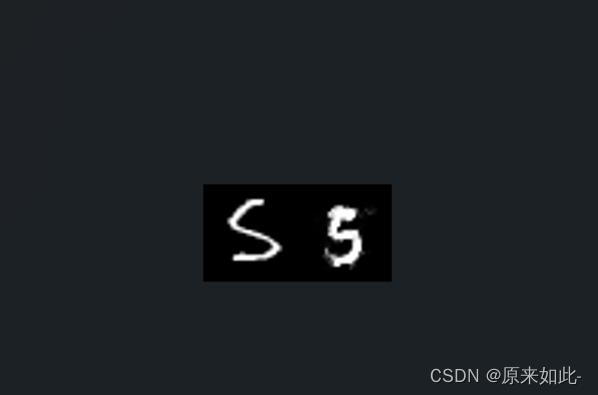
1.4 CGAN
为就解决问题1,同年提出CGAN;通过引入先验约束,让生成器生成指定的数据。引入办法(以手写数字识别为例):
- 用
torch.nn.embedding将数字0-9进行编码,得到每个数字的embeding。
- 得到的
embeding与输入噪音进行拼接操作。
- 在解码器部分让对应数字的
embeding与拉平后的图片拼接。
效果:左边是真实数据,右边是解码器端输入5后生成的数据
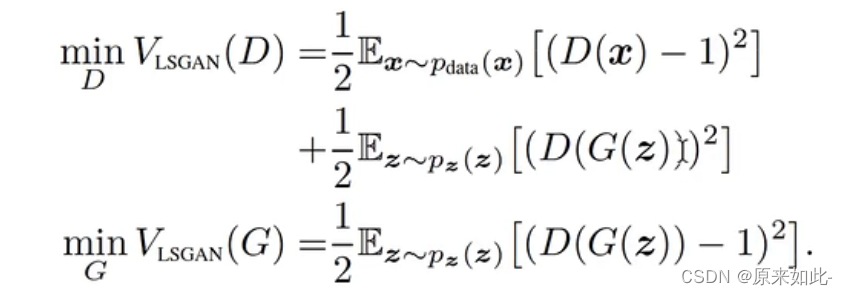
1.5 LSGAN
为了解决问题2,提出了LSGAN,采用最小二乘法作为模型的损失函数,解决了梯度消失问题,使模型训练更可靠。
标准GAN优化目标:

LSGAN的优化目标:
1.6 C—LSGAN实现
生成器输入形状为(batch_size, latent_dim) noise,已经条件约束embedding—labels输出batch_size张的图片的张量数据,形状为(batch_size, 1, 28, 28)。
class Generator(nn.Module):

    def __init__(self):
        super(Generator, self).__init__()
        self.embedding = nn.Embedding(10, latent_dim)
        self.model = nn.Sequential(
            nn.Linear(2*latent_dim, 128),
            torch.nn.BatchNorm1d(128),
            torch.nn.GELU(),

            nn.Linear(128, 256),
            torch.nn.BatchNorm1d(256),
            torch.nn.GELU(),
            nn.Linear(256, 512),
            torch.nn.BatchNorm1d(512),
            torch.nn.GELU(),
            nn.Linear(512, 1024),
            torch.nn.BatchNorm1d(1024),
            torch.nn.GELU(),
            nn.Linear(1024, np.prod(image_size, dtype=np.int32)),
            #  nn.Tanh(),
            nn.Sigmoid(),
        )

    def forward(self, z, labels):
        # shape of z: [batchsize, latent_dim]
        labels_embedding = self.embedding(labels)
        z = torch.cat([z, labels_embedding], dim=1)
        output = self.model(z)
        image = output.reshape(z.shape[0], 1, 28, 28)

        return image
1.7 判别器
判别器输入一个batch的图片数据,形状为(batch_size, 1, 28, 28)及先验条件约束embedding—labels,输出为该图片为真实数据的概率。
class Discriminator(nn.Module):

    def __init__(self):
        super(Discriminator, self).__init__()
        self.embeding = nn.Embedding(10, latent_dim)
        self.model = nn.Sequential(
            nn.Linear(np.prod(image_size, dtype=np.int32)+latent_dim, 512),
            torch.nn.GELU(),
            nn.Linear(512, 256),
            torch.nn.GELU(),
            nn.Linear(256, 128),
            torch.nn.GELU(),
            nn.Linear(128, 64),
            torch.nn.GELU(),
            nn.Linear(64, 32),
            torch.nn.GELU(),
            nn.Linear(32, 1),
            nn.Sigmoid(),
        )

    def forward(self, image, labels):
        # shape of image: [batchsize, 1, 28, 28]
        labels_embeding = self.embeding(labels)
        prob = self.model(torch.cat([image.reshape(image.shape[0], -1), labels_embeding], dim=-1))
        return prob
总代码
""" 基于MNIST 实现对抗生成网络 (GAN) """

import torch
import torchvision
import torch.nn as nn
import numpy as np

image_size = [1, 28, 28]
latent_dim = 96
batch_size = 64
use_gpu = torch.cuda.is_available()

class Generator(nn.Module):

    def __init__(self):
        super(Generator, self).__init__()
        self.embedding = nn.Embedding(10, latent_dim)
        self.model = nn.Sequential(
            nn.Linear(2*latent_dim, 128),
            torch.nn.BatchNorm1d(128),
            torch.nn.GELU(),

            nn.Linear(128, 256),
            torch.nn.BatchNorm1d(256),
            torch.nn.GELU(),
            nn.Linear(256, 512),
            torch.nn.BatchNorm1d(512),
            torch.nn.GELU(),
            nn.Linear(512, 1024),
            torch.nn.BatchNorm1d(1024),
            torch.nn.GELU(),
            nn.Linear(1024, np.prod(image_size, dtype=np.int32)),
            #  nn.Tanh(),
            nn.Sigmoid(),
        )

    def forward(self, z, labels):
        # shape of z: [batchsize, latent_dim]
        labels_embedding = self.embedding(labels)
        z = torch.cat([z, labels_embedding], dim=1)
        output = self.model(z)
        image = output.reshape(z.shape[0], *image_size)

        return image


class Discriminator(nn.Module):

    def __init__(self):
        super(Discriminator, self).__init__()
        self.embeding = nn.Embedding(10, latent_dim)
        self.model = nn.Sequential(
            nn.Linear(np.prod(image_size, dtype=np.int32)+latent_dim, 512),
            torch.nn.GELU(),
            nn.Linear(512, 256),
            torch.nn.GELU(),
            nn.Linear(256, 128),
            torch.nn.GELU(),
            nn.Linear(128, 64),
            torch.nn.GELU(),
            nn.Linear(64, 32),
            torch.nn.GELU(),
            nn.Linear(32, 1),
            nn.Sigmoid(),
        )

    def forward(self, image, labels):
        # shape of image: [batchsize, 1, 28, 28]
        labels_embeding = self.embeding(labels)
        prob = self.model(torch.cat([image.reshape(image.shape[0], -1), labels_embeding], dim=-1))
        return prob

# Training
dataset = torchvision.datasets.MNIST("mnist_data", train=True, download=True,
                                     transform=torchvision.transforms.Compose(
                                         [
                                             torchvision.transforms.Resize(28),
                                             torchvision.transforms.ToTensor(),
                                             #  torchvision.transforms.Normalize([0.5], [0.5]),
                                         ]
                                                                             )
                                     )
dataloader = torch.utils.data.DataLoader(dataset, batch_size=batch_size, shuffle=True, drop_last=True)

generator = Generator()
discriminator = Discriminator()


g_optimizer = torch.optim.Adam(generator.parameters(), lr=0.0003, betas=(0.4, 0.8), weight_decay=0.0001)
d_optimizer = torch.optim.Adam(discriminator.parameters(), lr=0.0003, betas=(0.4, 0.8), weight_decay=0.0001)

loss_fn = nn.MSELoss()
labels_one = torch.ones(batch_size, 1)
labels_zero = torch.zeros(batch_size, 1)

if use_gpu:
    print("use gpu for training")
    generator = generator.cuda()
    discriminator = discriminator.cuda()
    loss_fn = loss_fn.cuda()
    labels_one = labels_one.to("cuda")
    labels_zero = labels_zero.to("cuda")

num_epoch = 200
for epoch in range(num_epoch):
    for i, mini_batch in enumerate(dataloader):
        gt_images, labels = mini_batch


        z = torch.randn(batch_size, latent_dim)

        if use_gpu:
            gt_images = gt_images.to("cuda")
            z = z.to("cuda")

        pred_images = generator(z, labels)
        g_optimizer.zero_grad()

        recons_loss = torch.abs(pred_images-gt_images).mean()

        g_loss = recons_loss*0.05 + loss_fn(discriminator(pred_images, labels), labels_one)

        g_loss.backward()
        g_optimizer.step()

        d_optimizer.zero_grad()

        real_loss = loss_fn(discriminator(gt_images, labels), labels_one)
        fake_loss = loss_fn(discriminator(pred_images.detach(), labels), labels_zero)
        d_loss = (real_loss + fake_loss)

        # 观察real_loss与fake_loss,同时下降同时达到最小值,并且差不多大,说明D已经稳定了

        d_loss.backward()
        d_optimizer.step()

        if i % 50 == 0:
            print(f"step:{len(dataloader)*epoch+i}, recons_loss:{recons_loss.item()}, g_loss:{g_loss.item()}, d_loss:{d_loss.item()}, real_loss:{real_loss.item()}, fake_loss:{fake_loss.item()}")

        if i % 400 == 0:
            _image = gt_images[0]
            _pre_image = pred_images[0]
            image = torch.stack([_image, _pre_image])
            torchvision.utils.save_image(image, f"GAN_save_image/image_{len(dataloader)*epoch+i}.png", nrow=4)
二、Unet
Unet是编码器—解码器架构的语义分割模型,在2015年被提出,是图像分割领域中划时代的一个模型。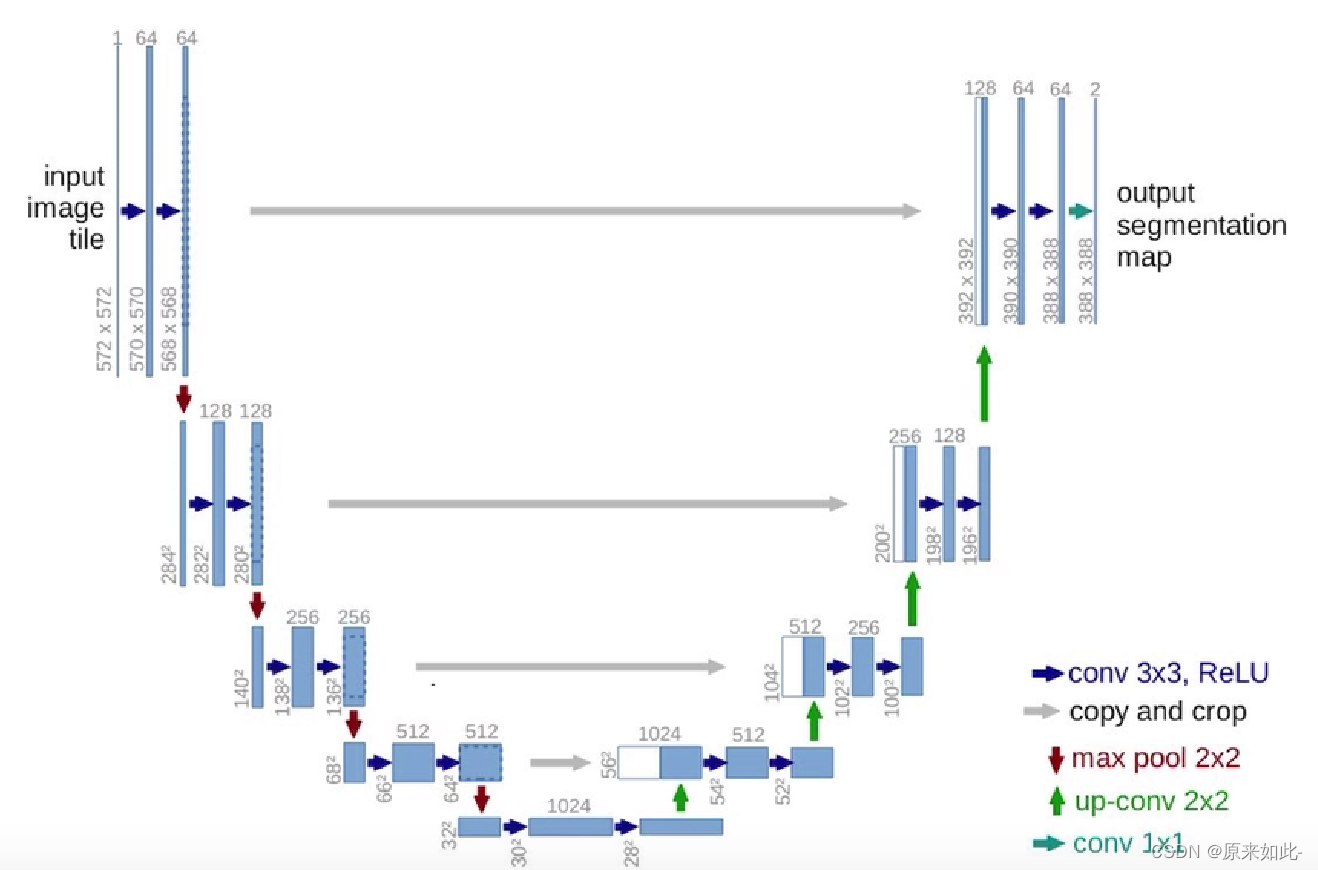
2.1 编码器
编码器是由卷积阶段—下采样阶段组成。作用是将图片的宽度减少,通道数增加,以便于增大模型的感受野。卷积阶段得到的数据会和解码器上采样阶段得到的数据进行拼接。类似做一个ResNet。
2.2 编码器
解码器是由卷积阶段—上采样阶段组成。作用是将图片通道压缩,增大宽度和高度,还原出图片原本大小,分割或者生成需要的目标图片。
2.3 效果
用Unet实现用上一时刻的图片生成下一时刻图片效果:
(左边是上一时刻图片,中间是预测的目标图片,右边是模型生成的图片)

2.4 模型代码
import torch
import torch.nn as nn

class Conv(nn.Module):
    """Unet卷积层,两层 (nn.conv2d—nn.BatchNorm2d—nn.LeakReLU)组成
        1. 数据形状
        ->>输入: (batch, in_channel, image_h, image_w)
        ->>输出: (batch, out_channel, image_h, image_w)
        2. 作用: 是将输入数据的通道个数由in_channel变为out_channel
    """
    def __init__(self, in_channel, out_channel):
        super(Conv, self).__init__()
        self.layer = nn.Sequential(
            nn.Conv2d(in_channel, out_channel, kernel_size=(3, 3), padding=1),
            nn.BatchNorm2d(out_channel),
            nn.LeakyReLU(inplace=True),
            nn.Conv2d(out_channel, out_channel, kernel_size=(3, 3), padding=1),
            nn.BatchNorm2d(out_channel),
            nn.LeakyReLU(inplace=True),
        )
    def forward(self, x):
        return self.layer(x)

class DownSample(nn.Module):
    """下采样层
        1. 可选择:
        ->>model="conv"卷积的方式采样;用卷积将保留更多特征
        ->>model="maxPool"最大池化的方式进行采样。若采用该方法,将不用输入通道数目
        2. 默认使用卷积的方式进行下采样。
        3. 数据形状:
        ->> 输入: (batch, in_channel, image_h, image_w)
        ->> 输出: (batch, in_channel, image_h/2, image_w/2)
        4. 作用:将图像大小缩小一半"""
    def __init__(self, channel=None, model="conv"):
        super(DownSample, self).__init__()
        if model == "conv":
            self.layer=nn.Sequential(
                nn.Conv2d(in_channels=channel, out_channels=channel, kernel_size=(2, 2), stride=(2, 2), bias=False),
                nn.LeakyReLU(inplace=True)
            )
        if model == "maxPool":
            self.layer = nn.Sequential(
                nn.MaxPool2d(kernel_size=(2, 2), stride=(2, 2))
            )

    def forward(self, x):
        return self.layer(x)

class UpSample(nn.Module):
    """上采样层"""
    def __init__(self, scale=2):
        super(UpSample, self).__init__()
        self.up = nn.UpsamplingBilinear2d(scale_factor=scale)
    def forward(self, x):
        return self.up(x)

class Unet(nn.Module):
    """输入(batch,(time_len channel),image_h,image_w)
    返回(batch (time_len channel) image_h image_w)"""
    def __init__(self):
        super(Unet, self).__init__()
# ---------------------------------下采样阶段-------------------------------
        # 下采样阶段压缩图片
        self.d_c0 = Conv(3*20, 64)
        """"输入:(batch, 3, 560, 480) -> 输出:(batch, 64, 560, 480)"""
        self.d_s0 = DownSample(64)
        """输入:(batch, 64, 560, 480) -> 输出:(batch, 64, 280, 240)"""

        self.d_c1 = Conv(64, 128)
        """输入:(batch, 64, 280, 240) -> 输出:(batch, 128, 280, 240)"""
        self.d_s1 = DownSample(128)
        """输入:(batch, 128, 280, 240) -> 输出:(batch, 128, 140, 120)"""

        self.d_c2 = Conv(128, 256)
        """输入:(batch, 128, 140, 120) -> 输出:(batch, 256, 140, 120)"""
        self.d_s2 = DownSample(256)
        """输入:(batch, 256, 140, 120) -> 输出:(batch, 256, 70, 60)"""

        self.d_c3 = Conv(256, 512)
        """输入:(batch, 256, 70, 60) -> 输出:(batch, 512, 70, 60)"""
        self.d_s3 = DownSample(512)
        """输入:(batch, 512, 70, 60) -> 输出:(batch, 512, 35, 30)"""

        self.d_c4 = Conv(512, 1024)
        """输入:(batch, 512, 35, 30) -> 输出:(batch, 1024, 35, 30)"""
# -------------------------------------------------------------------------
        self.middle = Conv(1024, 512)
        self.middle_up = UpSample()
# -------------------------------上采样阶段-----------------------------------
        # 上采样阶段将图片还原
        self.u_c4 = Conv(1024, 256)
        """输入:(batch, 1024, 70, 60) -> 输出:(batch, 256, 70, 60)"""
        self.u_s4 = UpSample()
        """输入:(batch, 256, 70, 60) -> 输出:(batch, 256, 140, 120)"""

        self.u_c3 = Conv(512, 128)
        """输入:(batch, 512, 140, 120) -> 输出:(batch, 128, 140, 120)"""
        self.u_s3 = UpSample()
        """输入:(batch, 128, 140, 120) -> 输出:(batch, 128, 280, 240)"""

        self.u_c2 = Conv(256, 64)
        """输入:(batch, 256, 280, 240) -> 输出:(batch, 64, 280, 240)"""
        self.u_s2 = UpSample()
        """输入:(batch, 64, 280, 240) -> 输出:(batch, 64, 560, 480)"""

        self.u_c1 = Conv(128, 3*20)
        """输入:(batch, 128, 560, 480) -> 输出:(batch, 3, 280, 240)"""

        self.u_c0 = Conv(6*20, 3*20)
        """输入:(batch, 6, 560, 480) -> 输出:(batch, 3, 560, 480)"""
# ------------------------------------------------------------------------------
    def forward(self, x):
        d_c0_output = self.d_c0(x)
        """形状:(batch, 64, 560, 480)"""
        d_c1_output = self.d_c1(self.d_s0(d_c0_output))
        """形状:(batch, 128, 280, 240)"""
        d_c2_output = self.d_c2(self.d_s1(d_c1_output))
        """形状:(batch, 256, 140, 120)"""
        d_c3_output = self.d_c3(self.d_s2(d_c2_output))
        """形状:(batch, 512, 70, 60)"""

        d_s4_output = self.d_c4(self.d_s3(d_c3_output))
        """形状:(batch,1024, 35, 30)"""
        middle_output = self.middle_up(self.middle(d_s4_output))
        """形状:(batch, 512, 70, 60)"""

        u_s4_output = self.u_s4(self.u_c4(self.cat(middle_output, d_c3_output)))
        """形状:(batch, 256, 140, 120)"""
        u_s3_output = self.u_s3(self.u_c3(self.cat(u_s4_output, d_c2_output)))
        """形状:(batch, 128, 280, 240)"""
        u_s2_output = self.u_s2(self.u_c2(self.cat(u_s3_output, d_c1_output)))
        """形状:(batch, 64, 560, 480)"""
        u_c1_output = self.u_c1(self.cat(u_s2_output, d_c0_output))
        """形状:(batch, 3, 560, 480)"""
        output = self.u_c0(self.cat(u_c1_output, x))
        return output
    def cat(self, x1, x2):
        """在通道维度上组合"""
        return torch.cat([x1, x2], dim=1)

if __name__ == '__main__':
    model = Unet()
    para_sum = sum(p.numel() for p in model.parameters())
    print(para_sum)
    x = torch.randn(2, 60, 480, 560)
    y = model(x)
    print(y.shape)