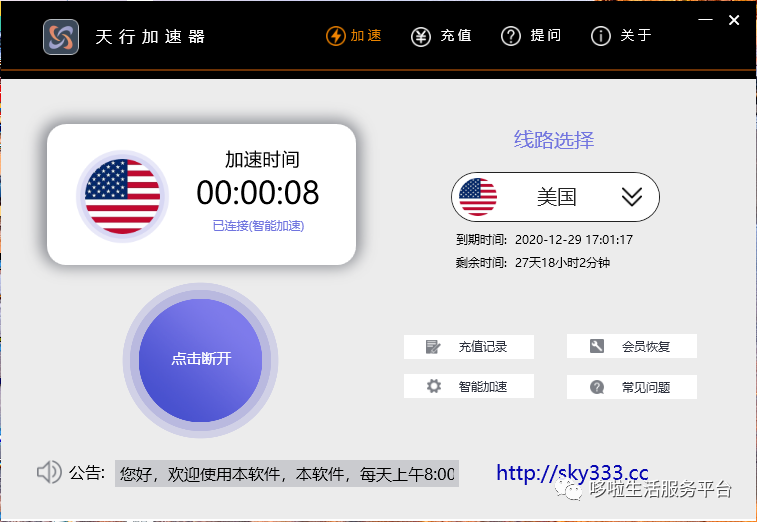
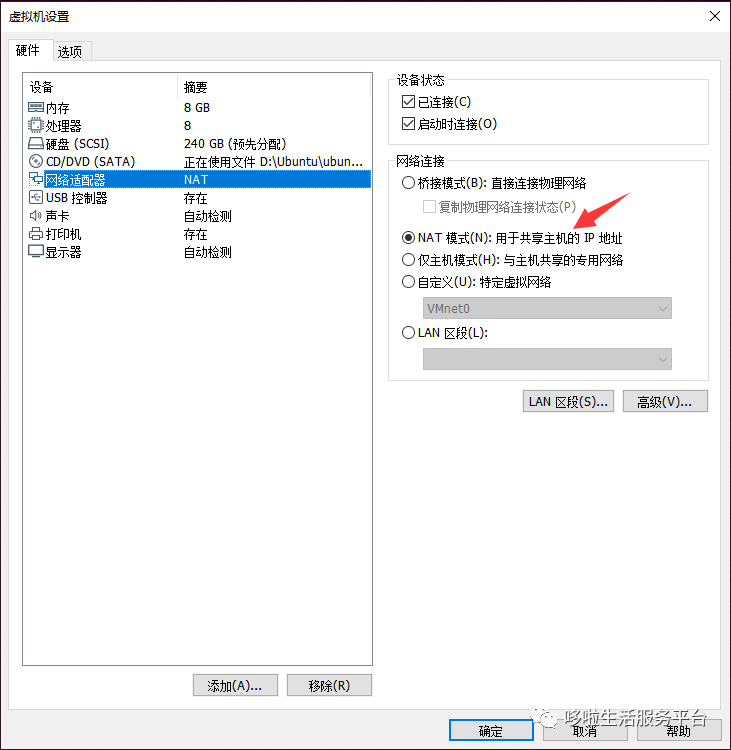
一、获取Android源码网络配置可以访问google(方法一)
二、获取Android源码网络配置可以访问google(方法二)
三、Ubuntu18.04下更改apt源为阿里云源
四、代理导致网络无法访问时,证书问题的解决方法
五、Ubuntu环境普通用户自动化下载LineageOS支持机型的各版本Android系统源码的操作方法
六、MoKee(魔趣)或LineageOS
七、MoKee魔趣
八、常用的Android系统源码编译基础
九、端口占用问题的解决方法
十、Ubuntu 16.04上增加Swap分区
十一、磁盘空间不足可以采用如下方法扩展磁盘空间
十二、无法访问google的情况下魔趣Mokee镜像添加编译系统的设备选型号(lunch)
十三、无法访问google的情况下Lineage OS镜像添加编译系统的设备选型号(lunch)
一、获取Android源码网络配置可以访问google(方法一)
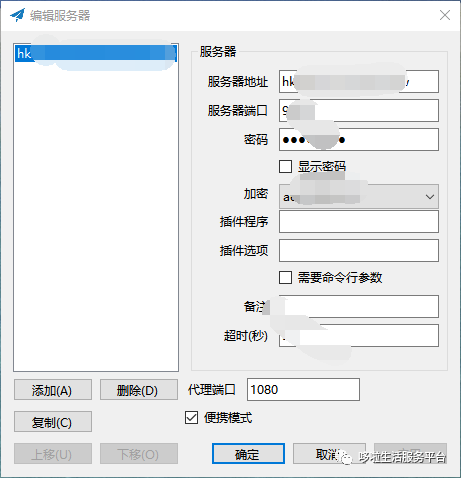

设置http、https以及ftp代理(其中IP为主机IP地址)
export http_proxy=socks5://172.20.10.2:1080
export https_proxy=socks5://172.20.10.2:1080
export FTP_PROXY=socks5://172.20.10.2:1080
export ALL_PROXY=socks5://172.20.10.2:1080
设置http代理(其中IP为主机IP地址)
git config --global http.proxy http://172.20.10.2:1080
git config --global https.proxy https://172.20.10.2:1080
git config --global user.email "****@email.address"
git config --global user.name "****"
取消http代理
git config --system (或 --global 或 --local) --unset http.proxy
git config --system (或 --global 或 --local) --unset https.proxy
二、获取Android源码网络配置可以访问google(方法二)
三、Ubuntu18.04下更改apt源为阿里云源
sudo cp /etc/apt/sources.list /etc/apt/sources.list.bak
sudo apt-get install vim
将原有的内容注释掉,添加以下内容
sudo vim /etc/apt/sources.list
或
sudo gedit /etc/apt/sources.list
deb http://mirrors.aliyun.com/ubuntu/ bionic main restricted universe multiverse
deb-src http://mirrors.aliyun.com/ubuntu/ bionic main restricted universe multiverse
deb http://mirrors.aliyun.com/ubuntu/ bionic-security main restricted universe multiverse
deb-src http://mirrors.aliyun.com/ubuntu/ bionic-security main restricted universe multiverse
deb http://mirrors.aliyun.com/ubuntu/ bionic-updates main restricted universe multiverse
deb-src http://mirrors.aliyun.com/ubuntu/ bionic-updates main restricted universe multiverse
deb http://mirrors.aliyun.com/ubuntu/ bionic-backports main restricted universe multiverse
deb-src http://mirrors.aliyun.com/ubuntu/ bionic-backports main restricted universe multiverse
deb http://mirrors.aliyun.com/ubuntu/ bionic-proposed main restricted universe multiverse
deb-src http://mirrors.aliyun.com/ubuntu/ bionic-proposed main restricted universe multiverse
更新软件列表
sudo apt-get update
更新软件包
sudo apt-get upgrade
四、代理导致网络无法访问时,证书问题的解决方法
取消代理
git config --global --unset http.proxy
git config --global --unset https.proxy
删除本地配置文件
apt-get purge openssl
rm -rf /etc/ssl
重新安装
sudo apt-get install libssl-dev openssl
apt-get install ca-certificates
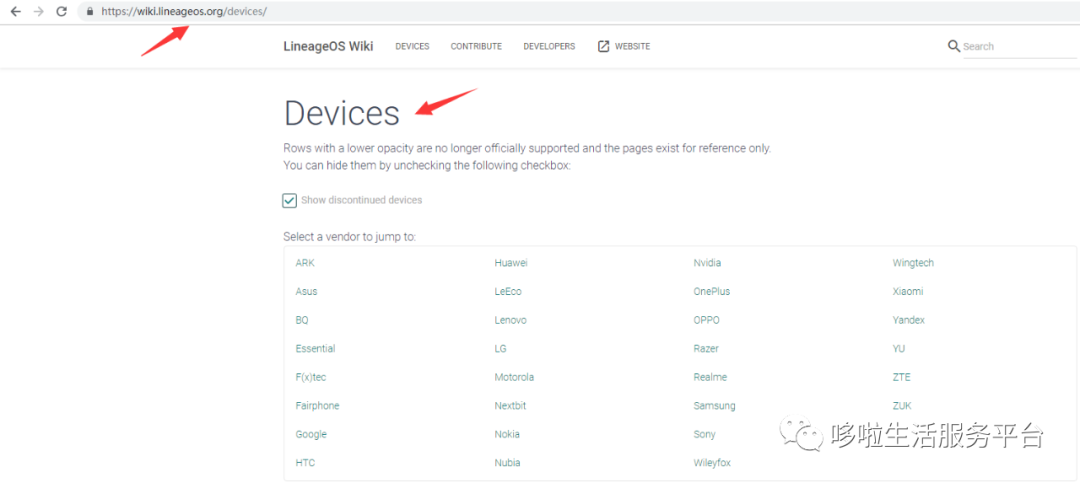
五、Ubuntu环境普通用户自动化下载LineageOS支持机型的各版本Android系统源码的操作方法
(1).获取root权限
sudo su
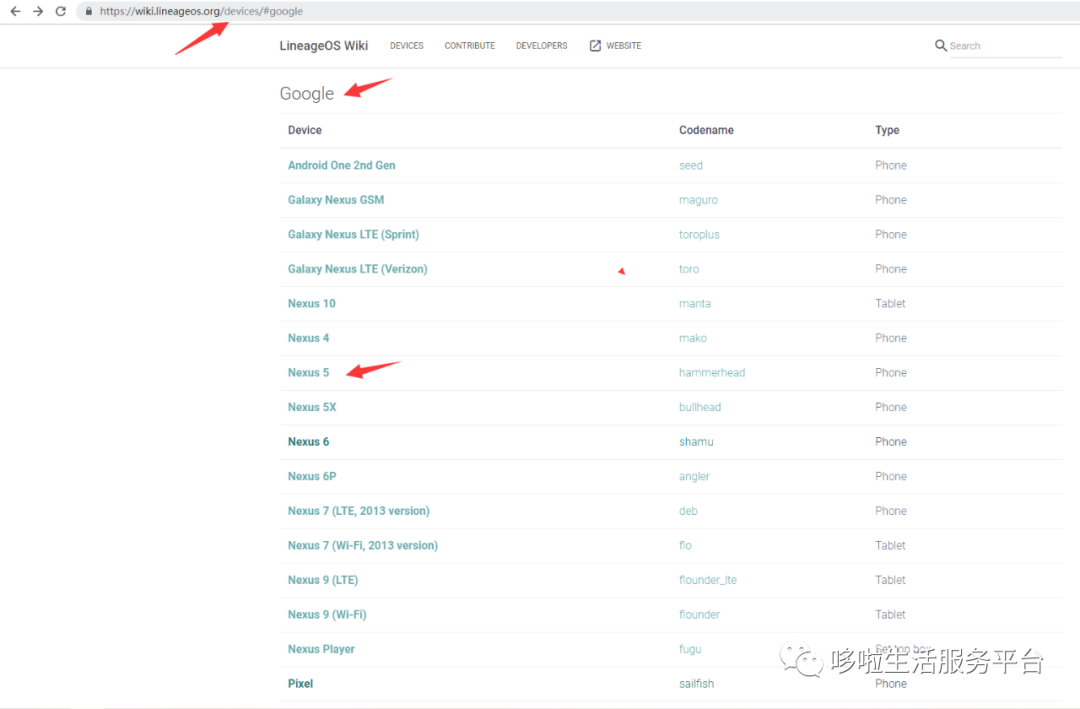
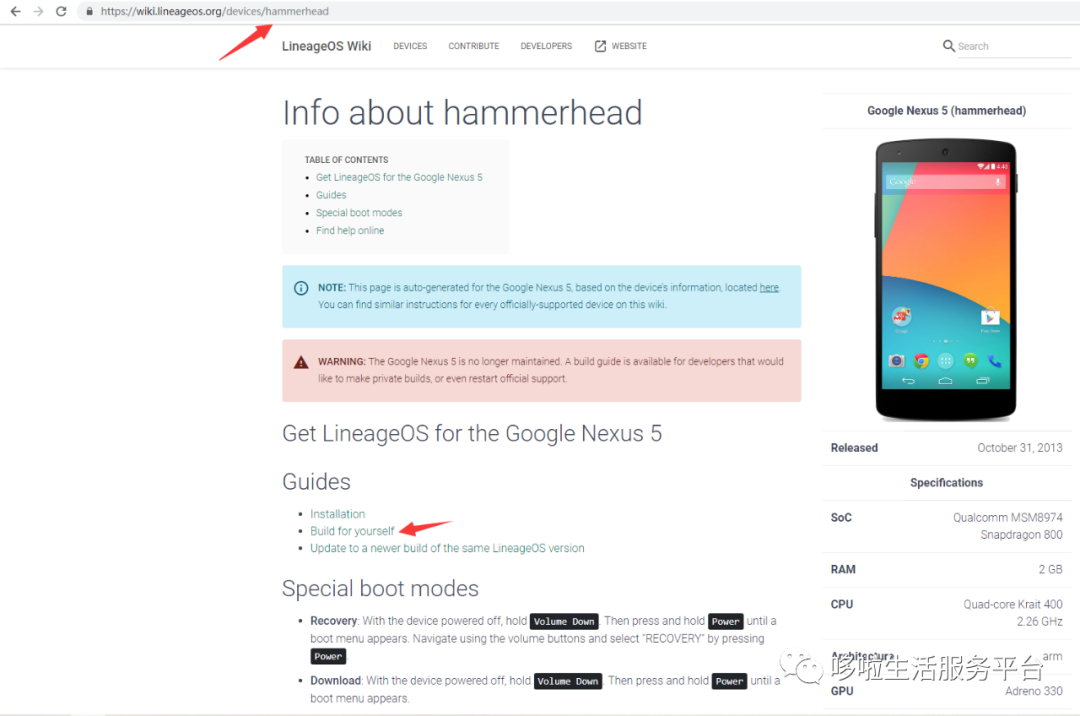
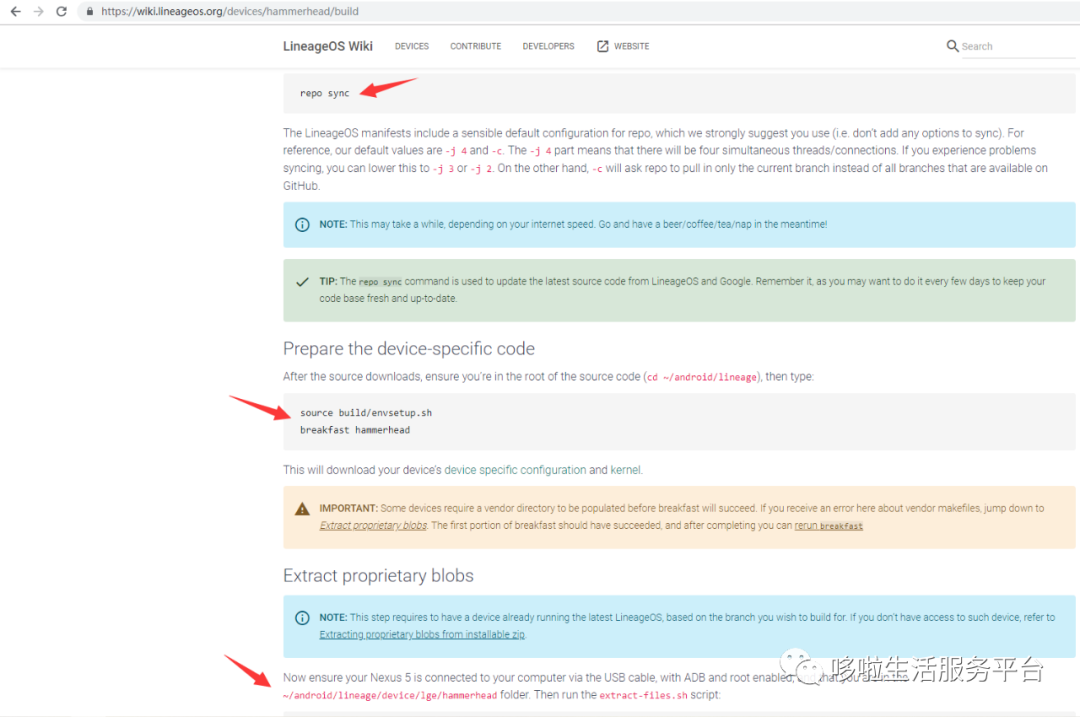
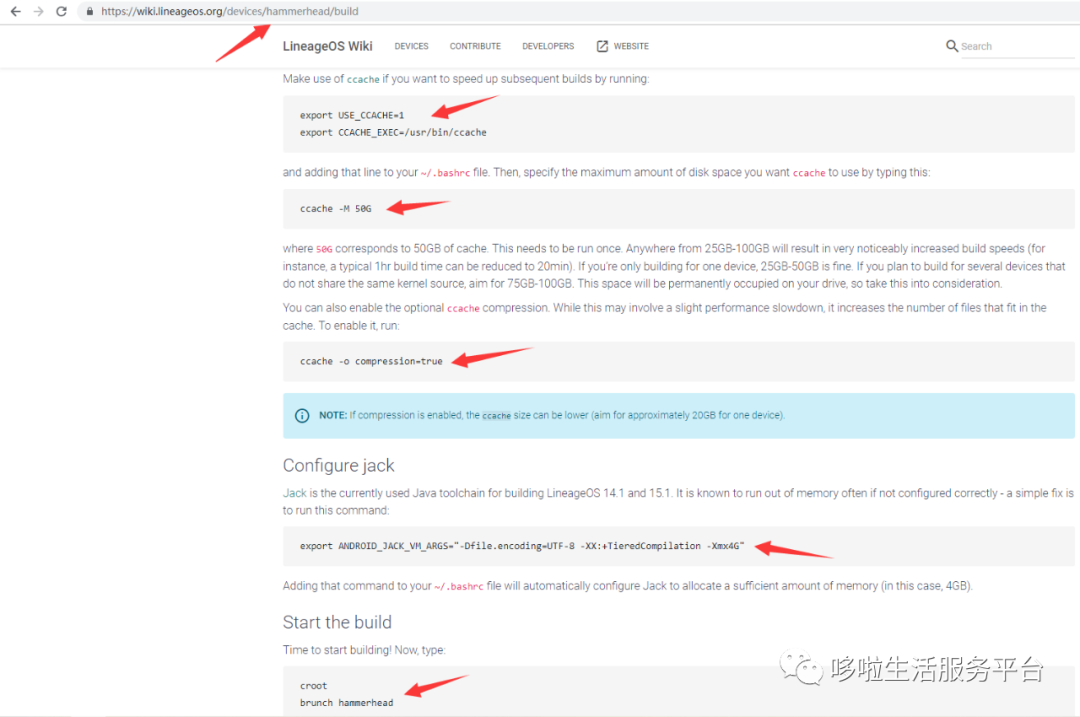
按https://wiki.lineageos.org/devices/的操作步骤获取Android系统源码(各机型获取源码的方法类似),如图所示:
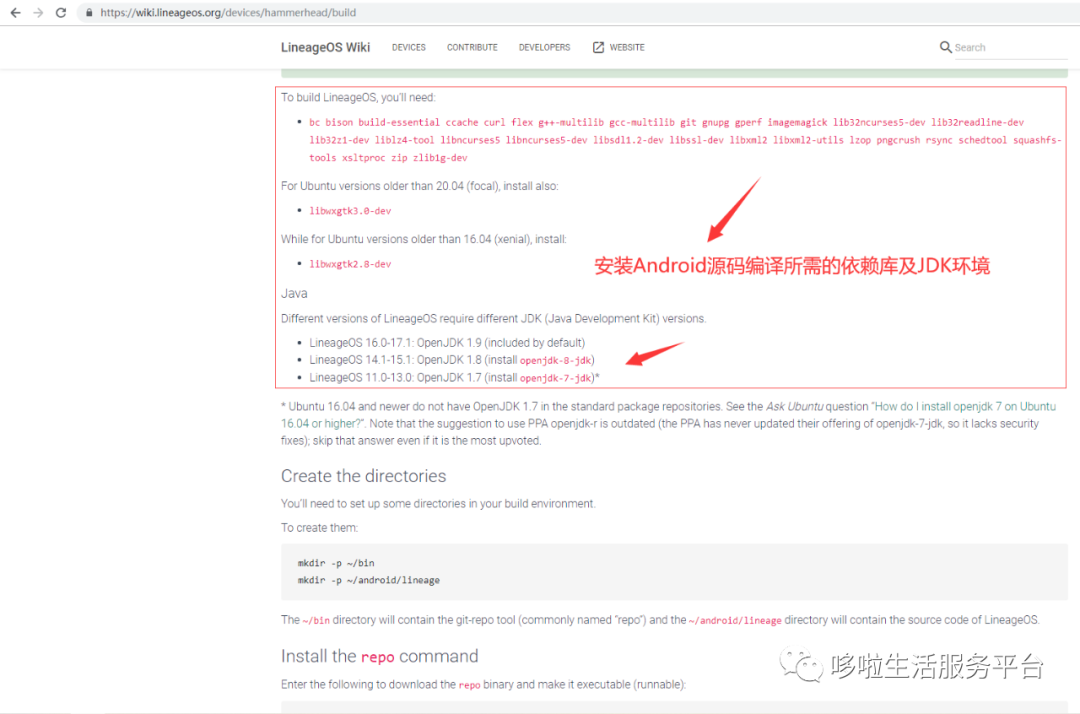
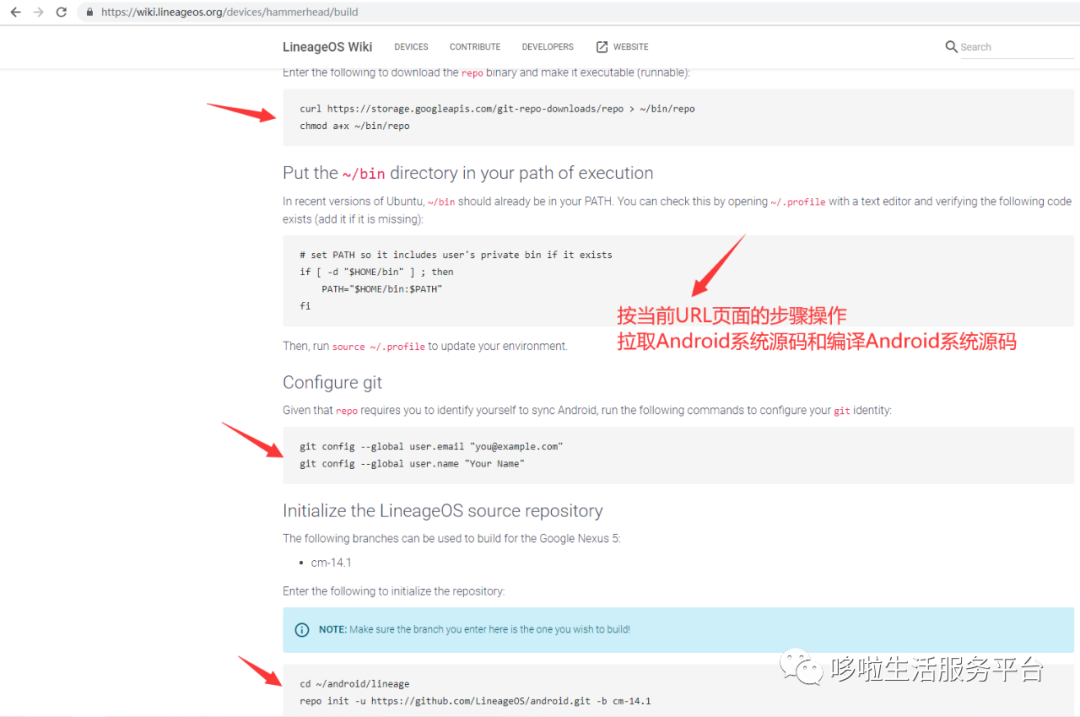
https://wiki.lineageos.org/devices/hammerhead/build(其他机型类似)
六、MoKee(魔趣)或LineageOS
(1).通过git下载各机型支持的device、kernel、vendor系统源码的方法(各机型类似),如下所示:
https://github.com/LineageOS/android_device_xiaomi_cancro
https://github.com/LineageOS/android_kernel_xiaomi_cancro
https://github.com/MoKee/android_vendor_xiaomi_cancro
https://github.com/MoKee/android_device_xiaomi_cancro
https://github.com/MoKee/android_kernel_xiaomi_cancro
https://github.com/LineageOS/android_device_lge_hammerhead
https://github.com/LineageOS/android_kernel_lge_hammerhead
https://github.com/MoKee/android_vendor_lge_hammerhead
https://github.com/MoKee/android_kernel_lge_hammerhead
https://github.com/LineageOS/android_device_huawei_angler
https://github.com/MoKee/android_vendor_huawei_angler
https://github.com/LineageOS/android_kernel_huawei_angler
(2).配置Android系统源码编译环境(普通用户)
vim ~/.bashrc
source ~/.bashrc
./prebuilts/sdk/tools/jack-admin kill-server
./prebuilts/sdk/tools/jack-admin start-server
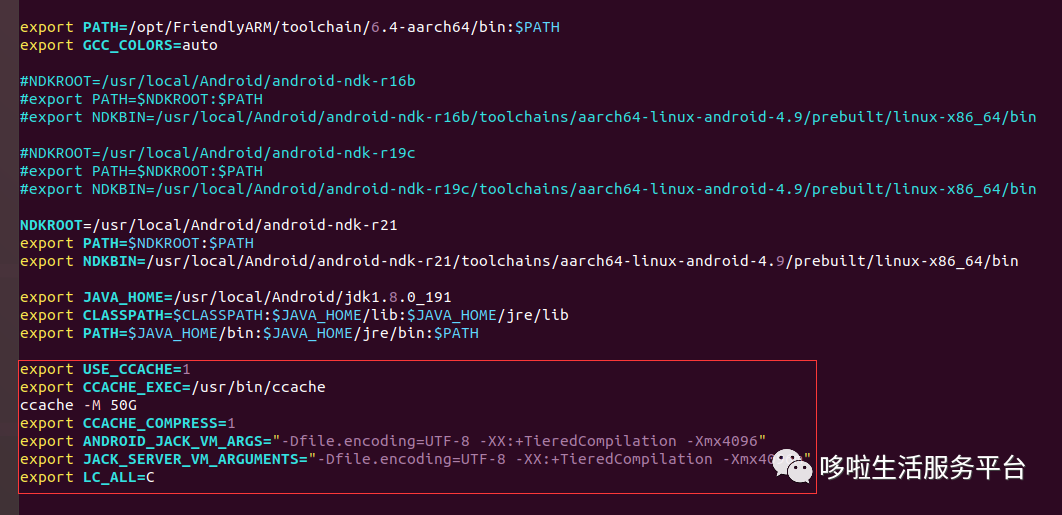
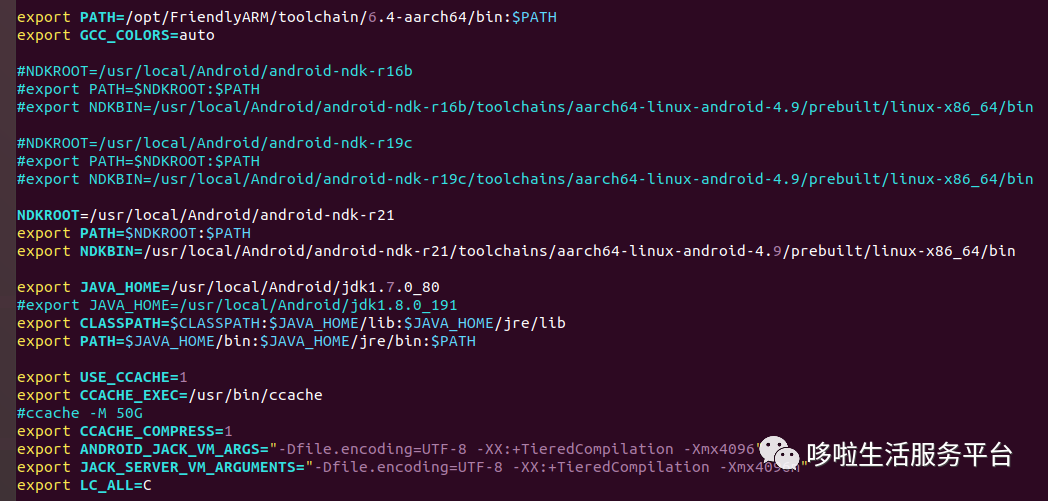
(3).配置Android系统源码编译环境(root用户)
vim ~/.bashrc
export USE_CCACHE=1
export CCACHE_EXEC=/usr/bin/ccache
ccache -M 50G
export CCACHE_COMPRESS=1
export ANDROID_JACK_VM_ARGS="-Dfile.encoding=UTF-8 -XX:+TieredCompilation -Xmx4096"
export JACK_SERVER_VM_ARGUMENTS="-Dfile.encoding=UTF-8 -XX:+TieredCompilation -Xmx4096m"
export LC_ALL=C

source ~/.bashrc
./prebuilts/sdk/tools/jack-admin kill-server
./prebuilts/sdk/tools/jack-admin start-server
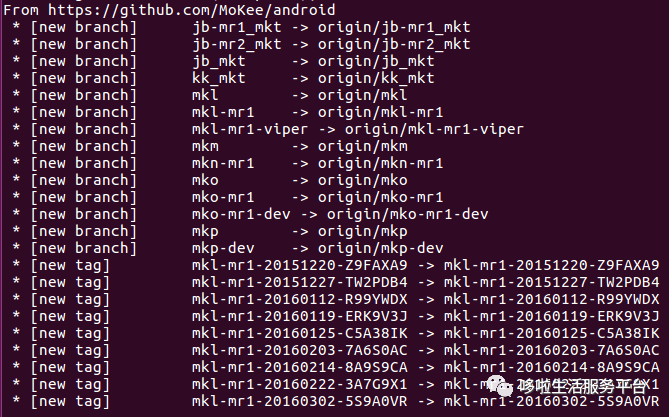
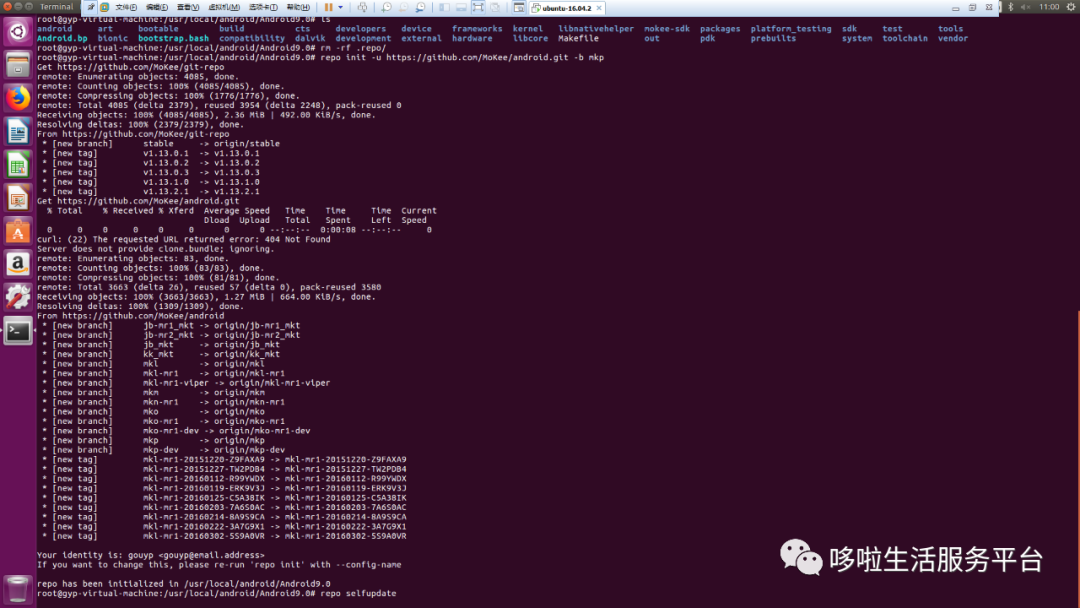
七、MoKee魔趣
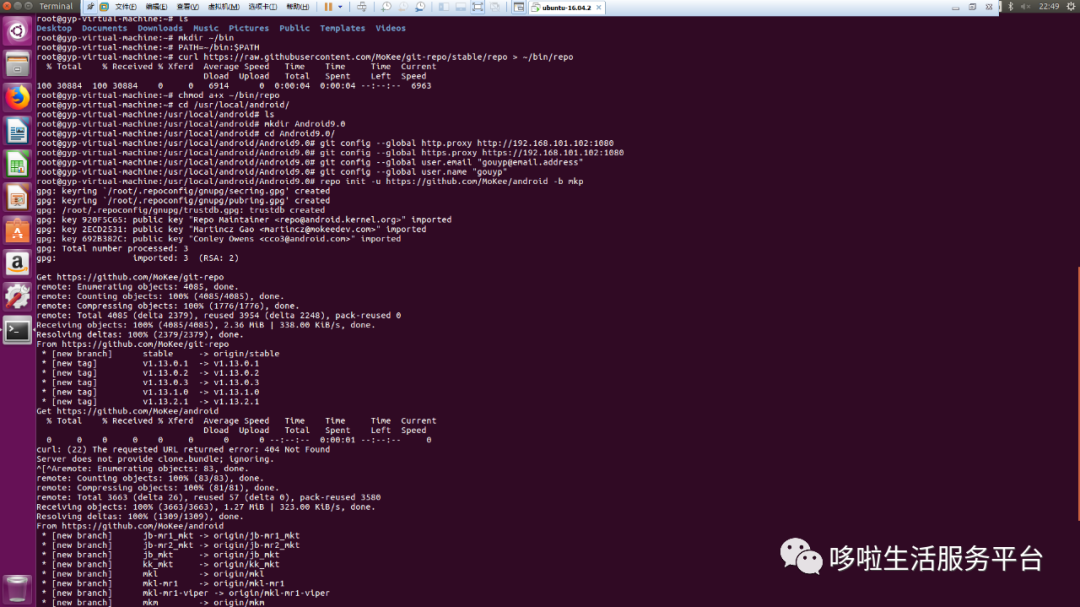
安装Repo
在当前用户的根目录创建bin文件夹,并添加到系统环境变量中
mkdir ~/bin
PATH=~/bin:$PATH
下载Repo并给予执行权限
curl https://download.mokeedev.com/git-repo-downloads/repo > ~/bin/repo
curl https://raw.githubusercontent.com/MoKee/git-repo/stable/repo > ~/bin/repo
chmod a+x ~/bin/repo
8.1的魔趣源码,分支修改成mko-mr1
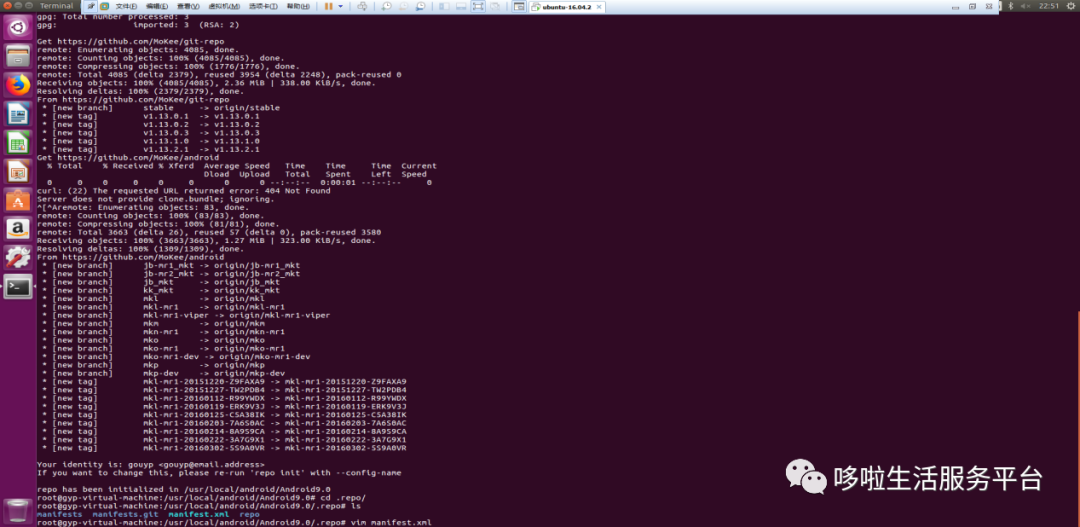
repo init -u https://github.com/MoKee/android -b mko-mr1
repo sync
repo sync -f -j8
repo sync -c -f -j8 --force-sync --no-clone-bundle
编译Android8.1的命令
make bacon
make bacon -j4
make bacon -j8
make bacon -j16
9.0的魔趣源码,分支修改成mkp
git config --global http.proxy http://192.168.101.102:1080
git config --global https.proxy https://192.168.101.102:1080
git config --global user.email "gouyp@email.address"
git config --global user.name "gouyp"
repo init -u https://github.com/MoKee/android -b mkp
repo init -u https://github.com/MoKee/android -b mkp-dev
repo init -u https://github.com/MoKee/android.git -b mkp
repo sync
9.0的魔趣源码的编译
. build/envsetup.sh && lunch (enter device number) && mka bacon
repo init -u https://github.com/MoKee/android -b mkp --depth 1
repo sync
. build/envsetup.sh
lunch
编译选项:28(OnePlus 6机型)
mka bacon
mka bacon -j8
Android系统一键刷机的方法

fastboot --disable-verity --disable-verification flash vbmeta stock_vbmeta.img
fastboot flash vbmeta vbmeta.img
fastboot flash boot boot.img
fastboot flash system system.img
fastboot flash userdata userdata.img
fastboot -w reboot

八、常用的Android系统源码编译基础
删除所有配置所编译输出的结果文件
make clobber
添加系统API或者修改@hide的API后,需要执行如下命令,然后再make
make update-api
修改公共API后,需要执行如下命令,然后再make
make update-api
分模块编译
编译boot.img
make bootimage
编译userdata.img
make userdataimage
编译system.img
make systemimage
重新打包system.img
make snod
将App预装到系统中(需要预装的App是以源码形式提供,则需要先编译)
在源码根目录执行以下命令
source build/envsetup.sh
mmm packages/apps/TestApp
编译完成后,会在out/target/product/xxx/system/app/路径下生成对应的apk文件(xxx为设备代号),如果已经有apk文件则直接放在该路径下;如果是系统应用,则应放在out/target/product/xxx/system/priv-app/路径下,接下来需要重新打包成镜像文件,回到源码根目录,执行以下命令重新打包system.img
make snod
九、端口占用问题的解决方法
netstat -tln | grep jack-端口号,只查看端口jack-端口的使用情况
lsof -i:jack-端口号 查看端口属于哪个程序,端口被哪个进程占用
kill -9 jack-端口号进程pid
sudo vim ~/.jack-settings
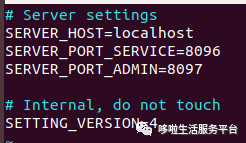
sudo vim ~/.jack-server/config.propertie
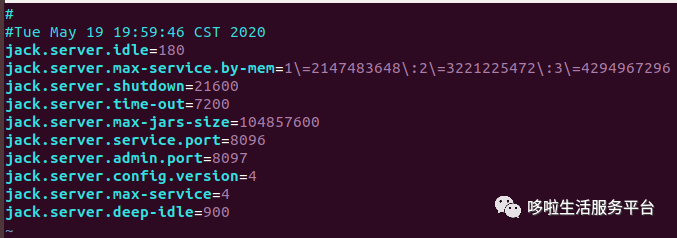
sudo chmod 600 ~/.jack-settings
sudo chmod 600 ~/.jack-server/config.properties
sudo vim ~/.bashrc
sudo source ~/.bashrc


export USE_CCACHE=1
export CCACHE_EXEC=/usr/bin/ccache
ccache -M 50G
export CCACHE_COMPRESS=1
export ANDROID_JACK_VM_ARGS="-Dfile.encoding=UTF-8 -XX:+TieredCompilation -Xmx4096"
export JACK_SERVER_VM_ARGUMENTS="-Dfile.encoding=UTF-8 -XX:+TieredCompilation -Xmx4096m"
export LC_ALL=C
./out/host/linux-x86/bin/jack-admin stop-server
./out/host/linux-x86/bin/jack-admin start-server
./prebuilts/sdk/tools/jack-admin kill-server
./prebuilts/sdk/tools/jack-admin start-server
十、Ubuntu 16.04上增加Swap分区
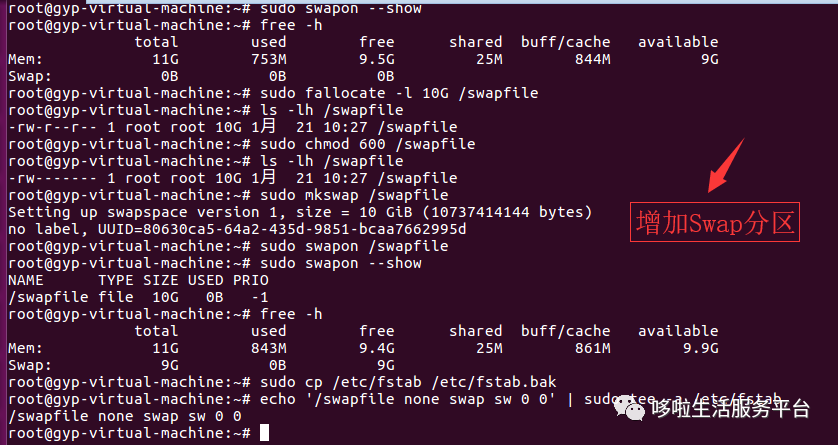
查看磁盘空间大小
df -h
查看磁盘中的文件大小
du -sh
查看内存使用情况
free -m
gnome-system-monitor
十一、磁盘空间不足可以采用如下方法扩展磁盘空间
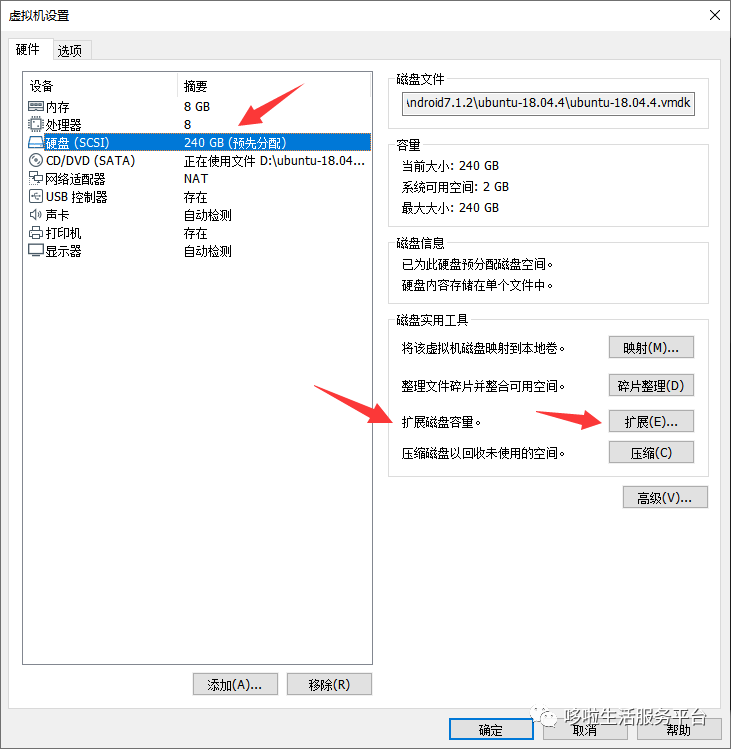
安装gparted分区管理软件
sudo apt-get install gparted
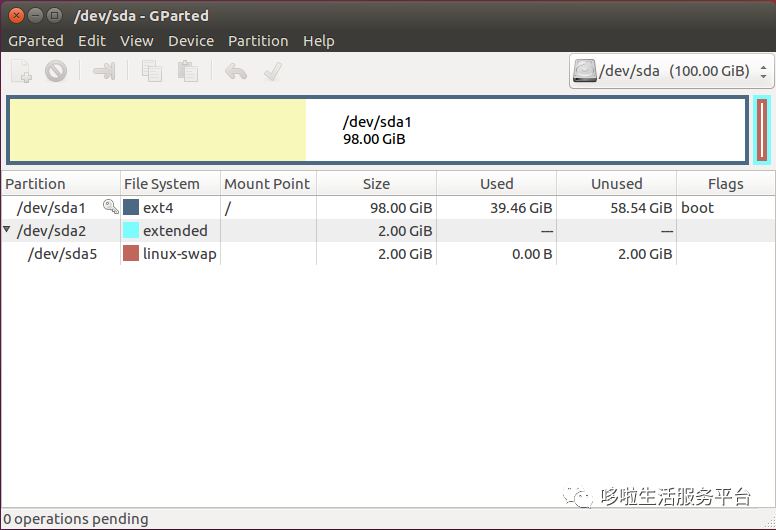
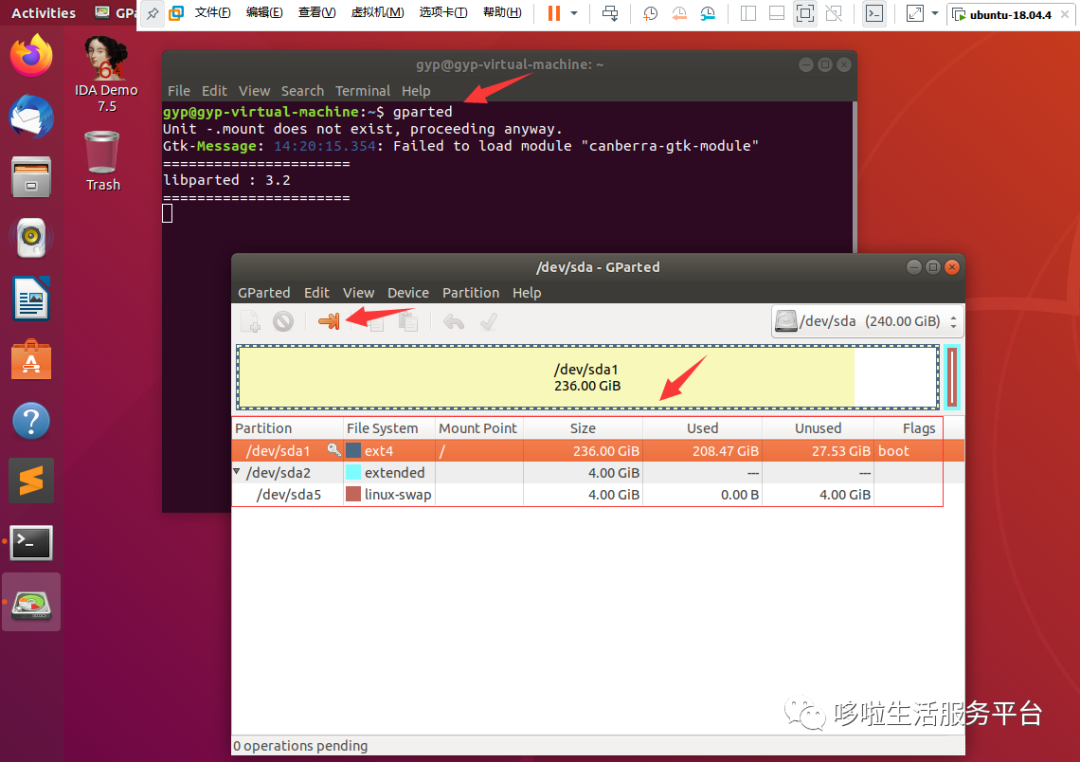
https://blog.csdn.net/u011345885/article/details/73060897
十二、无法访问google的情况下魔趣Mokee镜像添加编译系统的设备选型号(lunch)
十三、无法访问google的情况下Lineage OS镜像添加编译系统的设备选型号(lunch)

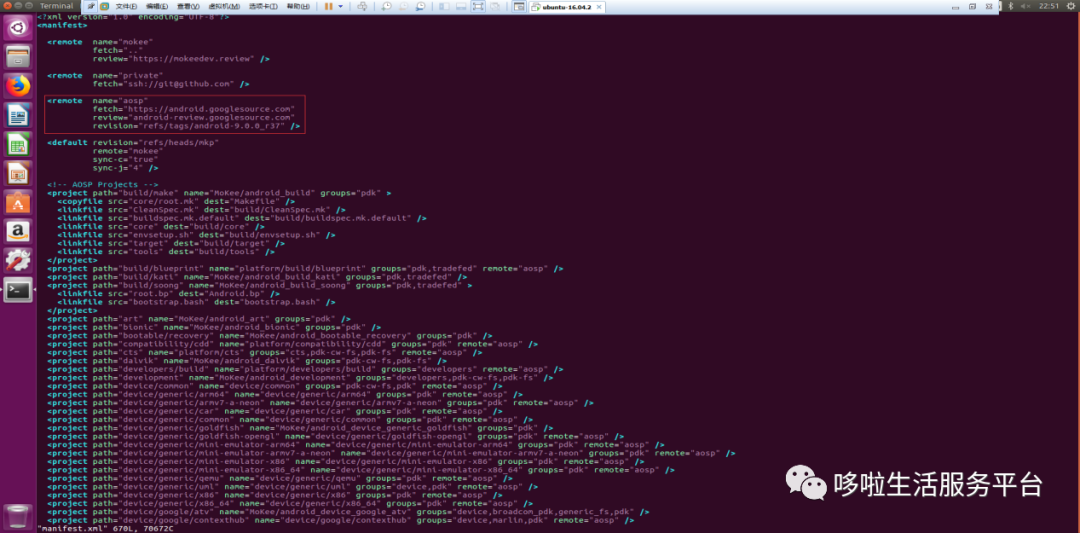
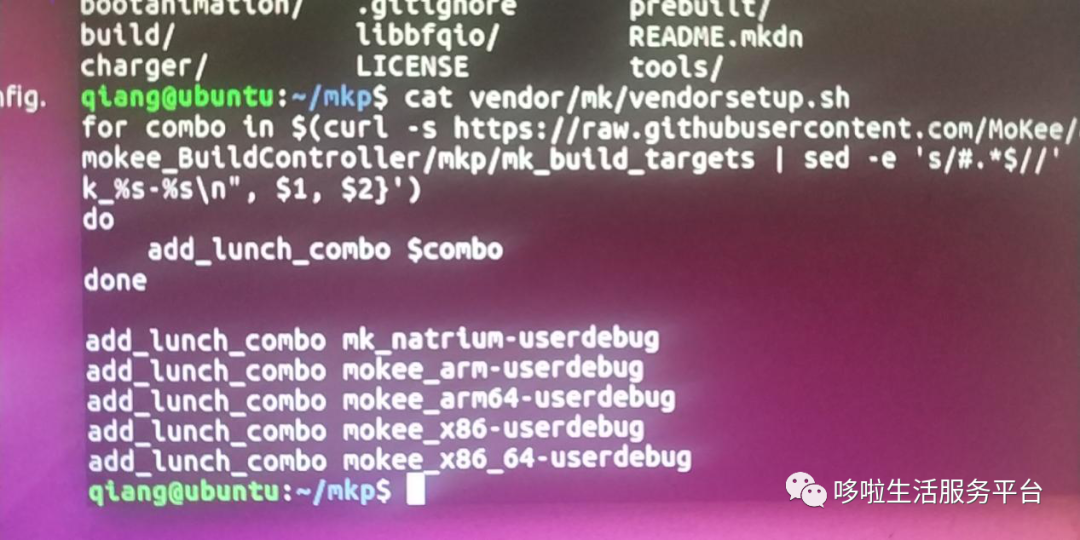
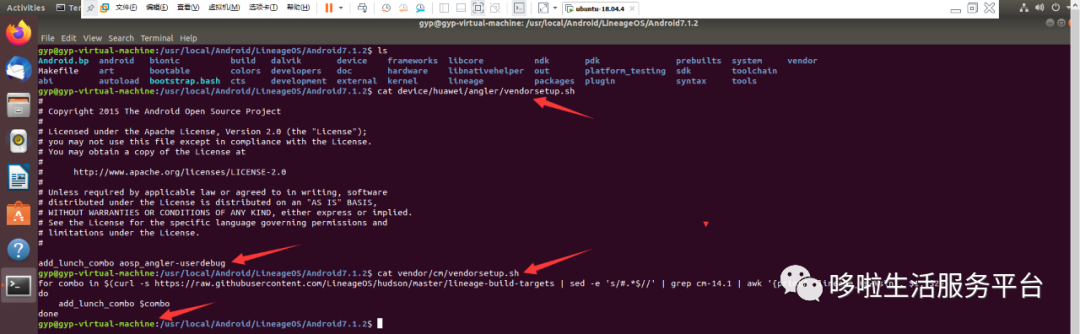
vendor和device相应子目录下的vendorsetup.sh文件的实现,它们主要就是添加相应的设备型号及其编译类型支持到Lunch菜单中去
把device/huawei/angler/vendorsetup.sh中的add_lunch_combo aosp_angler-userdebug添加到vendor/cm/vendorsetup.sh的最后,编译源码时就可以输入lunch命令获取到设备选型号
关注微信公众号,获取更多最新文章信息,感谢您的支持