1-使用numpy构建基本函数
Numpy是Python中主要的科学计算包。它由一个大型社区维护。在本练习中,你将学习一些关键的numpy函数,例如np.exp,np.log和np.reshape。你需要知道如何使用这些函数去完成将来的练习。
1.1- sigmoid function和np.exp()
在使用np.exp()之前,你将使用math.exp()实现Sigmoid函数。然后,你将知道为什么np.exp()比math.exp()更可取。
练习:构建一个返回实数x的sigmoid的函数。将math.exp(x)用于指数函数。
提示:
有时也称为逻辑函数。它是一种非线性函数,即可用于机器学习(逻辑回归),也能用于深度学习。
要引用特定程序包的函数,可以使用package_name.function()对其进行调用。运行下面的代码查看带有math.exp()的示例。
# GRADED FUNCTION: basic_sigmoid

import math
import numpy as np

def sigmoid(x):
    """
    Compute sigmoid of x.

    Arguments:
    x -- A scalar

    Return:
    s -- sigmoid(x)
    """

    ### START CODE HERE ### (≈ 1 line of code)
    s = 1 / (1 + np.exp(-x) )
    ### END CODE HERE ###

    return s
x = np.array([1, 2, 3])
sigmoid(x)
array([0.73105858, 0.88079708, 0.95257413])
1.2- Sigmoid gradient
正如你在教程中所看到的,我们需要计算梯度来使用反向传播优化损失函数。 让我们开始编写第一个梯度函数吧。
练习:创建函数sigmoid_grad()计算sigmoid函数相对于其输入x的梯度。 公式为:
[外链图片转存失败,源站可能有防盗链机制,建议将图片保存下来直接上传(img-IWIQVDyc-1634973961056)(attachment:image.png)]
1.将s设为x的sigmoid。 你可能会发现sigmoid(x)函数很方便。
2.计算

# GRADED FUNCTION: sigmoid_derivative

def sigmoid_derivative(x):
    """
    Compute the gradient (also called the slope or derivative) of the sigmoid function with respect to its input x.
    You can store the output of the sigmoid function into variables and then use it to calculate the gradient.

    Arguments:
    x -- A scalar or numpy array

    Return:
    ds -- Your computed gradient.
    """

    ### START CODE HERE ### (≈ 2 lines of code)
    s = sigmoid(x)
    ds = s*(1-s)
    ### END CODE HERE ###

    return ds
x = np.array([1, 2, 3])
print ("sigmoid_derivative(x) = " + str(sigmoid_derivative(x)))
sigmoid_derivative(x) = [0.19661193 0.10499359 0.04517666]
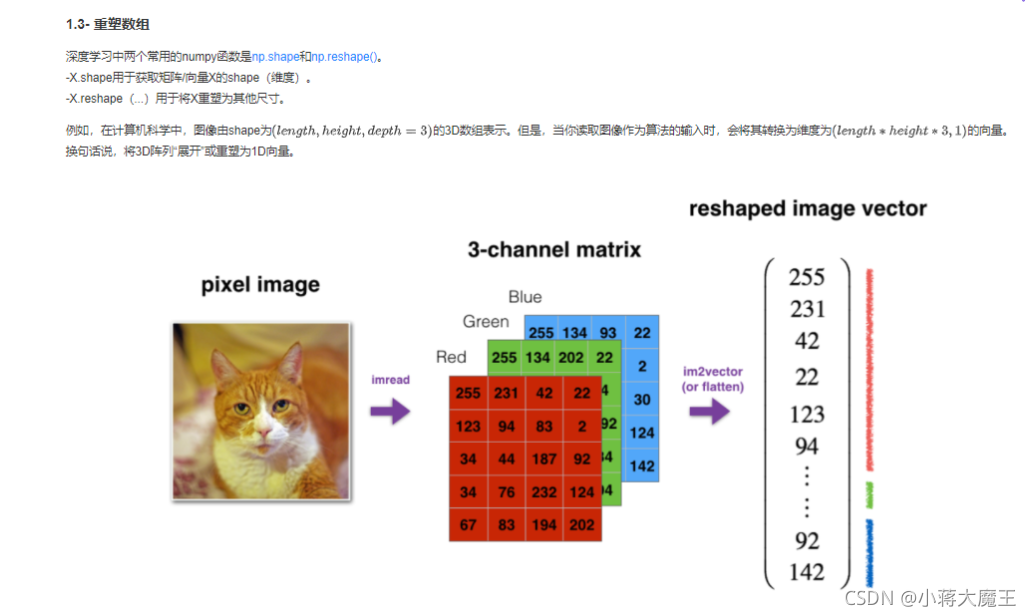
练习:实现image2vector() ,该输入采用维度为(length, height, 3)的输入,并返回维度为(lengthheight3, 1)的向量。例如,如果你想将形为(a,b,c)的数组v重塑为维度为(a*b, 3)的向量,则可以执行以下操作:
v = v.reshape((v.shape[0]*v.shape[1], v.shape[2])) # v.shape[0] = a ; v.shape[1] = b ; v.shape[2] = c
-请不要将图像的尺寸硬编码为常数。而是通过image.shape [0]等来查找所需的数量。
# GRADED FUNCTION: image2vector
def image2vector(image):
    """
    Argument:
    image -- a numpy array of shape (length, height, depth)

    Returns:
    v -- a vector of shape (length*height*depth, 1)
    """

    ### START CODE HERE ### (≈ 1 line of code)
    v = image.reshape(image.shape[0]*image.shape[1]*image.shape[2],1)
    ### END CODE HERE ###

    return v
# This is a 3 by 3 by 2 array, typically images will be (num_px_x, num_px_y,3) where 3 represents the RGB values
image = np.array([[[ 0.67826139,  0.29380381],
        [ 0.90714982,  0.52835647],
        [ 0.4215251 ,  0.45017551]],

       [[ 0.92814219,  0.96677647],
        [ 0.85304703,  0.52351845],
        [ 0.19981397,  0.27417313]],

       [[ 0.60659855,  0.00533165],
        [ 0.10820313,  0.49978937],
        [ 0.34144279,  0.94630077]]])

print ("image2vector(image) = " + str(image2vector(image)))
image2vector(image) = [[0.67826139]
 [0.29380381]
 [0.90714982]
 [0.52835647]
 [0.4215251 ]
 [0.45017551]
 [0.92814219]
 [0.96677647]
 [0.85304703]
 [0.52351845]
 [0.19981397]
 [0.27417313]
 [0.60659855]
 [0.00533165]
 [0.10820313]
 [0.49978937]
 [0.34144279]
 [0.94630077]]
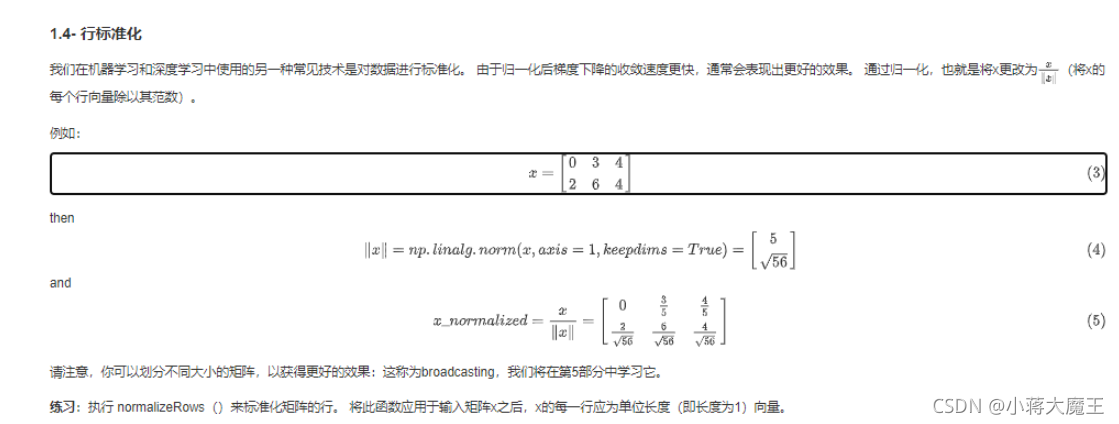
# GRADED FUNCTION: normalizeRows

def normalizeRows(x):
    """
    Implement a function that normalizes each row of the matrix x (to have unit length).

    Argument:
    x -- A numpy matrix of shape (n, m)

    Returns:
    x -- The normalized (by row) numpy matrix. You are allowed to modify x.
    """

    ### START CODE HERE ### (≈ 2 lines of code)
    # Compute x_norm as the norm 2 of x. Use np.linalg.norm(..., ord = 2, axis = ..., keepdims = True)
    x_norm = np.linalg.norm(x ,ord = 2,axis = 1,keepdims = True)

    # Divide x by its norm.
    x = x/x_norm
    ### END CODE HERE ###

    return x
x = np.array([
    [0, 3, 4],
    [1, 6, 4]])
print("normalizeRows(x) = " + str(normalizeRows(x)))
normalizeRows(x) = [[0.         0.6        0.8       ]
 [0.13736056 0.82416338 0.54944226]]
![[外链图片转存失败,源站可能有防盗链机制,建议将图片保存下来直接上传(img-K0L5lV8w-1634973961065)(attachment:image.png)]](https://img-blog.csdnimg.cn/8fecaab94d2743e5b8b74119145b9f62.png?x-oss-process=image/watermark,type_ZHJvaWRzYW5zZmFsbGJhY2s,shadow_50,text_Q1NETiBA5bCP6JKL5aSn6a2U546L,size_20,color_FFFFFF,t_70,g_se,x_16)
# GRADED FUNCTION: softmax

def softmax(x):
    """Calculates the softmax for each row of the input x.

    Your code should work for a row vector and also for matrices of shape (n, m).

    Argument:
    x -- A numpy matrix of shape (n,m)

    Returns:
    s -- A numpy matrix equal to the softmax of x, of shape (n,m)
    """

    ### START CODE HERE ### (≈ 3 lines of code)
    # Apply exp() element-wise to x. Use np.exp(...).
    x_exp = np.exp(x)

    # Create a vector x_sum that sums each row of x_exp. Use np.sum(..., axis = 1, keepdims = True).
    x_sum = np.sum(x_exp,axis=1,keepdims=True)

    # Compute softmax(x) by dividing x_exp by x_sum. It should automatically use numpy broadcasting.
    s = x_exp/x_sum
    ### END CODE HERE ###

    return s
x = np.array([
    [9, 2, 5, 0, 0],
    [7, 5, 0, 0 ,0]])
print("softmax(x) = " + str(softmax(x)))
softmax(x) = [[9.80897665e-01 8.94462891e-04 1.79657674e-02 1.21052389e-04
  1.21052389e-04]
 [8.78679856e-01 1.18916387e-01 8.01252314e-04 8.01252314e-04
  8.01252314e-04]]
2.向量化
import time

x1 = [9, 2, 5, 0, 0, 7, 5, 0, 0, 0, 9, 2, 5, 0, 0]
x2 = [9, 2, 2, 9, 0, 9, 2, 5, 0, 0, 9, 2, 5, 0, 0]

### CLASSIC DOT PRODUCT OF VECTORS IMPLEMENTATION ###
tic = time.process_time()
dot = 0
for i in range(len(x1)):
    dot+= x1[i]*x2[i]
toc = time.process_time()
print ("dot = " + str(dot) + "\n ----- Computation time = " + str(1000*(toc - tic)) + "ms")

### CLASSIC OUTER PRODUCT IMPLEMENTATION ###
tic = time.process_time()
outer = np.zeros((len(x1),len(x2))) # we create a len(x1)*len(x2) matrix with only zeros
for i in range(len(x1)):
    for j in range(len(x2)):
        outer[i,j] = x1[i]*x2[j]
toc = time.process_time()
print ("outer = " + str(outer) + "\n ----- Computation time = " + str(1000*(toc - tic)) + "ms")

### CLASSIC ELEMENTWISE IMPLEMENTATION ###
tic = time.process_time()
mul = np.zeros(len(x1))
for i in range(len(x1)):
    mul[i] = x1[i]*x2[i]
toc = time.process_time()
print ("elementwise multiplication = " + str(mul) + "\n ----- Computation time = " + str(1000*(toc - tic)) + "ms")

### CLASSIC GENERAL DOT PRODUCT IMPLEMENTATION ###
W = np.random.rand(3,len(x1)) # Random 3*len(x1) numpy array
tic = time.process_time()
gdot = np.zeros(W.shape[0])
for i in range(W.shape[0]):
    for j in range(len(x1)):
        gdot[i] += W[i,j]*x1[j]
toc = time.process_time()
print ("gdot = " + str(gdot) + "\n ----- Computation time = " + str(1000*(toc - tic)) + "ms")
dot = 278
 ----- Computation time = 0.0ms
outer = [[81. 18. 18. 81.  0. 81. 18. 45.  0.  0. 81. 18. 45.  0.  0.]
 [18.  4.  4. 18.  0. 18.  4. 10.  0.  0. 18.  4. 10.  0.  0.]
 [45. 10. 10. 45.  0. 45. 10. 25.  0.  0. 45. 10. 25.  0.  0.]
 [ 0.  0.  0.  0.  0.  0.  0.  0.  0.  0.  0.  0.  0.  0.  0.]
 [ 0.  0.  0.  0.  0.  0.  0.  0.  0.  0.  0.  0.  0.  0.  0.]
 [63. 14. 14. 63.  0. 63. 14. 35.  0.  0. 63. 14. 35.  0.  0.]
 [45. 10. 10. 45.  0. 45. 10. 25.  0.  0. 45. 10. 25.  0.  0.]
 [ 0.  0.  0.  0.  0.  0.  0.  0.  0.  0.  0.  0.  0.  0.  0.]
 [ 0.  0.  0.  0.  0.  0.  0.  0.  0.  0.  0.  0.  0.  0.  0.]
 [ 0.  0.  0.  0.  0.  0.  0.  0.  0.  0.  0.  0.  0.  0.  0.]
 [81. 18. 18. 81.  0. 81. 18. 45.  0.  0. 81. 18. 45.  0.  0.]
 [18.  4.  4. 18.  0. 18.  4. 10.  0.  0. 18.  4. 10.  0.  0.]
 [45. 10. 10. 45.  0. 45. 10. 25.  0.  0. 45. 10. 25.  0.  0.]
 [ 0.  0.  0.  0.  0.  0.  0.  0.  0.  0.  0.  0.  0.  0.  0.]
 [ 0.  0.  0.  0.  0.  0.  0.  0.  0.  0.  0.  0.  0.  0.  0.]]
 ----- Computation time = 0.0ms
elementwise multiplication = [81.  4. 10.  0.  0. 63. 10.  0.  0.  0. 81.  4. 25.  0.  0.]
 ----- Computation time = 0.0ms
gdot = [21.8997841  31.29257159 28.65068146]
 ----- Computation time = 0.0ms
x1 = [9, 2, 5, 0, 0, 7, 5, 0, 0, 0, 9, 2, 5, 0, 0]
x2 = [9, 2, 2, 9, 0, 9, 2, 5, 0, 0, 9, 2, 5, 0, 0]

### VECTORIZED DOT PRODUCT OF VECTORS ###
tic = time.process_time()
dot = np.dot(x1,x2)
toc = time.process_time()
print ("dot = " + str(dot) + "\n ----- Computation time = " + str(1000*(toc - tic)) + "ms")

### VECTORIZED OUTER PRODUCT ###
tic = time.process_time()
outer = np.outer(x1,x2)
toc = time.process_time()
print ("outer = " + str(outer) + "\n ----- Computation time = " + str(1000*(toc - tic)) + "ms")

### VECTORIZED ELEMENTWISE MULTIPLICATION ###
tic = time.process_time()
mul = np.multiply(x1,x2)
toc = time.process_time()
print ("elementwise multiplication = " + str(mul) + "\n ----- Computation time = " + str(1000*(toc - tic)) + "ms")

### VECTORIZED GENERAL DOT PRODUCT ###
tic = time.process_time()
dot = np.dot(W,x1)
toc = time.process_time()
print ("gdot = " + str(dot) + "\n ----- Computation time = " + str(1000*(toc - tic)) + "ms")
dot = 278
 ----- Computation time = 0.0ms
outer = [[81 18 18 81  0 81 18 45  0  0 81 18 45  0  0]
 [18  4  4 18  0 18  4 10  0  0 18  4 10  0  0]
 [45 10 10 45  0 45 10 25  0  0 45 10 25  0  0]
 [ 0  0  0  0  0  0  0  0  0  0  0  0  0  0  0]
 [ 0  0  0  0  0  0  0  0  0  0  0  0  0  0  0]
 [63 14 14 63  0 63 14 35  0  0 63 14 35  0  0]
 [45 10 10 45  0 45 10 25  0  0 45 10 25  0  0]
 [ 0  0  0  0  0  0  0  0  0  0  0  0  0  0  0]
 [ 0  0  0  0  0  0  0  0  0  0  0  0  0  0  0]
 [ 0  0  0  0  0  0  0  0  0  0  0  0  0  0  0]
 [81 18 18 81  0 81 18 45  0  0 81 18 45  0  0]
 [18  4  4 18  0 18  4 10  0  0 18  4 10  0  0]
 [45 10 10 45  0 45 10 25  0  0 45 10 25  0  0]
 [ 0  0  0  0  0  0  0  0  0  0  0  0  0  0  0]
 [ 0  0  0  0  0  0  0  0  0  0  0  0  0  0  0]]
 ----- Computation time = 0.0ms
elementwise multiplication = [81  4 10  0  0 63 10  0  0  0 81  4 25  0  0]
 ----- Computation time = 0.0ms
gdot = [21.8997841  31.29257159 28.65068146]
 ----- Computation time = 0.0ms

# GRADED FUNCTION: L1

def L1(yhat, y):
    """
    Arguments:
    yhat -- vector of size m (predicted labels)
    y -- vector of size m (true labels)

    Returns:
    loss -- the value of the L1 loss function defined above
    """
    tic = time.process_time()
    ### START CODE HERE ### (≈ 1 line of code)
    loss = np.sum (abs(np.add(yhat,-y)))
    toc = time.process_time()
    ### END CODE HERE ###
    print(str(1000000*(toc - tic)))
    return loss
yhat = np.array([.9, 0.2, 0.1, .4, .9])
y = np.array([1, 0, 0, 1, 1])
print("L1 = " + str(L1(yhat,y)))
0.0
L1 = 1.1

# GRADED FUNCTION: L2

def L2(yhat, y):
    """
    Arguments:
    yhat -- vector of size m (predicted labels)
    y -- vector of size m (true labels)

    Returns:
    loss -- the value of the L2 loss function defined above
    """

    ### START CODE HERE ### (≈ 1 line of code)
    loss = np.dot(y-yhat,(y-yhat).T)
    ### END CODE HERE ###

    return loss
yhat = np.array([.9, 0.2, 0.1, .4, .9])
y = np.array([1, 0, 0, 1, 1])
print("L2 = " + str(L2(yhat,y)))
L2 = 0.43