一、FastDFS-Client的实践
1.FastDFS-Client的主要特性
- 对关键部分代码加入了单元测试,便于理解与服务器的接口交易,提高接口质量。
- 将以前对byte硬解析风格重构为使用对象+注解的形式,尽量增强了代码的可读性
- 支持对服务端的连接池管理
- 支持上传图片时,检查图片格式,并且自动生成缩略图
- 在springboot当中自动导入依赖
2.SpringBoot测试操作FastDFS
1.SpringBoot的配置
-
将FastDFS-Client依赖引入pom.xml文件中:
<!-- https://mvnrepository.com/artifact/com.github.tobato/fastdfs-client -->
<dependency>
    <groupId>com.github.tobato</groupId>
    <artifactId>fastdfs-client</artifactId>
    <version>1.27.2</version>
</dependency>
-
在resource的application.yml文件下添加如下配置:
#分布式文件系统配置

fdfs:
  #连接超时
  connect-timeout: 600
  #连接时间
  so-timeout:  1500
  #配置tracker列表
  tracker-list:
    - 192.168.126.11:22122
2.测试springboot环境下javaapi对分布式文件系统上传文件的操作
- 通过spring容器注入FastFileStorageClient对象,直接调用该对象的uploadFile方法来上传文件。
代码如下: //分布式文件系统fastdfs存储节点的客户端对象。
@Autowired
private FastFileStorageClient fastFileStorageClient;
/**
* 测试springboot环境下javaapi对分布式文件系统上传文件的操作
*/
@Test
public void testUpload() throws FileNotFoundException {
//1.获取本地文件
File file = new File("C:\\qycache\\picture\\11.jpg");
//2.创建传输文件的输入流
FileInputStream fileInputStream = new FileInputStream(file);
//3.文件上传
/**
* 第一个参数:输入文件内容的输入流
* 第二个参数:文件大小
* 第三个参数:文件拓展名
* 第四个参数:描述文件的元数据
*/
StorePath storePath = fastFileStorageClient.uploadFile(fileInputStream, file.length(), "jpg", null);
//4.将卷名和文件名一起打印
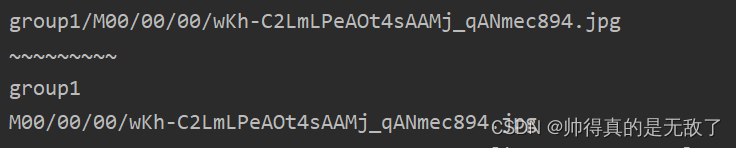
System.out.println(storePath.getFullPath());
System.out.println("~~~~~~~~~");
//5.将卷名和文件名分开打印
System.out.println(storePath.getGroup());
System.out.println(storePath.getPath());
}
上传成功,返回结果如下:
3.测试springboot环境下javaapi对分布式文件系统下载文件的操作
-
直接调用 FastFileStorageClient对象的downloadFile方法来下载文件。
代码如下:
	 @Test
    public void testDownload() throws IOException {
         //1.下载文件
         /**
          * 第一个参数:文件在存储节点的卷名
          * 第二个参数:文件在存储节点的文件名
          * 第三个参数:下载的回调函数
          */
         byte[] bytes = fastFileStorageClient.downloadFile("group1", "M00/00/00/wKh-C2LmLPeAOt4sAAMj_qANmec894.jpg", new DownloadByteArray());
         //2.创建文件输出流
         FileOutputStream fileOutputStream = new FileOutputStream("c:\\qycache\\picture\\女子澡堂.jpg");
         //3.使用文件输出流将文件内容字节数组写出
         fileOutputStream.write(bytes);
         //4.刷新输出流
         fileOutputStream.flush();
         //5.关闭输出流
         fileOutputStream.close();
     }
此时对应路径会出现女子澡堂.jpg。
3.SpringBoot操作FastDFS实现文件上传
-
下载wangEditor.min.js:
下载地址:https://www.jsdelivr.com/package/npm/wangeditor
解压后wangEditor.min.js在package/dist/目录下。
-
将wangEditor.min.js文件放在resources/static目录下。
-
在resources/templates目录下创建index.html,内容如下:
<!DOCTYPE html>
<html lang="en" xmlns:th="http://www.thymeleaf.org">
<head>
    <meta charset="UTF-8">
    <title>wangEditor demo</title>
</head>
<body>

<div id="div1">
    <p>欢迎使用 <b>wangEditor</b> 富文本编辑器</p>
</div>
<script type="text/javascript" th:src="@{wangEditor.min.js}" src="../static/wangEditor.min.js"></script>

<script type="text/javascript">
    const E = window.wangEditor;
    const editor = new E('#div1');
    //配置服务端接口
    editor.config.uploadImgServer = '/upload'
    //参数名字
    editor.config.uploadFileName = 'file'
    //限制图片大小
    editor.config.uploadImgMaxSize = 2 * 1024 * 1024 // 2M
    //限制图片类型
    editor.config.uploadImgAccept = ['jpg', 'jpeg', 'png', 'gif', 'bmp', 'webp']
    //限制一次最多能上传几张图片
    editor.config.uploadImgMaxLength = 5 // 一次最多上传 5 个图片
    editor.create()
</script>

</body>
</html>
-
引入thymeleaf和web依赖
		<!--     引入thymeleaf   -->
        <!-- https://mvnrepository.com/artifact/org.springframework.boot/spring-boot-starter-thymeleaf -->
        <dependency>
            <groupId>org.springframework.boot</groupId>
            <artifactId>spring-boot-starter-thymeleaf</artifactId>

        </dependency>
        <!-- https://mvnrepository.com/artifact/org.springframework.boot/spring-boot-starter-web -->
        <dependency>
            <groupId>org.springframework.boot</groupId>
            <artifactId>spring-boot-starter-web</artifactId>
        </dependency>
-
创建一个controller的package,在该package下创建UploadController类,添加如下内容:
	//分布式文件系统fastdfs存储节点的客户端对象。
    @Autowired
    private FastFileStorageClient fastFileStorageClient;
    /**
     * 图片上传
     * @param file
     */
    @PostMapping("upload")
    public void upload(MultipartFile file) throws IOException {
        //1.判断文件是否为空
        if(!file.isEmpty())
        {
            //2.获取上传图片的名字
            String filename = file.getOriginalFilename();
            //3.图片后缀 jpg
            String fileSuffix = filename.substring(filename.lastIndexOf(".") + 1);
            //4.上传图片
            StorePath storePath = fastFileStorageClient.uploadFile(file.getInputStream(), file.getSize(), fileSuffix, null);
            //5.创建成功返回文件路径 打印输出,实际业务会将其保存到数据库
            System.out.println(storePath.getFullPath());
        }
    }
通过浏览器访问:localhost:8080,然后如图操作,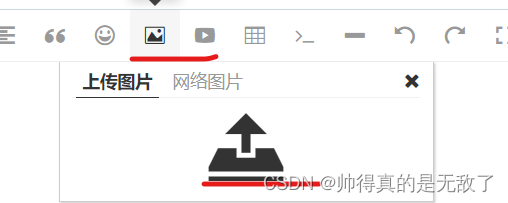
因为wangEditor有固定的返回结果格式,但是没有返回值,所以他会出现上传图片失败!但是此时已经上传成功。
后台打印出group1/M00/00/00/wKh-C2LmS7mAQxj1AAMj_qANmec320.jpg即可。
二、FastDFS整合Nginx
1.作用
- 为分布式文件系统提供Http服务支持
通过nginx的web服务代理访问分布式文件系统的存储节点,从而实现通过http请求访问存储节点资源。
- 解决复制延迟问题
由于FastDFS的同卷存储节点之间需要同步,当文件尚未同步完成时,访问请求到达该结点,获取的数据将是未同步完的不完整数据,即为复制延迟问题。通过Nginx检测请求存储节点的数据,若该存储节点的数据尚未同步完成,则将请求转发至数据的原存储节点,从而解决复制延迟问题。
2.环境搭建
- 进入到/usr/local目录下,下载FastDFS的Nginx模块包:
wget https://github.com/happyfish100/fastdfs-nginx-module/archive/V1.22.tar.gz
- 对下载的文件进行解压缩:
tar -zxvf V1.22.tar.gz
- 安装nginx依赖文件:
yum install -y gcc gcc-c++ zlib zlib-devel openssl openssl-devel pcre pcre-devel gd-devel epel-release
- 下载nginx软件包:
wget https://nginx.org/download/nginx-1.22.0.tar.gz
- 解压缩:
tar -zxvf nginx-1.22.0.tar.gz
- 然后将压缩包放在opt目录:
mv nginx-1.22.0.tar.gz /opt
- 进入nginx-1.22.0目录,添加第三方模块:
./configure --add-module=/usr/local/fastdfs-nginx-module-1.22/src/
即建立Makefile文件,检查Linux系统环境以及相关的关键属性。
- 编译项目,主要将gcc源代码编译成可执行的目标文件:
make
- 根据上一步骤编译完成的数据安装到预定的目录中:
make install
- 进入到/usr/local/fast-6.06/conf目录,将FastDFS的http.conf和mime.types拷贝到/etc/fdfs/目录中:
cp mime.types /etc/fdfs/,cp http.conf /etc/fdfs/
- 进入到/usr/local/fastdfs-nginx-module-1.22/src目录:
cp mod_fastdfs.conf /etc/fdfs
3.文件配置
-
进入到/etc/fdfs目录,编辑mod_fastdfs.conf;修改base_path,tracker_server,url_have_group_name,store_path0:base_path=/data/fastdfs/storage,tracker_server=192.168.126.11:22122,url_have_group_name = true,store_path0=/data/fastdfs/storage
-
编辑nginx.conf:vim /usr/local/nginx/conf/nginx.conf
-
在server块中添加如下location:
	location ~ /group1/M00{
                alias /data/fastdfs/storage/data;
                ngx_fastdfs_module;

        }
即匹配group1/M00,但是路径不拼接group1/M00;alias也就是说参与匹配的不拼接到路径中。并且使用ngx_fastdfs_module模块。
-
进入到/usr/local/nginx/sbin目录下,启动nginx:./nginx -c /usr/local/nginx/conf/nginx.conf
-
启动追踪服务tracker:fdfs_trackerd /etc/fdfs/tracker.conf start
启动存储节点服务:fdfs_storaged /etc/fdfs/storage.conf start
-
查看nginx服务启动情况:ps -ef | grep nginx,结果如下:

-
从浏览器访问分布式文件系统的图片:http://192.168.126.11/group1/M0/00/00/wKh-C2LmS7mAQxj1AAMj_qANmec320.jpg
此时如果显示404,需要重新上传文件到storage,配置文件的路径都是新的,之前上传的无效。
总结:
1.Springboot整合FastDFS,需要引入整合依赖,在yml文件中配置配置tracker服务器的ip地址和端口号,在代码中需要引入FastFileStorageClient,即分布式文件系统fastdfs存储节点的客户端对象;然后对该客户端对象直接调用上传、下载等方法。
2.在没有FastDFS没有整合nginx之前,我们是不能直接通过浏览器访问上传的图片的。整合后,nginx提供了http服务支持,所以可以直接通过浏览器访问到。
并且nginx还能解决复制延迟问题,就是组内在同步期间,访问请求到达未同步完成的服务器,nginx会将请求转发给数据的原存储节点。
3.FastDFS整合nginx,需要nginx安装包以及ngx_fastdfs_module第三方模块,需要匹配的location块中使用该模块;并且需要修改第三方模块的conf文件。