文章目录
- Lecture: The (Py)Tesseract Library
- 对文本图像的处理
- 改变图片大小
- greyscale - 灰度图
- binarization 二值图
- Tesseract and Photographs 对图像的OCR识别
- Jupyter Widgets (Optional)
Lecture: The (Py)Tesseract Library
让我们首先使用 import PIL 库并展示 text图像
from PIL import Image

image = Image.open('readonly/text.png')
display(image)

让我们import pytesseract 库,并使用 dir() 函数看看这个库的一些函数
import pytesseract
dir(pytesseract)
---
['Output',
 'TesseractError',
 '__builtins__',
 '__cached__',
 '__doc__',
 '__file__',
 '__loader__',
 '__name__',
 '__package__',
 '__path__',
 '__spec__',
 'get_tesseract_version',
 'image_to_boxes',
 'image_to_data',
 'image_to_osd',
 'image_to_pdf_or_hocr',
 'image_to_string',
 'pytesseract']
只有少量的函数,我觉得image_to_string 是合适的,我们使用 help() 查看一下
help(pytesseract.image_to_string)
---
Help on function image_to_string in module pytesseract.pytesseract:

image_to_string(image, lang=None, config='', nice=0, output_type='string')
    Returns the result of a Tesseract OCR run on the provided image to string
可见这个函数第一个输入参数是 an image, 剩下的是一些可选参数,返回的是OCR的结果。
这是因为pytesseract库下面正在调用C++库,该库完成了所有艰苦的工作,而作者只是将所有调用传递给了底层tesseract可执行文件。 在使用python库时,这是一个常见问题,这意味着我们需要执行一些 Web 搜索,以便了解如何与tesseract进行交互。
还有一个问题是没有说明输入参数 image 具体是什么,Is it a string to an image file? A PILLOW image?Something else? 我们通过查看源码了解到是一个 PILLOW image。因此输入一个 PIL image是可以作为这个函数的参数的。
为这个函数撰写说明文档
Hint: The doc line we needed was :param image: A PIL Image.Image file or an ndarray of bytes
Ok, lets try and run tesseract on this image
from PIL import Image
image = Image.open('readonly/text.png')
display(image)
text = pytesseract.image_to_string(image)
print(text)
Behold, the magic of OCR! Using
pytesseract, we’ll be able to read the
contents of this image and convert it to
text
More Tesseract - 更复杂的情况
前面我们使用的是清晰的 unambiguous 图片。现在我们试试混淆的图片
from PIL import Image
img = Image.open('readonly/Nosiy_OCR.PNG')
display(img)

现在我们尝试使用 tsseract -OCR 函数
import pytesseract
text = pytesseract.image_to_string(Image.open('readonly/Noisy_OCR.PNG'))
print(text)
e magic of OCR! Using pytesseract,
le to read the contents of this
d convert it to text
识别的不是很好,我们现在采用一种方法:change the size of the image
对文本图像的处理
改变图片大小
import PIL
basewidth = 600
img = Image.open('readonly/Noisy_OCR.PNG')
wpercent = (basewidth / float(image.size[0]))
hsize = int(float(img.size[1]) * float(wpercent))
img = img.resize((basewidth, hsize), PIL.Image.ANTIALIAS)
img.save('resized_noise.png')
display(img)
text = pytesseract.image_to_string(Image.open('resized_nois.png'))
print(text)
e magic of OCR! Using pytesseract,
le to read the contents of this
d convert it to text
通过 resize 图片大小OCR的效果没有提升,下面我们把图像转为灰度图。
greyscale - 灰度图
我们看 PILLOW documention可以发现一种最简单的转换成灰度图的方法是使用 convert() 函数。
img = Image.open('readonly/Noisy_OCR.png')
img = img.convert('L')
---
img.save('greyscale_noise.jpg')
text = pytesseract.image_to_string(Image.open('greyscale_noise.jpg'))
print(text)
Behold, the magic of OCR! Using pytesseract,
we'll be able to read the contents of this
image and convert it to text
运行效果非常好。
binarization 二值图
这意味着要分为两个不同的部分-在这种情况下为黑色和白色。 二值化通过称为阈值threshold的过程进行。 如果像素值大于阈值,它将被转换为黑色像素; 如果它低于阈值,它将被转换为白色像素。
在 PILLOW 里调用函数:
img = Image.open('readonly/Noisy_OCR.PNG').convert('1')
img.save('black_white_noise.jpg')
display(img)

不过你也可以自己写二值化图像的函数:
def binarize(image_to_transform, threshold):
output_image=image_to_transform.convert("L")
for x in range(output_image.width):
for y in range(output_image.height):
if output_image.getpixel((x,y))< threshold:
output_image.putpixel( (x,y), 0 )
else:
output_image.putpixel( (x,y), 255 )
return output_image
让我们在不同阈值范围内测试此功能。 请记住,您可以使用 range() 函数生成不同步长的数字列表。 使用开始,停止和步长调用 range()。 因此,让我们尝试 range(0,257,64),它应该生成5个不同阈值的图像
for thresh in range(0,257,64):
print("Trying with threshold " + str(thresh))
display(binarize(Image.open('readonly/Noisy_OCR.PNG'), thresh))
print(pytesseract.image_to_string(binarize(Image.open('readonly/Noisy_OCR.PNG'), thresh)))
Tesseract and Photographs 对图像的OCR识别
让我们尝试一下其它的图片OCR识别,例如一个门头:
from PIL import Image
import pytesseract
image = Image.open('readonly/storefront.jpg')
display(image)
pytesseract.image_tostring(image)

''
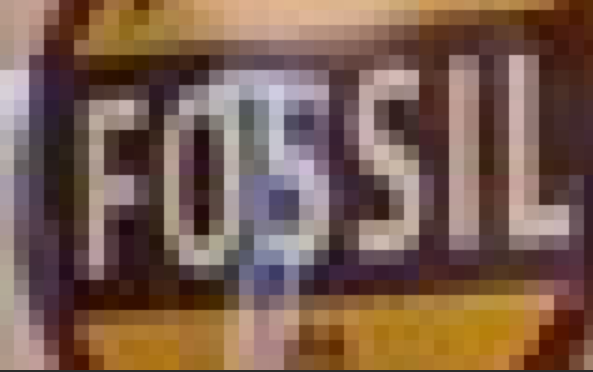
OCR识别返回空的字符串,说明 Tesseract不能识别这幅图。我们在上一节学习过 裁剪图片的方法,crop the images;我们在这里尝试对原图进行裁剪。
bounding_box = (315, 170, 700, 270)
title_image=image.crop(bounding_box)
display(titlr_image)
pytesseract.image_to_string(title_image)

'FOSSIL'
太好了,我们看到了如何通过减少一些问题来使该工作得以实现。 因此,现在我们已经能够拍摄图像,对其进行预处理(灰度图,二值化,裁剪),以至于希望看到文本,然后将其转换为python可以理解的字符串。
观察图片可以发现墙上也有 商店的名字的标志。我们现在试试能不能识别它。
bounding_box = (900, 420, 940, 445)
little_sign = image.crop((990, 420, 940, 445))
display(little_sign)

这是一个很小的图片,我们首先对它 resize
new_size = (little_sign.width*10, little_sign.height*10)
help(little_sign.resize)
---
Help on method resize in module PIL.Image:
resize(size, resample=0, box=None) method of PIL.Image.Image instance
Returns a resized copy of this image.
:param size: The requested size in pixels, as a 2-tuple:
(width, height).
:param resample: An optional resampling filter. This can be
one of :py:attr:`PIL.Image.NEAREST`, :py:attr:`PIL.Image.BOX`,
:py:attr:`PIL.Image.BILINEAR`, :py:attr:`PIL.Image.HAMMING`,
:py:attr:`PIL.Image.BICUBIC` or :py:attr:`PIL.Image.LANCZOS`.
If omitted, or if the image has mode "1" or "P", it is
set :py:attr:`PIL.Image.NEAREST`.
See: :ref:`concept-filters`.
:param box: An optional 4-tuple of floats giving the region
of the source image which should be scaled.
The values should be within (0, 0, width, height) rectangle.
If omitted or None, the entire source is used.
:returns: An :py:class:`~PIL.Image.Image` object.
display(little_sign.resize(new_size, Image.NEAREST))
上面是对图像进行resize操作时默认的 filter,让我们看看所有的filter 的效果
options=[Image.NEAREST, Image.BOX, Image.BILINEAR, Image.HAMMING, Image.BICUBIC, Image.LANCZOS]
for option in options:
print(option)
display(little_sign.resize(new_size, option))
在这种情况下,Image.LANCZOS和Image.BICUBIC筛选器可以很好地完成工作。 让我们看看我们是否能够从调整后的图像中识别出文字
new_size = (little_sign.width*10, little_sign.height*10)
bigger_sign = little_sign.resize(new_size, Image.BICUBIC)
pytesseract.image_to_string(bigger_sign)
''
并没有识别,
我们再对它尝试二值化 binarize,我么前面编写的二值化程序:
def binarize(image_to_transform, threshold):
output_image=image_to_transform.convert("L")
for x in range(output_image.width):
for y in range(output_image.height):
if output_image.getpixel((x,y))< threshold:
output_image.putpixel( (x,y), 0 )
else:
output_image.putpixel( (x,y), 255 )
return output_image
binarized_bigger_sign = binarize(bigger_sign, 190)
dispay(binarized_bigger_sign)
pytesseract.image_to_string(binarized_bigger_sign)

'Lae'
好的,该文本几乎没有用。我们应该如何选择最佳的二值化方法来使用? 好的,让我们尝试一些非常简单的方法, 我们正在尝试检测一个英文单词“ FOSSIL”。 如果我们尝试从0到255的所有二值化,并查看列表中是否有英文单词,这可能是一种方法。 因此,让我们看看是否可以编写例程来执行此操作。
eng_dict=[]
with open ("readonly/words_alpha.txt", "r") as f:
data=f.read()
eng_dict = data.split("\n")
for i in range(150,170):
strng = pytesseract.image_to_string(binarize(bigger_sign,i))
strng=strng.lower()
import string
comparison=''
for character in strng:
if character in string.ascii_lowercase:
comparison = comparison + character
if comparison in eng_dict:
print(comparison)
fossil
si
fossil
fossil
gas
gas
sl
sl
sil
好吧,这并不完美,但是我们看到 fossil 在字典中还有其他值。 这不是清除OCR数据的好方法。 在实践中使用语言或领域特定的词典可能很有用,尤其是在生成针对特定语言(例如医学知识库或位置)的搜索引擎时。
至此,您已经了解了如何处理图像并将其转换为文本。 在本课程的下一个模块中,我们将更深入地研究计算机视觉库,该库可让我们检测其他事物。 然后,继续进行最终的项目!
Jupyter Widgets (Optional)
在这个简短的演讲中,我想向您介绍Jupyter笔记本开发环境中称为小部件Widgets 的更高级功能之一。 有时您想与已创建的函数进行交互,并使用不同的参数多次调用它。 例如,如果我们想在图像的一部分周围绘制一个红色框,以尝试微调裁剪位置。 小部件是在浏览器中快速完成此操作的一种方法,而无需学习如何编写大型桌面应用程序。
让我们来看看。 首先,我们要从PILLOW包中导入Image和ImageDraw类
from PIL import Image, ImageDraw
from ipywidgets import interact
image = Image.open('readonly/storefront.jpg')
好的,我们的设置完成了。 现在,我们将使用交互装饰器interact decorator来表示要包装wrap的python函数。 我们使用 @ 符号进行此操作。
这将使用一组与要调用的函数相同的参数。 然后Jupyter将在屏幕上绘制一些滑块,让我们操纵这些值。
Decorators, which is what the @ sign is describing, are standard python statements and just a short hand for functions which wrap other functions. @ 符号描述的装饰器是标准的python语句,只是包装其他函数的函数的简写形式。 不过,它们有点先进,因此我们在本课程中没有讨论它们.
@interact(left=100, top=100, right=200, bottom=200)

def draw_border(left, top, right, bottom):
    img = img.copy()
    drawing_object = ImageDraw.Draw(img)
    drawing_object.rectangle((left, top, right, bottom), fill=None, outline='red')
    display(img)

Jupyter小部件无疑是高级领域,但是如果您想探索更多内容,则可以阅读此处的信息:https://ipywidgets.readthedocs.io/en/stable/examples/Using%20Interact.html
本文内容由网友自发贡献,版权归原作者所有,本站不承担相应法律责任。如您发现有涉嫌抄袭侵权的内容,请联系:hwhale#tublm.com(使用前将#替换为@)