之前使用虚拟机编译过Android10,现在开始记录编译12,上次忘记给镜像了这次补上镜像ubuntu-20.04.4-desktop-amd64:
链接:https://pan.baidu.com/s/1REJ2cIJyqupLRQjN9SW08Q
提取码:kezj
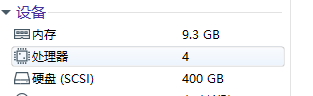
硬件虚拟机:硬盘先准备400G不知道够不够,内存方面google是推荐16G。。我这内存+交换空间希望能成功编译吧。(ps:内存不够,后面有教设置交换空间)
不知道为啥,repo使用的python指令?为python 建立软连接,自带了python3.8,并建立了python3软连接,我们直接就把python 也搞成python3
sudo ln -s /bin/python3 /bin/python
1、安装git 并配置好git
sudo apt-get install git

git config --global user.name "your name"
git config --global user.email "XXX@XXX.com"
2、下载repo并配置,创建一个目录,下载的repo和aosp源代码全部都在这里面
mkdir aosp
cd aosp

git clone https://aosp.tuna.tsinghua.edu.cn/git-repo/
chmod a+x git-repo/repo

添加repo 到环境变量
export PATH=~/aosp/git-repo:$PATH
3、初始化选择需要下载的Android版本
repo init -u https://aosp.tuna.tsinghua.edu.cn/platform/manifest
不知道选择哪一个版本的进入到.repo/manifests.git/ 查看有哪些分支,在做选择。
cd .repo/manifests.git/
git branch -a
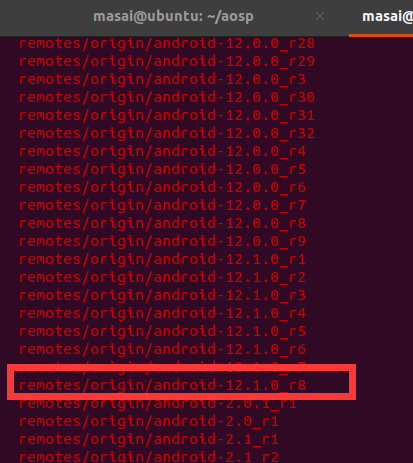
我们直接选择一个最新的初始化,
repo init -u https://aosp.tuna.tsinghua.edu.cn/platform/manifest -b android-12.1.0_r8
repo sync -j4
下面就慢慢等吧。。等的过程我们在检查检查其他需要的东西。。
重新打开一个命令行,由于本人的机子内存不足,是分配了8G后面可能会出现内存不足无法编译的情况,这个时候需要设置交换空间,也就是虚拟内存!!上次编译Android10的时候是8G ,交换6G。。这次编译12估计要设置大一点儿了,机子好的自行忽略下面步骤。

开始设置交换空间
如果第一步存在swapfile则需要先禁用
sudo swapoff /swapfile

修改swap 空间的大小为8G
sudo dd if=/dev/zero of=/swapfile bs=1M count=8192

设置文件为“swap file”类型
sudo mkswap /swapfile

启用swapfile
sudo swapon /swapfile

4、 安装open-jdk
sudo apt-get install openjdk-8-jdk
5、安装依赖
sudo apt-get install libx11-dev:i386 libreadline6-dev:i386 libgl1-mesa-dev g++-multilib
sudo apt-get install -y git flex bison gperf build-essential libncurses5-dev:i386
sudo apt-get install tofrodos python python-markdown libxml2-utils xsltproc zlib1g-dev:i386
sudo apt-get install dpkg-dev libsdl1.2-dev libesd0-dev (找不到)
sudo apt-get install git-core gnupg flex bison gperf build-essential
sudo apt-get install zip curl zlib1g-dev gcc-multilib g++-multilib
sudo apt-get install libc6-dev-i386
sudo apt-get install lib32ncurses5-dev x11proto-core-dev libx11-dev(ubutun20也找不到,会被安装6,下面有解决办法)
sudo apt-get install libgl1-mesa-dev libxml2-utils xsltproc unzip m4
sudo apt-get install lib32z-dev ccache
sudo apt-get install libssl-dev
特别注意:如遇到 libesd0-dev 找不到,执行下面的
sudo vi /etc/apt/sources.list  //在行尾添加下面这个源保存
deb http://archive.ubuntu.com/ubuntu/ trusty main universe restricted multiverse

#安装libesd0-dev
sudo apt-get update && sudo apt-get install libesd0-dev
方法一:关于编译时报 lib32ncurses5-dev的问题,这个包安装不上。在安装的时候发现要安装libncurses5-dev,但是我软件包都更新为最新版本的了,也就是libncurses5-dev 最新版本是6.2的,我查看了下/usr/lib/x86_64-linux-gnu 这个目录下的动态库,发现只有libncurses.so.6,这就是因为libncurses5-dev这个包太新了,已经更新到6.2了,所以没有libncurses.so.5,因为后面编译需要有libncurses.so.5,不然编译会报错,我想了下有两种方案:一种libncurses5-dev回退到5.9,但是其他也有可能有依赖,又因为libncurses.so.6依赖了libtinfo.so.6,所以干脆如下暴力处理
cd /usr/lib/x86_64-linux-gnu
sudo cp libncurses.so.6 libncurses.so.5
sudo cp libtinfo.so.6 libtinfo.so.5
方法二:这是从另外一篇文章看到的,可行
deb-src http://us.archive.ubuntu.com/ubuntu/ xenial main universe


sudo apt install apt-file
sudo apt-file update
sudo apt-file find libncurses.so.5  #没有 这个文件在执行下面的。
sudo apt install libncurses5
6.1下载完毕后,就来编译Android 12吧。。cd到aosp目录,执行预编译脚本
. build/envsetup.sh
6.2 因为我确定我只使用x86的模拟器所以我直接使用!请使用下面指令,确认你需要使用的编译的版本,第一次执行lunch可能会等很久。
lunch    #一定要执行查看自己需要的版本。每次拉取的项目不同数字代表的版本就不一样。这次我机子差不多等了3分钟。Android10的时候 1分钟左右


lunch sdk_phone_x86_64  # Android 我是模拟器版本
You're building on Linux

Lunch menu... pick a combo:
     1. aosp_arm-eng
     2. aosp_arm64-eng
     3. aosp_barbet-userdebug
     4. aosp_blueline-userdebug
     5. aosp_blueline_car-userdebug
     6. aosp_bonito-userdebug
     7. aosp_bonito_car-userdebug
     8. aosp_bramble-userdebug
     9. aosp_bramble_car-userdebug
     10. aosp_car_arm-userdebug
     11. aosp_car_arm64-userdebug
     12. aosp_car_x86-userdebug
     13. aosp_car_x86_64-userdebug
     14. aosp_cf_arm64_auto-userdebug
     15. aosp_cf_arm64_phone-userdebug
     16. aosp_cf_x86_64_foldable-userdebug
     17. aosp_cf_x86_64_pc-userdebug
     18. aosp_cf_x86_64_phone-userdebug
     19. aosp_cf_x86_64_tv-userdebug
     20. aosp_cf_x86_auto-userdebug
     21. aosp_cf_x86_phone-userdebug
     22. aosp_cf_x86_tv-userdebug
     23. aosp_coral-userdebug
     24. aosp_coral_car-userdebug
     25. aosp_crosshatch-userdebug
     26. aosp_crosshatch_car-userdebug
     27. aosp_crosshatch_vf-userdebug
     28. aosp_flame-userdebug
     29. aosp_flame_car-userdebug
     30. aosp_oriole-userdebug
     31. aosp_oriole_car-userdebug
     32. aosp_raven-userdebug
     33. aosp_raven_car-userdebug
     34. aosp_redfin-userdebug
     35. aosp_redfin_car-userdebug
     36. aosp_redfin_vf-userdebug
     37. aosp_sargo-userdebug
     38. aosp_sargo_car-userdebug
     39. aosp_slider-userdebug
     40. aosp_sunfish-userdebug
     41. aosp_sunfish_car-userdebug
     42. aosp_trout_arm64-userdebug
     43. aosp_trout_x86-userdebug
     44. aosp_whitefin-userdebug
     45. aosp_x86-eng
     46. aosp_x86_64-eng
     47. arm_krait-eng
     48. arm_v7_v8-eng
     49. armv8-eng
     50. armv8_cortex_a55-eng
     51. armv8_kryo385-eng
     52. beagle_x15-userdebug
     53. beagle_x15_auto-userdebug
     54. car_ui_portrait-userdebug
     55. car_x86_64-userdebug
     56. db845c-userdebug
     57. fuchsia_arm64-eng
     58. fuchsia_x86_64-eng
     59. gsi_car_arm64-userdebug
     60. gsi_car_x86_64-userdebug
     61. hikey-userdebug
     62. hikey64_only-userdebug
     63. hikey960-userdebug
     64. hikey960_tv-userdebug
     65. hikey_tv-userdebug
     66. pixel3_mainline-userdebug
     67. poplar-eng
     68. poplar-user
     69. poplar-userdebug
     70. qemu_trusty_arm64-userdebug
     71. sdk_car_arm-userdebug
     72. sdk_car_arm64-userdebug
     73. sdk_car_portrait_x86_64-userdebug
     74. sdk_car_x86-userdebug
     75. sdk_car_x86_64-userdebug
     76. silvermont-eng
     77. uml-userdebug
     78. yukawa-userdebug
     79. yukawa_sei510-userdebug
arm64表示是使用arm64 cpu的设备,eng表示engineer版本,其直接开放了一些root等权限。当然直接使用lunch命令会列出所有可选的编译目标
6.3开始编译,-j参数取决你的cpu数量就行,我是双核双线程,应该是-j4 的,但是考虑到我要做其他的事情,我就使用make -j3
make -j3
PS:中途肯定会报其他的错,自己百度解决吧。如果使用的我说的ubuntu版本的话,内存够的话,基本不会怎么报错。。这aosp 编译效果越来越好了还能实时看到编译的项目。(推荐16G哟。)如果因为内存问题编译不过。-j设置小点儿

期间编译出错了4,5次都是因为内存溢出了,不过没关系调整make -j1 继续编译几次就行了。

6.4 编译工作结束后,运行模拟器(机器每次重启后都需要重新执行 6.1和6.2 )
运行模拟器实际上需要四个组件
Linux Kernel
system.img
userdata.img
ramdisk.img
运行模拟器
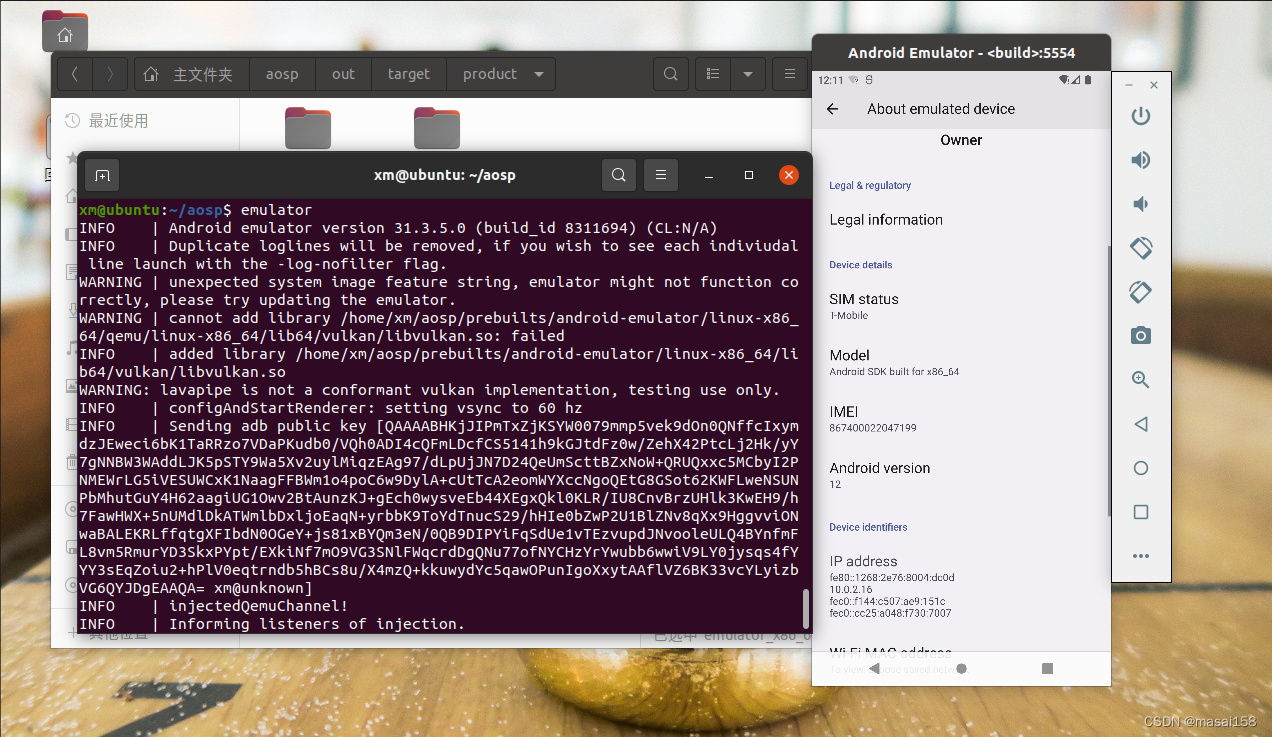
emulator
成功点亮模拟器,Android12 跟编译 Android 10 还是稍微区别!!!一直有人问-j1 还报内存溢出,如果一直报错内存溢出的话,那就加内存吧。没办法了。。
如果你在使用lunch命令时选择的是aosp_arm-eng,那么在执行不带参数的emualtor命令时,Linux Kernel默认使用的是/source/prebuilds/qemu-kernel/arm/kernel-qemu目录下的kernel-qemu文件。而android镜像文件则是默认使用source/out/target/product/generic目录下的system.img、userdata.img和ramdisk.img,也就是我们刚刚编译出来的镜像文件。
上面我在使用lunch命令时选择的是aosp_arm64-eng,因此linux默认使用的/source/prebuilds/qemu-kernel/arm64/kernel-qemu下的kernel-qemu,而其他文件则是使用的source/out/target/product/generic64目录下的system.img、userdata.img和ramdisk.img。
在使用emulator命令后,正常的话,我们可以启动模拟器,我这里启动的模拟器信息如下
这里可以看出启动的是我们编译时指定的aosp_arm64-eng模拟器,实际上emulator还有很多其它指令可以选择,这个可以通过它的help命令来查看
emulator -help
7、单独编译模块及SDK
除了通过make命令编译可以整个android源码外,Google也为我们提供了相应的命令来支持单独模块的编译。
编译环境初始化(即执行. build/envsetup.sh)之后,我们可以得到一些有用的指令,除了上边用到的lunch,在envsetup.sh文件中我们还可以找到如下的指令
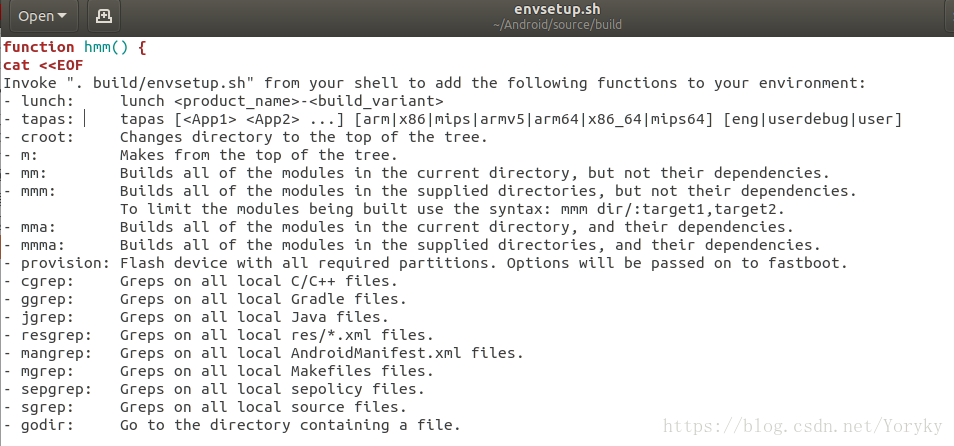
此外还有以下命令可以进行单编:
- mmm:编译指定目录下的模块,不编译它所依赖的其它模块。
- mma:编译当前目录下的模块及其依赖项。
- mmma:编译指定路径下所有模块,并且包含依赖。
如果你修改了源码,想查看生成的APK文件,有两种方式:
- 通过adb push或者adb install 来安装APK。
- 使用make snod命令,重新生成 system.img,运行模拟器查看。
mmm packages/apps/StorageManager/
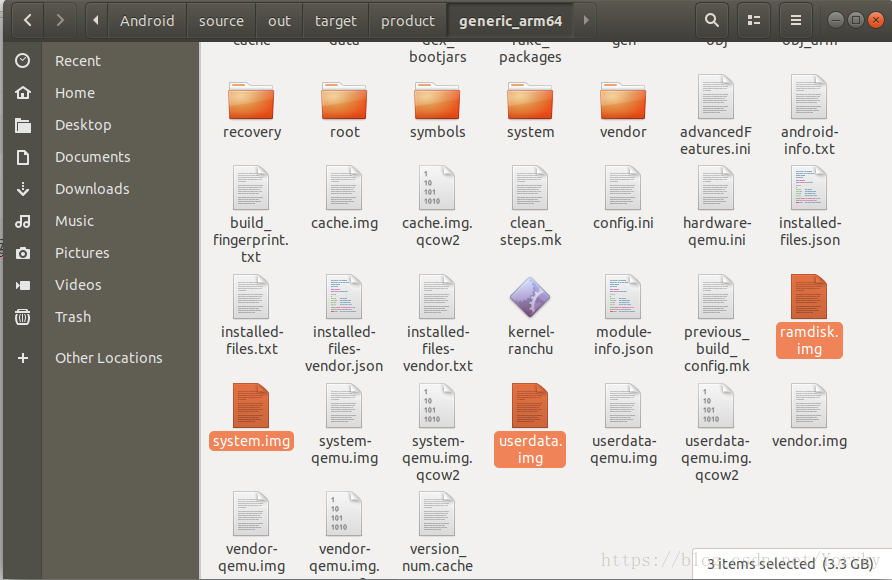
稍等一会之后,如果提示编译完成,此时便可在out/target/product/gereric_arm64/system/priv-app就可以找到编译的StorageManager.apk文件了。

编译好指定模块后,如果我们想要将该模块对应的apk集成到系统镜像中,需要借助make snod指令重新打包系统镜像,这样我们新生成的system.img中就包含了刚才编译的Launcher2模块了,重启模拟器之后生效。
我们在不断的修改某些模块,总不能每次编译完成后都要重新打包system.img,然后重启手机吧?有没有什么简单的方法呢?
在编译完后,借助adb install命令直接将生成的apk文件安装到设备上即可,相比使用make snod,会节省很多时间。
直接执行make是不包括make sdk的,如果要编译自己的sdk则十分简单,只需要执行如下命令便可
. build/envsetup.sh
lunch sdk-eng
make sdk
如果编译成功,不出意外,在out/host/linux-x86/sdk就可以看到了。
补充
我们简单的来介绍out/target/product/generic_arm64/system目录下的常用目录:
Android系统自带的apk文件都在out/target/product/generic_arm64/system/priv-app目录下
一些可执行文件(比如C编译的执行),放在out/target/product/generic_arm64/system/bin目录下
动态链接库放在out/target/product/generic_arm64/system/lib目录下
硬件抽象层文件都放在out/targer/product/generic_arm64/system/lib/hw目录下
这里需要注意的就是由于我们这里编译的是aosp_arm64-eng编译目标,所以这里的路径中是generic_arm64,如果是编译的其它目标路径可能不一样,比如当编译的是aosp_arm-eng时,则路径中就是generic。
grep -rn 'xxxx' 路径 搜索内容
因为网络或者某些原因导致的无法同步的话,并且以下错误可以执行
Error: leaving XXXX; does not track upstream.
git abandon branchName;

repo forall -c git reset HEAD --hard;repo forall -c git clean -df;repo sync -c -j4
# 将HEAD强制指向manifest的库,而忽略本地的改动。
repo sync -d

# Remove all working directory (and staged) changes.
repo forall -c 'git reset --hard'

# Clean untracked files
repo forall -c 'git clean -f -d'

# 拉代码
repo sync -c
查看文献:
Ubantu18.04环境下编译android源码_小草的胖冬瓜的博客-CSDN博客_android源码编译