目录
python opncv 数据增强 亮度:
opencv 亮度饱和度增强:
vgg19图像增强
c++ opencv 图像增强
python opncv 数据增强 亮度:
def data_augment(image, brightness):
    factor = 1.0 + random.uniform(-1.0*brightness, brightness)
    table = np.array([(i / 255.0) * factor * 255 for i in np.arange(0, 256)]).clip(0,255).astype(np.uint8)
    image = cv2.LUT(image, table)
    return image, factor

if __name__ == '__main__':
    import os
    img=cv2.imread('img/8883.jpg')

    while True:

        # image_t, beta = _distort(img)
        image_t,factor = data_augment(img,0.3)

        cv2.imshow("asdf",image_t)
        cv2.waitKey()
opencv 亮度、饱和度增强:
import random

import cv2
import numpy as np
import pandas as pd


def aug_HLS(img):
   min_v = -20
   MAX_VALUE =50
   fImg = img.astype(np.float32)
   fImg = fImg / 255.0
   # HLS空间,三个通道分别是: Hue色相、lightness明度、saturation饱和度
   # 通道0是色相、通道1是明度、通道2是饱和度
   hlsImg = cv2.cvtColor(fImg, cv2.COLOR_BGR2HLS)

   lnum = random.uniform(min_v, MAX_VALUE)
   snum = random.uniform(min_v, MAX_VALUE)
   cnum = random.uniform(min_v, MAX_VALUE)
   # print(lnum, snum, cnum)
   # 1.调整亮度饱和度(线性变换)、 2.将hlsCopy[:,:,1]和hlsCopy[:,:,2]中大于1的全部截取
   hlsImg[:, :, 1] = (1.0 + lnum / 100.0) * hlsImg[:, :, 1]
   hlsImg[:, :, 1][hlsImg[:, :, 1] > 1] = 1
   # HLS空间通道2是饱和度,对饱和度进行线性变换,且最大值在255以内,这一归一化了,所以应在1以内
   hlsImg[:, :, 2] = (1.0 + snum / 100.0) * hlsImg[:, :, 2]
   hlsImg[:, :, 2][hlsImg[:, :, 2] > 1] = 1

   # HLS2BGR
   lsImg = cv2.cvtColor(hlsImg, cv2.COLOR_HLS2BGR)
   lsImg = (lsImg * 255).astype(np.uint8)
   return lsImg

if __name__ == '__main__':

   img=cv2.imread(r'D:\data\similar\0822_1405\imgs\0822_0714-141713_20019_0_0_77.jpg')

   while True:
      img_a=aug_HLS(img)

      cv2.imshow("asdf",img)

      cv2.imshow("img-a",img_a)

      cv2.waitKey()
vgg19图像增强
vgg19,模型500多m,效果还行
https://github.com/aiff22/DPED
c++ opencv 图像增强
#include <QCoreApplication>
#include<opencv2/highgui/highgui.hpp>
#include<opencv2/core/core.hpp>
#include<opencv2/imgproc/imgproc.hpp>
#include<opencv/ml.h>
#include<opencv2/photo/photo.hpp>
using namespace cv;
using namespace std;
cv::Mat image_clahe;
int erosion_elem = 0;
int erosion_size = 0;
int dilation_elem = 0;
int dilation_size = 0;
void Erosion( int, void* )
{Mat dst1;
int erosion_type;
namedWindow( "Erosion Demo", CV_WINDOW_AUTOSIZE );
if( erosion_elem == 0 ){ erosion_type = MORPH_RECT; }
else if( erosion_elem == 1 ){ erosion_type = MORPH_CROSS; }
else if( erosion_elem == 2) { erosion_type = MORPH_ELLIPSE; }
Mat element = getStructuringElement( erosion_type,
Size( 2*erosion_size + 1, 2*erosion_size+1 ),
Point( erosion_size, erosion_size ) );
/// Apply the erosion operation
erode( image_clahe, image_clahe, element,Point(0,0),3000 );
fastNlMeansDenoisingColored( image_clahe, dst1, 3, 3, 7, 21 );
imshow( "Erosion Demo", dst1);
imwrite("/home/sukhad/Downloads/Nipun.jpg",dst1);
}
/** @function Dilation */
void Dilation( int, void* )
{
int dilation_type;
namedWindow( "Dilation Demo", CV_WINDOW_AUTOSIZE );
if( dilation_elem == 0 ){ dilation_type = MORPH_RECT; }
else if( dilation_elem == 1 ){ dilation_type = MORPH_CROSS; }
else if( dilation_elem == 2) { dilation_type = MORPH_ELLIPSE; }
Mat element = getStructuringElement( dilation_type,
Size( 2*dilation_size + 1, 2*dilation_size+1 ),
Point( dilation_size, dilation_size ) );
/// Apply the dilation operation
dilate( image_clahe, image_clahe, element,Point(0,0),3000 );
imshow( "Dilation Demo", image_clahe );
}
int main(int argc, char** argv)
{
QCoreApplication a(argc, argv);
// READ RGB color image and convert it to Lab
cv::Mat bgr_image;
cv::Mat lab_image;
bgr_image=imread("051246060311637.png");
cv::cvtColor(bgr_image, lab_image, CV_BGR2Lab);
cv::Mat dst1;
// Extract the L channel
std::vector<cv::Mat> lab_planes(3);
cv::split(lab_image, lab_planes); // now we have the L image in lab_planes[0]
// apply the CLAHE algorithm to the L channel
cv::Ptr<cv::CLAHE> clahe = cv::createCLAHE();
clahe->setClipLimit(4);
cv::Mat dst;
clahe->apply(lab_planes[0], dst);
// Merge the the color planes back into an Lab image
dst.copyTo(lab_planes[0]);
cv::merge(lab_planes, lab_image);
// convert back to RGB
cv::cvtColor(lab_image, image_clahe, CV_Lab2BGR);
namedWindow( "image original", CV_WINDOW_AUTOSIZE );
namedWindow( "image CLAHE", CV_WINDOW_AUTOSIZE );
// display the results (you might also want to see lab_planes[0] before and after).
Erosion( 0, 0 );
Dilation( 0, 0 );
imshow("image original", bgr_image);
imshow("image CLAHE", image_clahe);
return a.exec();
}
//#include <iostream>
//#include <iomanip>
//#include <math.h>
//#include <ctime>
//void checkTripletASM(float* aptr,float* bptr,float* cptr,int& o)
//{
// _asm {
// push eax
// push ebx
// mov eax, aptr
// mov ebx, bptr
// movaps xmm0, [eax]
// movaps xmm1, [ebx]
// movaps xmm7, xmm0
// mulps xmm7, xmm0
// movaps xmm2, xmm7
// movaps xmm7, xmm1
// mulps xmm7, xmm1
// movaps xmm3, xmm7
// movaps xmm4, xmm2
// addps xmm4, xmm3
// movaps xmm5, xmm4
// sqrtps xmm5, xmm5
// roundps xmm5, xmm5, 1
// mulps xmm5, xmm5
// subps xmm5, xmm4
// mov eax, cptr
// movaps[eax], xmm5
// pop ebx
// pop eax
// }
// for (int i = 0; i < 4;i++)
// if (*(cptr + i) == 0.0)
// {
// o++;
// //std::cout << *(aptr + i) << " " << *(bptr + i) << " " << *(aptr + i) * *(aptr + i) +
// //*(bptr + i) * *(bptr + i) << std::endl;
// }
//}
//void checkTripletC(float* aptr, float* bptr, float* cptr, int& o)
//{
// for (int i = 0 ; i < 4;i++)
// {
// float a = aptr[i] * aptr[i] + bptr[i] * bptr[i];
// if (sqrt(a) == round(sqrt(a)))
// {
// o++;
// //std::cout << aptr[i] << " " << bptr[i] <<" "<< a << std::endl;
// }
// }
//}
//float Experiment( void(*fun)(float*, float*, float*, int&), int& countas,int pr)
//{
// int n = pr;
// __declspec(align(16)) float pa[4] = { 1,1,6,1 };
// __declspec(align(16)) float pb[4] = { 4096,1,8,1 };
// __declspec(align(16)) float ts[4] = { 0,0,0,0 };
// float* aptr = &pa[0];
// float* bptr = &pb[0];
// float* cptr = &ts[0];
// int c = 0;
// int o = 0;
// std::clock_t b = std::clock();
// for (int i = 1; i <= n; i++)
// for (int j = i; j <= n;j++)
// {
// pa[c] = i; pb[c] = j; c++;
// if (c == 4)
// {
// c = 0;
// fun(aptr, bptr, cptr, o);
// }
// }
// std::clock_t end = std::clock();
// float ats = (float)(end - b) / CLOCKS_PER_SEC ;
// countas = o;
// return ats;
//}
//int main()
//{
// int n = 100;
// int pr = 2000;
// float m = 0;
// void(*fun)(float*,float*,float*,int&);
// fun = &checkTripletASM;
// int c = 0;
// std::cout << "RUNS: " << n << " PER RUN: " << pr << std::endl;
// std::cout << "TEST BEGINS! \n";
// for (int i = 0; i < n;i++)
// m += Experiment(fun,c,pr);
// std::cout <<"SSE/FLOAT TIME: "<< m / (float)n << " ENTRYS: " << c << std::endl;
// m = 0;
// fun = &checkTripletC;
// for (int i = 0; i < n;i++)
// m += Experiment(fun,c,pr);
// std::cout << "C++/FLOAT TIME: " << m / (float)n << " ENTRYS: " << c << std::endl;
// std::cout << "TEST END!";
// std::cin.ignore();
//}
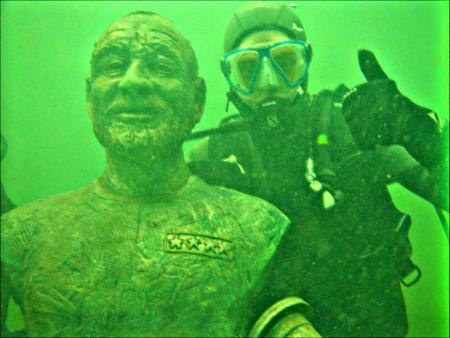
目标效果如下,但是本demo好像达不到
<QCoreApplication>
#include<opencv2/highgui/highgui.hpp>
#include<opencv2/core/core.hpp>
#include<opencv2/imgproc/imgproc.hpp>
#include<opencv/ml.h>
#include<opencv2/photo/photo.hpp>
using namespace cv;
using namespace std;
cv::Mat image_clahe;
int erosion_elem = 0;
int erosion_size = 0;
int dilation_elem = 0;
int dilation_size = 0;
void Erosion( int, void* )
{Mat dst1;
int erosion_type;
namedWindow( "Erosion Demo", CV_WINDOW_AUTOSIZE );
if( erosion_elem == 0 ){ erosion_type = MORPH_RECT; }
else if( erosion_elem == 1 ){ erosion_type = MORPH_CROSS; }
else if( erosion_elem == 2) { erosion_type = MORPH_ELLIPSE; }
Mat element = getStructuringElement( erosion_type,
Size( 2*erosion_size + 1, 2*erosion_size+1 ),
Point( erosion_size, erosion_size ) );
/// Apply the erosion operation
erode( image_clahe, image_clahe, element,Point(0,0),3000 );
fastNlMeansDenoisingColored( image_clahe, dst1, 3, 3, 7, 21 );
imshow( "Erosion Demo", dst1);
imwrite("/home/sukhad/Downloads/Nipun.jpg",dst1);
}
/** @function Dilation */
void Dilation( int, void* )
{
int dilation_type;
namedWindow( "Dilation Demo", CV_WINDOW_AUTOSIZE );
if( dilation_elem == 0 ){ dilation_type = MORPH_RECT; }
else if( dilation_elem == 1 ){ dilation_type = MORPH_CROSS; }
else if( dilation_elem == 2) { dilation_type = MORPH_ELLIPSE; }
Mat element = getStructuringElement( dilation_type,
Size( 2*dilation_size + 1, 2*dilation_size+1 ),
Point( dilation_size, dilation_size ) );
/// Apply the dilation operation
dilate( image_clahe, image_clahe, element,Point(0,0),3000 );
imshow( "Dilation Demo", image_clahe );
}
int main(int argc, char** argv)
{
QCoreApplication a(argc, argv);
// READ RGB color image and convert it to Lab
cv::Mat bgr_image;
cv::Mat lab_image;
bgr_image=imread("051246060311637.png");
cv::cvtColor(bgr_image, lab_image, CV_BGR2Lab);
cv::Mat dst1;
// Extract the L channel
std::vector<cv::Mat> lab_planes(3);
cv::split(lab_image, lab_planes); // now we have the L image in lab_planes[0]
// apply the CLAHE algorithm to the L channel
cv::Ptr<cv::CLAHE> clahe = cv::createCLAHE();
clahe->setClipLimit(4);
cv::Mat dst;
clahe->apply(lab_planes[0], dst);
// Merge the the color planes back into an Lab image
dst.copyTo(lab_planes[0]);
cv::merge(lab_planes, lab_image);
// convert back to RGB
cv::cvtColor(lab_image, image_clahe, CV_Lab2BGR);
namedWindow( "image original", CV_WINDOW_AUTOSIZE );
namedWindow( "image CLAHE", CV_WINDOW_AUTOSIZE );
// display the results (you might also want to see lab_planes[0] before and after).
Erosion( 0, 0 );
Dilation( 0, 0 );
imshow("image original", bgr_image);
imshow("image CLAHE", image_clahe);
return a.exec();
}
//#include <iostream>
//#include <iomanip>
//#include <math.h>
//#include <ctime>
//void checkTripletASM(float* aptr,float* bptr,float* cptr,int& o)
//{
// _asm {
// push eax
// push ebx
// mov eax, aptr
// mov ebx, bptr
// movaps xmm0, [eax]
// movaps xmm1, [ebx]
// movaps xmm7, xmm0
// mulps xmm7, xmm0
// movaps xmm2, xmm7
// movaps xmm7, xmm1
// mulps xmm7, xmm1
// movaps xmm3, xmm7
// movaps xmm4, xmm2
// addps xmm4, xmm3
// movaps xmm5, xmm4
// sqrtps xmm5, xmm5
// roundps xmm5, xmm5, 1
// mulps xmm5, xmm5
// subps xmm5, xmm4
// mov eax, cptr
// movaps[eax], xmm5
// pop ebx
// pop eax
// }
// for (int i = 0; i < 4;i++)
// if (*(cptr + i) == 0.0)
// {
// o++;
// //std::cout << *(aptr + i) << " " << *(bptr + i) << " " << *(aptr + i) * *(aptr + i) +
// //*(bptr + i) * *(bptr + i) << std::endl;
// }
//}
//void checkTripletC(float* aptr, float* bptr, float* cptr, int& o)
//{
// for (int i = 0 ; i < 4;i++)
// {
// float a = aptr[i] * aptr[i] + bptr[i] * bptr[i];
// if (sqrt(a) == round(sqrt(a)))
// {
// o++;
// //std::cout << aptr[i] << " " << bptr[i] <<" "<< a << std::endl;
// }
// }
//}
//float Experiment( void(*fun)(float*, float*, float*, int&), int& countas,int pr)
//{
// int n = pr;
// __declspec(align(16)) float pa[4] = { 1,1,6,1 };
// __declspec(align(16)) float pb[4] = { 4096,1,8,1 };
// __declspec(align(16)) float ts[4] = { 0,0,0,0 };
// float* aptr = &pa[0];
// float* bptr = &pb[0];
// float* cptr = &ts[0];
// int c = 0;
// int o = 0;
// std::clock_t b = std::clock();
// for (int i = 1; i <= n; i++)
// for (int j = i; j <= n;j++)
// {
// pa[c] = i; pb[c] = j; c++;
// if (c == 4)
// {
// c = 0;
// fun(aptr, bptr, cptr, o);
// }
// }
// std::clock_t end = std::clock();
// float ats = (float)(end - b) / CLOCKS_PER_SEC ;
// countas = o;
// return ats;
//}
//int main()
//{
// int n = 100;
// int pr = 2000;
// float m = 0;
// void(*fun)(float*,float*,float*,int&);
// fun = &checkTripletASM;
// int c = 0;
// std::cout << "RUNS: " << n << " PER RUN: " << pr << std::endl;
// std::cout << "TEST BEGINS! \n";
// for (int i = 0; i < n;i++)
// m += Experiment(fun,c,pr);
// std::cout <<"SSE/FLOAT TIME: "<< m / (float)n << " ENTRYS: " << c << std::endl;
// m = 0;
// fun = &checkTripletC;
// for (int i = 0; i < n;i++)
// m += Experiment(fun,c,pr);
// std::cout << "C++/FLOAT TIME: " << m / (float)n << " ENTRYS: " << c << std::endl;
// std::cout << "TEST END!";
// std::cin.ignore();
//}
目标效果如下,但是本demo好像达不到


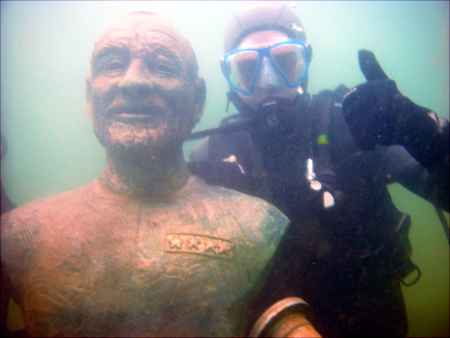


项目地址:https://github.com/sukhad-app/under-water-image-enhancement
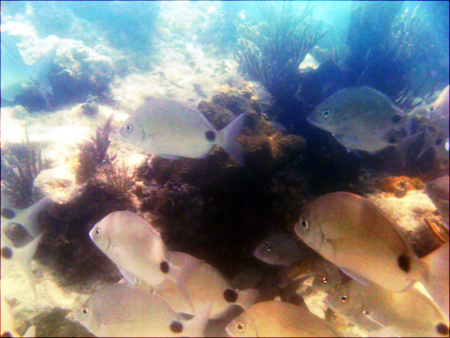
这个效果也一般:
http://download.csdn.net/download/mashang666/9555191
http://download.csdn.net/detail/dbc12345666/8092531,这个图像增强后效果: