目录
一. yum私有仓库的实现
二. 画图 TCP协议和三次握手及四次挥手
三.centos/ubuntu 静态网卡IP配置
四. 实现免密登录脚本, expect登录远程主机,将生成的密钥写入到目标主机, expect测试远程登录。
一. yum私有仓库的实现
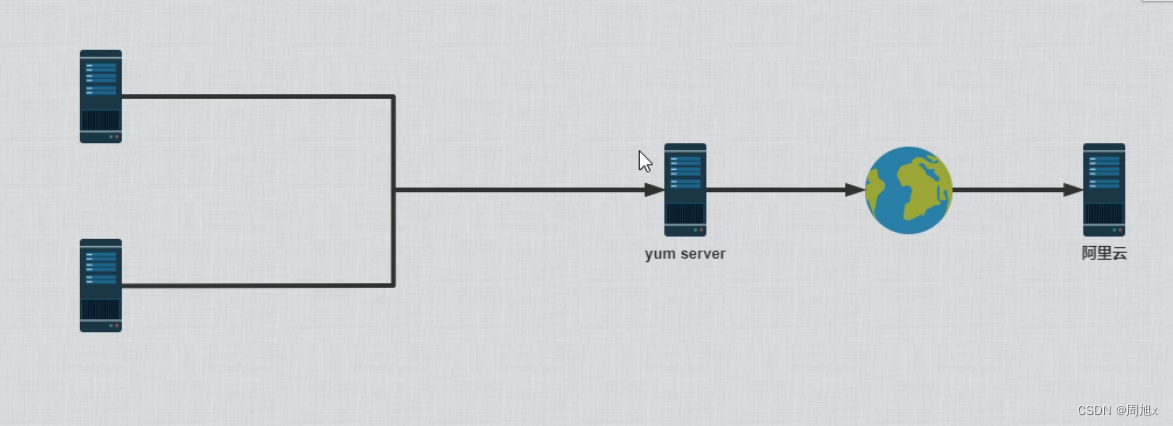
思路:首先搭建公司内部服务器EPEL源,把EPEL源下载到公司内部服务器,再由http将服务器EPEL所有数据共享出来,公司内部的客户端就可以从创建好的这个http共享服务器来获取资源了。
第1步.环境准备:关闭SELinux 和防火墙,再进行yum仓库搭建
#关闭SELinux
sed -i '/^SELINUX=/c SELINUX=disabled' /etc/selinux/config
#关闭防火墙
systemctl disable --now firewalld
第2步.EPEL的yum源
#阿里云 http://mirrors.aliyun.com/epel/8/Everything/x86_64/
#腾讯云 https://mirrors.cloud.tencent.com/epel/8/Everything/x86_64/
#清华大学 https://mirror.tuna.tsinghua.edu.cn/epel/7/x86_64/
第3步.rocky gpgkey
#山东大学 http://mirrors.sdu.edu.cn/rocky/RPM-GPG-KEY-Rocky-8
#上海交通大学 https://mirrors.sjtug.sjtu.edu.cn/rocky/RPM-GPG-KEY-Rocky-8
第4步.为rocky配置yum的系统和EPEL源仓库
在/etc/yum.repos.d文件下创建一个以*.repo为后缀的文件


第5步.yum配置文件
vim /etc/yum.repos.d/*.repo
[BaseOs]
name=BaseOs
baseurl=https://mirrors.aliyun.com/epel/8/Everything/x86_64/
        https://mirrors.cloud.tencent.com/epel/8/Everything/x86_64/
enable=1
gpgkey=https://mirrors.cloud.tencent.com/epel/RPM-GPG-KEY-EPEL-8

[AppStream]
name=AppStream
baseurl=https://mirrors.aliyun.com/epel/8/Everything/x86_64/
enable=1
gpgkey=https://mirrors.cloud.tencent.com/epel/RPM-GPG-KEY-EPEL-8

[EPEL]
name=EPEL
baseurl=https://mirrors.aliyun.com/epel/8/Everything/x86_64/
gpgcheck=0
第6步.安装http实现资源共享,可以搭建公司内部的http服务器
yum -y install http #安装http服务
systemctl enable --now httpd #启动http服务
第7步.在浏览器输入ip地址,测试http服务是否能正常被访问

第8步.下载阿里云的epel源,制作私有yum源
yum repolist #查看epel仓库id,repolistid
dnf reposync --repoid=epel --download-metadata -p /var/www/html/ #下载epel源
第9步.再将客户端yum配置文件[EPEL]中baseurl地址指向公司内部的http服务器地址

第10步.客户端使用yum源下载

二. 画图 TCP协议和三次握手及四次挥手
三次握手

三次握手概念:
第一次握手:客户端向服务器端发送请求报文段。
第二次握手:服务器端接收到请求报文段后,会发送一个响应。
第三次握手:客户端收到服务端连接同意的应答后,还会向服务端发送一个确认报文段,表示:服务端发来的连接同意应答已经成功收到。客户端发完这个报文段后便进入ESTABLISHED状态,服务端收到这个应答后也进入ESTABLISHED状态,此时连接的建立完成!
四次挥手
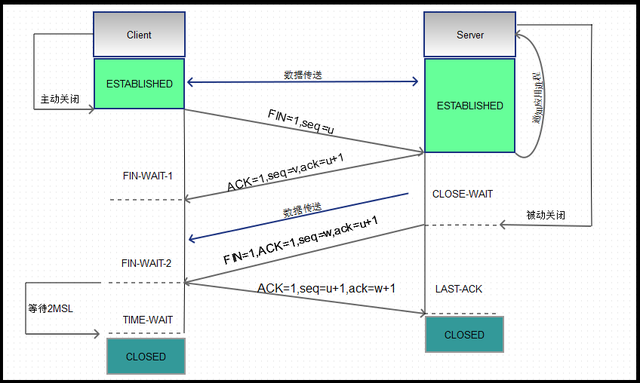
四次挥手:
第一次挥手:客户端数据发送完成,则它向服务端发送连接释放请求。
第二次挥手:服务器收到客户端连接释放报文,通知相应的高层应用进程,告诉它客户端向服务器这个方向的连接已经释放了。
第三次挥手:服务端将最后的数据发送完毕后,就向客户端发送连接释放报文。
第四次挥手:客户端收到服务器的连接释放报文后,向服务端发出确认应答,服务端只要收到了客户端发出的确认,立即进入CLOSED状态。同样,撤销TCB后,就结束了这次的TCP连接。
三.centos/ubuntu 静态网卡IP配置
centos/ubuntu网卡及ip配置(操作步骤基本一致)
centos/ubuntu:网卡配置文件路径
vim /etc/default/grub
centos:ip地址配置文件路径
vim /etc/sysconfig/network-scripts/ifcfg-eth0
ubuntu:ip地址配置文件路径
vim /etc/netplan/01-netcfg.yaml
第1步:centos/ubuntu使用传统命名方式
编辑网卡配置文件:
vim /etc/default/grub
GRUB_CMDLINE_LINUX="net.ifnames=0"
vim /etc/default/grub
显示效果

第2步:centos/ubuntu生效配置文件
centos生效配置文件
grub2-mkconfig -o /boot/grub2/grub.cfg
ubuntu为grub生效配置文件
grub-mkconfig -o /boot/grub/grub.cfg
执行效果
root@administrator:~# grub-mkconfig -o /boot/grub/grub.cfg
Sourcing file `/etc/default/grub'
Sourcing file `/etc/default/grub.d/init-select.cfg'
Generating grub configuration file ...
Found linux image: /boot/vmlinuz-5.4.0-124-generic
Found initrd image: /boot/initrd.img-5.4.0-124-generic
Found linux image: /boot/vmlinuz-5.4.0-122-generic
Found initrd image: /boot/initrd.img-5.4.0-122-generic
done
第3步:centos/ubuntu网卡名修改成功,执行ip a验证一下
ip a
发现网卡名已经修改成功,缺少ip地址。这是因为ip地址配置文件与网卡名不对应,导致ip地址没有显示,需要配置ip地址文件。
ip a显示效果

第4.1.1步centos配置ip地址文件
该文件必须以ifcfg-开头,网卡名设置的是eth0,这里我们就使用ifcfg-eth0与之对应
vim /etc/sysconfig/network-scripts/ifcfg-eth0
vim /etc/sysconfig/network-scripts/ifcfg-eth0

第4.1.2步 centosIP配置文件路径:
vim /etc/sysconfig/network-scripts
DEVICE="eth0"
NAME="eth0"
BOOTPROTO=static
IPADDR=192.168.23.132
PREFIX=24
GATEWAY=192.168.23.2
DNS1=180.76.76.76
DNS2=223.5.5.5
第4.1.3步centos执行命令生效:
systemctl restart network
[root@administrator ~]# systemctl restart network
第4.1.4步centos验证ip配置是否生效
ip a
执行效果:
centos网卡及ip配置完成

第4.2.1步ubuntu修改网卡名之后没有ip地址显示,原因是与ip配置文件中网卡名不一致
处理方式:配置正确ip地址

第4.2.2步ubuntu静态配置ip文件需要以.yaml后缀文件
执行命令:vim /etc/netplan/01-netcfg.yaml
network:
  ethernets:
    eth0:
      addresses:
      - 192.168.23.130/24
      gateway4: 192.168.23.2
      nameservers:
            search: [baidu.com]
            addresses: [180.76.76.76]
  version: 2
第4.2.3步ubuntu执行ip配置生效命令
执行生效命令,再使用ip a查看ip地址,完成静态ip地址配置
netplan apply
ip a
root@administrator:~# ip a
1: lo: <LOOPBACK,UP,LOWER_UP> mtu 65536 qdisc noqueue state UNKNOWN group default qlen 1000
    link/loopback 00:00:00:00:00:00 brd 00:00:00:00:00:00
    inet 127.0.0.1/8 scope host lo
       valid_lft forever preferred_lft forever
    inet6 ::1/128 scope host
       valid_lft forever preferred_lft forever
2: eth0: <BROADCAST,MULTICAST,UP,LOWER_UP> mtu 1500 qdisc fq_codel state UP group default qlen 1000
    link/ether 00:0c:29:76:88:a7 brd ff:ff:ff:ff:ff:ff
    inet 192.168.23.130/24 brd 192.168.23.255 scope global eth0
       valid_lft forever preferred_lft forever
    inet6 fe80::20c:29ff:fe76:88a7/64 scope link
       valid_lft forever preferred_lft forever
第5步:centos/ubuntu使用ip a命令均能正常查看网卡及ip地址配置,操作完成。

四. 实现免密登录脚本, expect登录远程主机,将生成的密钥写入到目标主机, expect测试远程登录。
(1)通过shift读取脚本参数
(2)通过select来选择功能.例如功能有
- 安装mysql
- 安装apache
- 免密钥登录主机
当前我们只实现免密钥登录主机
(3)通过函数封装每个功能
(4)将免密钥登录的过程可以重复进行, while 循环实现重复,需要有退出过程。当用户输入exit时,退出免密钥功能。
(5)支持输入一批主机免密钥,使用数组实现
#!/usr/bin/expect
set ip 192.168.23.135
set user root
set password qwwr123
set timeout 10
spawn ssh $user@$ip
expect {
		"yes/no" { send "yes\n";exp_continue }
		"password " { send "$password\n" }
}
interact