手把手带你从0完成医疗行业影像图像检测三大经典模型InceptionV3-RestNet50-VGG16
如果你想使用现在最火的ChatGPT来训练属于你的专属ChatGPT模型,那你千万不能错过这篇文章。迁移学习是机器学习领域中的一种重要方法,它通过利用先前的学习经验来提高当前任务的性能。本文通过3个经典的模型:InceptionV3-RestNet50-VGG16作为示例,为大家从0开始搭建了医疗影像行业迁移学习网络,并获取到了较好的准确度与结果一致性。而掌握好迁移学习的基础知识和应用,你就能通过模型微调(也称迁移学习),调用ChatGPT接口加上你的训练集去训练你的模型了。
1、迁移学习简介
迁移学习(transfer learning)是将在特定领域的一个任务中获得的知识迁移到另一个相似领域的相关项目的过程。它允许我们将在一个特定领域的任务中获得的知识应用到另一个相似领域的相关项目中。在深度学习中,这通常意味着使用预先训练好的模型作为解决新问题的起点。由于计算机视觉和自然语言处理问题需要大量的数据和计算资源来训练有效的深度学习模型,迁移学习可以减少对大量数据和时间的需求,因此在这些领域非常重要。
在2016年的NIPS教程中,Andrew Ng指出迁移学习将成为继监督学习之后推动机器学习商业成功的重要因素。这一预测正在变为现实,因为迁移学习现在被广泛应用于各种需要人工神经网络解决的困难问题。这引发了一个问题:为什么会出现这种情况?
从头开始训练人工神经网络是一项艰巨的任务,这主要有以下两个原因:
- 人工神经网络的损失面是非凸的。因此,它需要一组良好的初始权重才能得到合理的收敛。
- 人工神经网络有很多参数,因此需要大量的数据进行训练。遗憾的是,对于许多项目而言,可以被用于训练神经网络的特定数据并不够,但同时项目要解决的问题又非常复杂,需要依赖于神经网络的解决方案。
本项目将介绍如何使用迁移学习来解决医疗问题。
2、项目简介
在医疗领域,糖尿病视网膜病变通常在糖尿病患者中发现,病人的高血糖会对其视网膜中的血管造成损害。糖尿病视网膜病变的检测通常是手动检测,即由经验丰富的医生通过检查彩色的眼底视网膜图像来完成。这样的诊断过程通过会引人一定程度的延迟,进而导致治疗的延误。在本项目中,我们将使用迁移学习建立一个用于检测人眼中的糖尿病视网膜病变的模型,通过输人彩色视网膜眼底图像来检测是否存在糖尿病视网膜病变,并根据病变的严重程度进行分类。
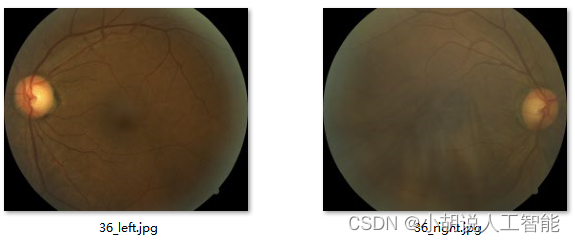
下图左侧图片是轻度糖尿病视网膜病变的视网膜,右侧图片是正常的视网膜。
3、糖尿病视网膜病变数据集
数据集下载链接: https://pan.baidu.com/s/1hsijpCLD5oF7G5NqspWAbQ?pwd=eu0j 提取码: eu0j
该数据集包含来自2015年糖尿病视网膜病变检测的图像。每个图像都已调整大小和裁剪,最大尺寸为1024 px。调整大小和裁剪的代码可以在这里找到。
对于2015年糖尿病视网膜病变检测图像,为每个受试者提供左眼和右眼。图像标记有受试者ID以及左或右(例如,1_left.jpeg是患者ID 1的左眼)。
临床医生已经在0到4的尺度上针对糖尿病性视网膜病变的严重性对每个图像进行了评级:
0 - No DR 0 -没有糖尿病视网膜病变
1 - Mild 1 -轻度糖尿病视网膜病变
2 - Moderate 2 -中度糖尿病视网膜病变
3 - Severe 3 -重度糖尿病视网膜病变
4 - Proliferative DR 4 -增生性糖尿病视网膜病变
与任何真实世界的数据集一样,您将在图像和标签中遇到噪声。图像可能包含伪影、失焦、曝光不足或曝光过度。这些图像是在很长一段时间内使用各种相机从多个诊所收集的,这将引入进一步的变化。
文件夹说明:
labels.zip-包含2015年的训练和测试标签
resized train15.zip-包含2015年已调整大小和裁剪的训练集图像,总共35126个图像。
resized test 15.zip-包含2015年已调整大小和裁剪的测试集图像,总共53576个图像。
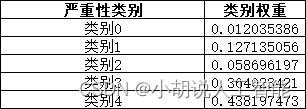
4、考虑类别不平衡问题
类别不平衡是分类问题中的一个主要挑战。下图描绘了训练集5个严重性类的类密度。

接近73%的训练数据属于类0,即没有糖尿病视网膜病变。因此,如果我们碰巧将所有数据都标记为类0,那么准确度可能会达到73%,但是在实际生活中,我们宁愿在患者实际没有某种健康问题的情况下误判为有问题(假阳性),而不是在有某种健康问题的情况下误判为没有问题(假阴性)。因此,即使模型学会将所有数据归类为类0,它的73%准确度也可能没有太大意义。
检测更高的严重性类别比检测不严重类别更为重要。使用对数损失或交叉熵损失函数的分类模型的问题在于它的结果通常会有利于数据量大的类别。这是因为交叉熵误差在最大相似性原则上更倾向于为数量更多的类别分配更高的概率。针对这个问题,我们可以两件事:
- 从具有更多样本的类别中丢弃数据或者对类别进行低频率采样以保持样本之间的均匀分布。
- 在损失函数中,为类别赋予与其密度成反比的权重。这可以保证当模型未能对它们进行分类时,损失函数对低频类别赋予更高的惩罚。
我们将使用方案二,因为它不涉及生成更多的数据或者丢弃现有数据。如果我们使用类频率的倒数作为权重,我们将得到下表所示的类别权重:
我们将在训练分类网络时使用这些权重。详见下面9、动态创建小批量数据进行训练
5、定义模型质量
我们将对训练集进行交叉验证,使用标记的训练数据构建模型,并在保留数据集上验证模型。由于我们正在处理分类问题,因此准确度是一个有用的验证指标。准确度定义如下:
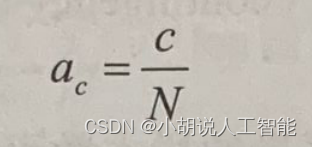
这里,c是被正确分类的样本的数量,N是用于评估的样本总数。
我们还将使用二次加权kappa(quadratic weighted kappa)统计量来定义模型的质量,并与Kaggle标准相比,看我们建立的模型相较于基准是否有提升。二次加权kappa定义如下:
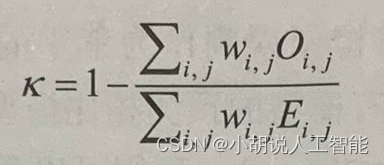
二次加权kappa表达式中的权重(wi,j)定义如下:
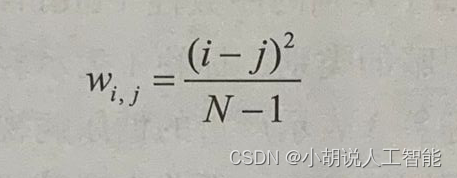
上述公式中包括以下内容:
- N表示类别的数量。
- Oi,j表示被预测为类别i且实际类别为j的图像的数量。
- Ei,j表示被预测为类别i且实际类别为j的图像的期望数量,并假设预测类别与实际类之间相互独立。
可查看更加详细的关于二次加权kappa定义及示例。
6、定义损失函数
在本项目中,数据有五个类别,即没有糖尿病视网膜病变、轻度糖尿病视网膜病变、中度糖尿病视网膜病变、严重的糖尿病视网膜病变和增生性糖尿病视网膜病变。因此,我们可以将其视为分类问题。对于我们的分类问题,输出标签需要进行独热编码,如下所示:
- 无糖尿病视网膜病变:[10000]T
- 轻度糖尿病视网膜病变:[01000]T
- 中度糖尿病视网膜病变:[00100]T
- 严重糖尿病视网膜病变:[00010]T
- 增生性糖尿病视网膜病变:00001]T
Softmax是用于在输出层中呈现不同类别的概率的最佳激活函数,而每个数据点的类别交叉熵损失之和是要优化的最佳损失。对于具有输出标签向量y和预测概率p的单个数据点,交叉熵损失由以下公式给出:
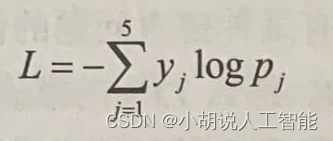
这里,y=[y1…yj…ys]T,且p=[p1…pj…p5]T。
同样地,M个训练数据点的平均损失可以表示为:
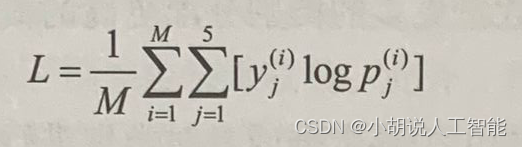
在训练过程中,基于上式得到的平均对数损失(average log loss)来产生小批量的梯度,其中M是所选的批量的大小。对于我们将结合验证准确度监视的验证对数损失,M是验证集数据点数。由于我们将在K折交叉验证(K-foldcross-validation)的每一折进行验证,因此我们将在每个折中使用不同的验证数据集。
请注意,输出中的类别具有序数性,并且严重性逐类递增。因此回归也可能是不错的
解决方法。大家也可以尝试用回归来代替分类,看看它是否合理。回归的挑战之一是将原始得分转换为类别。
7、预处理图像
不同类别的图像将存储在不同的文件夹中,因此可以很容易地标记它们的类别。博主写了个分类代码,可以直接修改文件夹地址,然后自动处理成不同类别的文件夹。具体python代码如下:
#!/usr/bin/env python3.8

# -*- coding: utf-8 -*-
# @Time : 2023/3/24 10:24
# @Author : Steven Hu
# @FileName: split_data.py
# @Software: PyCharm

import os
import shutil
import random
import pandas as pd

def split_dataset(folder_path, train_folder_path, validation_folder_path):
    # Get all list of files in the folder
    files = []

    for root, dirs, file_ in os.walk(folder_path):
        # 这里可以进行判断,如果不是要搜索的就跳过;
        # 也可以对 `files` 列表进行遍历,以达到具体文件的搜索
        if len(file_):
            file_path_list = [str(root) + os.sep + str(i) for i in file_]
            files.extend(file_path_list)

    # Split the dataset by 80%-20%
    train_files = random.sample(files, round(0.8 * len(files)))
    validation_files = [file for file in files if file not in train_files]

    # Copy the files from original folder to training folder
    if not os.path.exists(train_folder_path):
        os.makedirs(train_folder_path)

    for file in train_files:
        shutil.copy(file, train_folder_path)

    # Copy the files from original folder to validation folder
    if not os.path.exists(validation_folder_path):
        os.makedirs(validation_folder_path)

    for file in validation_files:
        shutil.copy(file, validation_folder_path)


def class_generation_from_train(csv_file, source_dir, class_list=None):
    # 如果train中没有分类,需要运行该函数,对class进行分类
    # 读取excel中的数据
    if class_list is None:
        class_list = ["class0", "class1", "class2", "class3", "class4"]
    df = pd.read_csv(csv_file)

    # 获取指定文件夹中的所有文件名
    file_list = os.listdir(source_dir)

    for class_ in class_list:
        path_ = os.path.join(source_dir, class_)
        if not os.path.exists(path_):
            os.makedirs(path_)

    # 遍历所有文件
    for filename in file_list:
        # 依次在excel中查找,如果找到对应行,则根据excel中指定列的值,将文件移动到以该值命名的文件夹中
        filename_ = filename[:-4]
        if filename_ in df['image'].values:
            row = df[df['image'] == filename_]
            target_dir = row['level'].values[0]
            target_dir = os.path.join(source_dir, "class" + str(target_dir))
            source_path = os.path.join(source_dir, filename)
            target_path = os.path.join(target_dir, filename)
            os.rename(source_path, target_path)


if __name__ == '__main__':
    # 先随机80%-20%拆分训练集和验证集
    folder_path = r"E:\Data\resized train 15"
    train_folder_path = r"E:\Data\train_validation\train"
    validation_folder_path = r"E:\Data\train_validation\validation"
    split_dataset(folder_path, train_folder_path, validation_folder_path)

    # 再对训练集和验证集内进行class分类
    train_csv_file = r'E:\Data\labels\trainLabels15.csv' # 这个是训练集的label文件testLabels15.csv
    class_generation_from_train(train_csv_file, train_folder_path,
                                                 ["class0", "class1", "class2", "class3", "class4"])
    class_generation_from_train(train_csv_file, validation_folder_path,
                                                 ["class0", "class1", "class2", "class3", "class4"])

    # 再对测试集进行class分类
    test_folder_path = r"E:\Data\resized test 15"
    test_csv_file = r'E:\Data\labels\testLabels15.csv'  # 这个是测试集的label文件
    class_generation_from_train(test_csv_file, test_folder_path,
                                ["class0", "class1", "class2", "class3", "class4"])
我们使用OpenCV函数读取图像,并调整它们的尺寸,如224x224x3。我们将参照ImageNe数服集从每个图像中逐通道减去平均像素强度。这样可以保证在模型上训练之前,糖尿病视像将数存的图像湿度与所处理的Imagener 图像具有相同的强度范围。一旦完成预处理,机像将被存储在一个numpy 数组中。图像预处理函数可以定义如下:
def pre_process(img):
    resized_img = cv2.resize(img, (224, 224), cv2.INTER_LINEAR)
    resized_img[:, :, 0] = resized_img[:, :, 0] - 103.939
    resized_img[:, :, 1] = resized_img[:, :, 0] - 116.779
    resized_img[:, :, 2] = resized_img[:, :, 0] - 123.68
    return resized_img
我们通过通过行间插值的方法将其大小调整为(224,224,3)或其他任意指定维度。
ImageNet 图像的红色、绿色和蓝色通道的平均像素强度分别为103.939、116.779和123.68。预训练模型是在从图像中减去这些平均值之后进行训练的。这种减去平均值的方法是为了使数据特征标准化,将数据集中在0附近有助于避免梯度消失和梯度爆炸问题,进而有助于模型更快地收敛。此外,每个通道标准化有助于保持梯度流均匀地进人每个通道。由于我们在这个项目中使用预训练模型,因此合理的做法是在将图像输人预训练网络之前,每个通道也基于同样的方式进行标准化。然而,使用基于预训练网络ImageNet的平均值来校正项目中的图像并非强制要求,也可以通过项目中训练集图像的平均像素强度来进行标准化。
同样,还可以选择对整个图像进行均值归一化,而不是分别对每个通道进行均值归一化。这需要从图像自身中减去每个图像的平均值。想象一下,CNN中识别的物体可能来自不同的光照条件(如白天和夜晚)。而我们希望无论何种光照条件,都能正确地对物体进行分类,然而,不同的像素强度将不同程度地激活神经网络的神经元,这会增加对象被错误分类的可能性。然而,如果从图像中减去每个图像的平均值,则该图像对象将不再受到不同照明条件的影响。因此,根据具体图像的性质,我们需要自己选择最佳的图像标准化方案,不过任何默认的标准化性能都不错。
另外为了扩充数据,我们将使用keras的ImageDataGenerator在图像像素坐标上进行仿射变换(affine transformation)来生成额外的数据。我们主要使用的仿射变换是旋转、平移和缩放。具体代码如下:
datagen = ImageDataGenerator(horizontal_flip=True,
							vertical_flip=True,
							width_shift_range=0.1,height_shift_range=0.1,
							channel_shift_range=0, zoom_range=0.2,
							rotation_range=20,
							preprocessing_function=pre_process)
从定义的生成器中可以看出,我们启用了水平和垂直翻转,这会生成分别沿水平轴和垂直轴反射得到的图像。类似地,我们还让图像沿宽度和高度方向平移10%像素位警旋转范围限制在20度的角度范围内,而缩放因子则定义在原始图像的0.8~1.2以内。
8、搭建迁移学习网络
我们现在将使用预训练的ResNet50、InceptionV3和VGG16网络进行实验,并找出能够获得最佳结果的网络。每个预训练模型的权重都基于ImageNet。我在下面提供了 ResNet InceptionV3和VGG16架构的原始论文链接以供参考。建议读者阅读这些文章,深入了解这些网络架构以及它们之间细微的差别。
以下是VGG论文的链接:
论文题目:Very Deep Convolutional Networks for Large-Scale Image Recognition
以下是ResNet 论文的链接:
论文题目:Deep Residual Learning for Image Recognition
以下是InceptionV3论文的链接:
论文题目:Rethinking the Inception Architecture for Computer Vision
论文百度下载链接:
链接: https://pan.baidu.com/s/1B6XklxnrwCBCkmNd1ATOYw?pwd=tpwm 提取码: tpwm
VGG16 迁移学习网络
VGG16是一个16层的CNN,它使用3x3的滤波器和2x2 感受野(receptive field)进行卷积。整个网络中使用的激活函数都是ReLU。VGG架构是由 Simonyan 和 Zisserman 开发的,它是2014年ILSVRC比赛的亚军。VGG16网络由于其简单性而获得广泛的普及,而且它是用于从图像中提取特征的最流行的网络。
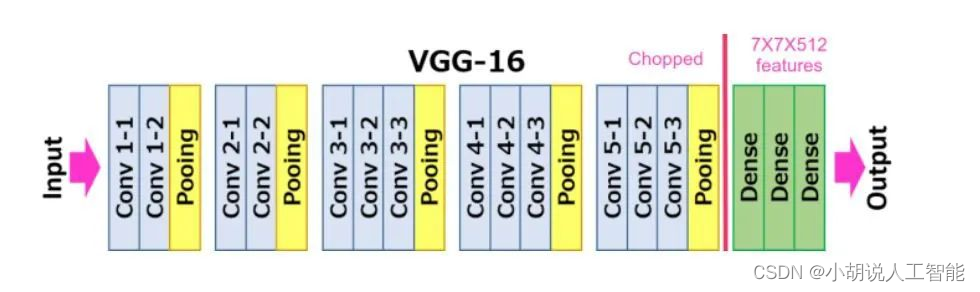
使用VGG16网络进行迁移学习,还是比较简单,使用在ImageNet上预训练的VGG16的权重作为模型的初始权重,然后对模型进行微调。冻结了前几个层(默认为10层)的权重,因为在 CNN 中,前几层会学习检测通用的特征,如边缘、颜色构成等。因此,不同领域图像的通用特征不会有很大差异。冻结层是指不训练特定于该层的权重。我们可以尝试不同的冻结层数量,并采用提供最佳验证结果的冻结层数量。由于我们现在面临的是多分类任务,因此最终输出层选择了softmax激活函数。具体代码如下:
def VGG16_pseudo(dim=224, freeze_layers=10, full_freeze='N'):
    model = VGG16(weights='imagenet', include_top=False)
    # model = VGG16(weights=r'E:\learning_AI\Intelligent_projects_using_python\weights\vgg16_weights_tf_dim_ordering_tf_kernels_notop.h5', include_top=False) # 如果上面运行出现网络下载错误,建议先下载权重后,使用权重地址
    x = model.output # 从预训练的网络中提取最后一个最大池化层的输出
    x = GlobalAveragePooling2D()(x)  #确保池输出是一维数组格式,而不是二维点阵格式
    x = Dense(dim, activation='relu')(x) # 连接一个全连接层,这个dim可以自定义成其它值,比如512
    x = Dropout(0.5)(x) # 防止过拟合
    x = Dense(dim, activation='relu')(x) # 再连接一个全连接层,这个dim可以自定义成其它值,比如512
    x = Dropout(0.5)(x) # 防止过拟合
    out = Dense(5, activation='softmax')(x) # 这里输出必须是分类数量的单元数
    model_final = Model(input=model.input, outputs=out)
    if full_freeze != 'N':
        for layer in model.layers[0:freeze_layers]:
            layer.trainable = False
    return model_final
VGG16_weights下载百度链接:https://pan.baidu.com/s/1pBz70iEtHe2PTXX7Mw20uw?pwd=wic3 提取码: wic3
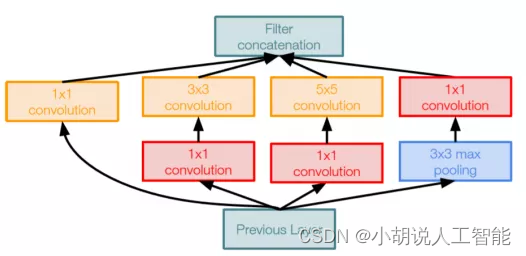
InceptionV3迁移学习网络
InceptionV3是来自谷歌的最先进的CNN。InceptionV3架构不是在每层使用固定大小的卷积滤波器,而是使用不同大小的滤波器来提取不同粒度级别的特征。Inception是2014年ImageNet竞赛的冠军,前五错误率为6.67%,非常接近人类的表现。InceptionV3层的卷积块如下图所示。
具体代码如下:
def inception_pseudo(dim=224, freeze_layers=30, full_freeze='N'):
    # model = InceptionV3(weights='imagenet', include_top=False) # 如果下载不了,则直接使用权重地址赋值到weights参数上
    model = InceptionV3(weights=r"E:\learning_AI\Intelligent_projects_using_python\weights\inception_v3_weights_tf_dim_ordering_tf_kernels_notop.h5",
        include_top=False)
    x = model.output # 从预训练的网络中提取最后一个最大池化层的输出
    x = GlobalAveragePooling2D()(x)  #确保池输出是一维数组格式,而不是二维点阵格式
    x = Dense(dim, activation='relu')(x) # 连接一个全连接层,这个dim可以自定义成其它值,比如512
    x = Dropout(0.5)(x) # 防止过拟合
    x = Dense(dim, activation='relu')(x) # 再连接一个全连接层,这个dim可以自定义成其它值,比如512
    x = Dropout(0.5)(x) # 防止过拟合
    out = Dense(5, activation='softmax')(x) # 这里输出必须是分类数量的单元数
    model_final = Model(input=model.input, outputs=out)
    if full_freeze != 'N':
        for layer in model.layers[0:freeze_layers]:
            layer.trainable = False
    return model_final
需要注意的一点是,由于InceptionV3是一个更深的网络,因此可以拥有更多的初始层。在数据有限的情况下,不需要训练模型中的所有层是一个优势。如果我们使用较少的训练数据,则整个网络的权重可能会导致过拟合。而冻结层可以减少需要训练的权重数量,因此提供了某种形式的正则化。由于初始层学习与问题领域无关的通用特征,因此它们是最适合冻结的层。我们还在完全连接层中使用了dropout,以防止过拟合。
InceptionV3_weights下载百度链接:https://pan.baidu.com/s/1pBz70iEtHe2PTXX7Mw20uw?pwd=wic3 提取码: wic3
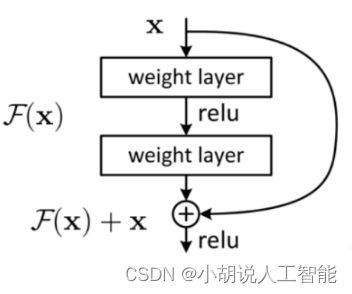
ResNet50迁移学习网络
ResNet50是一个深度CNN,它实现了残差块(residualblock)的概念,与VGG16网络非常不同。在一系列卷积-激活-池化操作之后,块的输入再次反馈到输出。ResNet构由 Kaiming He 等人开发,虽然它有152 层,但其实并没有VGG网络复杂。该架构以3.57%的前五错误率赢得了 2015 年ILSVRC 竞赛,这比竞赛数据集的人工标注成绩还要好。前五错误率是通过检查目标是否在最高概率的五个预测类别中得到的。实际上,ResNet网络尝试学习残差映射,而不是直接从输出映射到输入,如下图所示。
具体代码如下:
def resnet_pseudo(dim=224, freeze_layers=10, full_freeze='N'):
    # model = ResNet50(weights='imagenet', include_top=False) # 如果下载不了,则直接使用权重地址赋值到weights参数上
    model = ResNet50(weights=r"E:\learning_AI\Intelligent_projects_using_python\weights\resnet50_weights_tf_dim_ordering_tf_kernels_notop.h5",
        include_top=False)
    x = model.output # 从预训练的网络中提取最后一个最大池化层的输出
    x = GlobalAveragePooling2D()(x)  #确保池输出是一维数组格式,而不是二维点阵格式
    x = Dense(dim, activation='relu')(x) # 连接一个全连接层,这个dim可以自定义成其它值,比如512
    x = Dropout(0.5)(x) # 防止过拟合
    x = Dense(dim, activation='relu')(x) # 再连接一个全连接层,这个dim可以自定义成其它值,比如512
    x = Dropout(0.5)(x) # 防止过拟合
    out = Dense(5, activation='softmax')(x) # 这里输出必须是分类数量的单元数
    model_final = Model(input=model.input, outputs=out)
    if full_freeze != 'N':
        for layer in model.layers[0:freeze_layers]:
            layer.trainable = False
    return model_final
ResNet50_weights下载百度链接:https://pan.baidu.com/s/1pBz70iEtHe2PTXX7Mw20uw?pwd=wic3 提取码: wic3
9、动态创建小批量数据进行训练
如果你的电脑内存较低,建议使用小批量加载数据进行训练,在训练时只加载小批量数据的方式之一是通过随机地处理不同位置的图像来动态地创建小批量。每个小批量中处理的图像数量等于我们指定的小批量大小。当然,在训练期间动态地创建小批量会有一些性能瓶颈,但这些瓶颈可以忽略不计,特别是诸如 keras 之类的具有高效的动态批量创建机制。我们将利用keras 的flow_from_directory数间动态创建小批量,以减少训练过程需要的内存。同时使用ImageDataGenerator行图像增强。相关代码如下:
def train_model(train_dir, val_dir, batch_size=16, epochs=40, dim=224, lr=1e-5, model='ResNet50'):
    model_final = self.inception_pseudo(dim=dim, freeze_layers=30, full_freeze='N')  # 默认选择为'InceptionV3'
    if model == 'Resnet50':
        model_final = self.resnet_pseudo(dim=dim, freeze_layers=10, full_freeze='N')
    if model == 'VGG16':
        model_final = self.VGG16_pseudo(dim=dim, freeze_layers=10, full_freeze='N')

    train_file_names = glob.glob(f'{train_dir}/*/*')
    val_file_names = glob.glob(f'{val_dir}/*/*')
    train_steps_per_epoch = len(train_file_names) / float(batch_size)
    val_steps_per_epoch = len(val_file_names) / float(batch_size)
    train_datagen = ImageDataGenerator(horizontal_flip=True, vertical_flip=True, width_shift_range=0.1,
                                       height_shift_range=0.1,
                                       channel_shift_range=0, zoom_range=0.2, rotation_range=20,
                                       preprocessing_function=pre_process)
    val_datagen = ImageDataGenerator(preprocessing_function=pre_process)
    train_generator = train_datagen.flow_from_directory(train_dir,
                                                        target_size=(dim, dim),
                                                        batch_size=batch_size,
                                                        class_mode='categorical')
    val_generator = val_datagen.flow_from_directory(val_dir,
                                                    target_size=(dim, dim),
                                                    batch_size=batch_size,
                                                    class_mode='categorical')
    print(train_generator.class_indices)
    # 如果有GPU则直接用GPU
    physical_devices = tf.config.experimental.list_physical_devices('GPU')
    if physical_devices:
        tf.config.experimental.set_memory_growth(physical_devices[0], True)

    joblib.dump(train_generator.class_indices, f'{self.outdir}\class_indices.pkl')
    adam = optimizers.Adam(lr=lr, beta_1=0.9, beta_2=0.999, epsilon=1e-08, decay=0.0)
    model_final.compile(optimizer=adam, loss=["categorical_crossentropy"], metrics=['accuracy'])
    reduce_lr = ReduceLROnPlateau(monitor='val_loss', factor=0.50, patience=3, min_lr=0.000001)
    early = EarlyStopping(monitor='val_loss', patience=10, mode='min', verbose=1)
    logger_path = self.outdir + os.sep + 'keras-epochs_ib.log'
    logger = CSVLogger(logger_path, separator=',', append=False)
    model_name = self.outdir + os.sep + 'keras_transfer_learning-run.check'
    checkpoint = ModelCheckpoint(
        model_name,
        monitor='val_loss', mode='min',
        save_best_only=True,
        verbose=1)
    callbacks = [reduce_lr, early, checkpoint, logger]
    model_final.fit_generator(train_generator, steps_per_epoch=train_steps_per_epoch, epochs=epochs, verbose=1,
                              validation_data=(val_generator), validation_steps=val_steps_per_epoch,
                              callbacks=callbacks,
                              class_weight={0: 0.012, 1: 0.12, 2: 0.058, 3: 0.36, 4: 0.43})
    model_to_store_path = self.outdir + os.sep + model
    model_final.save(model_to_store_path)
    return model_to_store_path, train_generator.class_indices
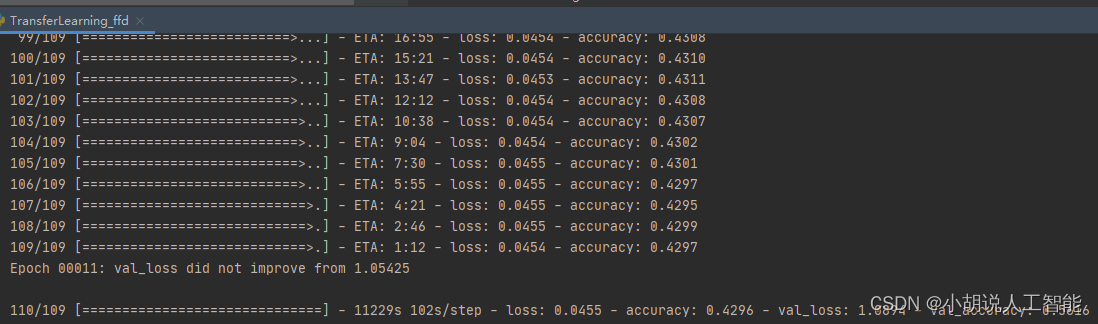
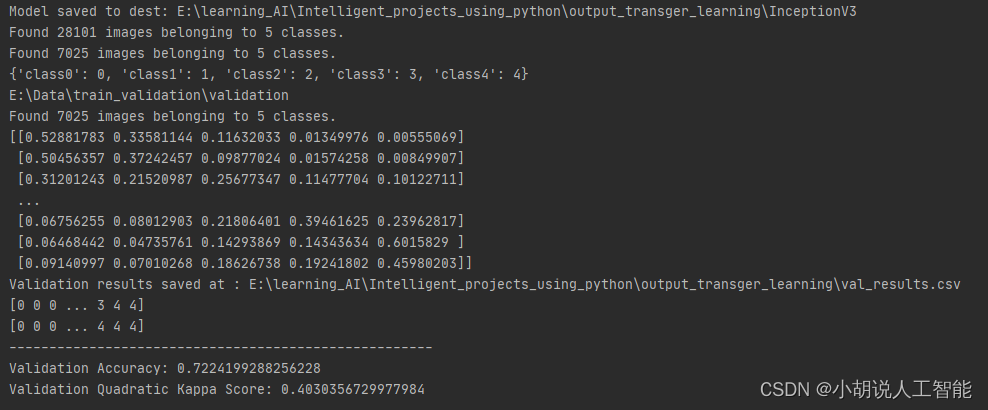
从上面日志可以看到,InceptionV3模型得到接近72%的验证准确度和0.403的二次Kappa得分。当然读者也可以尝试使用其它的模型和训练超参,最后获得更高的验证准确度。其它详细训练代码详见11、全部代码
10、测试集预测
读者可以通过9、动态创建小批量数据进行训练保存的模型,对测试集数据进行预测,然后获取到测试集准确度和二次Kappa得分,具体代码如下:
# !/usr/bin/env python3.8

# -*- coding: utf-8 -*-
# @Time : 2023/3/24 9:07
# @Author : Steven Hu
# @FileName: TransferLearning.py
# @Software: PyCharm

import numpy as np

np.random.seed(1000)

import pandas as pd
import time
import warnings

warnings.filterwarnings("ignore")
from sklearn.metrics import cohen_kappa_score
from tensorflow.keras.models import load_model
from tensorflow.keras.preprocessing.image import ImageDataGenerator
import cv2


# 平均化预处理图片,使其能满足ImageNet pre-trained model 图片要求
def pre_process(img):
    resized_img = cv2.resize(img, (224, 224), cv2.INTER_LINEAR)
    resized_img[:, :, 0] = resized_img[:, :, 0] - 103.939
    resized_img[:, :, 1] = resized_img[:, :, 0] - 116.779
    resized_img[:, :, 2] = resized_img[:, :, 0] - 123.68
    return resized_img

def prediction_test(model_path, test_dir, class_dict=None, dim=224):
    if class_dict is None:
        class_dict = {"class0": 0, "class1": 1, "class2": 2, "class3": 3, "class4": 4, }
    print(test_dir)

    model = load_model(model_path)
    test_datagen = ImageDataGenerator(preprocessing_function=pre_process)
    test_generator = test_datagen.flow_from_directory(
        test_dir,
        target_size=(dim, dim),
        shuffle=False,
        class_mode='categorical',
        batch_size=1)
    filenames = test_generator.filenames
    nb_samples = len(filenames)
    pred = model.predict_generator(test_generator, steps=nb_samples)
    print(pred)
    df = pd.DataFrame()
    df['filename'] = filenames
    df['actual_class'] = df['filename'].apply(lambda x: x[:6])
    df['actual_class_index'] = df['actual_class'].apply(lambda x: int(class_dict[x]))
    df['pred_class_index'] = np.argmax(pred, axis=1)
    k = list(class_dict.keys())
    v = list(class_dict.values())
    inv_class_dict = {}
    for k_, v_ in zip(k, v):
        inv_class_dict[v_] = k_
    df['pred_class'] = df['pred_class_index'].apply(lambda x: (inv_class_dict[x]))
    return df

def main():
    start_time = time.time()
    test_results_path = r'E:\learning_AI\Intelligent_projects_using_python\resutl_test\test_results.csv'
    model_path = r"E:\learning_AI\Intelligent_projects_using_python\output_transger_learning\keras_transfer_learning-run.check"
    test_dir = r'E:\Data\resized test 15'
    test_results_df = prediction_test(model_path, test_dir)
    test_results_df.to_csv(test_results_path, index=False)
    print(f'Validation results saved at : {test_results_path}')
    pred_class_index = np.array(test_results_df['pred_class_index'].values)
    actual_class_index = np.array(test_results_df['actual_class_index'].values)
    print(pred_class_index)
    print(actual_class_index)
    accuracy = np.mean(actual_class_index == pred_class_index)
    kappa = cohen_kappa_score(pred_class_index, actual_class_index, weights='quadratic')
    print("-----------------------------------------------------")
    print(f'Validation Accuracy: {accuracy}')
    print(f'Validation Quadratic Kappa Score: {kappa}')
    print("-----------------------------------------------------")
    print("Processing Time", time.time() - start_time, ' secs')

if __name__ == "__main__":
    main()
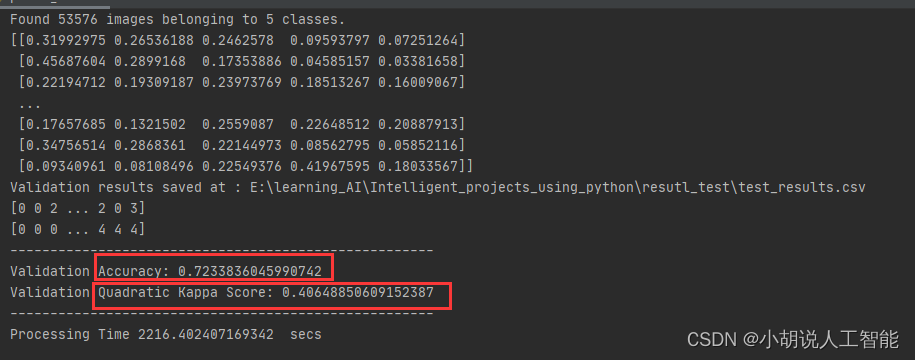
从上面日志可以看到,InceptionV3模型训练后的模型再53576张测试图片集中也取得接近72%的验证准确度和0.406的二次Kappa得分。当然读者也可以尝试使用其它的模型和训练超参,最后获得更高的测试准确度。
11、全部代码
#!/usr/bin/env python3.8

# -*- coding: utf-8 -*-
# @Time : 2023/3/24 9:03
# @Author : Steven Hu
# @FileName: TransferLearning_ffd.py
# @Software: PyCharm

import numpy as np

np.random.seed(1000)

import os
import pandas as pd
import time
import warnings

warnings.filterwarnings("ignore")
import tensorflow as tf
from sklearn.metrics import cohen_kappa_score
from tensorflow.keras.models import Sequential, Model
from tensorflow.keras.layers import Dense, Dropout, Flatten
from tensorflow.keras.layers import GlobalMaxPooling2D, GlobalAveragePooling2D
from tensorflow.keras.models import load_model

from tensorflow.keras.applications.inception_v3 import InceptionV3
from tensorflow.keras.applications import ResNet50
from tensorflow.keras.applications.vgg16 import VGG16
from tensorflow.keras import optimizers
from tensorflow.keras.callbacks import EarlyStopping, ModelCheckpoint, CSVLogger
from tensorflow.keras.preprocessing.image import ImageDataGenerator
from tensorflow.keras.callbacks import ReduceLROnPlateau
import joblib
import json
from pathlib import Path
import glob
import cv2


def pre_process(img):
    resized_img = cv2.resize(img, (224, 224), cv2.INTER_LINEAR)
    resized_img[:, :, 0] = resized_img[:, :, 0] - 103.939
    resized_img[:, :, 1] = resized_img[:, :, 0] - 116.779
    resized_img[:, :, 2] = resized_img[:, :, 0] - 123.68
    return resized_img


class TransferLearning:
    def __init__(self):
        self.path = r"E:\Data\train_validation"
        self.train_dir = r"E:\Data\train_validation\train"
        self.val_dir = r"E:\Data\train_validation\validation"
        self.class_folders = json.loads('["class0","class1","class2","class3","class4"]')
        self.dim = 224
        self.lr = float(1e-4)
        self.batch_size = 128
        self.epochs = 1
        self.initial_layers_to_freeze = 10
        self.model = "InceptionV3"
        self.folds = 5
        self.outdir = "E:\learning_AI\Intelligent_projects_using_python\output_transger_learning"

    def inception_pseudo(self, dim=224, freeze_layers=30, full_freeze='N'):
        # model = InceptionV3(weights='imagenet', include_top=False) # 如果下载不了,则直接使用权重地址赋值到weights参数上
        model = InceptionV3(weights=r"E:\learning_AI\Intelligent_projects_using_python\weights\inception_v3_weights_tf_dim_ordering_tf_kernels_notop.h5",
            include_top=False)
        x = model.output # 从预训练的网络中提取最后一个最大池化层的输出
        x = GlobalAveragePooling2D()(x)  #确保池输出是一维数组格式,而不是二维点阵格式
        x = Dense(dim, activation='relu')(x) # 连接一个全连接层,这个dim可以自定义成其它值,比如512
        x = Dropout(0.5)(x) # 防止过拟合
        x = Dense(dim, activation='relu')(x) # 再连接一个全连接层,这个dim可以自定义成其它值,比如512
        x = Dropout(0.5)(x) # 防止过拟合
        out = Dense(5, activation='softmax')(x) # 这里输出必须是分类数量的单元数
        model_final = Model(input=model.input, outputs=out)
        if full_freeze != 'N':
            for layer in model.layers[0:freeze_layers]:
                layer.trainable = False
        return model_final

    # ResNet50 Model for transfer Learning
    def resnet_pseudo(self, dim=224, freeze_layers=10, full_freeze='N'):
        # model = ResNet50(weights='imagenet', include_top=False) # 如果下载不了,则直接使用权重地址赋值到weights参数上
        model = ResNet50(weights=r"E:\learning_AI\Intelligent_projects_using_python\weights\resnet50_weights_tf_dim_ordering_tf_kernels_notop.h5",
            include_top=False)
        x = model.output # 从预训练的网络中提取最后一个最大池化层的输出
        x = GlobalAveragePooling2D()(x)  #确保池输出是一维数组格式,而不是二维点阵格式
        x = Dense(dim, activation='relu')(x) # 连接一个全连接层,这个dim可以自定义成其它值,比如512
        x = Dropout(0.5)(x) # 防止过拟合
        x = Dense(dim, activation='relu')(x) # 再连接一个全连接层,这个dim可以自定义成其它值,比如512
        x = Dropout(0.5)(x) # 防止过拟合
        out = Dense(5, activation='softmax')(x) # 这里输出必须是分类数量的单元数
        model_final = Model(input=model.input, outputs=out)
        if full_freeze != 'N':
            for layer in model.layers[0:freeze_layers]:
                layer.trainable = False
        return model_final

    # VGG16 Model for transfer Learning

    def VGG16_pseudo(self, dim=224, freeze_layers=10, full_freeze='N'):
        model = VGG16(weights='imagenet', include_top=False)
        # model = VGG16(weights=r'E:\learning_AI\Intelligent_projects_using_python\weights\vgg16_weights_tf_dim_ordering_tf_kernels_notop.h5', include_top=False) # 如果上面运行出现网络下载错误,建议先下载权重后,使用权重地址
        x = model.output # 从预训练的网络中提取最后一个最大池化层的输出
        x = GlobalAveragePooling2D()(x)  #确保池输出是一维数组格式,而不是二维点阵格式
        x = Dense(dim, activation='relu')(x) # 连接一个全连接层,这个dim可以自定义成其它值,比如512
        x = Dropout(0.5)(x) # 防止过拟合
        x = Dense(dim, activation='relu')(x) # 再连接一个全连接层,这个dim可以自定义成其它值,比如512
        x = Dropout(0.5)(x) # 防止过拟合
        out = Dense(5, activation='softmax')(x) # 这里输出必须是分类数量的单元数
        model_final = Model(input=model.input, outputs=out)
        if full_freeze != 'N':
            for layer in model.layers[0:freeze_layers]:
                layer.trainable = False
        return model_final

    def train_model(self, train_dir, val_dir, batch_size=16, epochs=40, dim=224, lr=1e-5, model='ResNet50'):
        model_final = self.inception_pseudo(dim=dim, freeze_layers=30, full_freeze='N')  # 默认选择为'InceptionV3'
        if model == 'Resnet50':
            model_final = self.resnet_pseudo(dim=dim, freeze_layers=10, full_freeze='N')
        if model == 'VGG16':
            model_final = self.VGG16_pseudo(dim=dim, freeze_layers=10, full_freeze='N')

        train_file_names = glob.glob(f'{train_dir}/*/*')
        val_file_names = glob.glob(f'{val_dir}/*/*')
        train_steps_per_epoch = len(train_file_names) / float(batch_size)
        val_steps_per_epoch = len(val_file_names) / float(batch_size)
        train_datagen = ImageDataGenerator(horizontal_flip=True, vertical_flip=True, width_shift_range=0.1,
                                           height_shift_range=0.1,
                                           channel_shift_range=0, zoom_range=0.2, rotation_range=20,
                                           preprocessing_function=pre_process)
        val_datagen = ImageDataGenerator(preprocessing_function=pre_process)
        train_generator = train_datagen.flow_from_directory(train_dir,
                                                            target_size=(dim, dim),
                                                            batch_size=batch_size,
                                                            class_mode='categorical')
        val_generator = val_datagen.flow_from_directory(val_dir,
                                                        target_size=(dim, dim),
                                                        batch_size=batch_size,
                                                        class_mode='categorical')
        print(train_generator.class_indices)
        # 如果有GPU则直接用GPU
        physical_devices = tf.config.experimental.list_physical_devices('GPU')
        if physical_devices:
            tf.config.experimental.set_memory_growth(physical_devices[0], True)

        joblib.dump(train_generator.class_indices, f'{self.outdir}\class_indices.pkl')
        adam = optimizers.Adam(lr=lr, beta_1=0.9, beta_2=0.999, epsilon=1e-08, decay=0.0)
        model_final.compile(optimizer=adam, loss=["categorical_crossentropy"], metrics=['accuracy'])
        reduce_lr = ReduceLROnPlateau(monitor='val_loss', factor=0.50, patience=3, min_lr=0.000001)
        early = EarlyStopping(monitor='val_loss', patience=10, mode='min', verbose=1)
        logger_path = self.outdir + os.sep + 'keras-epochs_ib.log'
        logger = CSVLogger(logger_path, separator=',', append=False)
        model_name = self.outdir + os.sep + 'keras_transfer_learning-run.check'
        checkpoint = ModelCheckpoint(
            model_name,
            monitor='val_loss', mode='min',
            save_best_only=True,
            verbose=1)
        callbacks = [reduce_lr, early, checkpoint, logger]
        model_final.fit_generator(train_generator, steps_per_epoch=train_steps_per_epoch, epochs=epochs, verbose=1,
                                  validation_data=(val_generator), validation_steps=val_steps_per_epoch,
                                  callbacks=callbacks,
                                  class_weight={0: 0.012, 1: 0.12, 2: 0.058, 3: 0.36, 4: 0.43})
        model_to_store_path = self.outdir + os.sep + model
        model_final.save(model_to_store_path)
        return model_to_store_path, train_generator.class_indices

    def inference(self, model_path, test_dir, class_dict, dim=224):
        print(test_dir)

        model = load_model(model_path)
        test_datagen = ImageDataGenerator(preprocessing_function=pre_process)
        test_generator = test_datagen.flow_from_directory(
            test_dir,
            target_size=(dim, dim),
            shuffle=False,
            class_mode='categorical',
            batch_size=1)
        filenames = test_generator.filenames
        nb_samples = len(filenames)
        pred = model.predict_generator(test_generator, steps=nb_samples)
        print(pred)
        df = pd.DataFrame()
        df['filename'] = filenames
        df['actual_class'] = df['filename'].apply(lambda x: x[:6])
        df['actual_class_index'] = df['actual_class'].apply(lambda x: int(class_dict[x]))
        df['pred_class_index'] = np.argmax(pred, axis=1)
        k = list(class_dict.keys())
        v = list(class_dict.values())
        inv_class_dict = {}
        for k_, v_ in zip(k, v):
            inv_class_dict[v_] = k_
        df['pred_class'] = df['pred_class_index'].apply(lambda x: (inv_class_dict[x]))
        return df

    def main(self):
        start_time = time.time()
        print('Data Processing..')
        self.num_class = len(self.class_folders)
        model_to_store_path, class_dict = self.train_model(self.train_dir, self.val_dir,
                                                           batch_size=self.batch_size,
                                                           epochs=self.epochs, dim=self.dim, lr=self.lr,
                                                           model=self.model)
        print("Model saved to dest:", model_to_store_path)

        # Validatione evaluate results

        folder_path = Path(f'{self.val_dir}')
        val_results_df = self.inference(model_to_store_path, folder_path, class_dict, self.dim)
        val_results_path = f'{self.outdir}/val_results.csv'
        val_results_df.to_csv(val_results_path, index=False)
        print(f'Validation results saved at : {val_results_path}')
        pred_class_index = np.array(val_results_df['pred_class_index'].values)
        actual_class_index = np.array(val_results_df['actual_class_index'].values)
        print(pred_class_index)
        print(actual_class_index)
        accuracy = np.mean(actual_class_index == pred_class_index)
        kappa = cohen_kappa_score(pred_class_index, actual_class_index, weights='quadratic')
        print("-----------------------------------------------------")
        print(f'Validation Accuracy: {accuracy}')
        print(f'Validation Quadratic Kappa Score: {kappa}')
        print("-----------------------------------------------------")
        print("Processing Time", time.time() - start_time, ' secs')


if __name__ == "__main__":
    obj = TransferLearning()
    obj.main()
其它资料下载
如果大家想继续了解人工智能相关学习路线和知识体系,欢迎大家翻阅我的另外一篇博客《重磅 | 完备的人工智能AI 学习——基础知识学习路线,所有资料免关注免套路直接网盘下载》
这篇博客参考了Github知名开源平台,AI技术平台以及相关领域专家:Datawhale,ApacheCN,AI有道和黄海广博士等约有近100G相关资料,希望能帮助到所有小伙伴们。