什么是puppet
puppet是一个IT基础设施自动化管理工具,它能够帮助系统管理员管理基础设施的整个生命周期: 供应(provisioning)、配置(configuration)、联动(orchestration)及报告(reporting)。
基于puppet ,可实现自动化重复任务、快速部署关键性应用以及在本地或云端完成主动管理变更和快速扩展架构规模等。
遵循GPL 协议(2.7.0-), 基于ruby语言开发。2.7.0 以后使用(Apache 2.0 license)
对于系统管理员是抽象的,只依赖于ruby与facter。
能管理多达40 多种资源,例如:file、user、group、host、package、service、cron、exec、yum repo等。
puppet的工作机制
1)工作模型
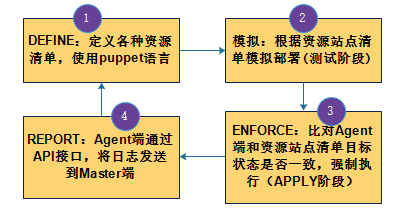
puppet 通过声明性、基于模型的方法进行IT自动化管理。
定义:通过puppet 的声明性配置语言定义基础设置配置的目标状态;
模拟:强制应用改变的配置之前先进行模拟性应用;
强制:自动、强制部署达成目标状态,纠正任何偏离的配置;
报告:报告当下状态及目标状态的不同,以及达成目标状态所进行的任何强制性改变;

puppet三层模型
puppet三层模型如下:

2)工作流程
- 客户端puppetd调用facter,facter探测出主机的一些变量,例如主机名,内存大小,ip地址等。pupppetd 把这些信息通过ssl连接发送到服务器端;
- 服务器端的puppetmaster 检测客户端的主机名,然后找到manifest里面对应的node配置,并对该部分内容进行解析,让对应的客户端执行。
- 客户端接收到catalog日志,并且执行,客户端把执行结果发送给服务器;
- 服务器端把客户端的执行结果写入日志
3)使用模型
puppet的使用模型分为单机使用模型和master/agent模型,下面我们来看看这两个模型的原理图。
单机使用模型
实现定义多个manifests --> complier --> catalog --> apply

puppet架构
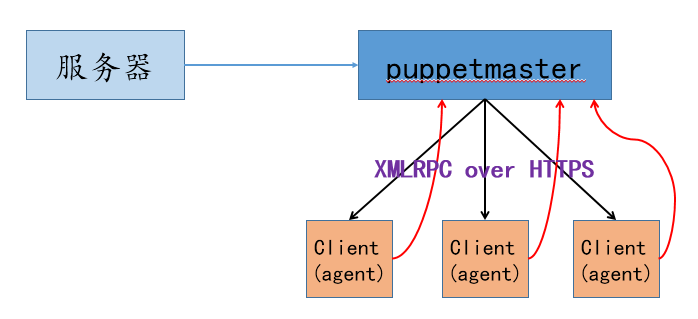
master/agent模型
master/agent模型实现的是集中式管理,即 agent 端周期性向 master 端发起请求,请求自己需要的数据。然后在自己的机器上运行,并将结果返回给 master 端。
架构和工作原理如下:
架构
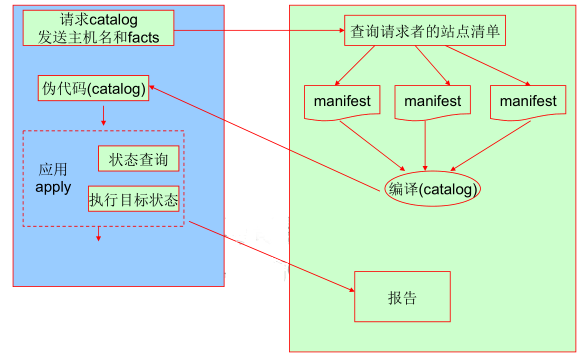
工作原理

- 客户端Puppetd向Master发起认证请求,或使用带签名的证书。
- Master告诉Client你是合法的。
- 客户端Puppetd调用Facter,Facter探测出主机的一些变量,例如主机名、内存大小、IP地址等。Puppetd将这些信息通过SSL连接发送到服务器端。
- 服务器端的Puppet Master检测客户端的主机名,然后找到manifest对应的node配置,并对该部分内容进行解析。Facter送过来的信息可以作为变量处 理,node牵涉到的代码才解析,其他没牵涉的代码不解析。解析分为几个阶段,首先是语法检查,如果语法错误就报错;如果语法没错,就继续解析,解析的结 果生成一个中间的“伪代码”(catalog),然后把伪代码发给客户端。
- 客户端接收到“伪代码”,并且执行。
- 客户端在执行时判断有没有File文件,如果有,则向fileserver发起请求。
- 客户端判断有没有配置Report,如果已配置,则把执行结果发送给服务器。
- 服务器端把客户端的执行结果写入日志,并发送给报告系统。
puppet资源解析
Ansible靠模块实现,而puppet靠的是资源实现;puppet的模块类似于Ansible的角色roles;定义的模块是为了复用,不是为了管控;定义模块的文件叫资源清单(manifest);为每个站点主机定义具体使用哪个模块的叫站点清单(sitemanifest);
- 资源:是puppet的核心,通过资源申报,定义在资源清单中。相当于
ansible中的模块,只是抽象的更加彻底。
- 类:一组资源清单。
- 模块:包含多个类。相当于
ansible中的角色。
- 站点清单:以主机为核心,应用哪些模块。
puppet基本语法格式:puppet <subcommand> [options] <action> [options]
subcommand:
help Display Puppet help.
apply Apply Puppet manifests locally
describe Display help about resource types
agent The puppet agent daemon
master The puppet master daemon
module Creates, installs and searches formodules on the Puppet Forge
puppet安装
我们可以通过单机模式进行具体介绍puppet各组件的作用
puppet下载地址
1.配置/etc/hosts文件(以server端为例)
[root@server ~]# vim /etc/hosts
127.0.0.1   localhost localhost.localdomain localhost4 localhost4.localdomain4
::1         localhost localhost.localdomain localhost6 localhost6.localdomain6
192.168.2.10 server
192.168.2.11 client
[root@server ~]# scp /etc/hosts root@client:/etc/hosts

2.安装软件包

server端:
[root@server ~]# rpm -ivh http://yum.puppetlabs.com/el/7/products/x86_64/puppetlabs-release-7-12.noarch.rpm
[root@server ~]# yum install openssl openssl-devel  ruby -y
[root@server ~]# rpm -ql puppet | less       # 可以通过rpm命令查看puppet是否安装成功,并且同时查看到包内的文件
其中主配置文件为/etc/puppet/puppet.conf,使用的主程序为/usr/bin/puppet。
[root@server ~]# ls /etc/puppet/
auth.conf  fileserver.conf  manifests  modules  puppet.conf

client端:
[root@client ~]# rpm -ivh http://yum.puppetlabs.com/el/7/products/x86_64/puppetlabs-release-7-12.noarch.rpm
[root@client ~]# yum install puppet -y
[root@client ~]# ls /etc/puppet/
auth.conf  modules  puppet.conf
------------------------------------------------------------------------------------------------------------
# auth.conf --> client访问puppet server的ACL配置文件
# fileserver.conf --> puppet server 作为文件服务器的ACL配置文件
# puppet.conf --> Puppet服务器配置文件
# manifests --> Puppet脚本主文件目录,至少需要包含site.pp文件。site.pppuppet主文件(入口文件)。所有要在服务器上执行的操作都写在这种.pp结尾的文件中。
------------------------------------------------------------------------------------------------------------

3.起服务
[root@server ~]# systemctl start puppetmaster.service
[root@server ~]# netstat -nutlp |  grep 8140
tcp        0      0 0.0.0.0:8140            0.0.0.0:*               LISTEN      17951/ruby
[root@server ~]# lsof -i:8140          # 查看8140端口被哪个进程所占用
COMMAND   PID   USER   FD   TYPE DEVICE SIZE/OFF NODE NAME
puppet  17951 puppet    9u  IPv4 635991      0t0  TCP *:8140 (LISTEN)

4.client端修改配置文件
[root@client ~]# vim /etc/puppet/puppet.conf
[agent]
    server=server        # 指定puppetmaster主机名
[root@client ~]# systemctl start puppet


4.配置ssl证书
[root@server ~]# puppet cert list --all       # 查看证书,查看所有的曾经过来请求了证书的,包含已经分配了证书的,“+”表示该证书已经分配给了客户端了。该客户端已经可以直接使用的
  "client" (SHA256) 7D:27:3E:2E:66:A6:ED:BD:72:AB:D0:81:87:D0:08:35:F5:2B:E7:F4:BA:1D:89:D5:0F:F8:AD:11:A6:35:70:6F
+ "server" (SHA256) 38:EC:31:51:4B:AA:93:78:F8:1F:E3:F4:94:D3:98:35:B2:B3:75:A6:B3:86:4D:A5:9C:F5:FE:CD:11:CD:75:5D
[root@server ~]# puppet cert list             # 查看有哪些客户端过来请求了证书而没有分配的客户端,表示当前客户端已经进行了请求但是服务端还没有给分配证书
  "client" (SHA256) 7D:27:3E:2E:66:A6:ED:BD:72:AB:D0:81:87:D0:08:35:F5:2B:E7:F4:BA:1D:89:D5:0F:F8:AD:11:A6:35:70:6F

[root@server ~]# puppet cert --sign  client       # 给指定的客户端进行证书分配
Notice: Signed certificate request for client
Notice: Removing file Puppet::SSL::CertificateRequest client at '/var/lib/puppet/ssl/ca/requests/client.pem'
[root@server ~]# puppet cert --sign  --all       # 如果有多个客户端可以使用--all选项,当前只有一个客户端
Error: No waiting certificate requests to sign

------------------------------------------------------------------------------------------------------------
以上所有的过程:客户端过来请求证书,服务端未分配(puppet cert list 查看),服务端手工分配证书(puppet  cert --sign  xxx.client.com)(puppet  cert  list)(puppet cert list --all再次查看), 客户端过来拿证书(puppet  agent --test   --server  xxx.server.com)
------------------------------------------------------------------------------------------------------------

[root@server ~]# puppet cert list --all        # 当前所有的客户端都已经分配了证书
+ "client" (SHA256) 41:C3:64:F6:8F:BE:FA:45:AF:E0:8F:8D:0C:E0:20:09:8E:39:E9:31:43:06:F8:EC:3B:71:69:07:C8:51:25:42
+ "server" (SHA256) 38:EC:31:51:4B:AA:93:78:F8:1F:E3:F4:94:D3:98:35:B2:B3:75:A6:B3:86:4D:A5:9C:F5:FE:CD:11:CD:75:5D
[root@server ~]# ls /var/lib/puppet/ssl/ca/signed/
client.pem  server.pem


[root@client ~]# puppet agent -t               # 客户端发送连接认证,出现以下内容即代表认证成功
Notice: Ignoring --listen on onetime run
Info: Retrieving pluginfacts
Info: Retrieving plugin
Info: Caching catalog for client
Info: Applying configuration version '1605231854'
Notice: Finished catalog run in 0.01 seconds
测试
file资源,文件测试
属性:
path:文件路径;(相当于name)
content:定义文件内容(只是少量信息);
source:复制目标文件到path;
recurse:递归复制文件到path;(true/false)
ensure:present、file、directory、link、absent;
file:类型为普通文件,其内容由content属性生成或复制由source属性指向的文件路径来创建;
link:类型为符号链接文件,必须由target属性指明其链接的目标文件;
directory:类型为目录,可通过source指向的路径复制生成,recurse属性指明是否递归复制;
target:链接文件link路径;
owner:属主
group:属组
mode:权限;
# server端编写测试
建立pp文件测试
puppet的第一个执行的代码是在/etc/puppet/manifest/site.pp
因此这个文件必须存在,而且其他的代码也要通过代码来调用.
[root@server ~]# vim /etc/puppet/manifests/site.pp
node default {
file {
   "/tmp/test.txt":
   content => "this is a text file";
}
}
此时,因为第一次配置认证后已经重启了puppetmaster ,以后配置资源就不用重启服务了。客户端直接拉取就行了

# 客户端拉取
[root@client ~]# puppet  agent --server server --test       # 不运行这个命令也可以,默认是30分钟去服务端去拉取一次,这里就采取手动拉取,立即更新资源到本地
Notice: Ignoring --listen on onetime run
Info: Retrieving pluginfacts
Info: Retrieving plugin
Info: Caching catalog for client
Info: Applying configuration version '1605234695'
Notice: Finished catalog run in 0.01 seconds

[root@client ~]# cat /tmp/test.txt                         # 查看文件
this is a text file
package资源,包的测试
属性:
ensure: installed, present, latest, absent, any version string (implies present)
name: 包名;
source: 程序包来源,仅对不会自动下载相关程序包的provider有用,例如rpm或dpkg;
provider: 指明安装方式;
platform: 平台(X86_64……)
# server端编写
[root@server ~]# vim /etc/puppet/manifests/site.pp
node default {
package {
   ["ntp","vsftpd"]:                         # 软件包的名,可以为多个
   allow_virtual => false,                   # 虚拟包名
   ensure => "installed";                    # 下载安装,ensure :软件包的状态,installed或present表示安装,absent表示卸载;pureged表示一处软件包;latest表示安装最新的。

   "lrzsz":                                  # 软件包名
   allow_virtual => false,                   # 虚拟包名
   ensure => "absent";                       # 卸载软件
}
}
# client端查看结果
[root@client ~]# rpm -q  vsftpd
vsftpd-3.0.2-27.el7.x86_64
[root@client ~]# rpm -q  ntp
ntp-4.2.6p5-29.el7.centos.2.x86_64
[root@client ~]# rpm -q  lrzsz
未安装软件包 lrzsz


# 同时,puppet也可以通过source源指定软件包,通过rpm方式安装.
# server端编写
[root@server ~]# vim /etc/puppet/manifests/site.pp
node default {
package { "lrzsz":
      ensure => present,
      source => "/mnt/gz/Packages/lrzsz-0.12.20-36.el7.x86_64.rpm",
      provider => "rpm";
}
}

# client端查看
[root@client ~]# puppet  agent --server server --test
Notice: Ignoring --listen on onetime run
Info: Retrieving pluginfacts
Info: Retrieving plugin
Info: Caching catalog for client
Info: Applying configuration version '1605238159'
Notice: Finished catalog run in 0.11 seconds

[root@client ~]# rpm -q lrzsz           # 查看该包已经安装成功
lrzsz-0.12.20-36.el7.x86_64
service资源,系统服务的管理
属性:
enable: 是否开机自起(true/false);
binary: 启动程序的二进制路径
hasrestart: 是否支持传参数重起(true:直接restart;false:先stop再start);
restart: 定义重启命令,通常用于定义reload操作;
stop:
start: 手动定义启动命令;
status:
path: 脚本的搜索路径,默认为/etc/init.d/;
ensure: stopped/false;running/true;
# server端编写
[root@server ~]# vim /etc/puppet/manifests/site.pp
node default {
service {
    "httpd":
     ensure => "running";

    "nfs":
    ensure => "stopped";
}
}

# client端查看
[root@client ~]# puppet  agent --server server --test
Notice: Ignoring --listen on onetime run
Info: Retrieving pluginfacts
Info: Retrieving plugin
Info: Caching catalog for client
Info: Applying configuration version '1605238673'
Notice: /Stage[main]/Main/Node[default]/Service[httpd]/ensure: ensure changed 'stopped' to 'running'
Info: /Stage[main]/Main/Node[default]/Service[httpd]: Unscheduling refresh on Service[httpd]
Notice: Finished catalog run in 0.07 seconds

[root@client ~]# ss -nutlp |  grep 80
tcp    LISTEN     0      128    [::]:80                 [::]:*                   users:(("httpd",pid=101418,fd=4),("httpd",pid=101417,fd=4),("httpd",pid=101416,fd=4),("httpd",pid=101415,fd=4),("httpd",pid=101414,fd=4),("httpd",pid=101413,fd=4))
cron资源,计划任务的管理
属性:
command: 要执行的任务;
ensure: present/absent;
minute: 分
hour: 时
monthday: 日
month: 月
weekday: 周
user: 以哪个用户的身份运行命令
target: 添加为哪个用户的任务
name: cron job的名称;
# server端编写
[root@server ~]# vim /etc/puppet/manifests/site.pp
node default {
cron {
    "echo":
    command => "/usr/bin/echo  heihei >> a.txt",
    user => "root",
    hour => "14",
    minute => "*";
}
}

# client端测试
[root@client ~]# puppet  agent --server server --test
Notice: Ignoring --listen on onetime run
Info: Retrieving pluginfacts
Info: Retrieving plugin
Info: Caching catalog for client
Info: Applying configuration version '1605247781'
Notice: /Stage[main]/Main/Node[default]/Cron[echo]/command: command changed '/usr/sbin/echo  heihei >> a.txt' to '/usr/bin/echo  heihei >> a.txt'
[root@client ~]# cat a.txt
heihei
heihei
文件推送
将本地的文件推送到服务器的文件夹中,client端进行同步,相当于ftp的共享目录
[root@server ~]# vim /etc/puppet/fileserver.conf
在文件的末尾添加:
[files]
        path /etc/puppet/files                        # 推送目录,要先存在此目录
        allow *

# server端写一个简单的脚本
[root@server ~]# vim /data/sh/auto_ssh.sh
#!/bin/bash
# yum -y install expect
passwd='1'
/usr/bin/expect  2>&1 << EOF
set time 30
spawn ssh tian@client
expect {
"*yes/no" {send "yes\n";exp_continue }
"*password:" { send "$passwd\r"}
}
expect eof
EOF

# server端编写site.pp
[root@server ~]# vim /etc/puppet/manifests/site.pp
node default {
file {
      "/mnt/auto_ssh.sh":
      source => "puppet://server/files/auto_ssh.sh",               # 源地址,书写格式为puppet://服务端主机名/files
      group => "root",
      owner => "root",
      mode => "755";
}
}

# client端连接测试
[root@client ~]# puppet  agent --server server --test
Notice: Ignoring --listen on onetime run
Info: Retrieving pluginfacts
Info: Retrieving plugin
Info: Caching catalog for client
Info: Applying configuration version '1605516748'
Notice: /Stage[main]/Main/Node[default]/File[/mnt/auto_ssh.sh]/ensure: defined content as '{md5}05d1d648dd8148f7e8f879cca128e8eb'
Notice: Finished catalog run in 0.10 seconds

[root@client ~]# ll /mnt/auto_ssh.sh
-rwxr-xr-x 1 root root 209 11月 16 16:52 /mnt/auto_ssh.sh
exec远程执行命令,(类似于command)
属性:
command (namevar): 要运行的命令(命令具有幂等性);
cwd: The directory from which to run the command.
creates: 文件路径,仅此路径表示的文件不存在时,command方才执行;
user/group: 运行命令的用户身份;
path: 指明搜索路径;
onlyif: 此属性指定一个命令,此命令正常(退出码为0)运行时,当前command才会运行;
unless: 此属性指定一个命令,此命令非正常(退出码为非0)运行时,当前command才会运行;
refresh: 重新执行当前command的替代命令;
refreshonly: 仅接收到订阅的资源的通知时方才运行;
# server端编写
[root@server ~]# vim /etc/puppet/manifests/site.pp
node default {
exec {
       "bash /tmp/auto_ssh.sh":
       cwd => "/tmp",
       user => "root",
       path => [ "/bin/bash","/usr/bin","/usr/sbin","/bin" ];
}
}

# client端同步
[root@client ~]# puppet  agent --server server --test
Notice: Ignoring --listen on onetime run
Info: Retrieving pluginfacts
Info: Retrieving plugin
Info: Caching catalog for client
Info: Applying configuration version '1605511620'
Notice: /Stage[main]/Main/Node[default]/Exec[bash /tmp/auto_ssh.sh]/returns: executed successfully
Notice: Finished catalog run in 10.20 second

参考文档:https://www.cnblogs.com/feihongwuhen/archive/2012/08/17/7169802.html