前言
這篇要來研究下每次寫 react 都在使用的 Hooks。說到 hooks,大家一定都用過,我自己也常用,但是一直都不知道 hook 背後到底是怎麼運作的,出現 bug 時就是百度解決辦法,半猜半試解決,其實都有點不明所以。所以,今天就要來把 react hooks 慢慢深入解析一下。
正文
調用 React Hook 到底背後發生了什麼?
前情提要下,這篇分析 hooks 所用的 React 源碼是 v16.13.1 的,因為最新版本的源碼關於 hooks 這塊個人能力不夠,不是看的很清楚,所以還是先以穩定版本來看,不過具體實現也都沒有大問題的。
初探 Hooks 源碼
當我們在調用 useXXX() 時到底背後發生了什麼?雖然看源碼真的有點累、挺難頂的,但是要想真正理解原理,還是看源碼最實在。
平時我們在項目中引入 hooks 時一般都是這樣寫的:
import React, { useState } from 'react';
後面的 from 'react' 其實就提示了我們 useState 這個 hook 源碼藏在 /react 這個目錄下,所以順藤摸瓜,最後就找到了導出所有 hooks 的地方:react/packages/react/src/React.js,跟 hooks 相關的源碼如下:
...

import {
  useCallback,
  useContext,
  useEffect,
  useImperativeHandle,
  useDebugValue,
  useLayoutEffect,
  useMemo,
  useReducer,
  useRef,
  useState,
  useResponder,
  useTransition,
  useDeferredValue,
} from './ReactHooks';

...
...

export {
  Children,
  createRef,
  Component,
  PureComponent,
  ...
  useCallback,
  useContext,
  useEffect,
  useImperativeHandle,
  useDebugValue,
  useLayoutEffect,
  useMemo,
  useReducer,
  useRef,
  useState,
  ...
};
這個文件中,我們看到其實所有 hooks 都來自 /ReactHooks.js,所以當然就再去看看啦~
Dispatcher
/**
 * Copyright (c) Facebook, Inc. and its affiliates.
 *
 * This source code is licensed under the MIT license found in the
 * LICENSE file in the root directory of this source tree.
 *
 * @flow
 */

import type {Dispatcher} from 'react-reconciler/src/ReactInternalTypes';
import type {
  MutableSource,
  MutableSourceGetSnapshotFn,
  MutableSourceSubscribeFn,
  ReactContext,
} from 'shared/ReactTypes';
import type {OpaqueIDType} from 'react-reconciler/src/ReactFiberHostConfig';

import ReactCurrentDispatcher from './ReactCurrentDispatcher';

type BasicStateAction<S> = (S => S) | S;
type Dispatch<A> = A => void;

function resolveDispatcher() {
  const dispatcher = ReactCurrentDispatcher.current;
  if (__DEV__) {
    if (dispatcher === null) {
      console.error(
        'Invalid hook call. Hooks can only be called inside of the body of a function component. This could happen for' +
          ' one of the following reasons:\n' +
          '1. You might have mismatching versions of React and the renderer (such as React DOM)\n' +
          '2. You might be breaking the Rules of Hooks\n' +
          '3. You might have more than one copy of React in the same app\n' +
          'See https://reactjs.org/link/invalid-hook-call for tips about how to debug and fix this problem.',
      );
    }
  }
  // Will result in a null access error if accessed outside render phase. We
  // intentionally don't throw our own error because this is in a hot path.
  // Also helps ensure this is inlined.
  return ((dispatcher: any): Dispatcher);
}

export function getCacheForType<T>(resourceType: () => T): T {
  const dispatcher = resolveDispatcher();
  // $FlowFixMe This is unstable, thus optional
  return dispatcher.getCacheForType(resourceType);
}

export function useContext<T>(Context: ReactContext<T>): T {
  const dispatcher = resolveDispatcher();
  if (__DEV__) {
    // TODO: add a more generic warning for invalid values.
    if ((Context: any)._context !== undefined) {
      const realContext = (Context: any)._context;
      // Don't deduplicate because this legitimately causes bugs
      // and nobody should be using this in existing code.
      if (realContext.Consumer === Context) {
        console.error(
          'Calling useContext(Context.Consumer) is not supported, may cause bugs, and will be ' +
            'removed in a future major release. Did you mean to call useContext(Context) instead?',
        );
      } else if (realContext.Provider === Context) {
        console.error(
          'Calling useContext(Context.Provider) is not supported. ' +
            'Did you mean to call useContext(Context) instead?',
        );
      }
    }
  }
  return dispatcher.useContext(Context);
}

export function useState<S>(
  initialState: (() => S) | S,
): [S, Dispatch<BasicStateAction<S>>] {
  const dispatcher = resolveDispatcher();
  return dispatcher.useState(initialState);
}

export function useReducer<S, I, A>(
  reducer: (S, A) => S,
  initialArg: I,
  init?: I => S,
): [S, Dispatch<A>] {
  const dispatcher = resolveDispatcher();
  return dispatcher.useReducer(reducer, initialArg, init);
}

export function useRef<T>(initialValue: T): {|current: T|} {
  const dispatcher = resolveDispatcher();
  return dispatcher.useRef(initialValue);
}

export function useEffect(
  create: () => (() => void) | void,
  deps: Array<mixed> | void | null,
): void {
  const dispatcher = resolveDispatcher();
  return dispatcher.useEffect(create, deps);
}

export function useLayoutEffect(
  create: () => (() => void) | void,
  deps: Array<mixed> | void | null,
): void {
  const dispatcher = resolveDispatcher();
  return dispatcher.useLayoutEffect(create, deps);
}

export function useCallback<T>(
  callback: T,
  deps: Array<mixed> | void | null,
): T {
  const dispatcher = resolveDispatcher();
  return dispatcher.useCallback(callback, deps);
}

export function useMemo<T>(
  create: () => T,
  deps: Array<mixed> | void | null,
): T {
  const dispatcher = resolveDispatcher();
  return dispatcher.useMemo(create, deps);
}

export function useImperativeHandle<T>(
  ref: {|current: T | null|} | ((inst: T | null) => mixed) | null | void,
  create: () => T,
  deps: Array<mixed> | void | null,
): void {
  const dispatcher = resolveDispatcher();
  return dispatcher.useImperativeHandle(ref, create, deps);
}

export function useDebugValue<T>(
  value: T,
  formatterFn: ?(value: T) => mixed,
): void {
  if (__DEV__) {
    const dispatcher = resolveDispatcher();
    return dispatcher.useDebugValue(value, formatterFn);
  }
}

export const emptyObject = {};

export function useTransition(): [boolean, (() => void) => void] {
  const dispatcher = resolveDispatcher();
  return dispatcher.useTransition();
}

export function useDeferredValue<T>(value: T): T {
  const dispatcher = resolveDispatcher();
  return dispatcher.useDeferredValue(value);
}

export function useOpaqueIdentifier(): OpaqueIDType | void {
  const dispatcher = resolveDispatcher();
  return dispatcher.useOpaqueIdentifier();
}

export function useMutableSource<Source, Snapshot>(
  source: MutableSource<Source>,
  getSnapshot: MutableSourceGetSnapshotFn<Source, Snapshot>,
  subscribe: MutableSourceSubscribeFn<Source, Snapshot>,
): Snapshot {
  const dispatcher = resolveDispatcher();
  return dispatcher.useMutableSource(source, getSnapshot, subscribe);
}

export function useCacheRefresh(): <T>(?() => T, ?T) => void {
  const dispatcher = resolveDispatcher();
  // $FlowFixMe This is unstable, thus optional
  return dispatcher.useCacheRefresh();
}
在這個文件裡,我們看到以 useXXX 命名的函數,但這還不是 hooks 真正的源碼,畢竟哪可能這麼短hh。看到這邊經常出現的單詞 dispatcher,我們其實大概率可以猜到這個文件其實是起到一個 調度 的作用,我們來分析下。
useState Hook
以 useState 來說:
export function useState<S>(
  initialState: (() => S) | S,
): [S, Dispatch<BasicStateAction<S>>] {
  const dispatcher = resolveDispatcher();
  return dispatcher.useState(initialState);
}
我們先跳過函數的參數以及返回值類型,直接看邏輯。看到首先調用了一個 resolveDispatcher 函數,接著就通過了 return 的這個 dispatcher 調用了 useState 函數。所以其實本質上就是通過 resolveDispatcher() 這個方法生成一個 dispatcher 分發器,然後通過調度器去調取實際執行用戶所希望的 hook 的真實邏輯。
那我們當然就好奇了,這個 resolveDispatcher 函數中的 dispatcher 到底是什麼?於是繼續往下挖源碼:
/**
 * Copyright (c) Facebook, Inc. and its affiliates.
 *
 * This source code is licensed under the MIT license found in the
 * LICENSE file in the root directory of this source tree.
 *
 * @flow
 */

import type {Dispatcher} from 'react-reconciler/src/ReactFiberHooks';

/**
 * Keeps track of the current dispatcher.
 */
const ReactCurrentDispatcher = {
  /**
   * @internal
   * @type {ReactComponent}
   */
  current: (null: null | Dispatcher),
};

export default ReactCurrentDispatcher;
在這個文件裡面,我們看到一個比較特別的語法:import type,這其實是一個 flow.js 的語法,不過因為不是本篇的重點所以在此暫不展開說明。
其實開頭的 import type 就是從另一個文件模塊中導入一個數據類型,也就是 /packages/react-reconciler/src/ReactFiberHooks.js 的 Dispatcher 類型。當然我們就是繼續去看看 ReactFiberHooks.js 看看裡面到底有啥。
來到 ReactFiberHooks.js,我們發現這是一個 2000 多行的怪物。所有官方提供的 hooks 源代碼的秘密就都藏在這個文件裡面。文件開頭也就看到了我們循跡而來的 Dispatcher 類型,後面就是每個 hooks 的具體實現了。
Hook 的實現
我們首先就來看看下面這段源碼:
const HooksDispatcherOnMount: Dispatcher = {
  readContext,

  useCallback: mountCallback,
  useContext: readContext,
  useEffect: mountEffect,
  useImperativeHandle: mountImperativeHandle,
  useLayoutEffect: mountLayoutEffect,
  useMemo: mountMemo,
  useReducer: mountReducer,
  useRef: mountRef,
  useState: mountState,
  useDebugValue: mountDebugValue,
  useResponder: createDeprecatedResponderListener,
  useDeferredValue: mountDeferredValue,
  useTransition: mountTransition,
};

const HooksDispatcherOnUpdate: Dispatcher = {
  readContext,

  useCallback: updateCallback,
  useContext: readContext,
  useEffect: updateEffect,
  useImperativeHandle: updateImperativeHandle,
  useLayoutEffect: updateLayoutEffect,
  useMemo: updateMemo,
  useReducer: updateReducer,
  useRef: updateRef,
  useState: updateState,
  useDebugValue: updateDebugValue,
  useResponder: createDeprecatedResponderListener,
  useDeferredValue: updateDeferredValue,
  useTransition: updateTransition,
};
我們看到,每一個 hook 都有兩個相關的函數:mountXXX 以及 updateXXX。這兩個函數其實分別是 hook 在 mount 階段(即組件的掛載,或者說初始化階段,又或者說是第一次執行 useXXX 的時候),和 update 階段(即組件更新,或者說組件重新渲染)的邏輯。
而為了方便管理和調用,react 團隊的工程師們把 Hook 在 Mount 階段的邏輯存到 HooksDispatcherOnMount 對象中,把 Update 階段的邏輯存到 HooksDispatcherOnUpdate 對象中,並以 Hook 自己的名字 useXXX 作為 key。
也就是說,同一個 hook 在 mount 和 update 階段所做的事情是不一樣的。
Hook 在 Mount 階段(useState)
每個 hook 都有各自實現的功能,而由於篇幅有限,在這裏我只用最最最基本的 hooks useState 進行分析。
首先來看看 useState mount 階的源碼 mountState():
function mountState<S>(
  initialState: (() => S) | S,
): [S, Dispatch<BasicStateAction<S>>] {
  const hook = mountWorkInProgressHook();
  if (typeof initialState === 'function') {
    // $FlowFixMe: Flow doesn't like mixed types
    initialState = initialState();
  }
  hook.memoizedState = hook.baseState = initialState;
  const queue = (hook.queue = {
    pending: null,
    dispatch: null,
    lastRenderedReducer: basicStateReducer,
    lastRenderedState: (initialState: any),
  });
  const dispatch: Dispatch<
    BasicStateAction<S>,
  > = (queue.dispatch = (dispatchAction.bind(
    null,
    currentlyRenderingFiber,
    queue,
  ): any));
  return [hook.memoizedState, dispatch];
}
我們就來分析下關於 useState 在 mount 階段的邏輯。首先就看到一個又看不懂的函數,mountWorkInProgressHook(),當然我們也只能再去找找這個函數的源碼,來看看這個函數幹了啥。
mountWorkInProgressHook() - 存儲 Hook 的數據結構 - 循環鏈表
馬上找到 mountWorkInProgressHook() 源碼如下:
function mountWorkInProgressHook(): Hook {
  const hook: Hook = {
    memoizedState: null,

    baseState: null,
    baseQueue: null,
    queue: null,

    next: null,
  };

  // workInProgressHook 指向當前組件的 hook 鏈表
  if (workInProgressHook === null) {
    // 如果当前组件的 Hook 链表为空,那么就将刚刚新建的 Hook 作为 Hook 链表的第一个节点(头结点)
    // This is the first hook in the list
    currentlyRenderingFiber.memoizedState = workInProgressHook = hook;
  } else {
    // 如果当前组件的 Hook 链表不为空,那么就将刚刚新建的 Hook 添加到 Hook 链表的末尾(作为尾结点)
    // Append to the end of the list
    workInProgressHook = workInProgressHook.next = hook;
  }
  return workInProgressHook;
}
我們首先看到,函數一開始定義了一個 Hook 類型的 hook 變量,其實就是一個簡單的 js 對象,裡面有五個屬性,其實這個就是一個存儲 hook 的鏈表的節點結構。
下面的 workInProgressHook 指向當前組件的 hook 鏈表,邏輯就是如上註解在代碼上。
所以我們很清楚可以看到,一個函數組件的的所有 hook 就是以 鏈表 的形式存儲的,而鏈表中的每個節點就是一個 hook,每個 hook 節點結構的定義如下:
export type Hook = {|
  memoizedState: any,
  baseState: any,
  baseQueue: Update<any, any> | null,
  queue: UpdateQueue<any, any> | null,
  next: Hook | null,
|};
這邊對 hook 節點的結構做一下解釋:
回到 mount 階段。所以在 mount 階段(組件初始化),調用 useState,mountState 就會調用 mountWorkInProgressHook 方法來創建一個新的 hook 節點,並把他添加到組件自身的 Hook 鏈表上。來舉個例子,假如現在有一個函數組件,並且第一次執行下面代碼:
const [firstName, setFirstName] = useState('尼古拉斯');
const [lastName, setLastName] = useState('赵四');
useEffect(() => {});
由於是第一次執行,也就是在 mount 階段,會創建如下圖的一個 hook 鏈表:

整個 Hook 鏈表保存在哪裡
其實關於這個問題,在上面的 mountWorkInProgressHook 已經有大致提示了。
function mountWorkInProgressHook(): Hook {
  ...
  if (workInProgressHook === null) {
    // This is the first hook in the list
    currentlyRenderingFiber.memoizedState = workInProgressHook = hook;
  } else {
    ...
  }
  ...
}
假如原來還沒有 hook 鏈表,那麼就會將新建的 hook 節點作為 hook 鏈表的頭節點,然後把 hook 鏈表的頭節點保存在 currentlyRenderingFiber.memoizedState 中,也就是 當前 FiberNode 的 memoziedState 屬性 (注意,currentlyRenderingFiber 不是 Hook 類型,而是一個 Fiber 類型)。這樣一個簡單的小小的赋值语句,就可以把當前組件和裡面的所有 hook 關聯起來。

useState 怎麼處理 state 更新
用過 useState 的人都知道,useState 返回一個數組,其中第一個元素是當前 state 的值,而第二個元素是一個用來設置,或者說更新 state 的函數,一般會名為 setXXX。
在上面我們看 mountState 源碼的時候,會新建一個更新隊列鏈表 queue,這個鏈表的作用其實就是用來存放更新操作,鏈表中的每一個節點就是一次更新 state 操作,也就是調用了一次 setXXX,以便後面的 update 階段可以拿到最新的 state。那我們當然就要來看看這個 queue 的源碼:
const queue = (hook.queue = {
  pending: null,
  dispatch: null,
  lastRenderedReducer: basicStateReducer,
  lastRenderedState: (initialState: any),
});
-
pending:最近一個等待執行的更新
-
dispatch:更新 state 的方法,setXXX
-
lastRenderedReducer:這個字段是組件最近一次渲染時使用的 reducer。其實 useState 本身就是一個簡化版的 useReducer,所以我們在使用 useState 時才不需要傳入 reducer,這是因為 useState 使用的 reducer 是 react 官方默認幫我們寫好的 reducer,basicStateReducer
-
lastRenderedState:組件最近一次渲染的 state
創建完這個隊列後,接著是一個 dispatch 變量,其實也是個方法,也就是最後要返回的第二個參數 setXXX,而這個變量實際上就是 dispatchAction 函數,通過 bind 來改變 this 的指向,將當前 fiber,更新隊列和 dispatch 關聯起來。
所以其實當我們調用了 useState 的更新方法 setXXX 時,其實本質上就是調用了 dispatchAction 這個方法。那我們當然就要繼續往下挖挖,看看 dispatchAction 的源碼:
function dispatchAction<S, A>(
  fiber: Fiber,
  queue: UpdateQueue<S, A>,
  action: A,
) {
  if (__DEV__) {
    if (typeof arguments[3] === 'function') {
      console.error(
        "State updates from the useState() and useReducer() Hooks don't support the " +
          'second callback argument. To execute a side effect after ' +
          'rendering, declare it in the component body with useEffect().',
      );
    }
  }

  const currentTime = requestCurrentTimeForUpdate();
  const suspenseConfig = requestCurrentSuspenseConfig();
  const expirationTime = computeExpirationForFiber(
    currentTime,
    fiber,
    suspenseConfig,
  );

  // 为当前更新操作新建 update 对象
  const update: Update<S, A> = {
    expirationTime,
    suspenseConfig,
    action,
    eagerReducer: null,
    eagerState: null,
    next: (null: any),
  }

  if (__DEV__) {
    update.priority = getCurrentPriorityLevel();
  }

  // Append the update to the end of the list.
  // pending 指向的是最新的 update 对象
  const pending = queue.pending;
  if (pending === null) {
    // This is the first update. Create a circular list.
    // 如果更新队列为空,那么将当前的更新作为更新队列的第一个节点,并且让它的 next 属性指向自身,以此来保持为循环链表
    update.next = update;
  } else {
    // 如果更新队列为非空,那么就将当前的更新对象插入到列表的头部
    update.next = pending.next;
    // 链表的尾结点指向最新的头节点,以保持为一个循环链表
    pending.next = update;
  }
  // 让 queue.pending 指向最新的头节点
  queue.pending = update;

  const alternate = fiber.alternate;
  if (
    fiber === currentlyRenderingFiber ||
    (alternate !== null && alternate === currentlyRenderingFiber)
  ) {
    // This is a render phase update. Stash it in a lazily-created map of
    // queue -> linked list of updates. After this render pass, we'll restart
    // and apply the stashed updates on top of the work-in-progress hook.
    didScheduleRenderPhaseUpdate = true;
    update.expirationTime = renderExpirationTime;
    currentlyRenderingFiber.expirationTime = renderExpirationTime;
  } else {
    if (
      fiber.expirationTime === NoWork &&
      (alternate === null || alternate.expirationTime === NoWork)
    ) {
      // The queue is currently empty, which means we can eagerly compute the
      // next state before entering the render phase. If the new state is the
      // same as the current state, we may be able to bail out entirely.
      const lastRenderedReducer = queue.lastRenderedReducer;
      if (lastRenderedReducer !== null) {
        let prevDispatcher;
        if (__DEV__) {
          prevDispatcher = ReactCurrentDispatcher.current;
          ReactCurrentDispatcher.current = InvalidNestedHooksDispatcherOnUpdateInDEV;
        }
        try {
          const currentState: S = (queue.lastRenderedState: any);
          const eagerState = lastRenderedReducer(currentState, action);
          // Stash the eagerly computed state, and the reducer used to compute
          // it, on the update object. If the reducer hasn't changed by the
          // time we enter the render phase, then the eager state can be used
          // without calling the reducer again.
          update.eagerReducer = lastRenderedReducer;
          update.eagerState = eagerState;
          if (is(eagerState, currentState)) {
            // Fast path. We can bail out without scheduling React to re-render.
            // It's still possible that we'll need to rebase this update later,
            // if the component re-renders for a different reason and by that
            // time the reducer has changed.
            return;
          }
        } catch (error) {
          // Suppress the error. It will throw again in the render phase.
        } finally {
          if (__DEV__) {
            ReactCurrentDispatcher.current = prevDispatcher;
          }
        }
      }
    }
    if (__DEV__) {
      // $FlowExpectedError - jest isn't a global, and isn't recognized outside of tests
      if ('undefined' !== typeof jest) {
        warnIfNotScopedWithMatchingAct(fiber);
        warnIfNotCurrentlyActingUpdatesInDev(fiber);
      }
    }
    scheduleWork(fiber, expirationTime);
  }
}
這段代碼真的還蠻複雜的,我也還沒完全看懂,不過大致上看懂了基本關鍵的思路部分。下面就來說說整理一下~
我們用栗子還帶入,假設現在有三個更新 state 的操作如下:
const [firstName, setFirstName] = useState('');

setFirstName('Tom');
setFirstName('Allen');
setFirstName('Bill');
- 執行
setFirstName('Tom')
1-1. const update = {...} // 新建一個 update 對象,為了方便說明這邊叫做 update0

1-2. queue.pending === null,所以 update.next = update // update0 的 next 指向它自己

1-3. queue.pending = update // queue.pending 指向 update0

- 執行
setFirstName('Allen')
2-1. const update = {...} // 新建一個 update 對象,為了方便說明這邊叫做 update1

2-2. const pending = queue.pending // 此時的 queue.pending 指向 update0

2-3. queue.pending !== null,所以

     2-3-1. update.next = pending.next // 相當於是 update1.next = update0.next,又因為 update0.next 就指向自己,所以這一部相當於 update1.next = update0

     2-3-2. pending.next = update // 相當於 update0.next = update1

2-4. queue.pending = update // queue.pending 指向 update1

- 執行
setFirstName('Bill')
2-1. const update = {...} // 新建一個 update 對象,為了方便說明這邊叫做 update2

2-2. const pending = queue.pending // 此時的 queue.pending 指向 update1

2-3. queue.pending !== null,所以

     2-3-1. update.next = pending.next // 相當於是 update2.next = update1.next,又因為前面執行 setFirstName('Allen') 時 update1.next 其實指向 update0,所以這步實際上就是 update2.next = update0

     2-3-2. pending.next = update // 相當於 update1.next = update2

2-4. queue.pending = update // queue.pending 指向 update2
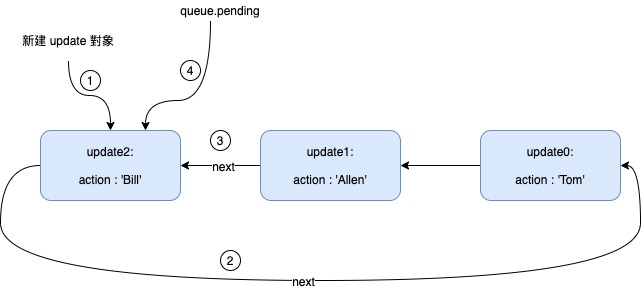
到此就是執行完三次 setState 之後的 hook 鏈表,整體最後的最終狀態如下圖:

觸發組件更新(重新渲染)使組建達到 Update 階段
在將 update 對象添加到 Hook 的更新隊列鏈表後,dispatchAction() 還會去判斷當前調用 setXxx(action) 傳入的值(action)和上一次渲染的 state(此時正展示的 UI)作對比,看看有沒有變化,如果有變化,則調用 scheduleWork() 安排 fiberNode 的更新工作(組件重新渲染),如果沒變化,則直接跳過,不安排更新(組件重新渲染。
關於 scheduleWork() 是如何安排更新工作的問題,這邊先不展開講了,因為涉及到另外更多的邏輯和機制,並且其實我自己也還沒看懂,實在是有點頂。暫時就先知道關於 setState 這個 hook 還有這些提升效率的機制這樣~
Hook 在 Update 階段做了什麼?
接下來,我們來看看 Update 階段(組件重新渲染)時幹了啥。還是以 useState 這個 Hook 來舉例子。在 Update 階段的時候,也就是組件重新渲染,即第二、第三、第 N 次執行 useState 的時候,這時就不是執行 mountState() 了,而是執行 updateState() 了。來看一波 updateState() 的源碼:
function updateState<S>(
  initialState: (() => S) | S,
): [S, Dispatch<BasicStateAction<S>>] {
  return updateReducer(basicStateReducer, (initialState: any));
}
可以發現,updateState() 實際上調用的是 updateReducer(),這也就再次證明了 useState 實際上只是簡化版的 useReducer 而已。因為我們調用 useState 的時候不會傳入 reducer,所以這裏會默認傳一個 basicStateReducer 進去作為 reducer。
function basicStateReducer<S>(state: S, action: BasicStateAction<S>): S {
  // $FlowFixMe: Flow doesn't like mixed types
  return typeof action === 'function' ? action(state) : action;
}
在使用 useState 時其實我們的 action 通常是一個值,而不會是一個函數,所以其實 basicStateReducer 就會直接把這個值返回出來而已。
那麼接下來當然就要來看看 updateReducer 的代碼啦~
function updateReducer<S, I, A>(
  reducer: (S, A) => S,
  initialArg: I,
  init?: I => S,
): [S, Dispatch<A>] {
  // 获取正在执行的处于更新阶段 Hook 节点
  const hook = updateWorkInProgressHook();
  // 获取更新队列链表
  const queue = hook.queue;
  invariant(
    queue !== null,
    'Should have a queue. This is likely a bug in React. Please file an issue.',
  );

  queue.lastRenderedReducer = reducer;

  const current: Hook = (currentHook: any);

  // The last rebase update that is NOT part of the base state.
  let baseQueue = current.baseQueue;

  // The last pending update that hasn't been processed yet.
  const pendingQueue = queue.pending;
  if (pendingQueue !== null) {
    // We have new updates that haven't been processed yet.
    // We'll add them to the base queue.
    if (baseQueue !== null) {
      // Merge the pending queue and the base queue.
      const baseFirst = baseQueue.next;
      const pendingFirst = pendingQueue.next;
      baseQueue.next = pendingFirst;
      pendingQueue.next = baseFirst;
    }
    if (__DEV__) {
      if (current.baseQueue !== baseQueue) {
        // Internal invariant that should never happen, but feasibly could in
        // the future if we implement resuming, or some form of that.
        console.error(
          'Internal error: Expected work-in-progress queue to be a clone. ' +
            'This is a bug in React.',
        );
      }
    }
    current.baseQueue = baseQueue = pendingQueue;
    queue.pending = null;
  }

  if (baseQueue !== null) {
    // We have a queue to process.

    // 获取更新队列最初(第一個)的 update 对象节点
    const first = baseQueue.next;
    // 初始化 newState
    let newState = current.baseState;

    let newBaseState = null;
    let newBaseQueueFirst = null;
    let newBaseQueueLast = null;
    let update = first;
    do {
      // 循环遍历更新队列链表
      // 从最早的那个 update 对象开始遍历,每次遍历执行一次更新,去更新状态

      const updateLane = update.lane;
      if (!isSubsetOfLanes(renderLanes, updateLane)) {
        // Priority is insufficient. Skip this update. If this is the first
        // skipped update, the previous update/state is the new base
        // update/state.
        const clone: Update<S, A> = {
          lane: updateLane,
          action: update.action,
          eagerReducer: update.eagerReducer,
          eagerState: update.eagerState,
          next: (null: any),
        };
        if (newBaseQueueLast === null) {
          newBaseQueueFirst = newBaseQueueLast = clone;
          newBaseState = newState;
        } else {
          newBaseQueueLast = newBaseQueueLast.next = clone;
        }
        // Update the remaining priority in the queue.
        // TODO: Don't need to accumulate this. Instead, we can remove
        // renderLanes from the original lanes.
        currentlyRenderingFiber.lanes = mergeLanes(
          currentlyRenderingFiber.lanes,
          updateLane,
        );
        markSkippedUpdateLanes(updateLane);
      } else {
        // This update does have sufficient priority.

        if (newBaseQueueLast !== null) {
          const clone: Update<S, A> = {
            // This update is going to be committed so we never want uncommit
            // it. Using NoLane works because 0 is a subset of all bitmasks, so
            // this will never be skipped by the check above.
            lane: NoLane,
            action: update.action,
            eagerReducer: update.eagerReducer,
            eagerState: update.eagerState,
            next: (null: any),
          };
          newBaseQueueLast = newBaseQueueLast.next = clone;
        }

        // Process this update.
        if (update.eagerReducer === reducer) {
          // If this update was processed eagerly, and its reducer matches the
          // current reducer, we can use the eagerly computed state.
          newState = ((update.eagerState: any): S);
        } else {
          // 具體就是在這邊更新了 newState 以不斷更新獲取到最新的 state
          const action = update.action;
          newState = reducer(newState, action);
        }
      }
      update = update.next;
    } while (update !== null && update !== first);

    if (newBaseQueueLast === null) {
      newBaseState = newState;
    } else {
      newBaseQueueLast.next = (newBaseQueueFirst: any);
    }

    // Mark that the fiber performed work, but only if the new state is
    // different from the current state.
    if (!is(newState, hook.memoizedState)) {
      markWorkInProgressReceivedUpdate();
    }

    hook.memoizedState = newState;
    hook.baseState = newBaseState;
    hook.baseQueue = newBaseQueueLast;

    queue.lastRenderedState = newState;
  }

  // Interleaved updates are stored on a separate queue. We aren't going to
  // process them during this render, but we do need to track which lanes
  // are remaining.
  const lastInterleaved = queue.interleaved;
  if (lastInterleaved !== null) {
    let interleaved = lastInterleaved;
    do {
      const interleavedLane = interleaved.lane;
      currentlyRenderingFiber.lanes = mergeLanes(
        currentlyRenderingFiber.lanes,
        interleavedLane,
      );
      markSkippedUpdateLanes(interleavedLane);
      interleaved = ((interleaved: any).next: Update<S, A>);
    } while (interleaved !== lastInterleaved);
  } else if (baseQueue === null) {
    // `queue.lanes` is used for entangling transitions. We can set it back to
    // zero once the queue is empty.
    queue.lanes = NoLanes;
  }

  const dispatch: Dispatch<A> = (queue.dispatch: any);
  return [hook.memoizedState, dispatch];
}
updateReducer() 會去遍歷更新隊列鏈表,執行每一個節點裏面的更新操作,得到最新的狀態並返回,以此來保證我們每次刷新組件都能拿到當前最新的狀態。useState 的 reducer 是 baseStateReducer,因為傳入的 update.action 是一個值,所以直接返回了 update.aciton。
小結一下,當 Update 階段,即第二次、第三次…第 N 次執行 useState 時,所做的事情是:
-
獲取正在執行的處於更新階段 Hook 節點;
-
獲取該 Hook 節點的更新隊列鏈表;
-
從該更新隊列的最早的 update 對象節點開始遍歷,一直遍歷到最近添加的(最新的)update 對象節點,遍歷到每個節點的時候執行該節點的更新操作,將該次更新的 state 值存到 newState 中;
-
當遍歷完最近的一個 update 對象節點後,此時 newState 裏存放的就是最新的 state 值,最後返回 newState,於是用戶就拿到了最新的 state;
useState 的運行流程
上面介紹了 useState(useReducer)在 mount 階段、 update 階段分別做的事情以及組件何時觸發組件更新,最後來總結一下 useState 整體的運行流程:
組件初次渲染 (mount) 時
此時是第一次執行 useState,也就是 mount 階段,所以執行的是 mountState。
-
在 Hook 鏈表上添加該 useState 的 Hook 節點
-
初始化 state 的值
-
返回此次渲染的 state 和 修改 state 的方法(dispatch)
當調用 setXxx/dispatchAction 時
-
創建 update 對象,並將 update 對象添加到該 Hook 節點的更新隊列鏈表
-
判斷傳入的值(action)和當前 UI 渲染的 state 值是否相同,若相同則略過,若不相同,則調用 scheduleWork 安排組件的重新渲染
-
當前所有 setXxx 都逐一執行完後,假如其中有能滿足(2)的條件,即有調用 scheduleWork 的話,則觸發更新(組件重新渲染),進入 Update 階段
組件重新渲染 (update) 時
組件重新渲染,進入 Update 階段,即第 2 、第 3 、… n 次執行 useState:
-
獲取該 useState Hook 的更新隊列鏈表
-
遍歷這個更新隊列鏈表,從最早的那一個 update 對象進行遍歷,直至遍歷到最近的添加那一個 update 對象,最後得到最新的 state 並返回,作為組件此次渲染的 state
-
返回此次渲染的 state 和 修改 state 的方法
useEffect Hook
如果能看到這裡,真的已經很堅持了,本人在學習這段時到這邊也快頂不住了,著實是有點太複雜。不過既然都已經大概理解了 useState 的基本原理,不仿再堅持一下。這邊我們打鐵趁熱,繼續挖掘下 useEffect 這個也是超常用的 Hook 的原理吧~
經過了上面的分析,我們知道,一個 Hook 在組件的初次渲染(掛載)和重新渲染的時候所執行的操作是不一樣的。在初次渲染的時候執行的是 mountXxx() 方法,而在重新渲染的時候,執行的是 updateXxx() 方法。
useEffect 這個 Hook 也同理,它對應著也有 mountEffect 和 updateEffect。
mountEffect
mountEffect 源碼如下:
function mountEffect(
  create: () => (() => void) | void,
  deps: Array<mixed> | void | null,
): void {
  if (__DEV__) {
    // $FlowExpectedError - jest isn't a global, and isn't recognized outside of tests
    if ('undefined' !== typeof jest) {
      warnIfNotCurrentlyActingEffectsInDEV(currentlyRenderingFiber);
    }
  }
  if (
    __DEV__ &&
    enableStrictEffects &&
    (currentlyRenderingFiber.mode & StrictEffectsMode) !== NoMode
  ) {
    return mountEffectImpl(
      MountPassiveDevEffect | PassiveEffect | PassiveStaticEffect,
      HookPassive,
      create,
      deps,
    );
  } else {
    // 重點就是這段,上面開發環境代碼都可以先略過
    return mountEffectImpl(
      PassiveEffect | PassiveStaticEffect,
      HookPassive,
      create,
      deps,
    );
  }
}
很明顯,重點就是 mountEffectImpl 這個方法,mountEffect 只是作為一個入口,那麼就接著往下看看:
function mountEffectImpl(fiberFlags, hookFlags, create, deps): void {
  // 获取当前 Hook 节点,同时将当前的 Hook 節點添加到所屬的 FiberNode 所指向的 Hook 链表中
  const hook = mountWorkInProgressHook();

  // 获取依赖
  const nextDeps = deps === undefined ? null : deps;

  currentlyRenderingFiber.flags |= fiberFlags;
  hook.memoizedState = pushEffect(
    HookHasEffect | hookFlags,
    create,
    undefined,
    nextDeps,
  );
}
看到在這個 mountEffectImpl 方法中又調用了一個 pushEffect,繼續看下去:
function pushEffect(tag, create, destroy, deps) {
  const effect: Effect = {
    tag,
    create,
    destroy,
    deps,
    // Circular
    next: (null: any),
  };
  // 获取当前 FiberNode 的 updateQueue
  let componentUpdateQueue: null | FunctionComponentUpdateQueue = (currentlyRenderingFiber.updateQueue: any);
  if (componentUpdateQueue === null) {
    // 如果 updateQueue 为空,那就创建一个新的 updateQueue,其中 lastEffect 指向最新添加进来的 effect
    componentUpdateQueue = createFunctionComponentUpdateQueue();
    currentlyRenderingFiber.updateQueue = (componentUpdateQueue: any);
    componentUpdateQueue.lastEffect = effect.next = effect;
  } else {
    const lastEffect = componentUpdateQueue.lastEffect;
    if (lastEffect === null) {
      // 假如 lastEffect 指向 null,说明此时链表还不是循环链表的结构,那么就要控制最新的 effect 的 next 的指向,使其变为循环链表的结构
      componentUpdateQueue.lastEffect = effect.next = effect;
    } else {
      // 将当前 effect 添加到 updateQueue 中
      const firstEffect = lastEffect.next;
      lastEffect.next = effect;
      effect.next = firstEffect;
      // 令 lastEffect 始终指向最新添加进来的 effect
      componentUpdateQueue.lastEffect = effect;
    }
  }
  return effect;
}
其實這個 pushEffect 邏輯還算比較清晰。pushEffect 所做的事情其實就是會依次獲取當前 Hook 節點以及 useEffect 的依賴,並調用 pushEffect 將當前 effect 添加到 FiberNode 的 updateQueue 隊列中,最後將 effect 保存在當前 Hook 節點的 memoizedState 屬性中。
可以看到,react 在處理 useEffect 時底層的思想也是應用到了單向的循環鏈表。重要的幾個參數,create、destroy、deps 其實就是我們使用的 useEffect 時的 effect 函數,銷毀函數和 effect 依賴。
useEffect(() => {
  // create

  return () => {
    // destroy
  }
}, [ /* deps */ ])
那這邊先小結一下,所以 useEffect 在 mount 階段的 mountEffect 所做的事如下:
-
獲取當前 Hook 節點,並把它添加到 Hook 鏈表中;
-
獲取本次 effect 的 deps 依賴;
-
將 effect 添加到 fiberNode 的 updateQueue 中。updateQueue 的 lastEffect 屬性指向的始終是最新添加進隊列的 effect,lastEffect 的 next 始終指向最早添加進來的 effect,以次形成一個循環鏈表的結構。

updateEffect
看完 mountEffect 當然就再來看看 updateEffect 啦~
function updateEffect(
  create: () => (() => void) | void,
  deps: Array<mixed> | void | null,
): void {
  if (__DEV__) {
    // $FlowExpectedError - jest isn't a global, and isn't recognized outside of tests
    if ('undefined' !== typeof jest) {
      warnIfNotCurrentlyActingEffectsInDEV(currentlyRenderingFiber);
    }
  }
  return updateEffectImpl(PassiveEffect, HookPassive, create, deps);
}
不用多說,繼續往下找找 updateEffectImpl 函數的源碼:
function updateEffectImpl(fiberFlags, hookFlags, create, deps): void {
  // 获取当前 Hook 节点,并把它添加到 Hook 链表中
  const hook = updateWorkInProgressHook();

  // 获取依赖
  const nextDeps = deps === undefined ? null : deps;
  // 初始化清除 effect 函数
  let destroy = undefined;

  if (currentHook !== null) {
    // 获取上一次渲染的 Hook 节点的 effect
    const prevEffect = currentHook.memoizedState;

    // 获取上一次渲染的 Hook 节点的 effect 的清除函数
    destroy = prevEffect.destroy;
    if (nextDeps !== null) {
      // 获取上一次渲染的 Hook 节点的 effect 的依赖
      const prevDeps = prevEffect.deps;

      // 对比前后依赖的值是否相同
      if (areHookInputsEqual(nextDeps, prevDeps)) {
        // 如果依赖的值相同,即依赖没有变化,那么只会给这个 effect 打上一个 HookPassive tag,然后在组件渲染完以后会跳过这个 effect 的执行
        hook.memoizedState = pushEffect(hookFlags, create, destroy, nextDeps);
        return;
      }
    }
  }

  currentlyRenderingFiber.flags |= fiberFlags;

  // pushEffect 的作用是将当前 effect 添加到 FiberNode 的 updateQueue 中,然后返回这个当前 effect
  // 然后是把返回的当前 effect 保存到 Hook 节点的 memoizedState 属性中
  hook.memoizedState = pushEffect(
    HookHasEffect | hookFlags,
    create,
    destroy,
    nextDeps,
  );
}
update 階段的 useEffect 和 mount 階段所做的事情基本相似,唯獨不一樣就是 update 階段會考慮 effect 的依賴是否有變化,如果沒有變化,那麽就只會給這次 effect 打上 HookPassive tag,在最後 commit 階段(組件視圖渲染完成後)會跳過 effect 的執行;如果有依賴有變化,那麽就會給這次 effect 打上 HookPassive 和 HookHasEffect 兩個 tag,表示這個 effect 將會在組件視圖渲染完成後執行。
小結一下,update 階段的 useEffect 做了一下事情:
-
獲取當前 Hook 節點,並把它添加到 Hook 鏈表中;
-
獲取本次 effect 的 deps 依賴;
-
拿本次 effect 的 依賴和上一次渲染時的 effect 的依賴做對比:
- 將本次 effect 添加到
fiberNode的 updateQueue 中,並將本次 effect 保存在當前 Hook 節點的 memoizedState 屬性中
useEffect 運行流程
一個使用 useEffect Hook 的函數組件,在運行的時候的運行流程如下:
組件初次渲染(mount)
-
執行 useEffect 時,將 useEffect Hook 添加到 Hook 鏈表中,然後創建 fiberNode 的 updateQueue,並把本次 effect 添加到 updateQueue 中;
-
渲染組件的 UI;
-
完成 UI 渲染後,執行本次 effect;
組件重新渲染(update)
- 執行
useEffect 時,將 useEffect Hook 添加到 Hook 鏈表中,判斷依賴:
-
假如沒有傳入依賴(useEffect 沒有傳入第二個參數),那麽直接給這個 effect 打上 “需要執行” 的 tag(HookHasEffect);
-
假如有傳入依賴 deps 並且當前依賴和上次渲染時的依賴對比有發生改變,那麽就給這個 effect 打上 “需要執行” 的 tag(HookHasEffect);
-
假如有傳入依賴 deps,但是依賴沒有發生改變,則不會給這個 effect “需要執行” 的 tag;
-
假如有傳入依賴 deps,但是傳入的是一個空數組 [],那麽也不會給這個 effect “需要執行” 的 tag;
-
渲染組件的 UI;
-
假如有清除函數(effect 中的 return 內容),則執行上一次渲染的清除函數;如果依賴是 [],則先不用執行清除函數,而是等到組件銷毀時才執行;
-
判斷本次 effect 是否有“需要執行” 的 tag(HookHasEffect),如果有,就執行本次 effect;如果沒有,就直接跳過,不執行本次 effect;
組件銷毀時
在組件銷毀之前,先執行完組件上次渲染時的清除函數。
關於 useEffect 源碼研究的部分,這邊還留有一個疑問:就是並沒有在源碼中看到對於 destroy 清除函數的判斷邏輯。我個人的猜測是 react 會在 commit 階段也就是 UI 渲染完後對這部分做邏輯處理,但純屬個人猜測。關於 react Hooks 這部分的學習其實還有一個部分在這篇中不打算再提了,可能會在別篇源碼研究中總結,就是關於 react 的幾個階段,begin、commit、complete、unwind。了解這些階段的處理應該可以更進一步的理解 react 對 Hooks 的一些做法和時機點,鑑於篇幅實在過長,這邊就暫時不寫了。
結語
這篇因為其實在實習之前就開始想寫,也陸陸續續開始,但是之後因為實習還有一些別的事所以擱置了好長一段時間,終於在不知道多久之後完成了這篇。這篇關於 react hooks 的源碼學習也是寫的有夠長,真的是蠻複雜得,且即使花了這麼多時間也才看了 useState 和 useEffect 兩個最基本的 hook,而且其實有一些部分還是沒有完全理解,只能說是粗淺的入門了一下。不過總是要有這麼一段過程的,這篇也真的寫得太累了,關於 react 源碼的學習陸續也都繼續更新,先撤了~