转载自 https://blog.csdn.net/jy02268879/article/details/82830789
一、接收参数(postman发送)
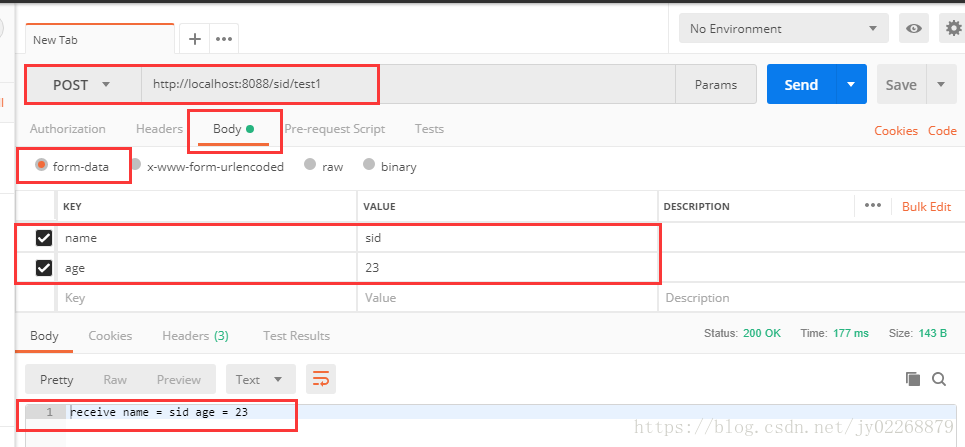
1.form表单
@RequestParam("name") String name
会把传递过来的Form表单中的name对应到formData方法的name参数上
该注解不能接收json传参
该注解表示name字段是必须入参的,否则会报错
@RequestParam(value = "name", required = false) String name
required = false表示必须入参
@RequestParam(value = "name", defaultValue = "admin") String name
defaultValue = "admin"表示当name入参为空的时候给它一个默认值admin
-
-
* 测试接收form表单、URL的数据。不能接收Json数据
-
-
@RequestMapping(value =
"/test1", method = RequestMethod.POST)
-
public String formData(@RequestParam("name") String name , @RequestParam("age") int age){
-
String result =
"receive name = "+name+
" age = "+age;
-
System.out.println(result);
-
-
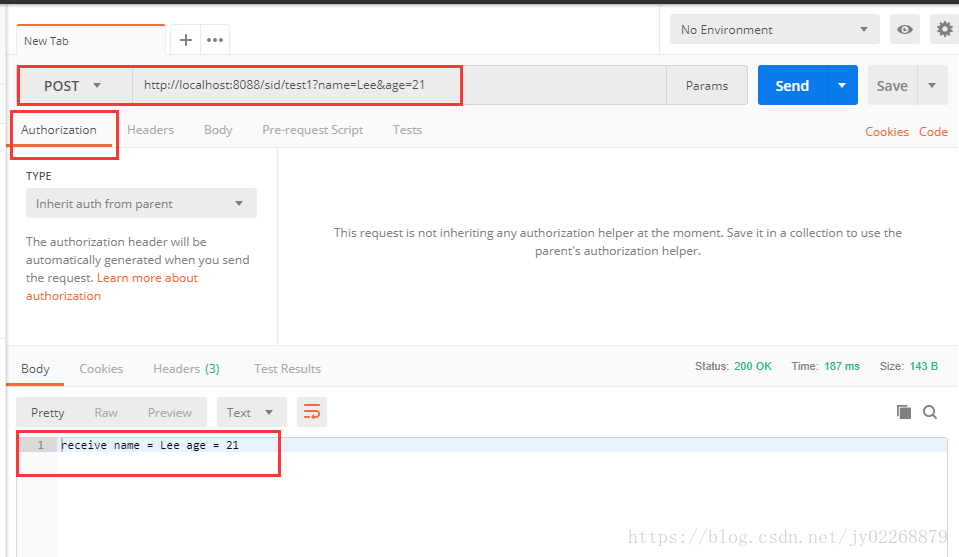
2.URL
代码跟1.form表单中的代码一样
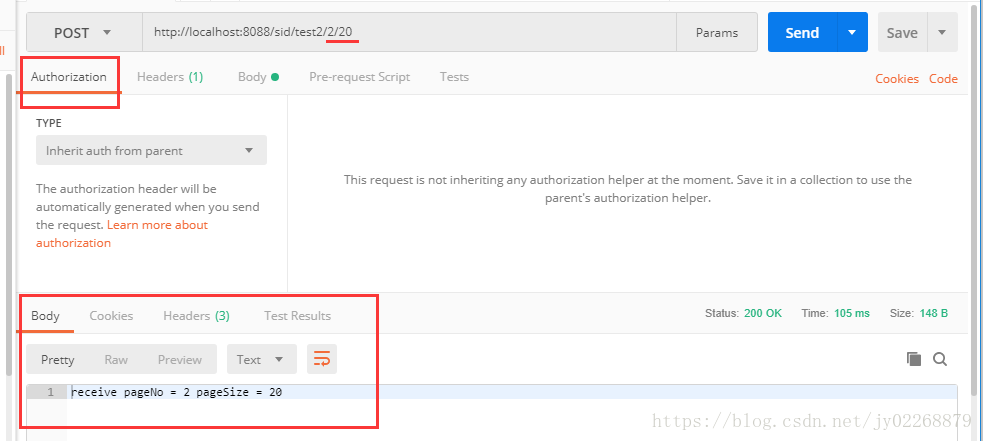
3.动态接收URL中的数据
@PathVariable将URL中的占位符参数绑定到控制器处理方法的入参
此种情况下,url求情中一定要带占位符pageNo,pageSize的值,不然访问失败
即访问时一定要用 http://localhost:8088/sid/test2/2/20
如果用 http://localhost:8088/sid/test2 则访问失败
-
-
-
-
@RequestMapping(value =
"/test2/{pageNo}/{pageSize}", method = RequestMethod.POST)
-
public String urlData(@PathVariable int pageNo , @PathVariable int pageSize){
-
String result =
"receive pageNo = "+pageNo+
" pageSize = "+pageSize;
-
System.out.println(result);
-
-
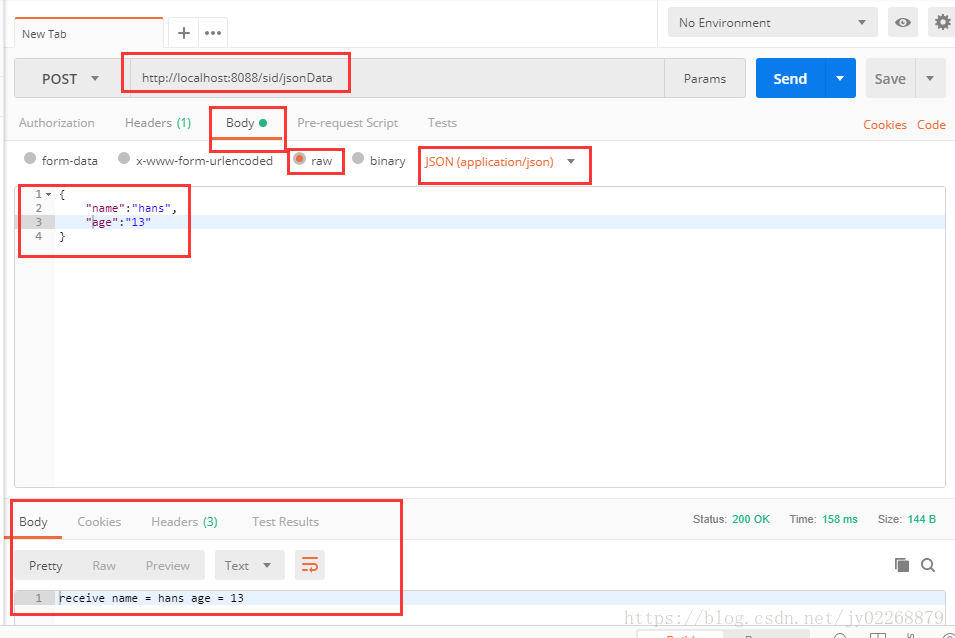
4.json
@RequestBody 接收Json格式的数据需要加这个注解。该注解不能接收URL、Form表单传参
-
-
-
-
@RequestMapping(value =
"/jsonData", method = RequestMethod.POST)
-
public String jsonData(@RequestBody TestModel tm){
-
String result =
"receive name = "+tm.getName()+
" age = "+tm.getAge();
-
System.out.println(result);
-
-
5.@RequestMapping注解详细介绍
1.处理多个URL
-
-
@RequestMapping(
"/home")
-
public
class IndexController {
-
-
@RequestMapping(value = {
-
-
-
-
-
-
String indexMultipleMapping() {
-
return
"Hello from index multiple mapping.";
-
-
这些 URL 都会由 indexMultipleMapping() 来处理:
localhost:8080/home
localhost:8080/home/
localhost:8080/home/page
localhost:8080/home/pageabc
localhost:8080/home/view/
localhost:8080/home/view/view
2.HTTP的各种方法
如POST方法
@RequestMapping(value = "/test1", method = RequestMethod.POST)
3.produces、consumes
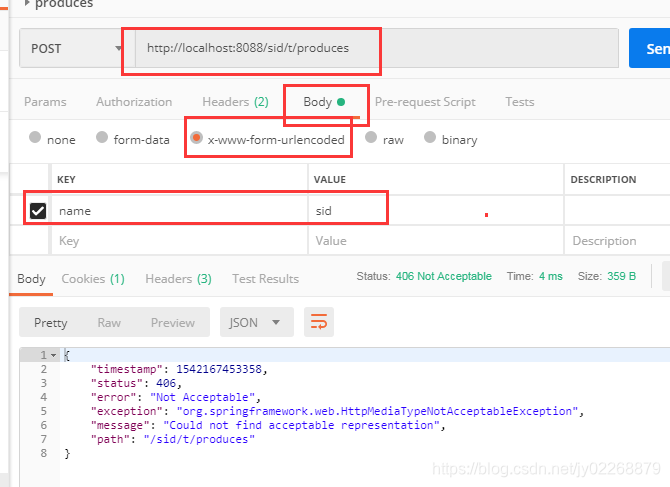
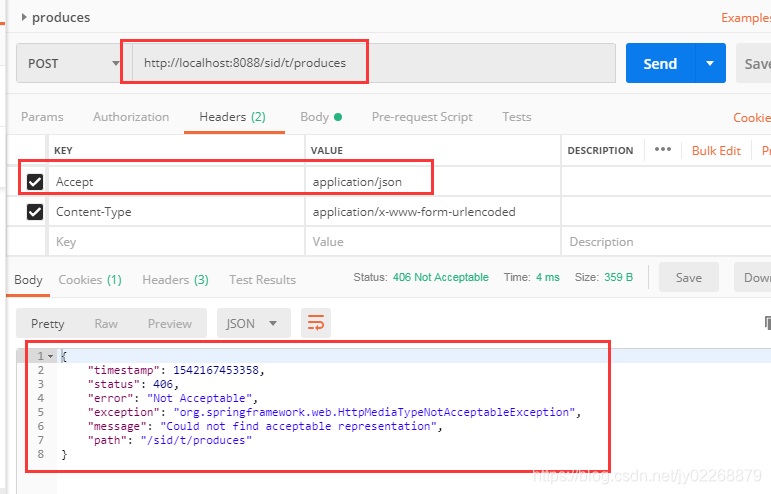
produces 指定返回的内容类型,仅当request请求头header中的(Accept)类型中包含该指定类型才返回。结合@ResponseBody使用
-
-
@RequestMapping(value =
"/t")
-
public
class TestController {
-
-
//方法仅处理request请求中Accept头中包含了"text/html"的请求
-
-
@RequestMapping(value =
"/produces",produces = {
"text/html"})
-
public String testProduces(String name)
-
-
return
"test requestMapping produces attribute! "+name;
-
-
方法仅处理request请求中Accept头中包含了"text/html"的请求
比如用postman构建一个Accept=“application/json”的请求,请求会失败
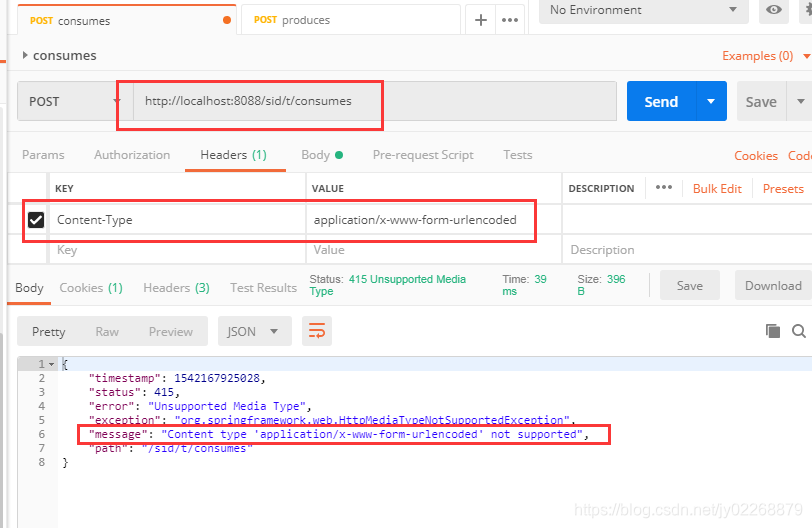
comsumes 指定处理请求的提交内容类型(Content-Type),例如application/json, text/html。结合@RequestBody使用
-
-
@RequestMapping(value =
"/t")
-
public
class TestController {
-
-
//方法仅处理request Content-Type为"application/json"类型的请求
-
-
@RequestMapping(value =
"/consumes",consumes = {
"application/json"})
-
public String testConsumes(@RequestBody String name)
-
-
return
"test requestMapping consumes attribute! "+name;
-
-
方法仅处理request Content-Type为"application/json"类型的请求。
如果用postman构建一个Content-Type=“application/x-www-form-urlencoded”的请求,该方法不处理
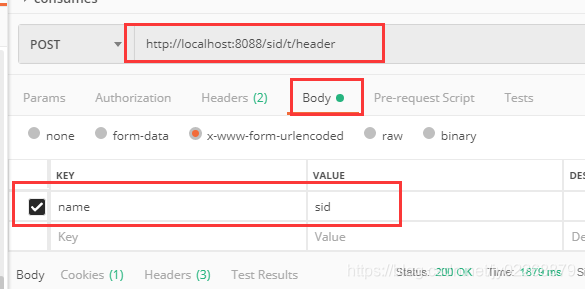
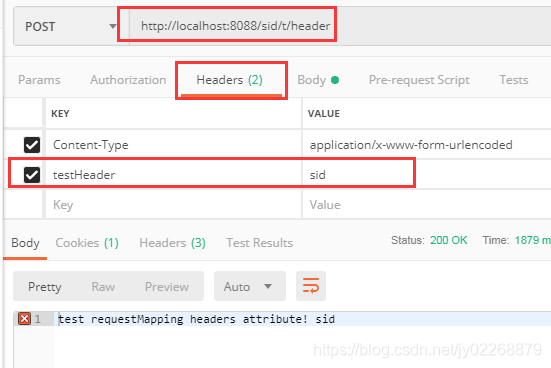
4.headers
根据请求中的消息头内容缩小请求映射的范围
例如:
只处理header中testHeader = sid的请求
-
//方法仅处理header中testHeader = sid的请求
-
-
@RequestMapping(value =
"/header",headers = {
"testHeader = sid"})
-
public String testHeader(String name)
-
-
return
"test requestMapping headers attribute! "+name;
-
构建一个header钟不带testHeader=sid的请求,会失败

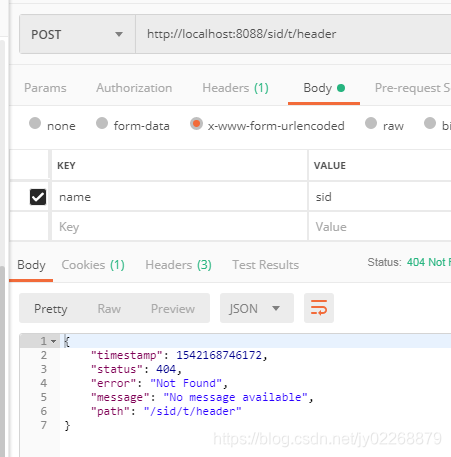
必须要header中带testHeader=sid的请求的请求才处理
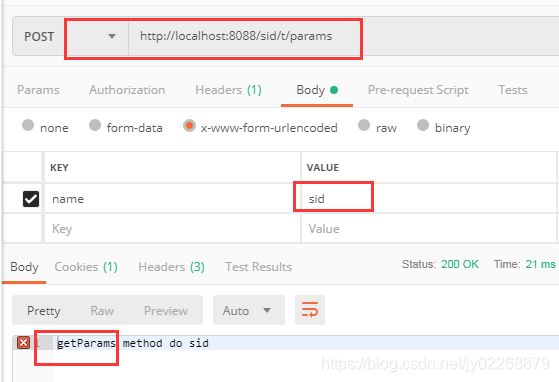
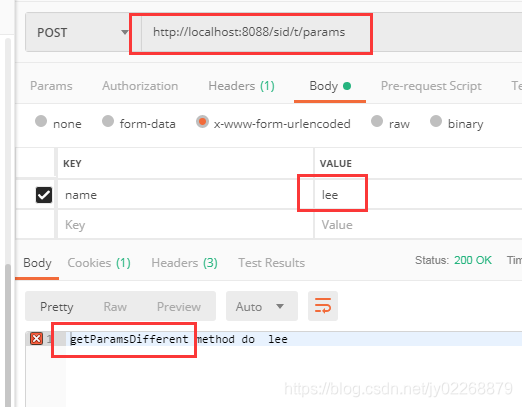
5.结合params属性处理请求参数
例如:
请求参数name=sid的时候由getParams方法处理
请求参数name=lee的时候由getParamsDifferent方法处理
-
-
@RequestMapping(value =
"/t")
-
public
class TestController {
-
-
@RequestMapping(value =
"/params", params = {
-
-
-
-
public String getParams(@RequestParam("name") String name) {
-
return
"getParams method do " + name;
-
-
@RequestMapping(value =
"/params", params = {
-
-
-
-
public String getParamsDifferent(@RequestParam("name") String name) {
-
return
"getParamsDifferent method do " + name;
-
-
二、返回值
@RestController注解,相当于@Controller+@ResponseBody两个注解的结合,返回json数据不需要在方法前面加@ResponseBody注解了,但使用@RestController这个注解,就不能返回jsp,html页面,视图解析器无法解析jsp,html页面
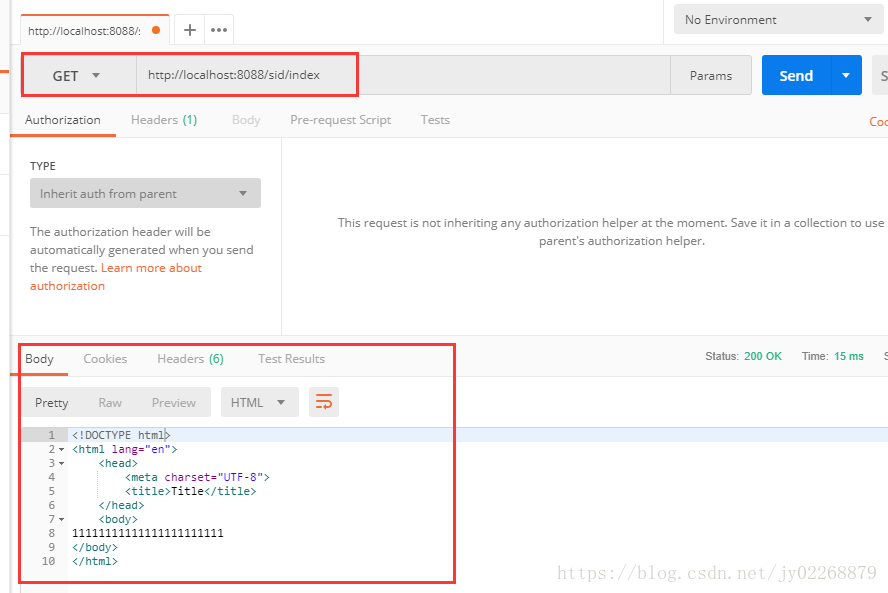
1.返回静态html页面
application.yml
-
-
-
-
-
-
-
-
-
-
-
-
-
-
-
-
* @Controller修饰的类 直接定义方法返回值为String
-
-
@RequestMapping(value =
"/index")
-
-
-
-
-
-
-
-
-
-
@RequestMapping(
"/indexmv")
-
public ModelAndView indexmv() {
-
ModelAndView mv =
new ModelAndView(
"index");
-
-
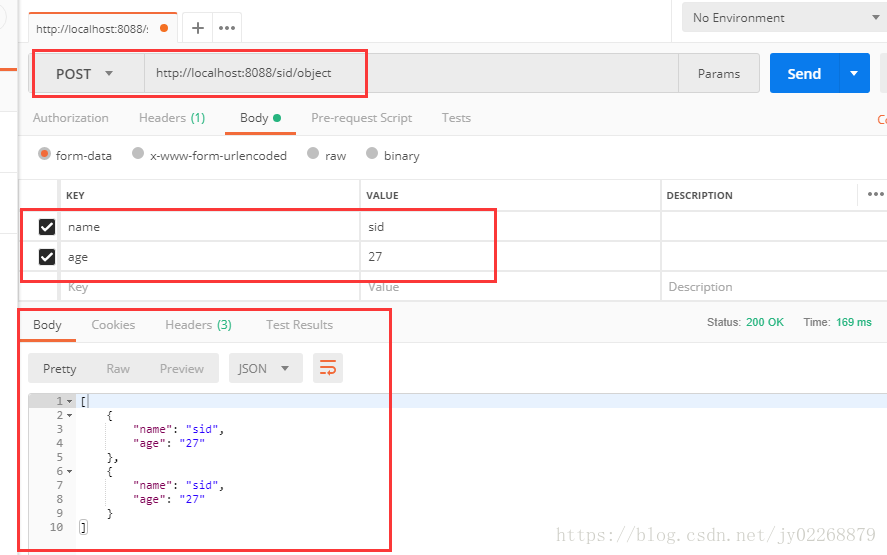
2.通过object返回查询结果
@ResponseBody会把返回值变成json
-
-
* 直接查询得到的model类,@ResponseBody会把返回值变成json
-
-
@RequestMapping(value =
"/object", method = RequestMethod.POST)
-
-
public Object object(@RequestParam("name") String name , @RequestParam("age") String age){
-
-
TestModel t =getModel( name , age);
-
List<TestModel> list =
new ArrayList();
-
-
-
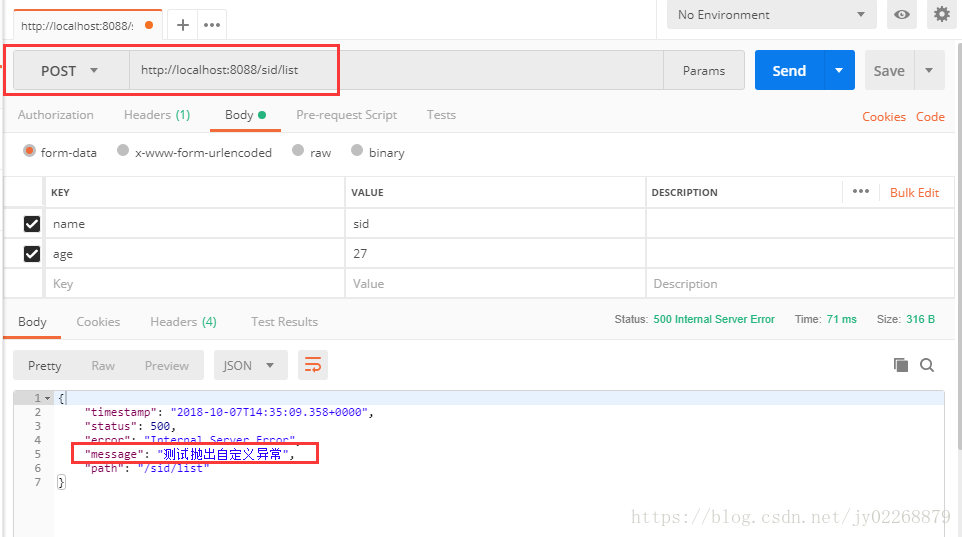
3.返回时直接抛出自定义异常
-
-
-
-
@RequestMapping(value =
"/list", method = RequestMethod.POST)
-
-
public List<TestModel> list(@RequestParam("name") String name , @RequestParam("age") String age){
-
TestModel t =getModel( name , age);
-
-
-
throw
new MyException(
"测试抛出自定义异常");
-
-
List<TestModel> list =
new ArrayList();
-
-
-
-
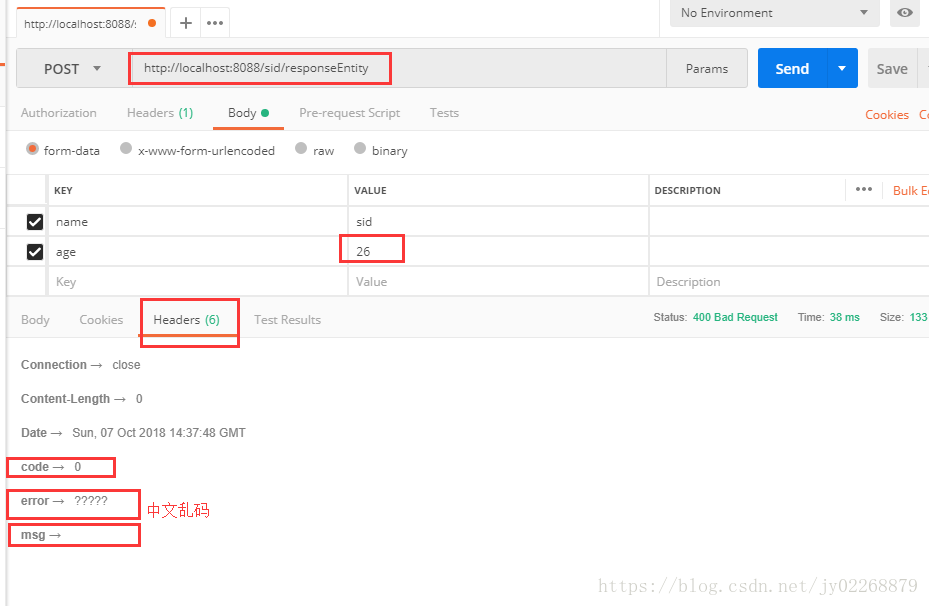
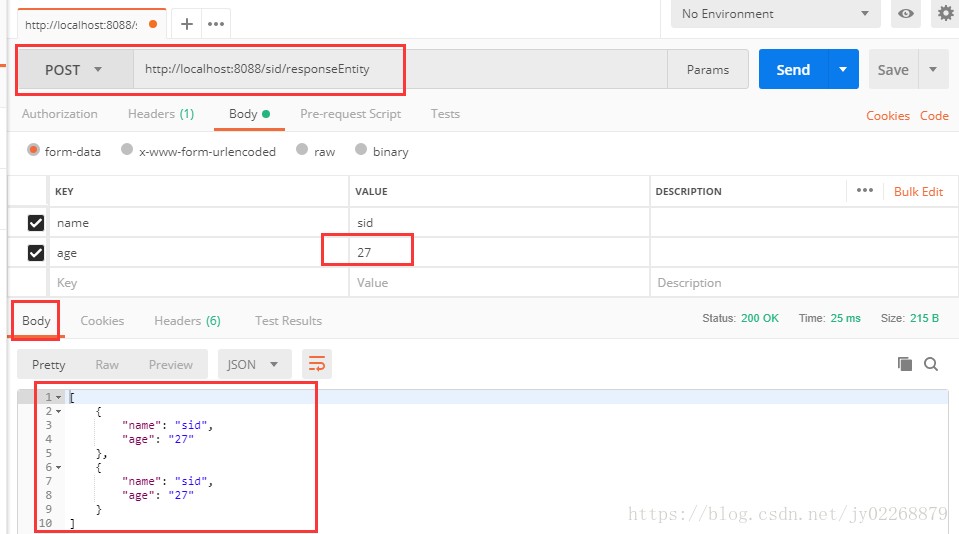
4.返回ResponseEntity
两种不同的创建ResponseEntity的方式
-
-
-
-
* ResponseEntity的优先级高于@ResponseBody。
-
* 在不是ResponseEntity的情况下才去检查有没有@ResponseBody注解。
-
* 如果响应类型是ResponseEntity可以不写@ResponseBody注解
-
-
@RequestMapping(value =
"/responseEntity", method = RequestMethod.POST)
-
public ResponseEntity<?> responseEntity(
@RequestParam(
"name") String name ,
@RequestParam(
"age") String age){
-
-
-
TestModel t =getModel( name , age);
-
if(!t.getAge().equals(
"27")){
-
throw
new MyException(
"年龄错误!");
-
-
List<TestModel> list =
new ArrayList();
-
-
-
HttpHeaders headers =
new HttpHeaders();
-
//headers.set("Content-type", "application/json;charset=UTF-8");
-
headers.add(
"code",
"1");
-
headers.add(
"msg",
"success");
-
headers.add(
"error",
"");
-
return
new ResponseEntity<List>(list,headers,HttpStatus.OK);
-
-
return ResponseEntity.badRequest()
-
//.header("Content-type", "application/json;charset=UTF-8")
-
-
-
.header(
"error", e.getMessage())
//中文乱码
-
.build();
//build无返回值 body有返回值
-
-
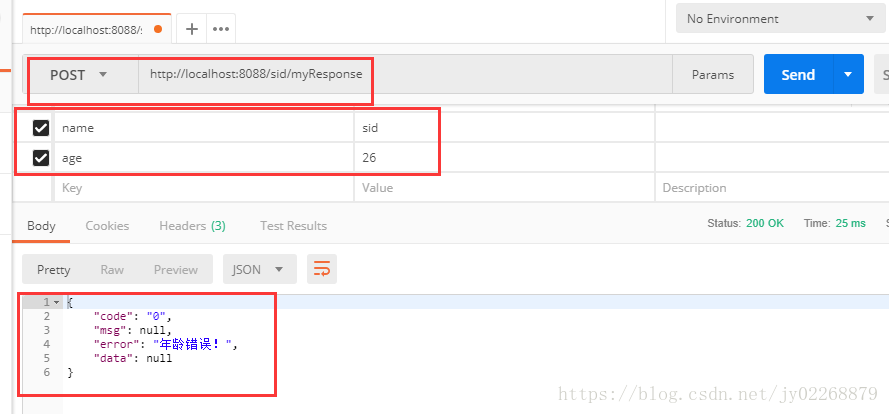
5.返回自定义类,其中有code msg error data 而查询结果在data中
MyResponse.java
-
package com.sid.springtboot.test.springboottest;
-
-
public
class MyResponse<T> {
-
-
-
-
-
-
public MyResponse(String code, String msg, String error, T data) {
-
-
-
-
-
-
-
public String getCode() {
-
-
-
-
public void setCode(String code) {
-
-
-
-
-
-
-
-
public void setMsg(String msg) {
-
-
-
-
public String getError() {
-
-
-
-
public void setError(String error) {
-
-
-
-
-
-
-
-
public void setData(T data) {
-
-
-
MyException.java
-
package com.sid.springtboot.test.springboottest;
-
-
public
class MyException extends RuntimeException{
-
-
private String errorCode;
-
-
-
public MyException(String message) {
-
-
-
-
public MyException(String errorCode, String msg) {
-
this.errorCode = errorCode;
-
-
-
-
public String getErrorCode() {
-
-
-
-
public void setErrorCode(String errorCode) {
-
this.errorCode = errorCode;
-
-
-
-
-
-
-
public void setMsg(String msg) {
-
-
-
controller
-
-
* 返回自定义类,其中有code msg error data 而查询结果在data中
-
-
@RequestMapping(value =
"/myResponse", method = RequestMethod.POST)
-
-
public MyResponse<?> myResponse(
@RequestParam(
"name") String name ,
@RequestParam(
"age") String age){
-
-
TestModel t1 =getModel( name , age);
-
if(!t1.getAge().equals(
"27")){
-
throw
new MyException(
"年龄错误!");
-
-
List<TestModel> list =
new ArrayList();
-
-
-
-
return
new MyResponse<List>(
"1",
"success",
null,list);
-
-
return
new MyResponse<>(
"0",
null,e.getMessage(),
null);
-
-

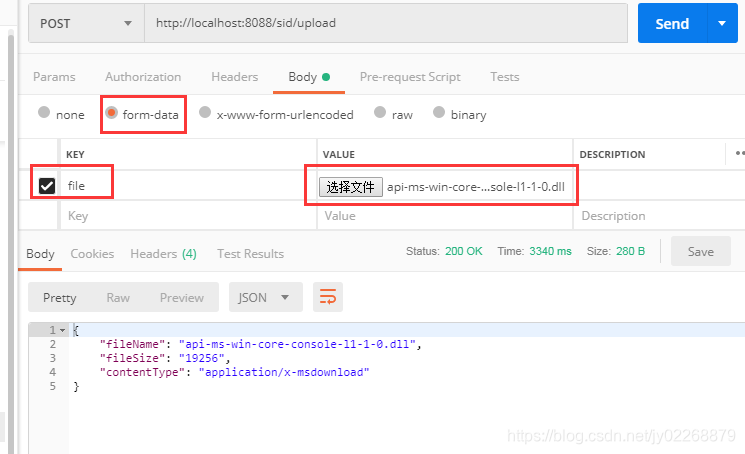
三、上传、下载文件
上传文件
-
-
-
public Map<String, String> upload1(@RequestParam("file") MultipartFile file) throws IOException {
-
System.out.println(
"[文件类型] - [{}]"+ file.getContentType());
-
System.out.println(
"[文件名称] - [{}]"+ file.getOriginalFilename());
-
System.out.println(
"[文件大小] - [{}]"+ file.getSize());
-
-
file.transferTo(
new File(
"D:\\gitrep\\springboot\\testFile\\" + file.getOriginalFilename()));
-
Map<String, String> result =
new HashMap<>(
16);
-
result.put(
"contentType", file.getContentType());
-
result.put(
"fileName", file.getOriginalFilename());
-
result.put(
"fileSize", file.getSize() +
"");
-
-
下载文件
1.通过ResponseEntity<InputStreamResource>实现
封装ResponseEntity,将文件流写入body中。这里注意一点,就是文件的格式需要根据具体文件的类型来设置,一般默认为application/octet-stream。文件头中设置缓存,以及文件的名字。文件的名字写入了,都可以避免出现文件随机产生名字,而不能识别的问题。
-
@GetMapping(
"/download")
-
public ResponseEntity<InputStreamResource> downloadFile() throws IOException {
-
String filePath =
"D:\\gitrep\\springboot\\testFile\\" +
"api-ms-win-core-console-l1-1-0.dll";
-
FileSystemResource file =
new FileSystemResource(filePath);
-
HttpHeaders headers =
new HttpHeaders();
-
headers.add(
"Cache-Control",
"no-cache, no-store, must-revalidate");
-
headers.add(
"Content-Disposition", String.format(
"attachment; filename=\"%s\"", file.getFilename()));
-
headers.add(
"Pragma",
"no-cache");
-
headers.add(
"Expires",
"0");
-
-
return ResponseEntity.ok().headers(headers)
-
.contentLength(file.contentLength())
-
.contentType(MediaType.parseMediaType(
"application/octet-stream"))
-
.body(
new InputStreamResource(file.getInputStream()));
-
2.用HttpServletResponse
-
@GetMapping(
"/download2")
-
public String downloadFile2( HttpServletResponse response) throws IOException {
-
-
String fileName =
"D:\\gitrep\\springboot\\testFile\\" +
"api-ms-win-core-console-l1-1-0.dll";
-
File file =
new File(fileName);
-
-
-
-
response.setHeader(
"content-type",
"application/octet-stream");
-
response.setContentType(
"application/octet-stream");
-
-
response.setHeader(
"Content-Disposition",
"attachment;filename=" + URLEncoder.encode(fileName,
"UTF-8"));
-
-
-
byte[] buffer =
new
byte[
1024];
-
FileInputStream fis =
null;
-
BufferedInputStream bis =
null;
-
-
fis =
new FileInputStream(file);
-
bis =
new BufferedInputStream(fis);
-
OutputStream os = response.getOutputStream();
-
int i = bis.read(buffer);
-
-
-
-
-
System.out.println(
"Download the song successfully!");
-
-
-
System.out.println(
"Download the song failed!");
-
-
-
-
-
}
catch (IOException e) {
-
-
-
-
-
-
-
}
catch (IOException e) {
-
-
-
-
-
-
-